
Sharing all the nitty-gritty details, tips and tricks to make foolproof choux pastry and create beautiful pastry shells every single time! Step by step photos and video tutorial included.
What is choux pastry?
Choux pastry (pronounced like “shoo”) is a twice-cooked pastry dough, originated in France. It’s pâte à choux, in French.
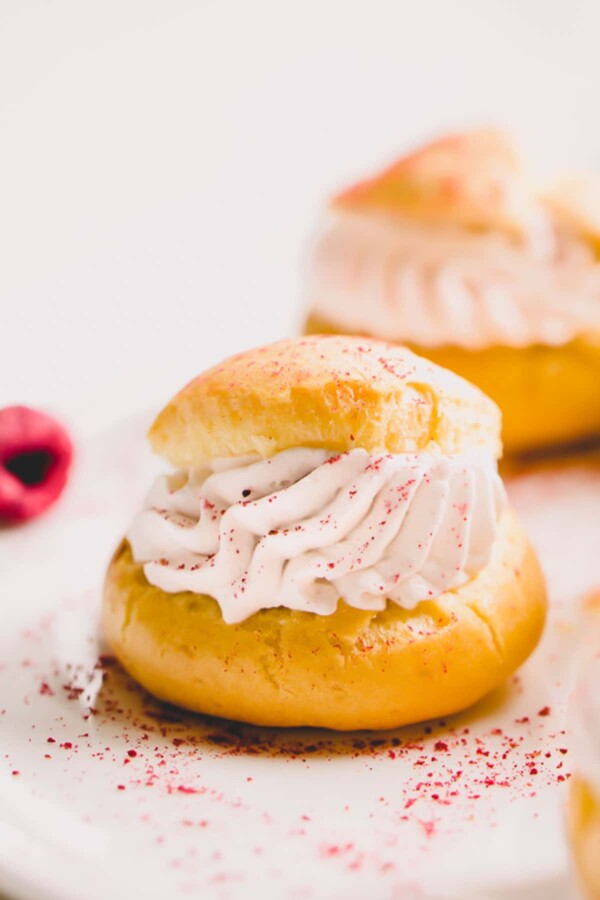
It’s quite a versatile dough and is a foundation for many different pastries, like classic eclairs, cream puffs, profiteroles, craquelin, or savory appetizers like gougères.
Why you’ll love this recipe:
- It’s incredibly simple and easy to make this pastry dough! And it requires basic pantry staples.
- In today’s post, you’ll find my time-tested recipe with step by step photos and a video, as well as lots of tips for success.
- And at the end, you’ll find a comprehensive troubleshooting guide for frustrating issues like flat, deflated shells, too many uneven cracks, soggy doughy pastries, etc.
It’s a long one, so grab a cup of coffee and let’s talk all things choux pastry.
Ingredients Notes:
As mentioned above, you’ll need very basic ingredients.
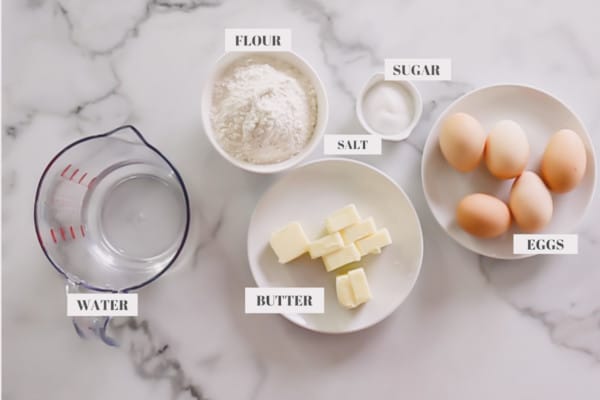
- Liquid – You can use either water or milk, or a combination of both. Water yields slightly crisper shells, while milk makes the shells a bit more tender.
- Flour – If you want crispy pastry, use high protein flour, like bread flour. All-purpose flour works fine too.
- Butter – I prefer unsalted butter. If you opt for salted butter, omit the salt.
- Sugar – A little bit of sugar not only adds flavor, but it also helps with browning. It’s optional though!
- Eggs play crucial part in this recipe, as it’s a main leavening agent that gives eclairs light and airy texture!
How to make pâte à choux:
1. Make panade
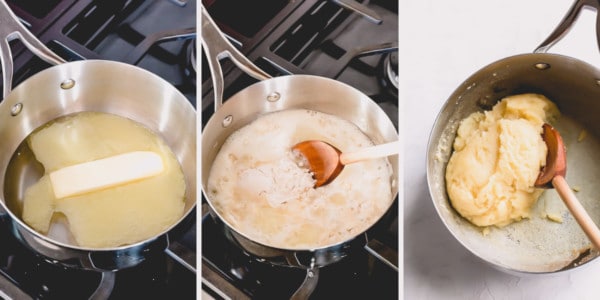
- Slowly heat water, butter, sugar and salt over medium low heat, stirring occasionally. The goal is to melt butter and dissolve sugar and salt before the mixture comes to a boil.
- Meanwhile, sift the flour. It helps to remove any lumps, so it incorporates into the dough better.
- Off heat, add all the flour at once into the butter mixture.
- Once all the flour is incorporated, cook the dough over medium high heat for about 5 minutes, or until it reaches 175°F.
Tip
Don’t boil the water for too long before adding flour, or you’ll evaporate too much water and get the ratio of wet and dry ingredients off.
2. Add eggs
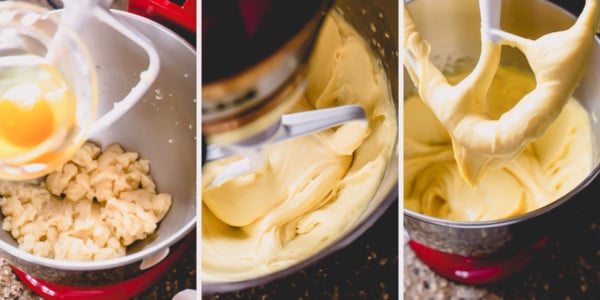
Tip
When cooling the dough, don’t beat it for too long, or on high speed, because it can cause the fat to separate, which can result large cracks in baked pastry shells.
- Cool the dough to room temperature before adding the eggs. You can just leave it for about 10 minutes, or beat it in a stand mixer with paddle attachment on low speed for 2-3 minutes.
- Add the eggs one at a time, mixing the mixture really well after each addition.
- It’s totally normal for the dough to break and look weird. But continue beating and adding the eggs, allowing each egg absorb into the dough completely before adding the next.
- Check the consistency of the dough after 4th egg. You may not need the last egg. Too much eggs will cause a runny dough, which will result flat pastry shells.
Tip
The proper consistency of batter is important, because it can make or break your final outcome.
Too runny batter will make flat shells, too thick batter is hard to pipe.
Batter consistency
The batter should be smooth, thick and glossy.
And when you lift the beater, the dough should slowly fall into a thick ribbon, leaving a V shape at the end.
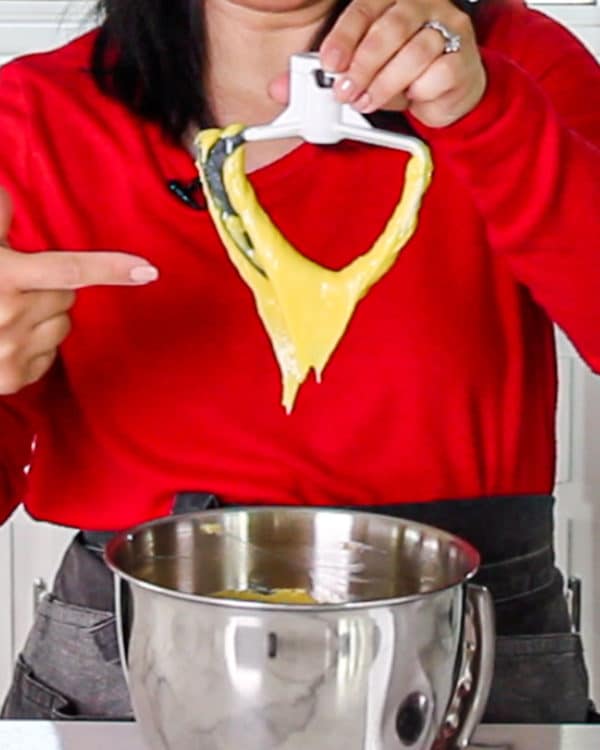
Following are a few factors that affect how many eggs your dough may need:
- how long the panade was cooked
- how big or small your eggs are
- type of flour you’re using. For example, more glutenous the flour, more eggs it needs.
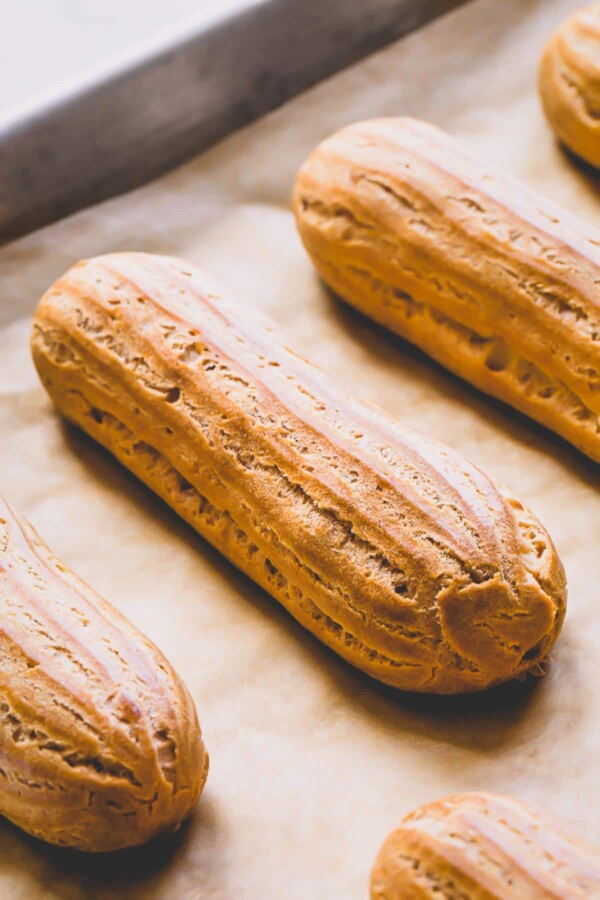
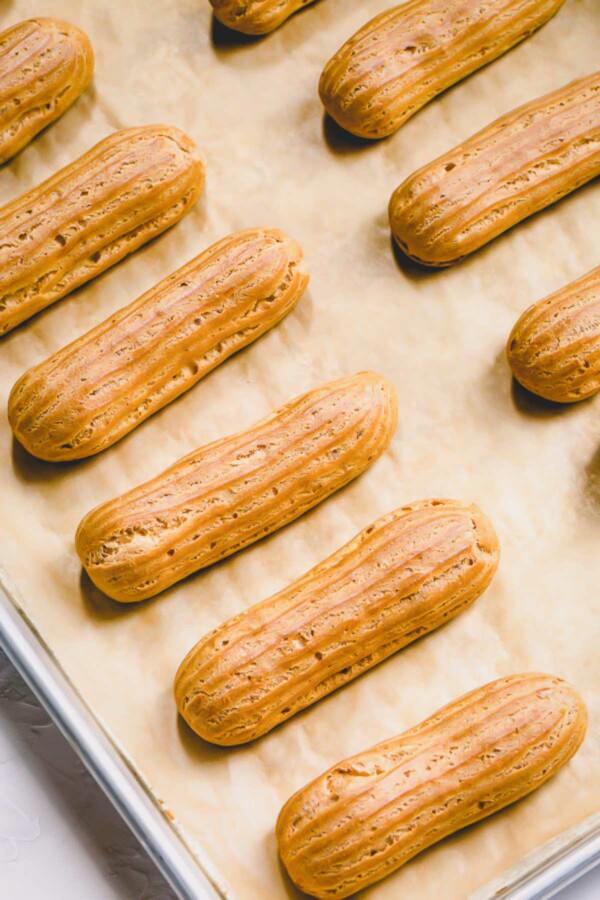
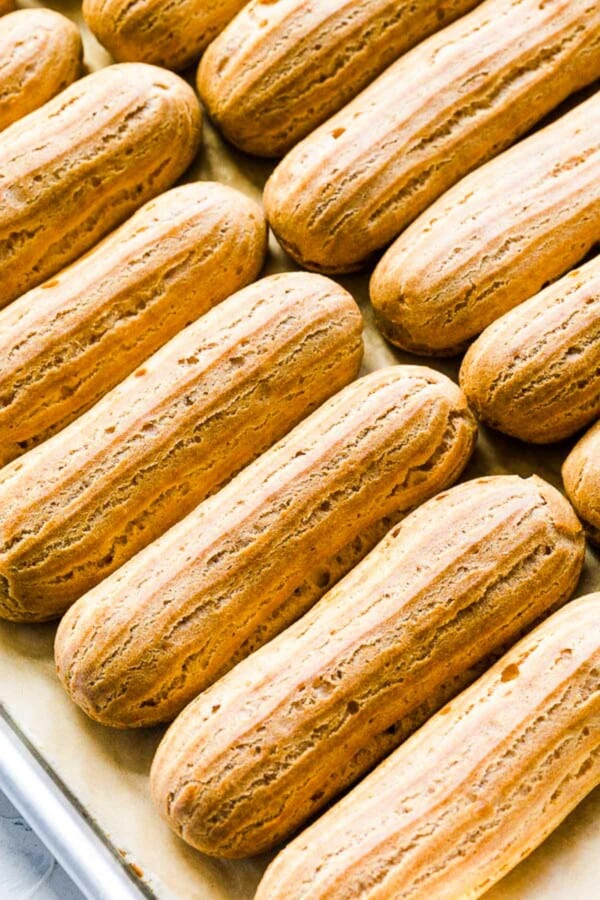
3. Shape the pastries
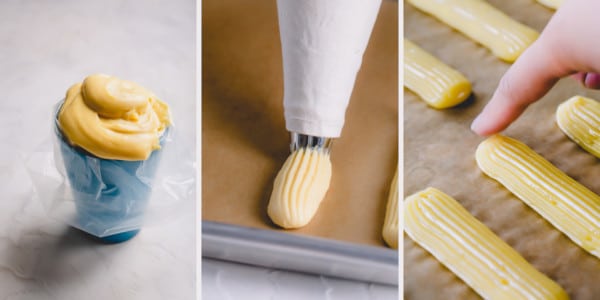
Tip
Place the pastry bag in a tall glass, as shown above. It’s much easier to fill it this way!
- Place a piping tip in a large pastry bag. I like to use this round tip to pipe rounds for cream puffs, and this star tip for eclairs. If you’d like, you can also find special French pastry star tip that is perfect for piping eclairs.
- Transfer the dough into the pastry bag (I use this 16″ disposable pastry bag and 18″ reusable canvas pastry bag).
- Rest the batter for about an hour before piping.
- Hold the pastry bag at 45° angle and pipe with a consistent pressure. This may require a little bit of practice. If you don’t get it right away, don’t fret. I promise, those pastry shells will taste just as delicious!
- Flatten the pointy ends with wet fingertip. Simply dip your finger in a bowl of water before flattening the dough to prevent the dough sticking to the finger. If not flattened, those pointy ends will burn and won’t look pretty.
Tip
Uncooked choux pastry dough can be stored in the fridge for up to 2 days. I like to put the dough in a pastry bag, tightly close both ends and refrigerate until ready to use.
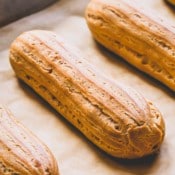
4. Bake
- Bake the pastry at 375°F for 30-35 minutes, or until puffed and golden brown.
- For best results, bake one baking sheet at a time. You can bake 2 sheets a time, rotating them half way into the baking, but you risk collapsing the shells. (See why in the next point.)
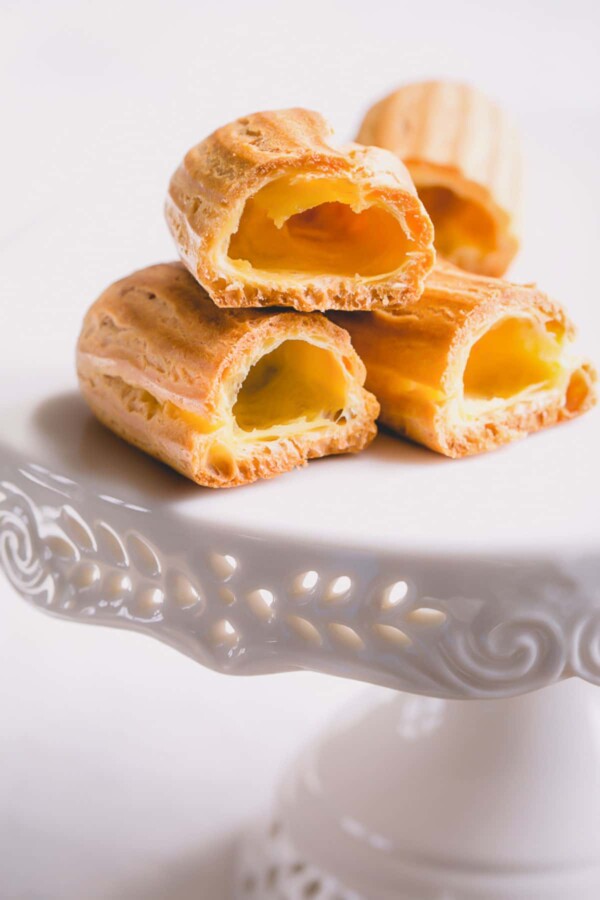
- Don’t open oven door until the shells are set and golden brown, for at least first 20-25 minutes! Why? These pastry shells need all the steam to puff up and set into shape during baking. And if you open the oven door before the shells get a chance to set properly, the steam will escape, deflating the shells.
RECIPE TESTING NOTES: Some recipes instruct to bake the shells at high temperature first, then lowering the temperature for the remaining bake time. I’ve tested it many different ways, and find baking choux pastry at consistent temperature yields the same, if not better results.
Whew, are you still with me? Kuddos to you for sticking with me!
Again, I wanted this post to be your go-to guide for mastering choux pastry. That’s why I took you step by step through entire process sharing everything I know about this versatile pastry dough. Hope these tips and tricks will help you achieve beautiful, professional looking desserts and appetizers.
Pate a choux troubleshooting
You probably added too much eggs.
FIX #1: Don’t just add raw flour into the runny dough to thicken it, you won’t get the proper pastry shells that way. Instead, make a half batch of dough on stovetop (without eggs) and mix it in with the runny choux pastry.
FIX #2: Next time, add the eggs one at a time and check the consistency of the dough after the 3rd egg and additional egg as needed.
1. Dry ingredients haven’t been dissolved/incorporated completely.
FIX: Make sure sugar and salt are fully dissolved before water mixture comes to a boil. And make sure to sift the flour to remove any lumps, and vigorously mix the dough once you add the flour all at once.
2. Dough may have been beaten for too long, or at high speed before adding the eggs, causing the fat to separate from dough.
FIX: Next time don’t beat the dough for too long, or make sure to beat at low speed for no longer than 3 minutes.
3. Pastry shells may have been baked at too high temperature, making the dough rise at a rapid speed.
FIX: Try baking the pastry shells at a constant temperature.
4. Pastry shells weren’t piped smoothly. Any wavy ripples will crack during baking.
FIX: Pipe smooth shells with even consistent pressure without ripples. Also star tip for piping long eclairs helps the pastry bake with even shape.
1. Runny choux pastry could cause flat eclairs, cream puffs, etc.
FIX: See runny pastry dough section above.
2. You opened the oven door too soon.
FIX: Don’t open the oven door for at least first 25 minutes. Open the oven door only when the pastry shells are nice and golden.
3. The pastry shells weren’t baked long enough.
FIX: Put the baking sheet with pastry shells right back into the oven and bake longer.
You didn’t make slit on the side of shells to allow steam to escape in the last 5 minutes of baking.
FIX: Make sure to make a small slit (0.5-inch slit) and bake for 5 minutes before removing the baking sheet out of the oven.
CHOUX PASTRY FAQ:
- Why some recipes call for combination of water and milk?
- Choux pastry made with milk comes out richer and more tender. I like to use combination of milk when I’m making cream puffs, or profiteroles.
- Can make choux pastry in advance?
- Yes, absolutely. Uncooked choux pastry dough can be stored in an airtight container (or pastry bag) in the fridge for up to 2 days.
- Can I freeze baked pastry shells?
- Yes, you can! Baked pastry shells without filling freeze beautifully. Put them in a ziplock bag and freeze for up to 3 months. To fill, thaw the shells in the fridge and then bake them at 300°F for 8-10 minutes.
Video Tutorial:
More Favorites from Sweet & Savory

How to Make Choux Pastry
Ingredients
- 1 cup (240 ml) water Note 1
- ½ cup (115 g) unsalted butter Note 2
- 1 tablespoon granulated sugar
- ¼ teaspoon salt
- 1 cup (125 g) all-purpose flour sifted Note 3
- 4-5 large eggs at room temperature Note 4
Instructions
- In a medium saucepan, combine water, butter, sugar and salt. Slowly heat the mixture over medium heat, stirring frequently to dissolve sugar and melt the butter. Once sugar is dissolved and butter is melted, increase the heat to medium high heat and bring the mixture to a boil.
- When the mixture comes to a boil, remove the saucepan from heat and add flour all at once. Quickly mix the mixture until all the flour is absorbed. (We just made panade!)
- Replace the saucepan back to burner and reduce the heat to medium. Cook the dough, continuously mixing with a wooden spoon. The dough will start to form into a ball. Keep mixing for another 3-4 minutes until light crust forms on the bottom of the pan. (Note: It's important to cook for at least 3-4 minutes to dry out the panade.)
- Transfer the dough into a mixing bowl with paddle attachment and mix it for a few minutes on low speed until the mixture is at room temperature, about 2 minutes. (No mixer? No problem. You can mix it with a wooden spoon!)
- Add eggs one at a time, beating well after each addition. This will help to get egg absorbed into the dough quicker. Don’t add more than 2 eggs at a time! This's especially important, as you might not need to the last egg. The dough should be smooth and shiny, thin enough to slowly fall into a ribbon, but too runny. (See visual cues in the post above, or in the video!)
- Transfer the batter into a large pastry bag and rest for at least 1 hour. At this point choux pastry is done and ready to be piped into whatever size you want. Uncooked dough can also be refrigerated for up to 3 days in an airtight container.
- Preheat oven to 375°F (190°C) about 30 minutes prior to baking the choux pastries. Line 2 baking sheets with parchment paper, or silicone mat.
- To cook pastry shells, pipe the batter into desired shape, depending on what you're making. For eclairs, pipe into 4-inch strips, for cream puffs pipe into 2-inch rounds 3 inches apart.
- Level peaked tops with a wet fingertip.
- Bake, one baking sheet at a time, for 30-35 minutes, or until the shells are puffed up and golden brown. (Note: Don't open the oven door the first 25 minutes.)
- After initial 30 minutes, quickly open the oven door and make a small slit on the side of shells, using a small sharp pairing knife. This allows the steam to escape and helps to dry out the inside of pastry shells. Bake for another 5 minutes, or until shells are crisp and golden brown.
- Transfer the shells onto a wire rack and cool completely before filling.
⭐️ Did you make this recipe?
Please leave a review and let us know how you liked it!
Tips & Notes
The choux pastry dough can be made and refrigerated for up to 3 days. Baked, unfilled shells can be stored at room temperature in an airtight container for 1 day, or frozen for up to 3 months.
Nutrition


If I make dough ahead of time can I use it straight from frig or does it need to be room temperature
Hi, Marie. Yes, bake straight from the fridge.
I followed all the tips but my eclair shells were round and puffy on the top but the bottom was flat. When cut open to fill it was a half round opening. Where did I go wrong?
Hi, Brenda. So flat shells are usually caused by runny batter. How many eggs did you use? 4 or 5? If your batter wasn’t runny, the culprit might be the oven temperature. Do you have an oven themometer to double check the actual temp in the oven? Choux pastry needs a high blast of heat to lift up and rise. Hope these tips help.
What if you add 4 eggs but it’s still not runny???
Hi, Sophie! Add 5th egg.
This recipe was easy to make and perfectly delicious. It also kept extremely well in the fridge.
My first time making choux, and I can’t wait to try it again.
Thanks.
They turned out amazing! I would be using this recipe again and sharing it with others! Didn’t disappoint!
Why would you preheat your oven if your gonna have people rest the dough for an hour? You really think the over needs to preheat for 2 hours?
Hi, there! Thanks for pointing it out! I’ll update the recipe with that note!!!
Hi! Umm… I accidentally added raw flour to my batter cause it was runny. What do I do now???
Not much you could do to salvage it. I specifically mentioned not to add flour to a runny mixture.
Thank you so much for all the tips.
And great job
Thanks, Bassem!
Thank you for these great tips. I have made a batch today with such confidence and they turned out perfectly.
Yay, so happy to hear this, Charls!! Thank you for your feedback!