
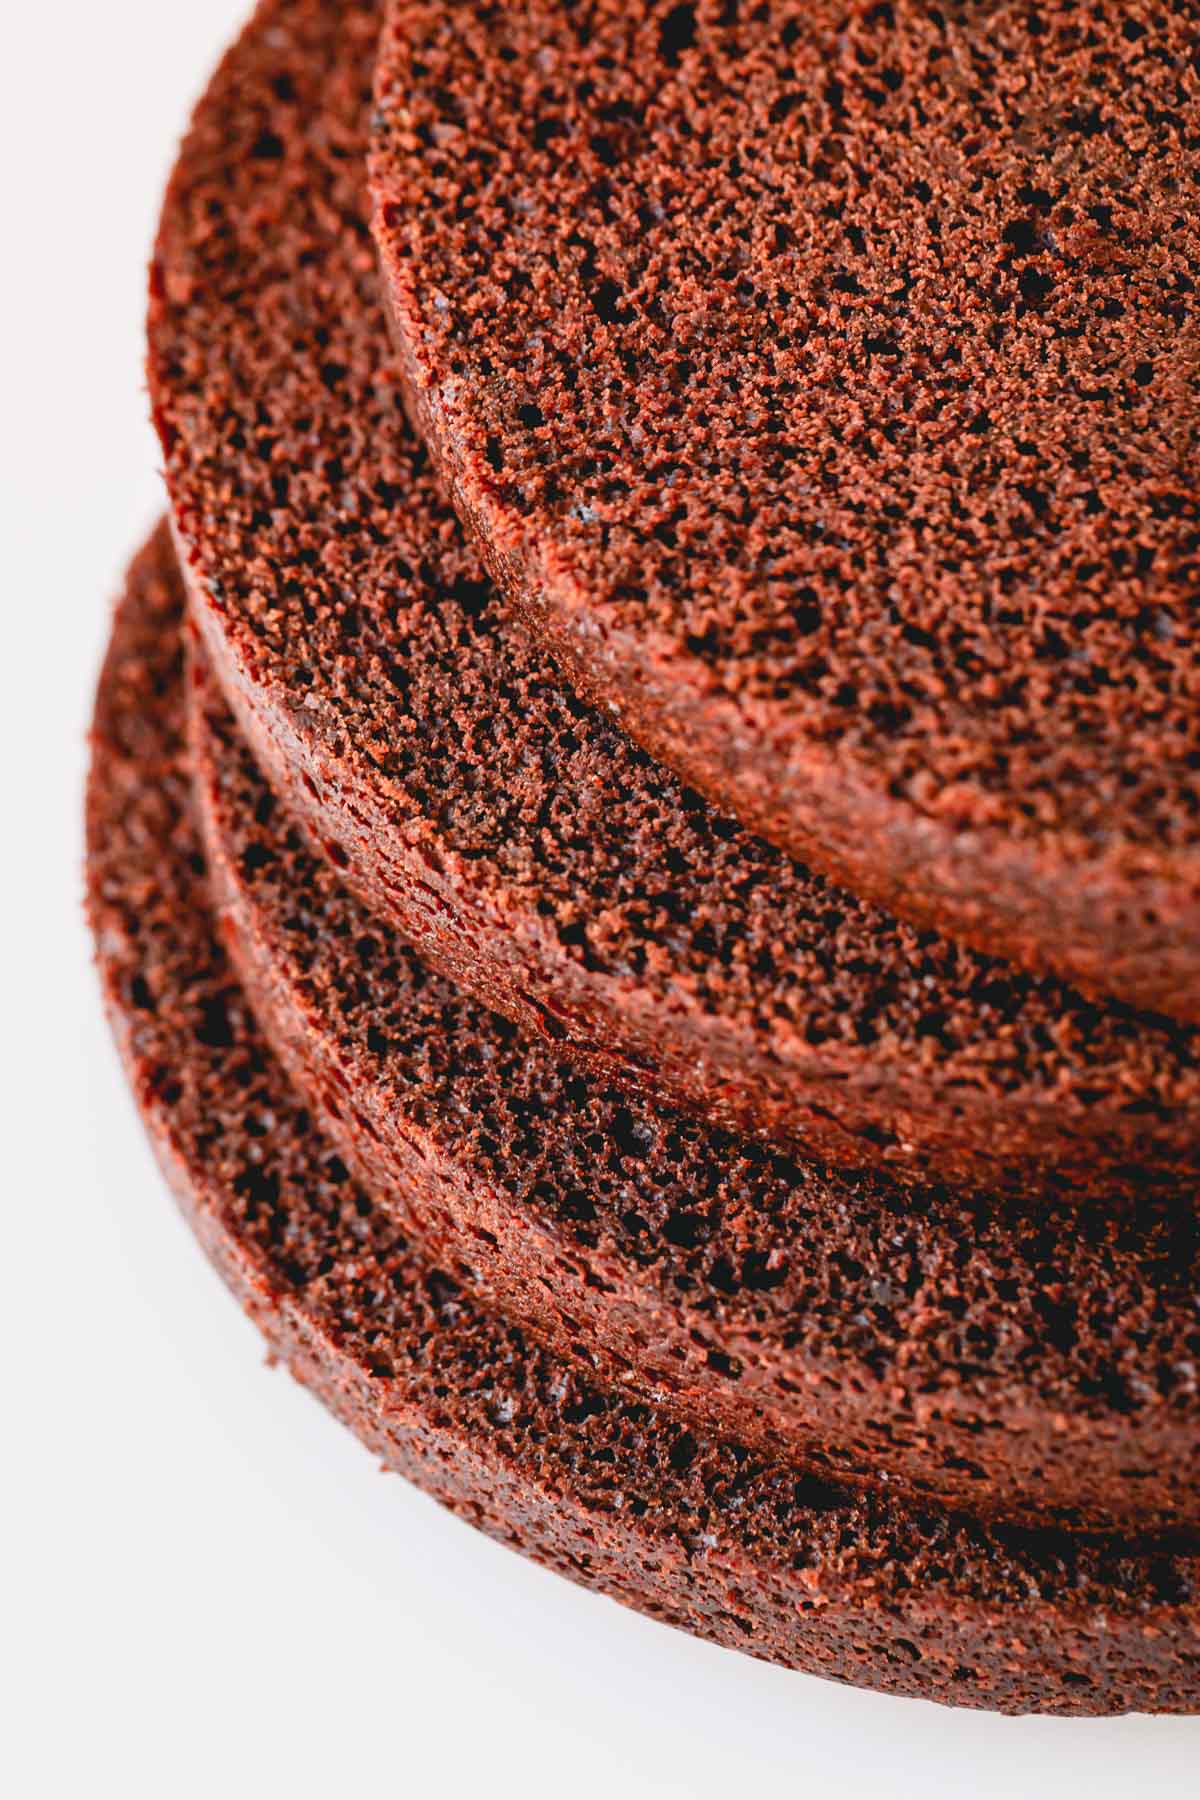
This simple chocolate cake is moist, tender, and rich and chocolatey, and it uses only 10 ingredients! My secret tip ensures the best homemade chocolate cake every time. It’s the most reliable recipe, perfect for parties, birthdays, or just a dessert during the week.
I believe every baker should have an amazing vanilla cake and chocolate cake recipe under their belt! They are the base to so many layer cakes and other cake-based desserts. After years of refining the recipe, this simple chocolate cake is my go-to base for my kids’ chocolate birthday cakes, layer cakes, and my snickers cake.
The chocolate batter uses 10 ingredients that I always have in my pantry and in only 15 minutes, I can have the cakes ready to bake, making dessert feel stress-free. Give it a try, it’s so much better than store-bought or a cake mix!
Table of Contents
Why you’ll love this recipe
- Moist and tender texture: sturdy, yet super moist and tender, and not fudgy.
- Rich chocolate flavor! thanks to cocoa powder plus a secret dash of espresso powder that brings out the chocolate even more.
- Quick and easy to make: straight-forward and simple method – no creaming butter and sugar, no whipping the eggs. The assembly is only 15 minutes!
- Versatile base cake: a perfect canvas for many different cake flavors. Pair it with different frostings and fillings, and you’ll never get bored with this chocolate cake!
The secret ingredient
My simple chocolate cake recipe doesn’t use buttermilk. And that’s not by accident, it’s thanks to rounds and rounds of recipe testing! Although buttermilk makes cakes incredibly moist, it also mellows the chocolate flavor significantly. And we want all the rich chocolate flavors in our cake.
I use milk and a small amount of white vinegar as my secret ingredient to keep the flavor rich and texture tender.
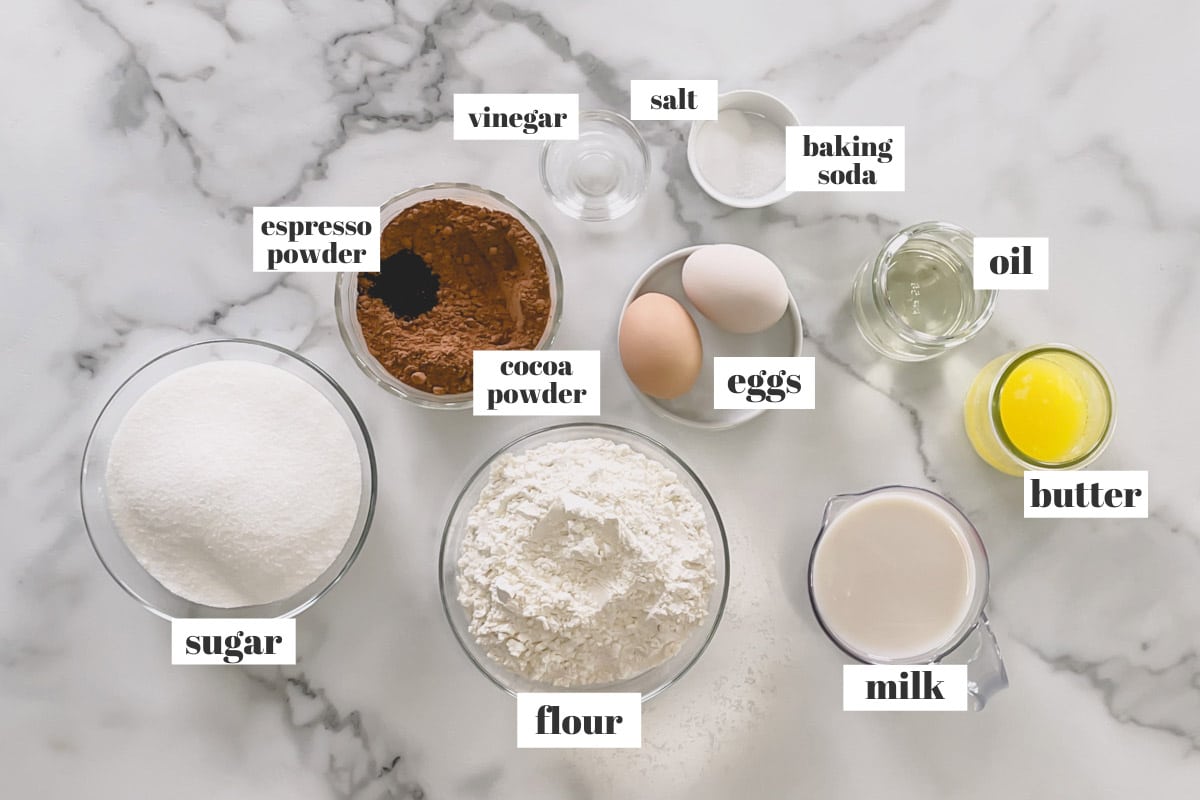
Key Ingredients
- Flour – All-purpose flour works great for this recipe.
- Cocoa powder – You can use either unsweetened natural or dutch-processed cocoa powder in this chocolate cake recipe.
- Instant espresso powder is optional, but highly recommended. It enhanced the chocolate flavor without adding coffee flavor.
- Milk – You can use absolutely any kind of milk: whole, skim and even almond milk.
- Oil makes this cake nice and moist. Use neutral oil, like vegetable or canola oil. I don’t recommend olive oil.
- Butter adds a great flavor. I choose unsalted butter. If you’re using salted butter, omit the salt in the dry ingredients.
- Vinegar is the secret ingredient. It reacts with baking soda and creates light and airy crumbs! Either white or apple cider vinegar will work fine.
Room temperature ingredients
Be sure to bring eggs and milk to room temperature, so that everything combines quickly and easily.
Simply let them stand at room temperature for 30 minutes or so.
Natural vs Dutch-processed Cocoa Powder
There are 2 types of cocoa powder and it can become confusing. Here’s the difference between them:
- Natural cocoa powder is a regular cocoa powder, like Hershey’s, which is naturally acidic. It has slightly bitter and rich taste.
- Dutch-processed cocoa powder is basically an alkalized (neutralized) cocoa powder, which produces darker color and has a milder flavor.
In most cases, these 2 cocoa powders aren’t interchangeable, because each cocoa powder reacts differently in different ingredients.
However, in this chocolate cake recipe, baking soda reacts with vinegar and leavens the cake without help of cocoa powder. Therefore, either natural and Dutch-processed cocoa powders works in this recipe.
How to make simple chocolate cake
1. Make the batter
Simply whisk the dry ingredients. Then add the wet ingredients. Mix until just combined and batter is ready!
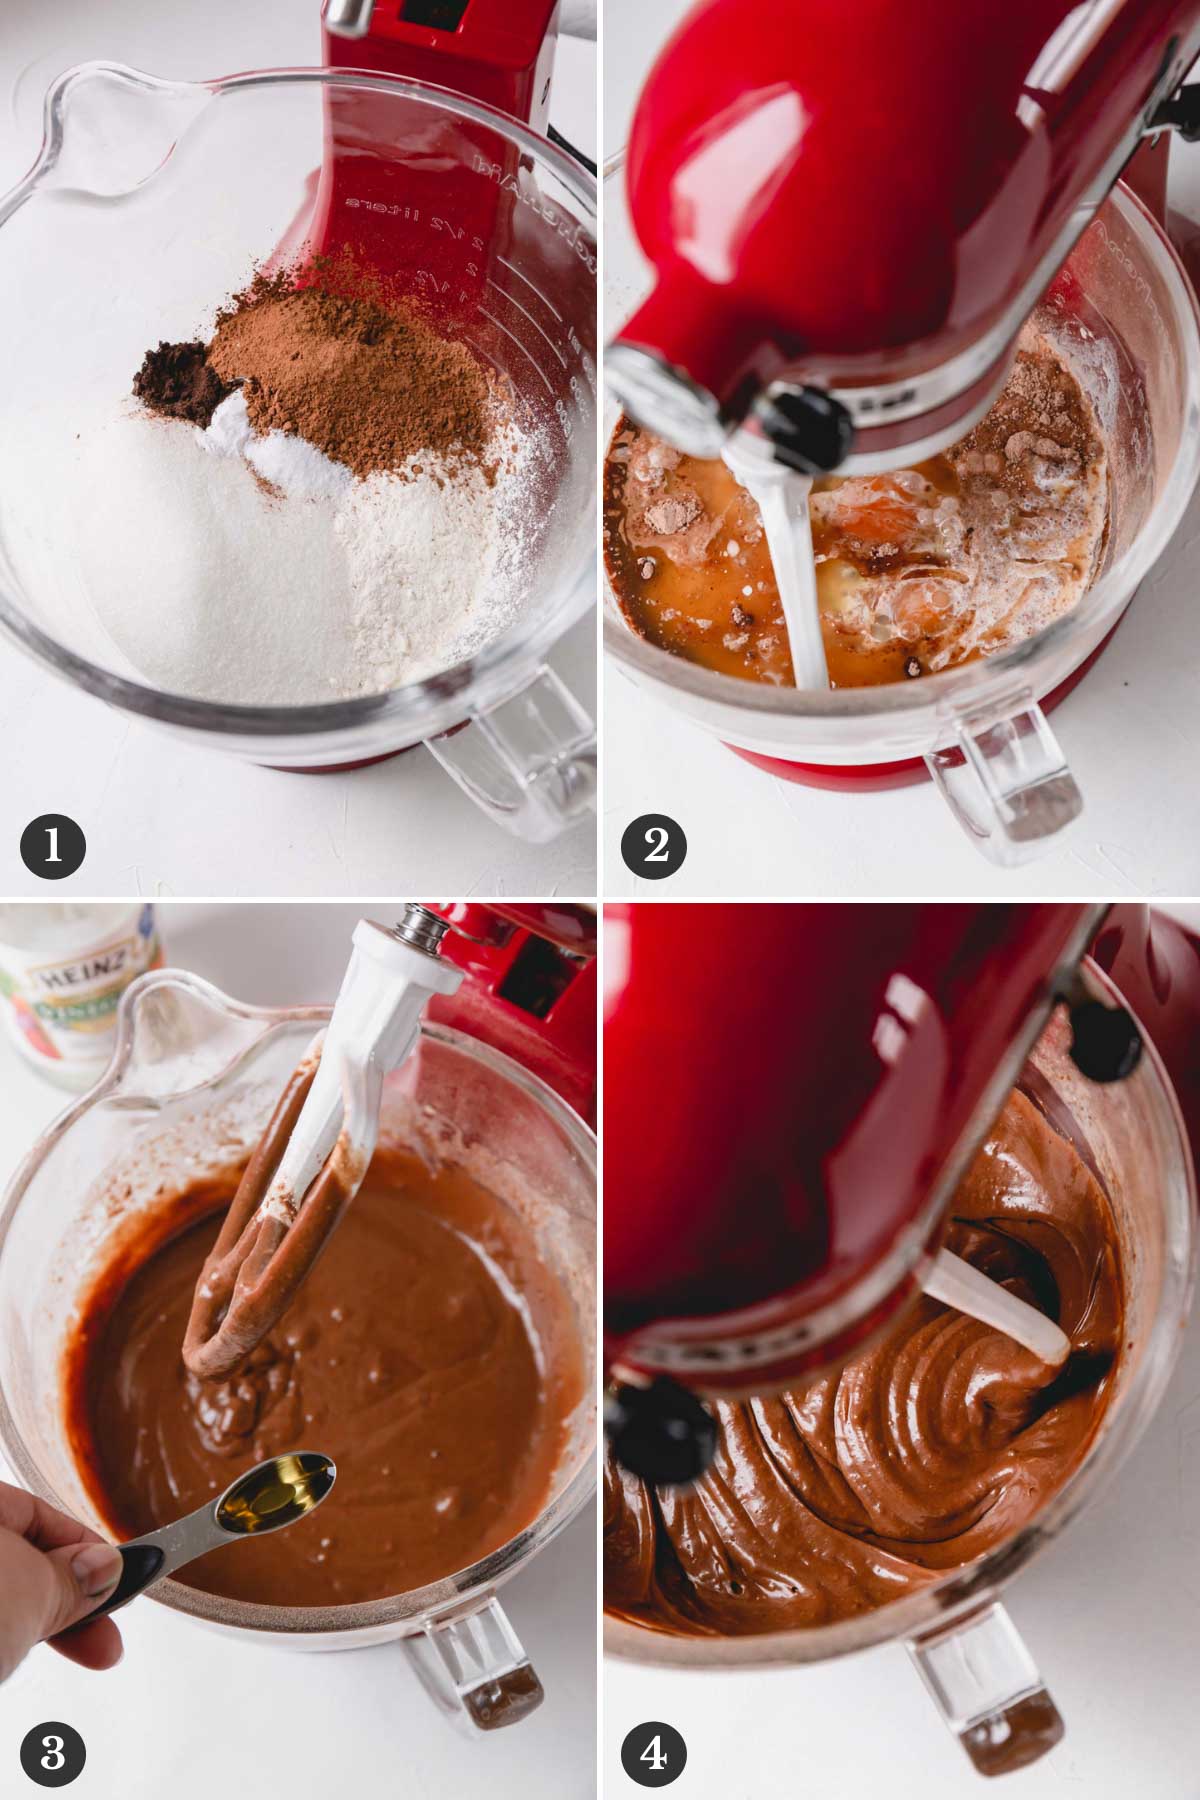
Avoid over-mixing
To avoid over-mixing the batter, whip it in a mixer until just combined, and then finish mixing with a rubber spatula, scraping the sides and bottom of the bowl, until the batter is mostly smooth.
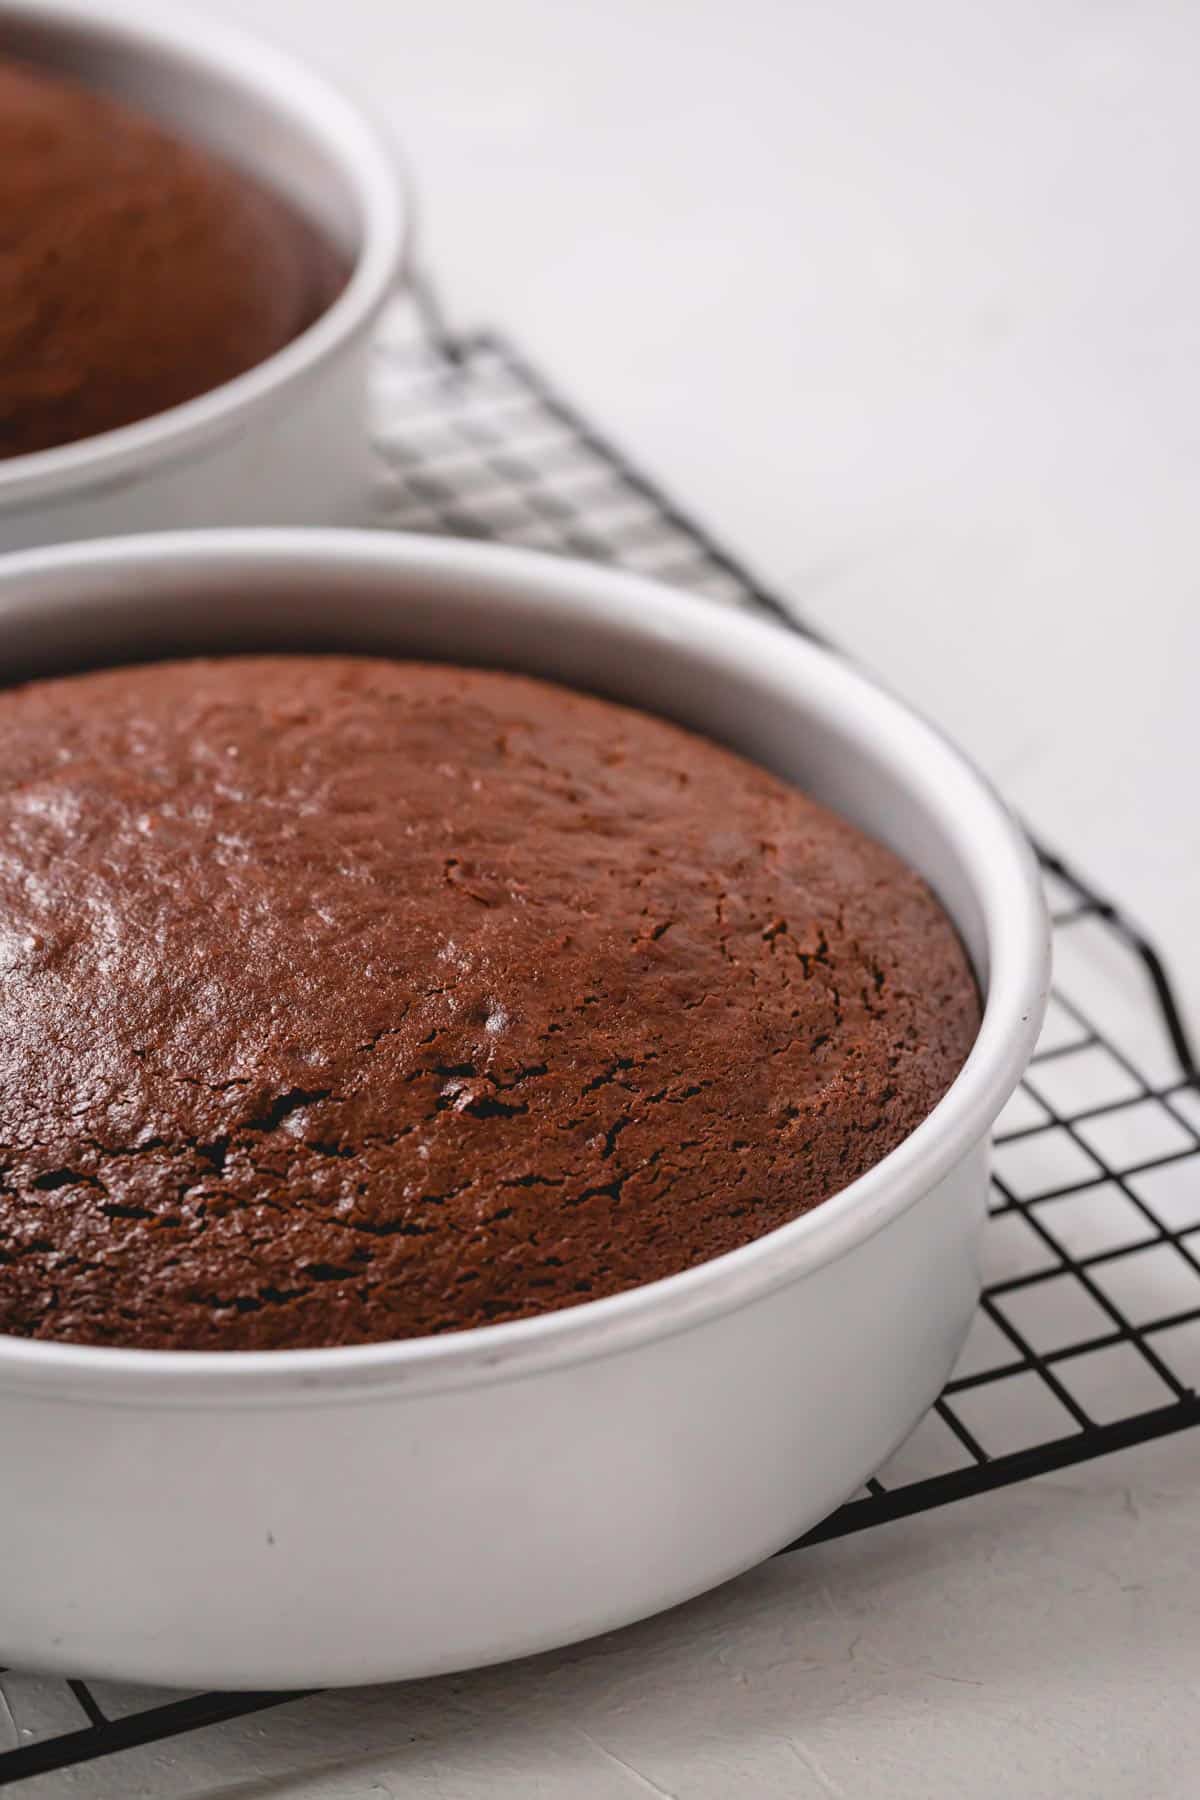
2. Bake
Divide the batter into the lightly greased cake pans lined with parchment paper.
Bake the cakes at 350°F until the inserted tooth pick comes out clean.
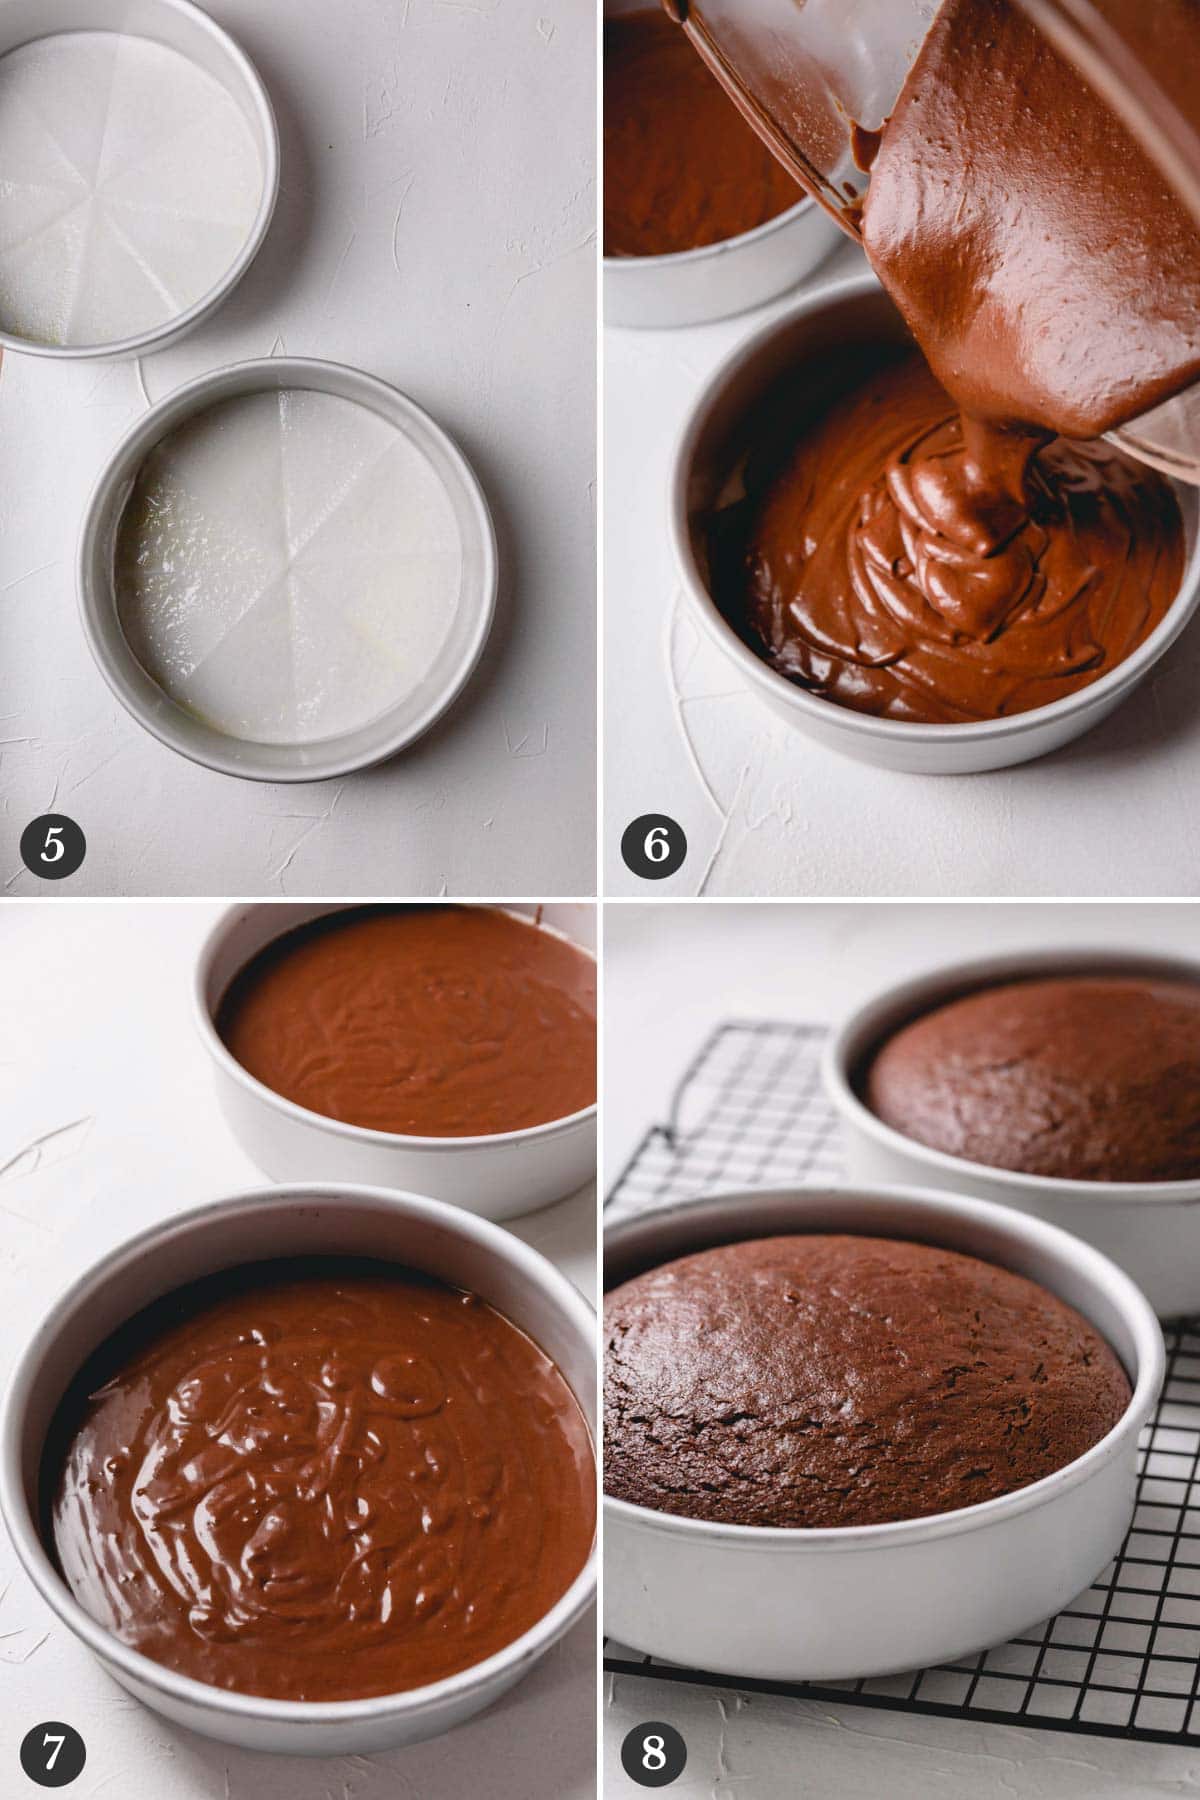
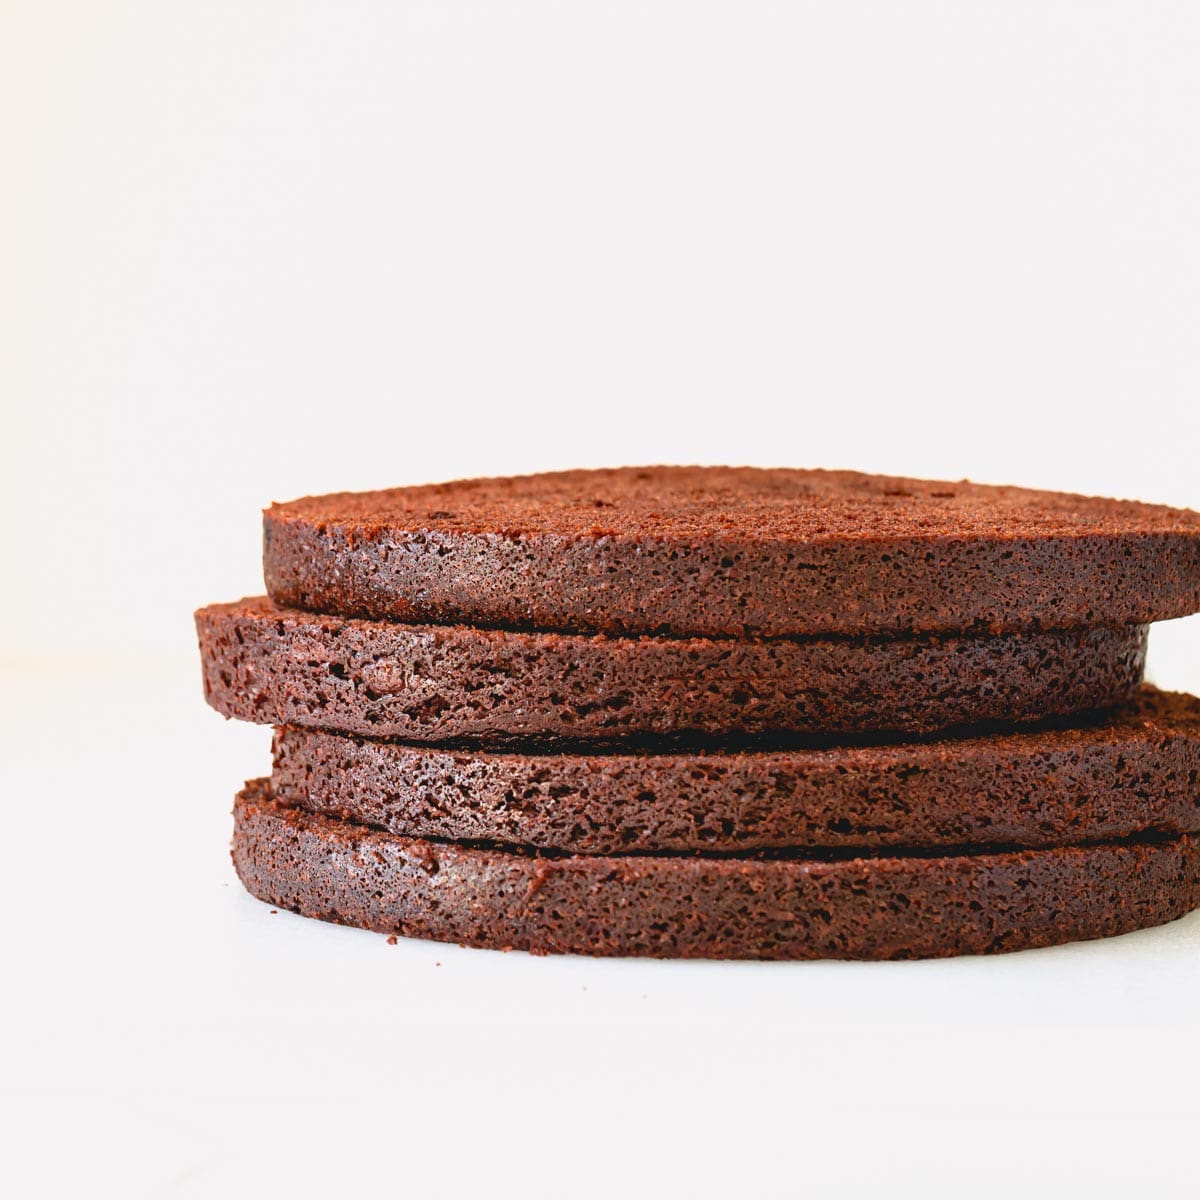
Get even layers
For flat cake layers, use these cake pan strips around the cake pans. If not, it’s easy to trim the cakes after baking too.
Bake times for different pan sizes
I usually use 7-inch cake pans for this simple chocolate cake, but I’ve also baked it in other sizes too. The bake time varies depending on the size and number of cake pans.
- Two 7-inch cake pans yield 2 tall cake layers that you can easily cut into 2 layers each. Bake time: about 35 minutes.
- Three 7-inch cake pans yield 3 cake layers for a perfect 3-layer cake. Bake time: about 20 minutes.
- Two 8 or 9-inch cake pans yield 2 thin cake layers, perfect for simple 2-layer cake. Bake time: about 25 minutes.
- Three 6-inch cake pans yield 3 thick layers that can be sliced horizontally for an extra-tall 6-layer cake. Bake time: about 25 minutes.
- One 9×13-inch baking pan yields a perfect sheet cake. Bake time: about 18 minutes.
Expert Tips
- Measure the flour correctly! I highly recommend using a scale to measure the dry ingredients, especially flour. It’s really easy to over-measure flour by volume, which will lead to dense and heavy cake that no one wants to eat. If you don’t have a scale, instead of scooping the flour with a measuring cup, spoon the flour into measuring cup and then level the top off with the back of a knife. This is called “spoon and level” method. Don’t be tempted to shake the measuring cup or pack the flour down!
- Don’t skip vegetable oil – I’m using both vegetable oil and melted butter in this chocolate cake recipe. Butter adds nice flavor, but vegetable oil keeps this cake moist! If anything, substitute oil for butter, and not other way around!
- Don’t over-mix the batter – It’s really important not to over-mix the batter when you combine wet and dry ingredients. Mix it just until the ingredients combined.
- Don’t over-bake the cake – This is the most common mistake when it comes to dry cakes. Over-baking dries out delicate cakes and there’s no fix for it!! Keep reading to my tips on checking for doneness.
- There are two ways to know that the cake has finished baking. Check the. cake 1 to 2 minutes before it’s finished baking:
- Method 1: Insert a toothpick in the middle of the cake. If it comes out clean (or with just couple crumbs), the cake is done!
- Method 2: Carefully press down on the cake. If it doesn’t leave a dent, your cake is done!! Bake a minute or two longer, if you see a dent left behind.
Storage
If you have any leftover chocolate cake, lucky you! Store either at room temperature or in the fridge for up to 3 days. Where you store the cake often depends on what kind of frosting you used.
You can bake this chocolate cake in advance. I actually prefer to bake them a day or two in advance, since chilled cakes are much sturdier and easier to handle.
- Cool the cake completely on wire rack.
- Wrap each layer separately in a plastic wrap.
- Refrigerate for up to 2 days, or freeze for up to 3 months.
Ways to serve this plain chocolate cake
Where do I even begin?! There are so many delicious cake and frosting combinations, here are some of my favorite frostings:
FAQs:
To make chocolate cupcakes, simply divide the batter into muffin pans and bake for approximately 20 minutes.
Of course! Just use large cake pans or watch the bake time to make sure it’s baked all the way through.
No, it’s a secret ingredient to help enhance the cocoa powder flavor.

Easy and Simple Chocolate Cake
Ingredients
- 2 cups (250 g) all-purpose flour
- 1 ½ cups (300 g) granulated sugar
- ½ cup (60 g) unsweetened cocoa powder Note 1
- 1 teaspoon baking soda
- 1 teaspoon instant espresso powder Note 2
- ½ teaspoon coarse kosher salt
- 1 cup + 2 tablespoons (280 ml) milk at room temperature Note 3
- 2 large eggs at room temperature
- ¼ cup (60 ml) vegetable oil
- 4 tablespoons (56 g) unsalted butter melted
- 1 teaspoon white vinegar or apple cider vinegar
Instructions
- Line two 7-inch cake pans with a parchment paper and spray with cooking spray.
- Preheat the oven to 350°F (175°C).
- In a mixing bowl with paddle attachment, combine flour, sugar, cocoa powder, baking soda and salt. Mix on low speed for 30 seconds, or until everything is well combined.
- Add milk, eggs, oil and butter. Mix the batter just until smooth, about 15 seconds.
- Stir in vinegar and mix for another 10 seconds.
- Divide the batter into the prepared baking pans. Bake for 35 minutes, or until inserted toothpick comes out clean.
- Let cakes cool completely in the pans set on wire rack. Then carefully run a knife around the edges and invert.
- Wrap each cake in a plastic wrap and refrigerate until ready to use, preferably overnight and up to 2 days. Chilled cakes are sturdier and slice much easier, but you can definitely frost the cake as soon as they cooled completely.
⭐️ Did you make this recipe?
Please leave a review and let us know how you liked it!
Video
Tips & Notes
Nutrition
This recipe was originally published on May 11, 2020.


I dont have espresso powder, can I use instant coffee as a substitute?, also is it possible to halve the recipe and bake in 1 x 8 inch round deep cake pan
Hi, Debbie. While I haven’t tested halving the recipe, I don’t see why you couldn’t. Let me know if you give it a try.
I used Nescafe and it turned into well.
Hi can I double the quantity
Hi, Azra. Sure, if you’ve already make it as written once and you liked it, I don’t see why you couldn’t double it.