
Let’s make bakery-style eclairs at home! I promise, it’s really easy to make with very basic ingredients. Plus, full video tutorial and 8 tips to perfect eclair shells every time!
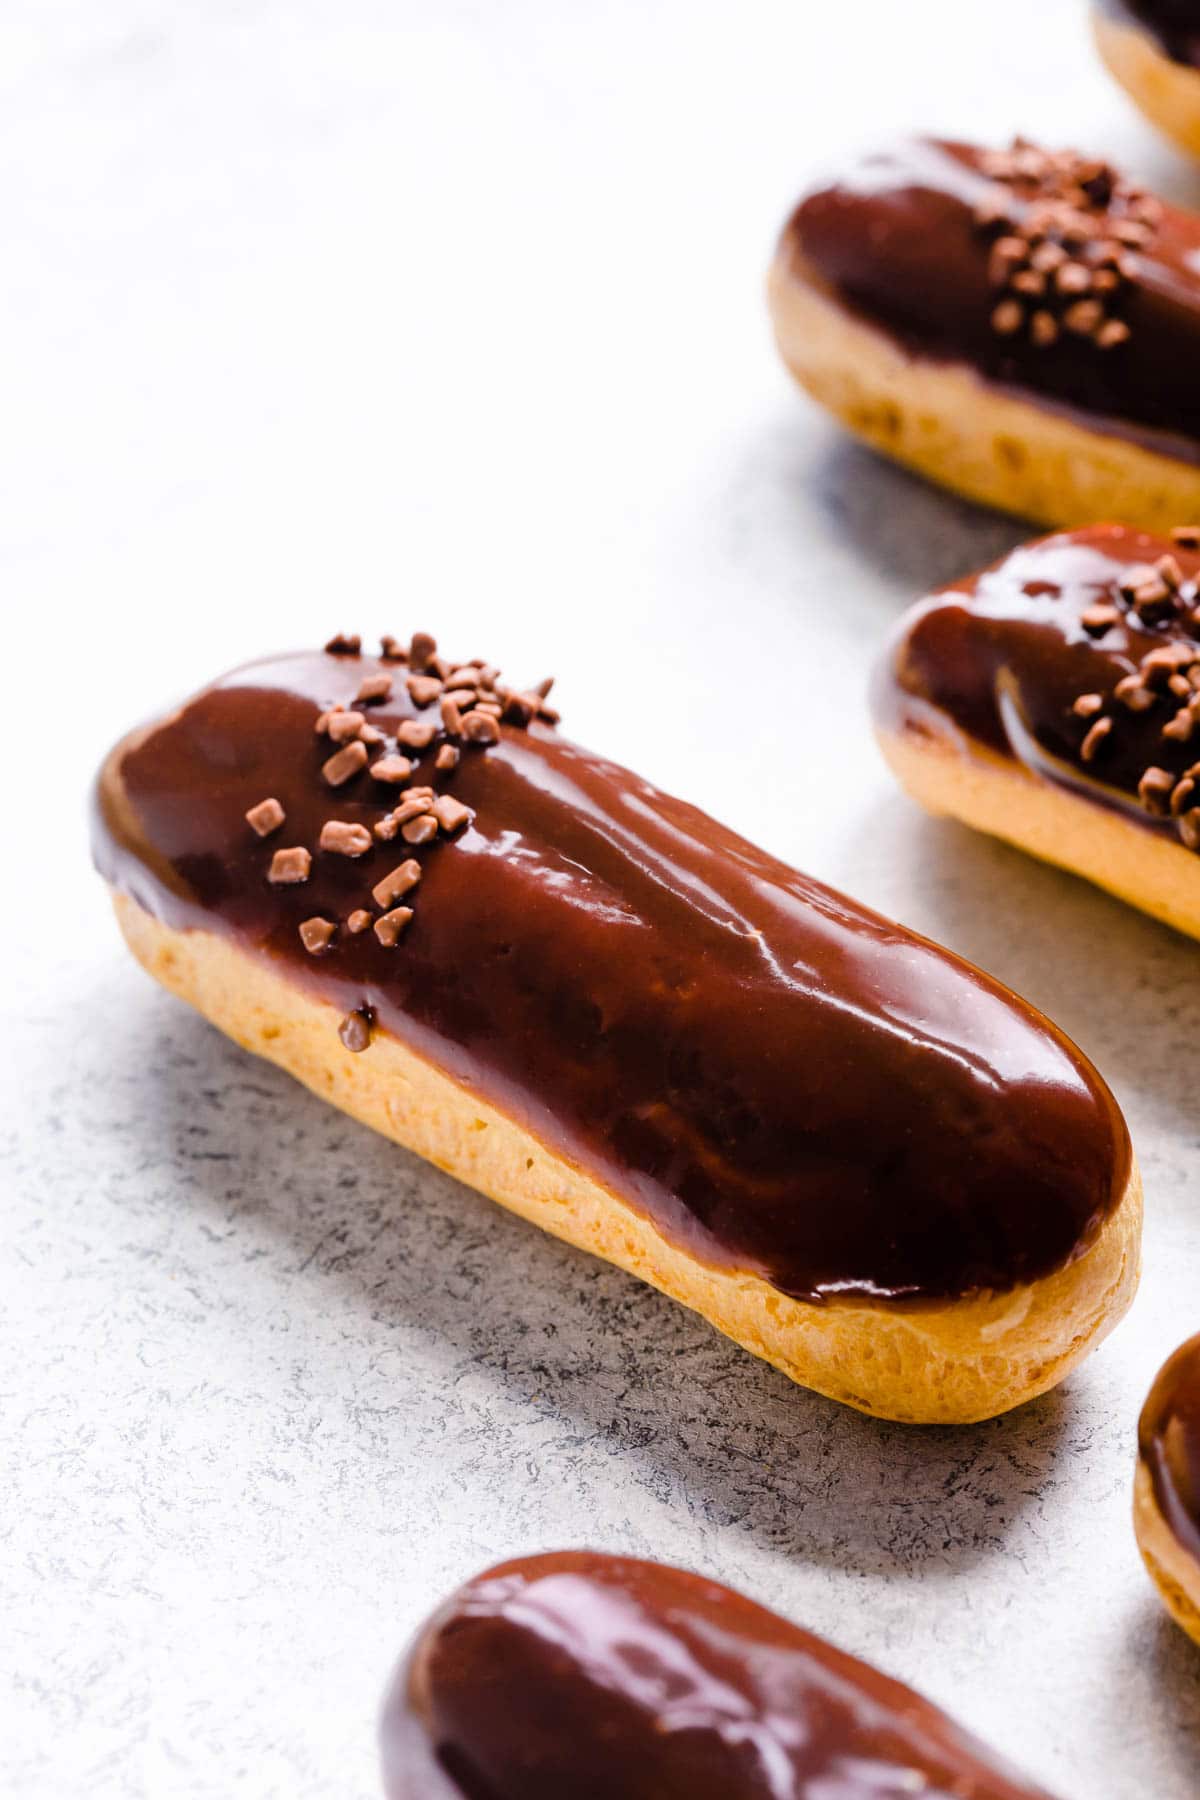
Classic eclairs are made of choux pastry (aka pate a choux), pastry cream filling and chocolate ganache glaze.
Chocolate éclairs bring so many childhood memories for me. Growing up, eclairs were my mom’s specialties, which means I’ve got a time-tested recipe with years of experience and tips for perfection!
Why you’ll love this Eclair recipe
(What is special about eclairs?)
This classic French pastry is sophisticated, yet simple! You’ll LOVE every bite of this dessert.
Don’t let the fancy name and look to fool you. It’s truly easy to make eclairs, and takes only a few basic ingredients that you probably have on hand!
This chocolate eclair recipe is my go-to recipe, and hope it’ll be yours too.
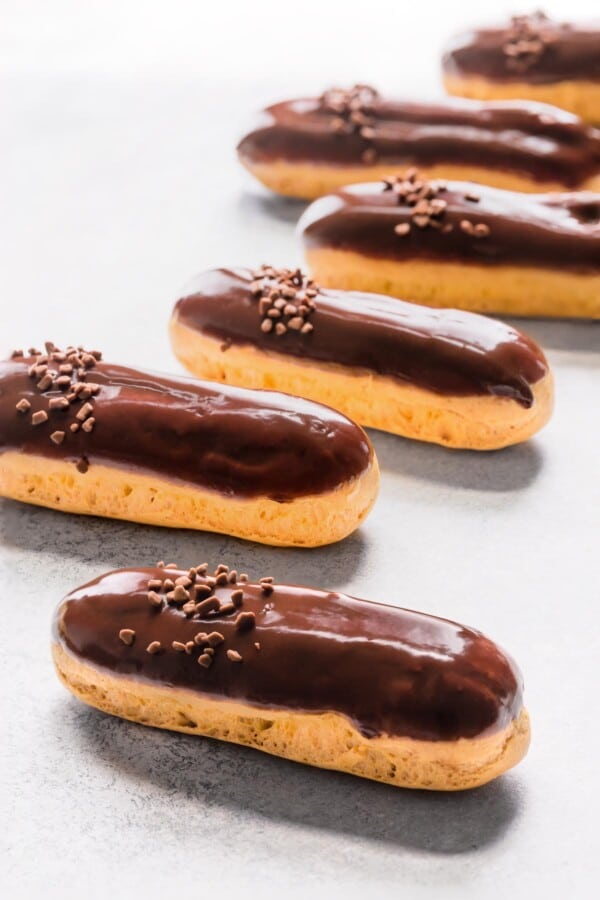
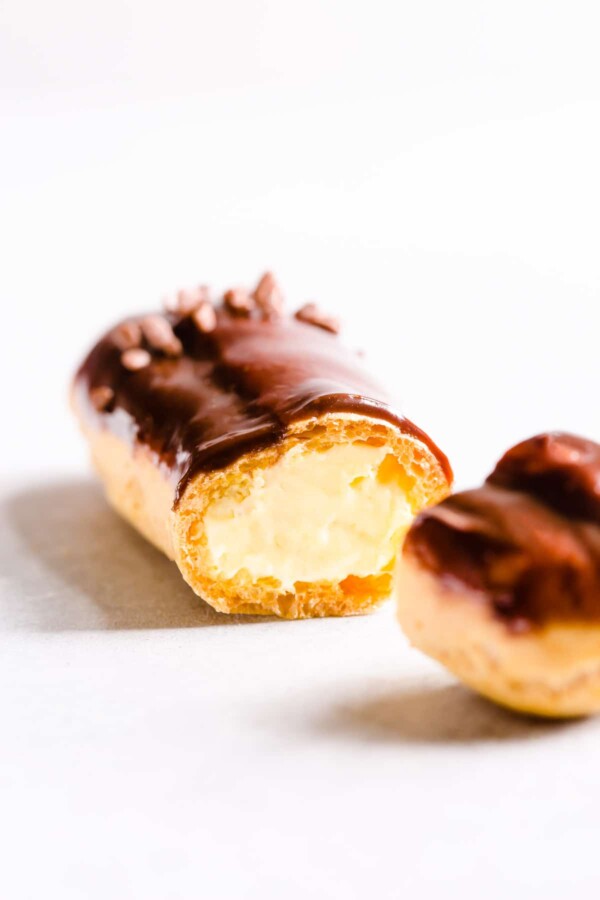
Table of Contents
- Why you’ll love this Eclair recipe (What is special about eclairs?)
- Chocolate Eclair Ingredient Notes
- How to make Eclair shells:
- Tip
- How to make Eclair filling
- How to fill Eclairs:
- How to make Chocolate Eclairs frosting
- 8 tips for perfect Eclair shells:
- Chocolate Eclair Recipe FAQ
- Eclairs Video Tutorial
- Chocolate Eclair Recipe
Chocolate Eclair Ingredient Notes
When I say you need basic ingredients, I mean basics!
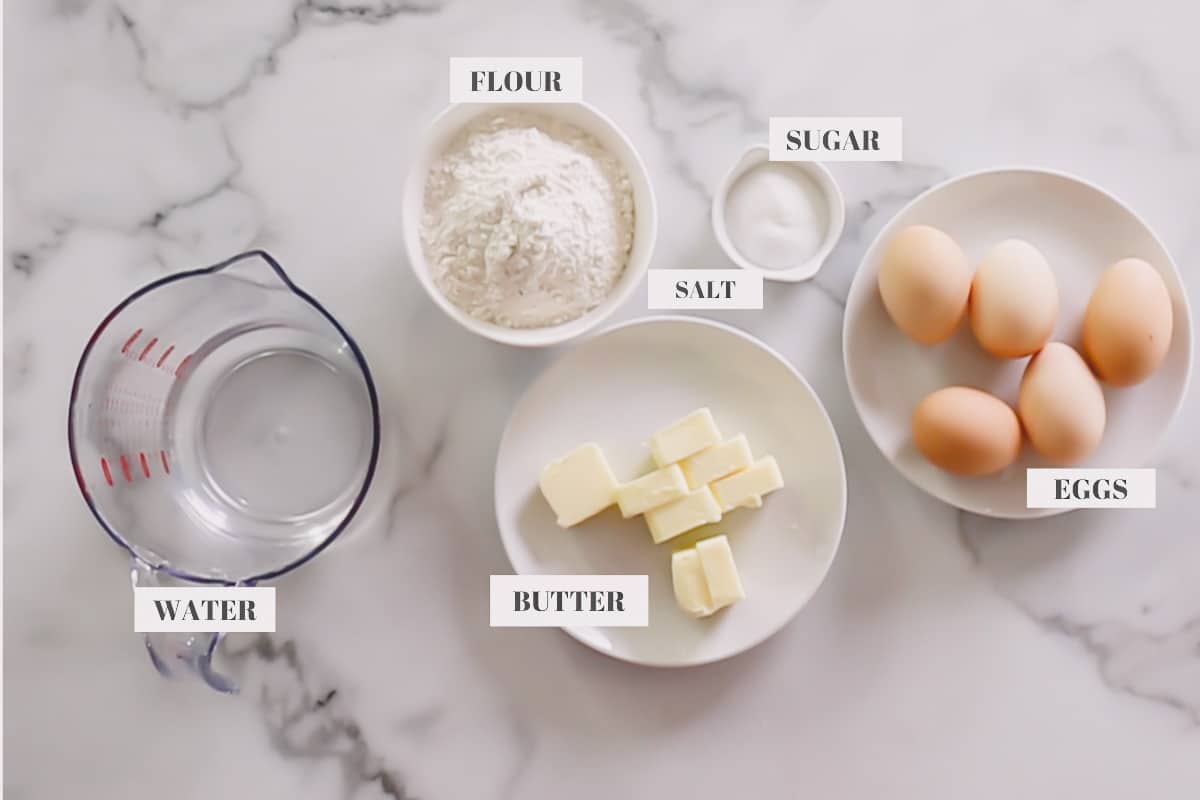
- Flour – Although all-purpose flour works fine, bread flour works better for choux pastry.
- Water – A lot of choux pastry recipes call for equal parts of water and milk. For eclairs, I prefer all water, as I feel like it yields crispier shells.
- Butter – I prefer unsalted butter. If you opt for salted butter, omit the salt.
- Sugar – A little bit of sugar not only adds flavor, but it also helps with browning.
- Eggs play crucial part in this recipe, as it’s a main leavening agent that gives eclairs light and airy texture! The reason I’ve listed 4-5 eggs is because you may not need all of the eggs. In my video tutorial, I showed you what consistency we’re looking for when making the dough.
How to make Eclair shells:
Let’s start with eclair shells, or choux pastry (“shoe” pastry). You can find even more tips and troubleshooting guide in my Choux Pastry 101 guide.
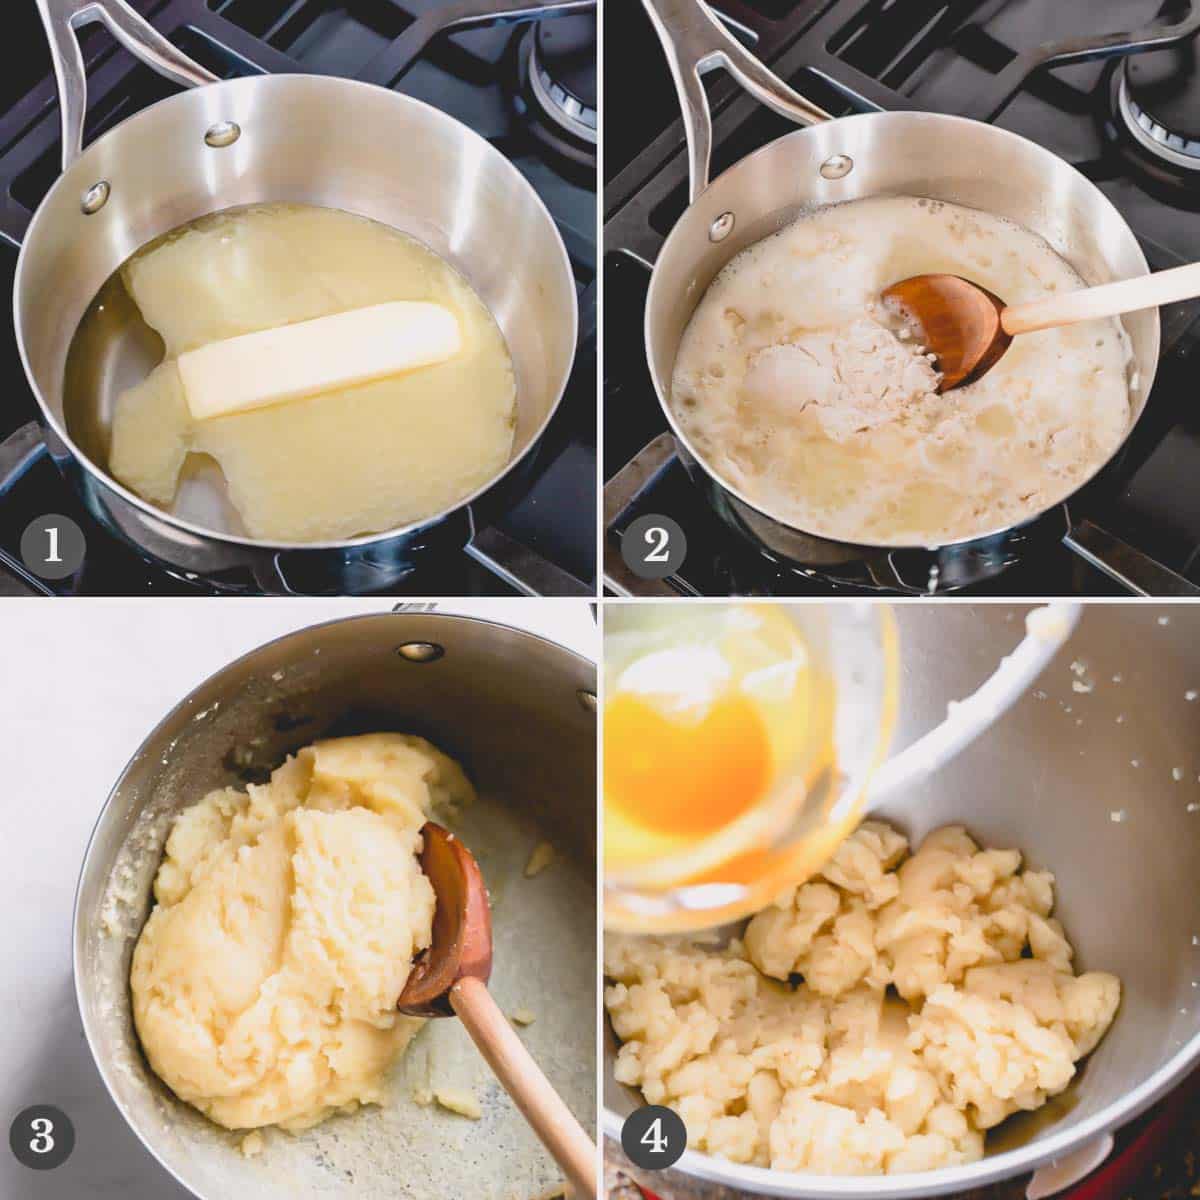
- Combine water, butter, sugar and salt in a saucepan and slowly heat the mixture over medium heat, stirring frequently to dissolve sugar and melt the butter. Once sugar is dissolved and butter is melted, increase the heat to medium high heat and bring the mixture to a boil.
- When the butter mixture comes to a boil, remove the saucepan from heat and add sifted flour all at once. Quickly mix the mixture until all the flour is absorbed. This mixture is called panade.
- Put the saucepan back to burner and reduce the heat to medium. Cook the dough, continuously mixing with a wooden spoon. The dough will start to form into a ball. Keep mixing for another 3-4 minutes until light crust forms on the bottom of the pan. (Note: It’s important to cook for at least 3-4 minutes to dry out the panade.)
- Cool the mixture to room temperature and then add eggs one at a time, mixing the batter well after each addition. This will help to get egg absorbed into the dough quicker.
Tip
Don’t add more than 2 eggs at a time! This is important, as you might not need to add all the eggs.
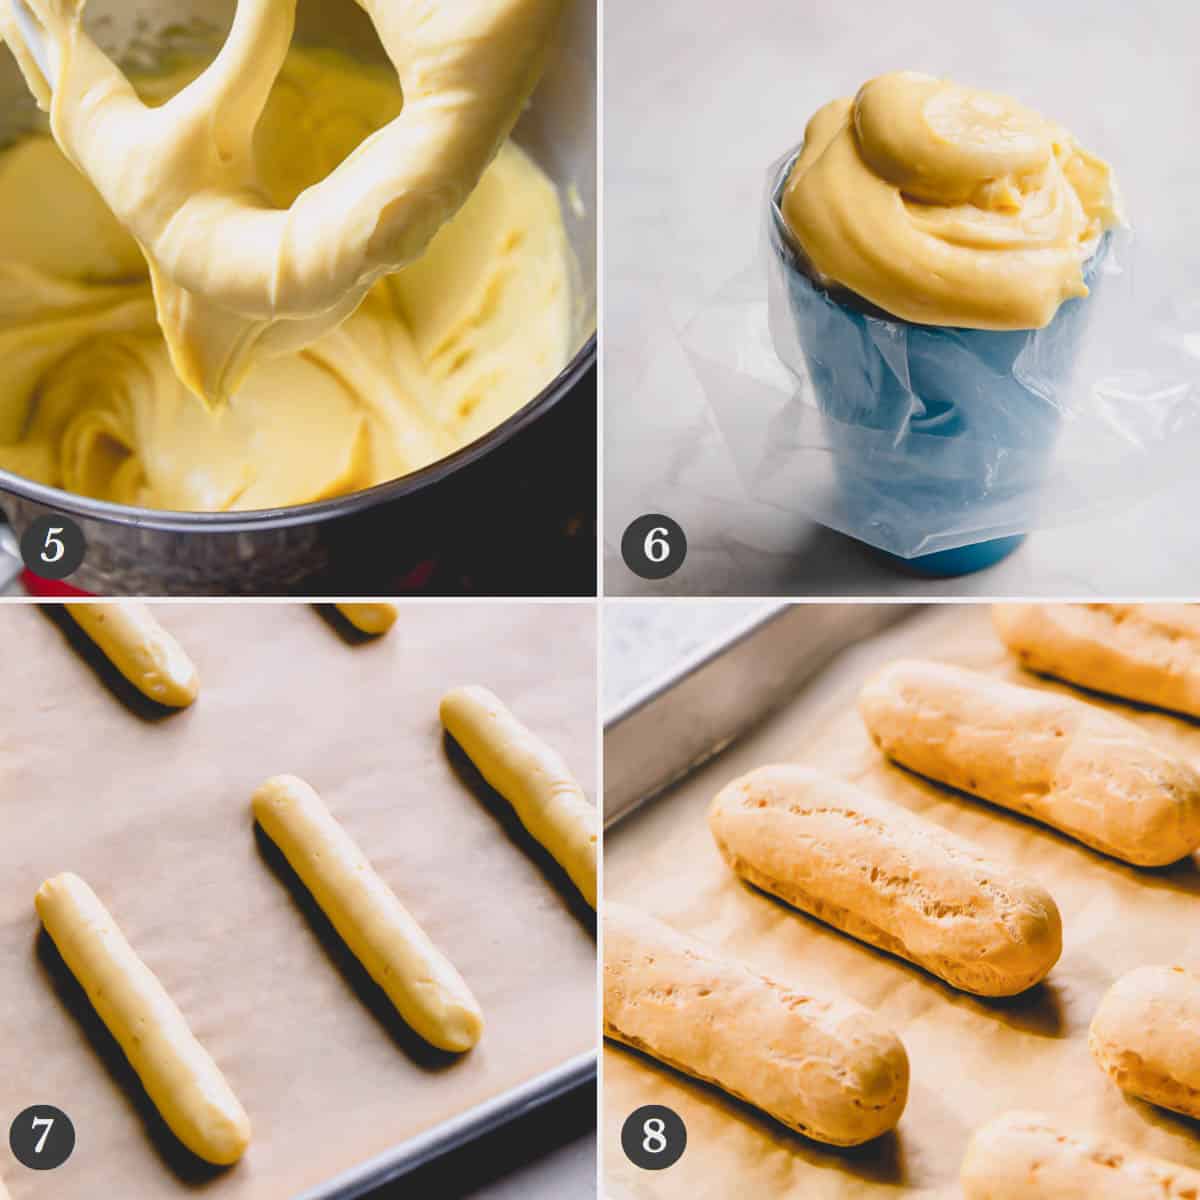
- The dough should be smooth and shiny, thin enough to slowly fall into a ribbon, but too runny, leaving a V-shape batter on the beater.
- Transfer the batter into a large pastry bag, fitted with a round or star tip. Rest the batter for at least 1 hour at room temperature, or refrigerate for up to 2 days. (Note: Make sure to close any opennings to avoid drying out the batter.)
- Pipe the batter into 4-inch skinny logs at least 2 inches apart. Level the peaked tops with a wet fingertip.
- Bake the shells for 30-35 minutes, or until the shells are puffed up and golden brown, one baking sheet at a time. (Note: Don’t open the oven door the first 25 minutes.)
How to make Eclair filling
Pastry cream is the classic filling for eclairs. But I like to fill mine with cream diplomat, which is basically a pastry cream mixed with whipped cream!!
Watch my pastry cream video tutorial.
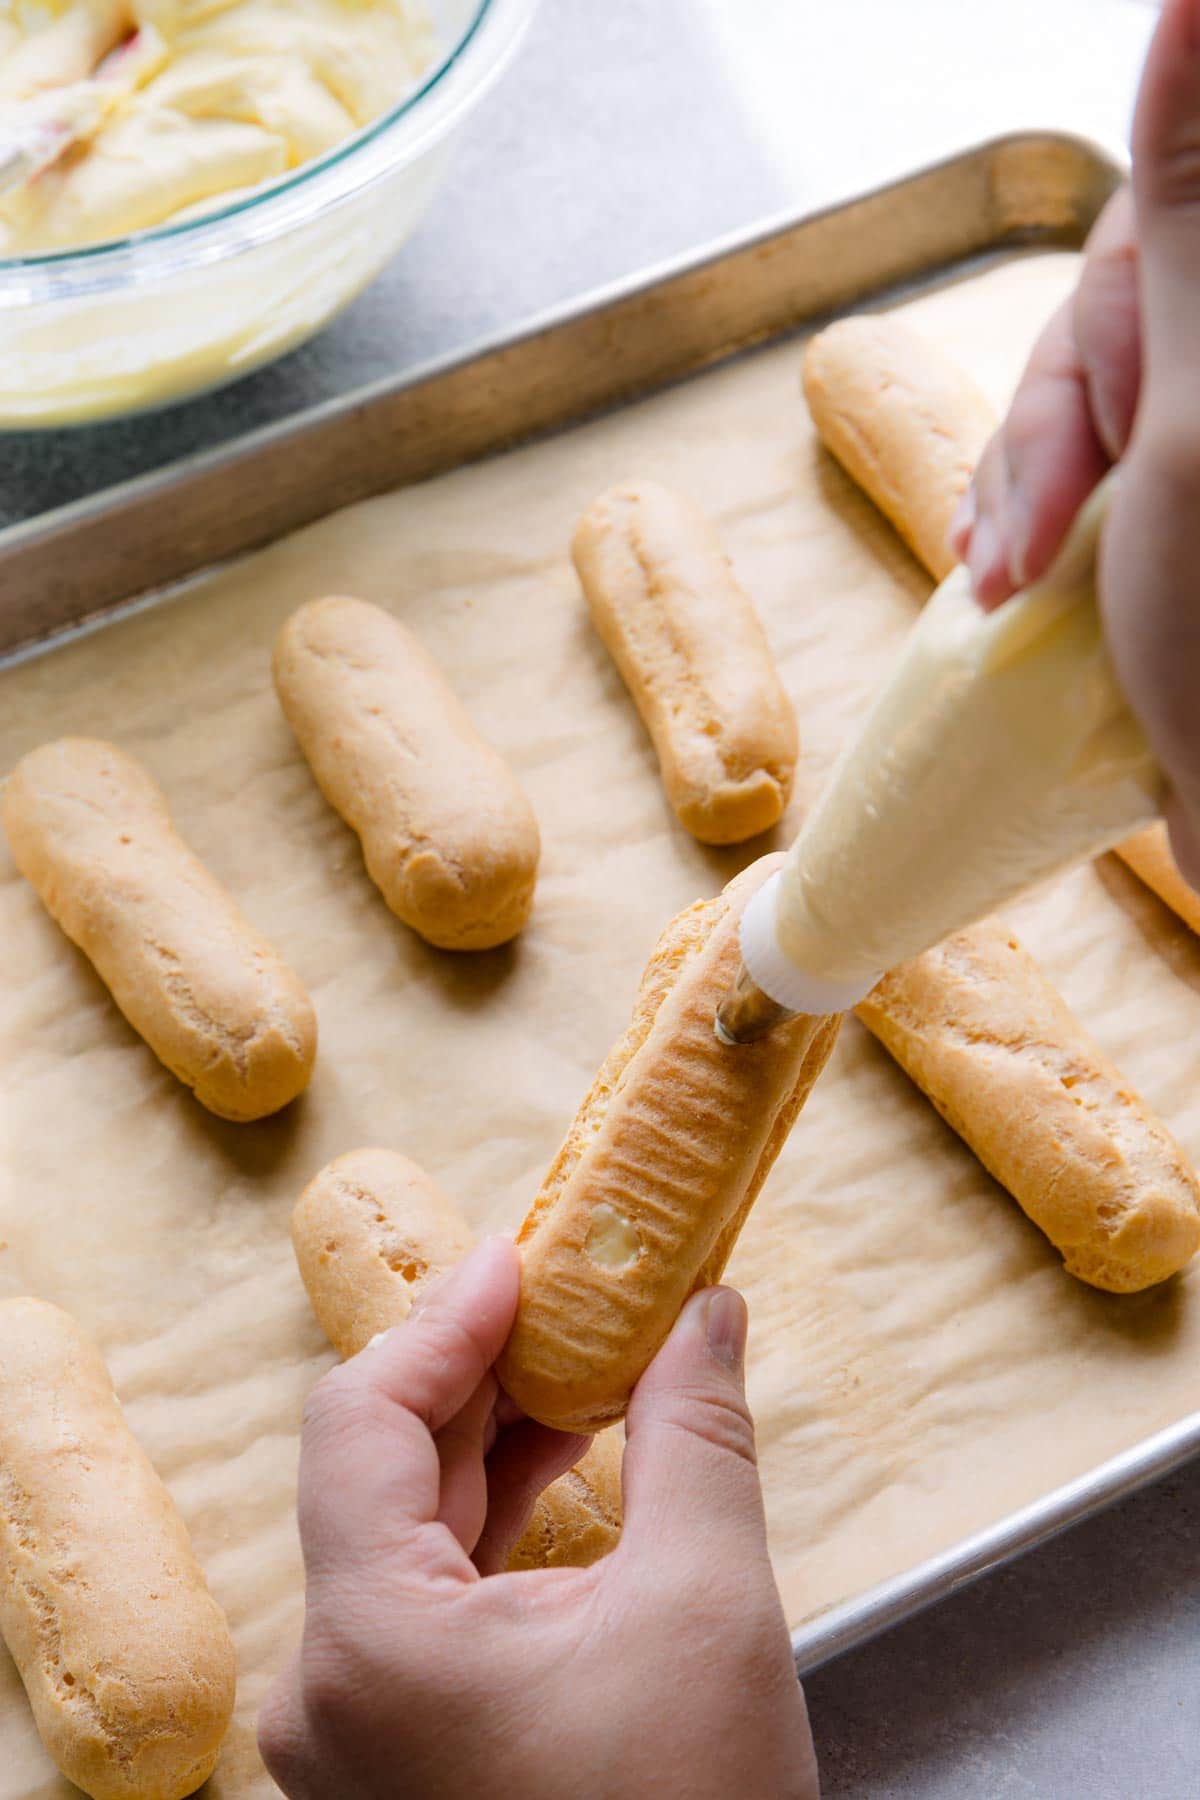
How to fill Eclairs:
There’re 2 ways you can fill those puffy eclair shells. But before filling the shells, I highly recommend drying the shells a little more.
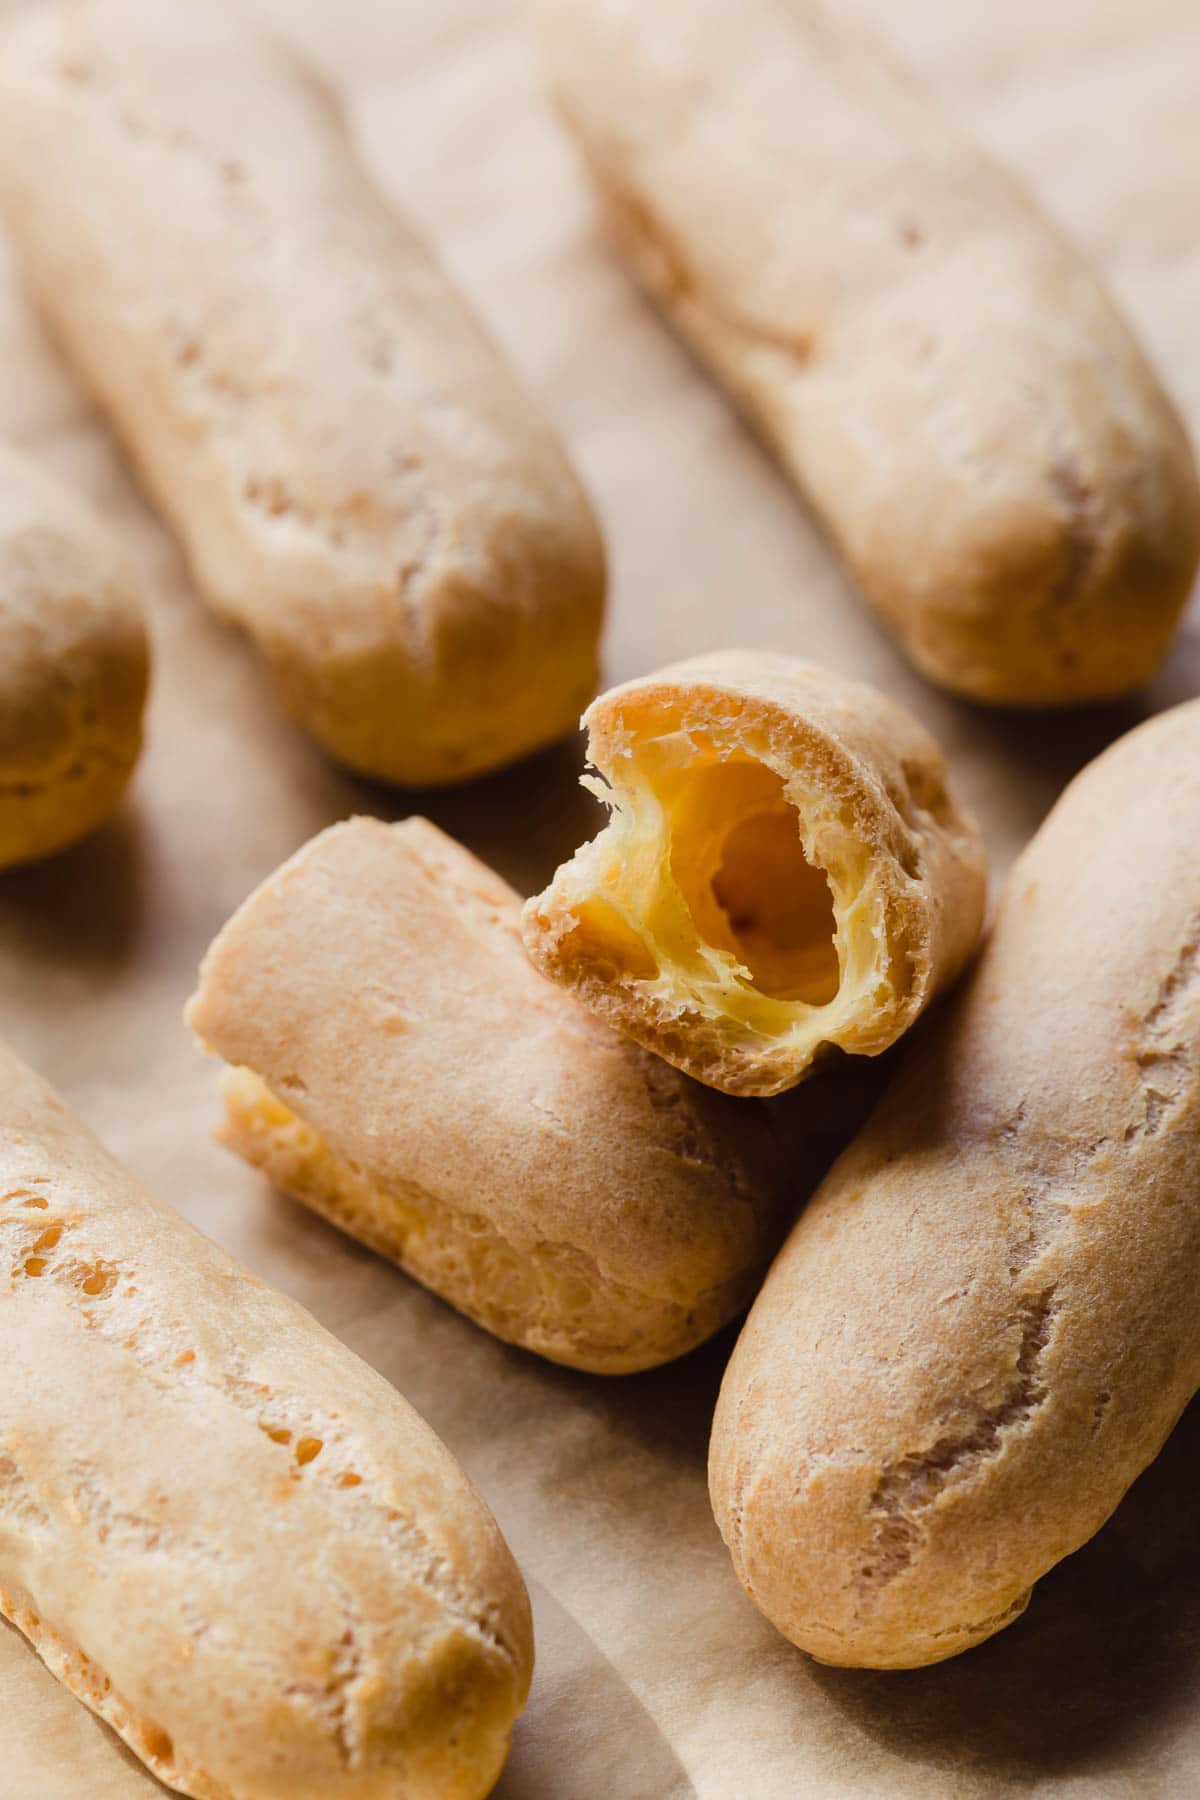
- Once the shells are baked, cool until safe to handle, cut out 2 wholes on the bottom using a round piping tip, or simply make a small slit on the side of shells, using a small sharp paring knife.
- Arrange the shells back on the baking sheet with the holes facing up. And bake them again for another 5 minutes. This dries out the inside of pastry shells and make them extra crisp.
- Transfer the shells onto a wire rack and cool completely before filling.
- Then choose one of the two options below to fill the eclairs.
Option 1
Make a small slit with a sharp paring knife on the side of pastry shells, and fill the eclairs through that.

Option 2
Or you can make 2 holes on the bottom of the shells, using a round piping tip, and fill eclairs through those holes. I like this method better, because it produces cleaner presentation!
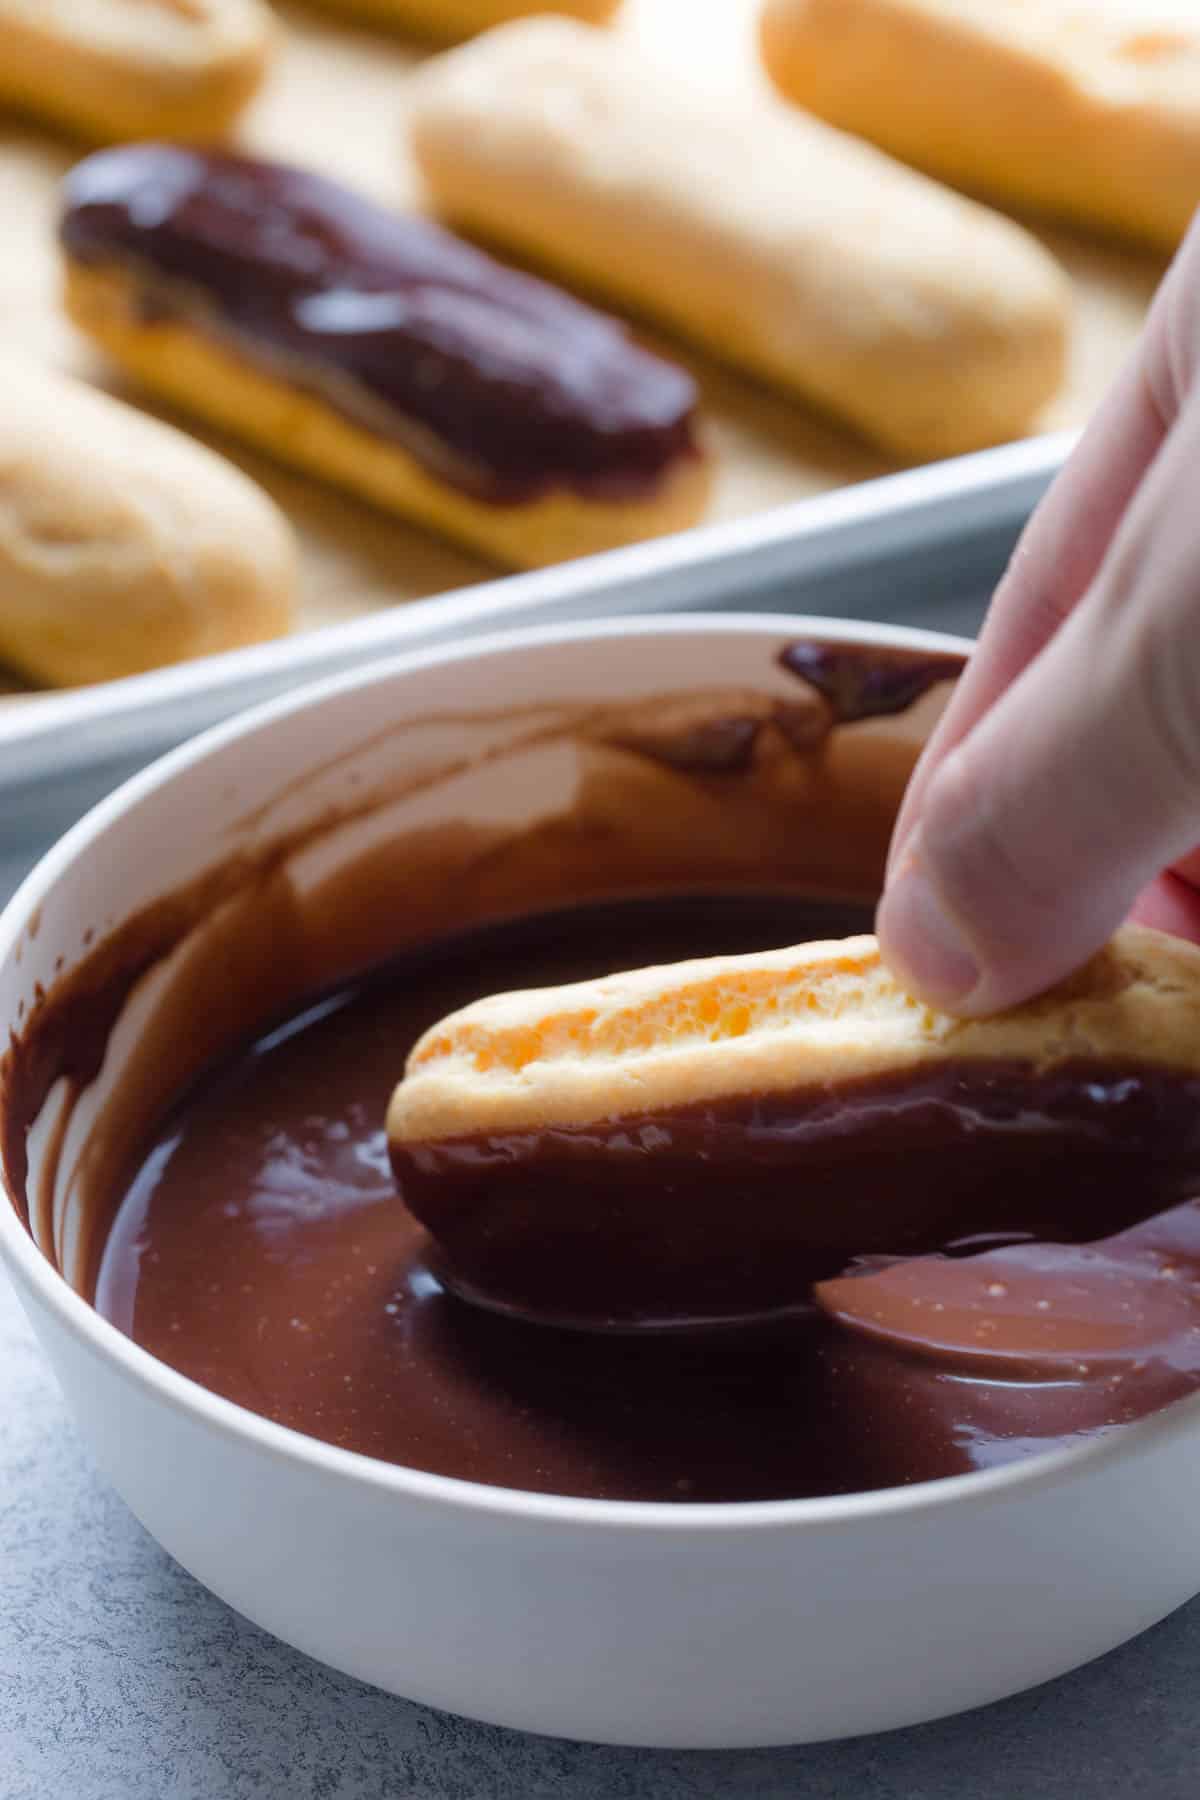
How to make Chocolate Eclairs frosting
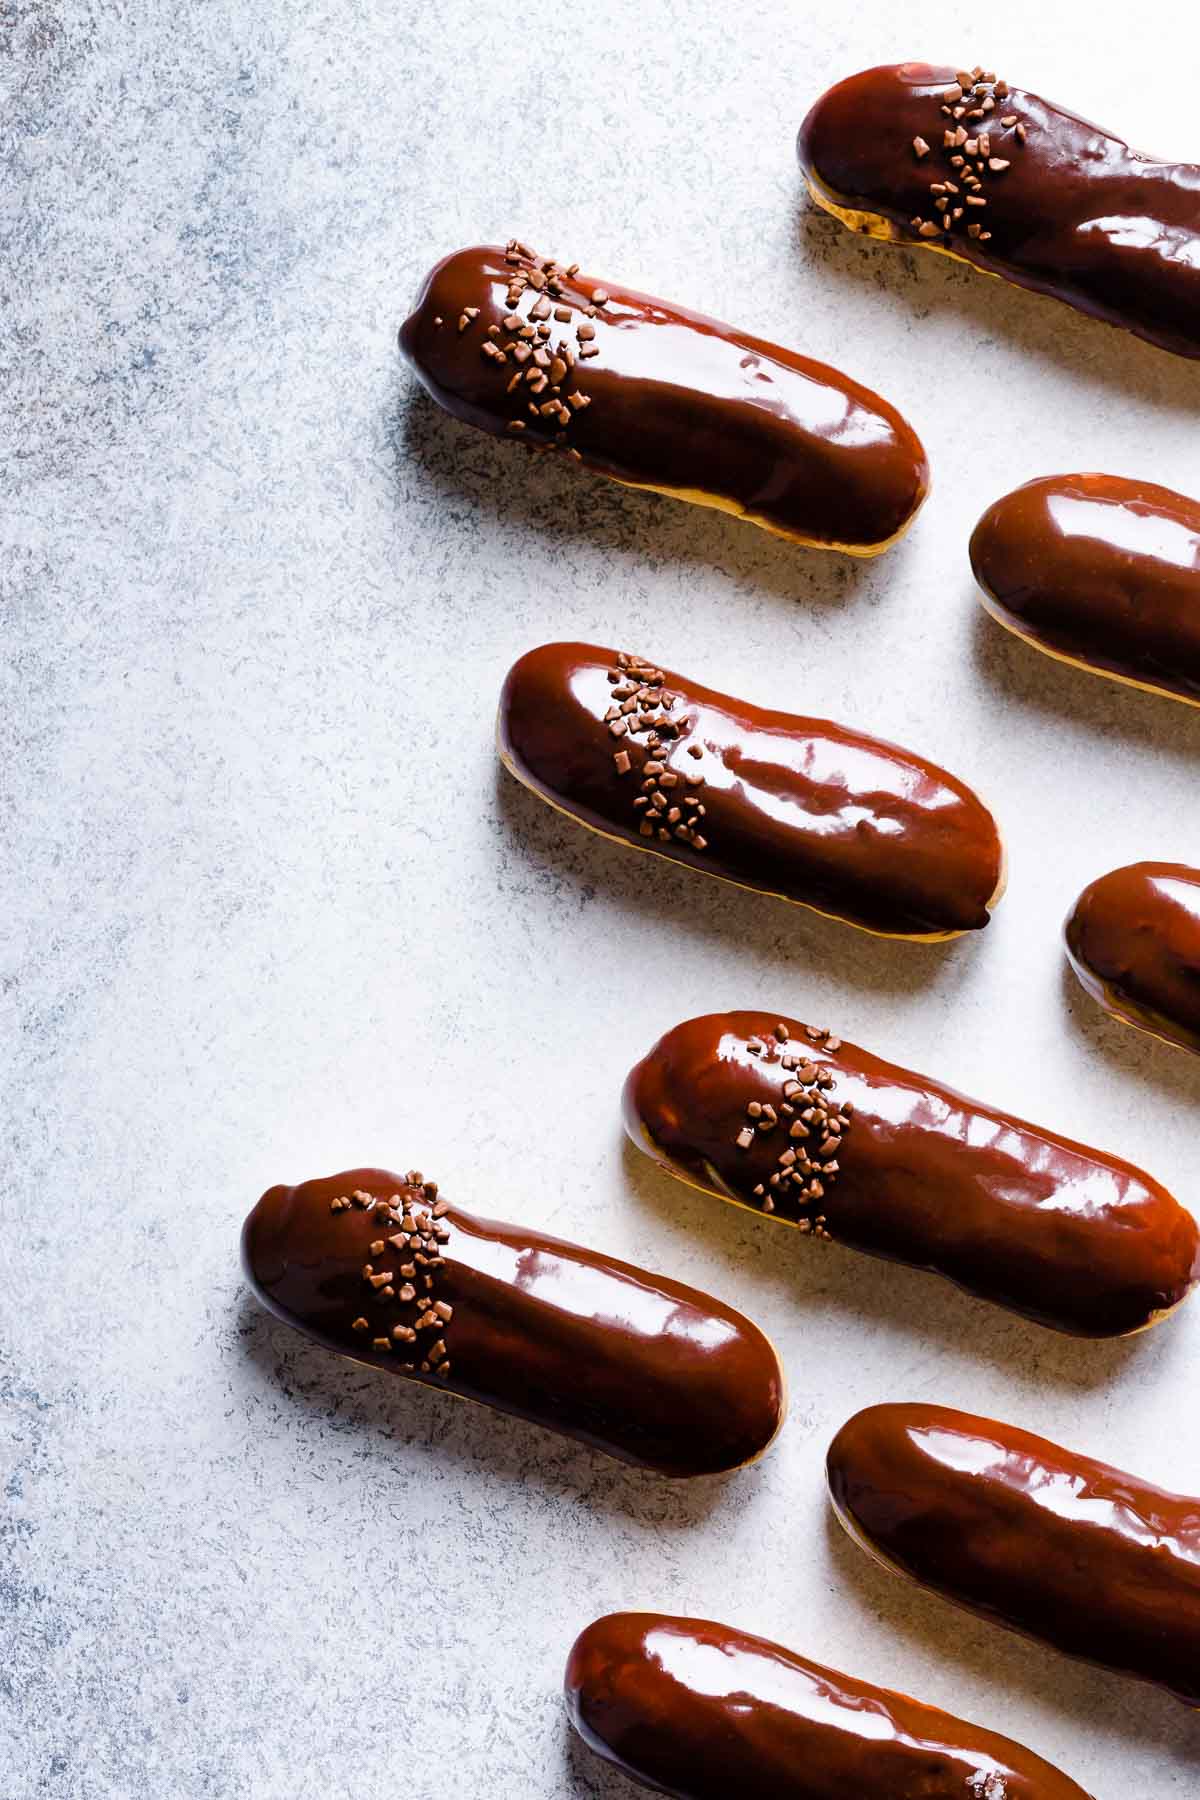
Frosting the filled eclairs with rich ganache is the final step before serving your fancy pastry!
Make a simple dark chocolate ganache and dip the top of each filled eclair in it. Allow the chocolate glaze to set and then serve!
8 tips for perfect Eclair shells:
- Slowly simmer water with butter, sugar and salt over medium heat. The goal is to dissolve sugar and salt completely before the water comes to a boil. Otherwise, you may evaporate too much liquid, throwing off the ratio of your ingredients.
- Sift flour to remove any clumps. And then add the flour all at once into the boiling liquid off heat.
- Cook the dough (it’s called “panade”) over medium high heat for about 5 minutes, stirring continuously. At this stage, we’re trying to evaporate as much moisture as possible, so that the dough can absorb more eggs. More eggs = better the pastry will rise!
- Cool the panade to room temperature and then add eggs one at a time, mixing the dough well after each addition.
- Make sure your batter is nice and shiny, thick yet runny enough to fall of the spatula slowly, leaving a V-shaped dough.
- Transfer the batter into a large pastry bag and rest for at least 1 hour before piping.
- Pipe the batter into skinny logs. If you pipe wider logs, they’ll expand during baking and you’ll get fat shells, which is fine too.
- When baking, do NOT open the oven for at least first 25 minutes to allow the eclairs puff up and set. If you open the oven door, you’ll let the steam out and risk collapsing the shells.
Chocolate Eclair Recipe FAQ
It’s best to serve eclairs within 6 hours of filling them, or the shells will get soggy. But leftover eclairs can be refrigerated for up to 3 days.
Not exactly. Though they’re both made of choux pastry, they differ in shape and fillings. Eclairs are log-shaped pastry filled with pastry cream and grazed with ganache. Profiteroles, on other hand, round shaped pastries often filled with ice cream and glazed with ganache.
Eclairs are a classic French dessert.
Cream puffs are small round choux pastries, often filled with whipped cream. Eclairs, on other hand, are long choux pastries filled with custard filling.
Eclairs are eaten cold.
Eclairs shells usually softens from the wet filling, like custard. However, the shells aren’t soggy.
Eclairs Video Tutorial

Chocolate Eclair Recipe
Ingredients
For Pastry Shells:
- 1 cup (240 ml) water
- ½ cup (115 g) unsalted butter
- 1 tablespoon (15 g) granulated sugar
- ¼ teaspoon coarse kosher salt
- 1 cup (125 g) all-purpose flour
- 4-5 large eggs at room temperature
For Pastry Cream:
- 2 cups (500 ml) milk
- 1 teaspoon pure vanilla extract
- 4 egg yolks
- 1/3 cup (70 g) granulated sugar
- 2 tablespoons (30 g) all-purpose flour
- 2 tablespoons (16 g) cornstarch
- ½ cup (120 ml) heavy whipping cream cold
For Chocolate Ganache:
- ½ cup (120 ml) heavy whipping cream
- ¼ cup (50 g) semi-sweet chocolate chips
- 1 tablespoon unsalted butter optional
Instructions
To make the eclair shells:
- Preheat oven to 375°F (190°C). Line 2 baking sheets with parchment paper, or silicone mat.
- In a medium saucepan, combine water, butter, sugar and salt. Slowly heat the mixture over medium heat, stirring frequently to dissolve sugar and melt the butter. Once sugar is dissolved and butter is melted, increase the heat to medium high heat and bring the mixture to a boil.
- Meanwhile, sift the flour.
- When the butter mixture comes to a boil, remove the saucepan from heat and add flour all at once. Quickly mix the mixture until all the flour is absorbed. (We just made panade!)
- Put the saucepan back to burner and reduce the heat to medium. Cook the dough, continuously mixing with a wooden spoon. The dough will start to form into a ball. Keep mixing for another 3-4 minutes until light crust forms on the bottom of the pan. (Note: It’s important to cook for at least 3-4 minutes to dry out the panade.)
- Transfer the dough into a mixing bowl with paddle attachment and mix it for a few minutes on low speed until the mixture is at room temperature, about 2 minutes. (No mixer? No problem. You can mix it with a wooden spoon!)
- Then add eggs one at a time, mixing the batter well after each addition. This will help to get egg absorbed into the dough quicker. Don’t add more than 2 eggs at a time! This is important, as you might not need to add all the eggs. The dough should be smooth and shiny, thin enough to slowly fall into a ribbon, but too runny.
- Transfer the batter into a large pastry bag, fitted with a round or star tip. Rest the batter for at least 1 hour at room temperature, or refrigerate for up to 2 days. (Note: Make sure to close any opennings to avoid drying out the batter.)
- Pipe the batter into 4-inch skinny logs at least 2 inches apart. Level the peaked tops with a wet fingertip.
- Bake the shells for 30-35 minutes, or until the shells are puffed up and golden brown, one baking sheet at a time. (Note: Don’t open the oven door the first 25 minutes.)
- Once the shells are baked, cool until safe to handle, cut out 2 wholes on the bottom using a round piping tip, or simply make a small slit on the side of shells, using a small sharp paring knife. Arrange the shells back on the baking sheet with the holes facing up. And bake them again for another 5 minutes. This dries out the inside of pastry shells and make them extra crisp.
- Transfer the shells onto a wire rack and cool completely before filling.
To make the Creme Diplomat filling:
- In a medium saucepan, bring milk and vanilla extract to a boil. Once it boils, turn the heat off.
- In a separate bowl, beat egg yolks with sugar until pale. And then stir in flour and cornstatrch.
- To temper the egg yolk mixture, take about ½ cup of hot milk and add it into the egg yolk mixture, while stirring vigorously.
- Now, add the tempered egg mixture back into the saucepan with remaining milk. Cook it over medium heat, stirring constantly, until it comes to a boil, about 5 minutes. (Note: It's normal if the mixture looks curdled in the beginning, be patient and it'll smooth out.) To see if the mixture is boiling, stop whisking for a moment. If it's burping bubbles, cook for 1 minute and remove from heat.
- Run the custard through a sieve, if desired, and transfer into a clean bowl and cover with a plastic wrap, so it touches the cream and refrigerate it for at least 2 hours. (TIP: Don’t be alarmed if your chilled pastry cream looks too thick and lumpy. Simply whisk it until smooth again.)
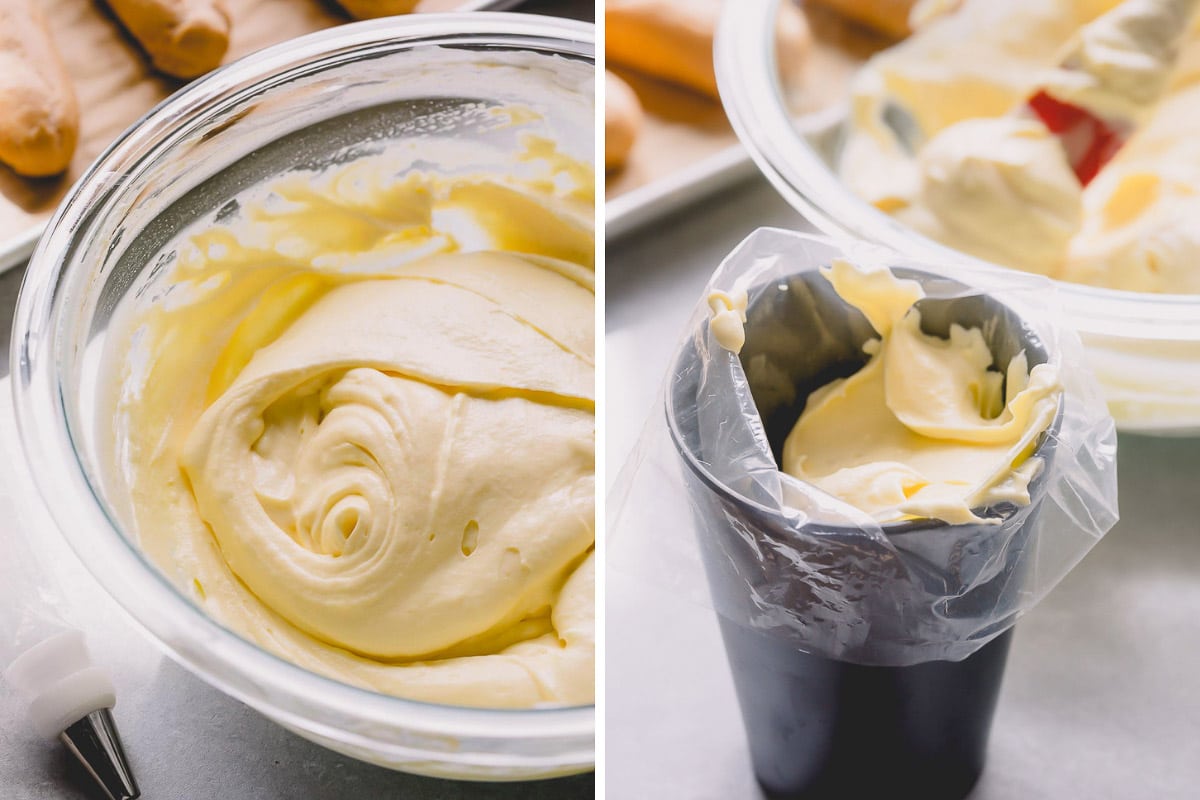
- Whip heavy whipping cream till hard peaks form. Fold in the whipped cream into the chilled pastry cream and gently fold until well combined. Transfer the filling into a large pastry bag fitted with a round tip.
To make the chocolate glaze:
- Heat heavy cream until just simmer. Do not boil. Pour it over chocolate chips, and let it sit for good 2 minutes. Then stir it until smooth for couple minutes. Stir in butter to add some shine.
To assemble the eclairs:
- Pipe the filling through the prepared holes on the bottom or a side slit. And then dip each filled eclair in the chocolate ganache.
- Let the eclairs set for about 1 hour in the fridge before serving.
⭐️ Did you make this recipe?
Please leave a review and let us know how you liked it!
Video
Tips & Notes
· Unfilled pastry shells can be stored at room temperature for 1 day, or frozen for up to 3 months.
· Pastry cream also can be prepared in advance and refrigerated until ready to use. Make sure to cover the filling with a plastic wrap touching the entire surface of the cream.
· It’s ideal to assemble the eclairs the day of serving. Assembled eclairs should be refrigerated.
Nutrition

This recipe was originally published on January 22, 2013.


We are have so much fun making these eclairs!!! And so far so good … but the ingredients listed for the chocolate ganache says 1/2 cup cream to 1/4 cup chocolate … that just can’t be right … we went with the 1:1 ratio you spoke of in other places. Can you clarify.
Hi, Sarah Jane. I’m so glad you’re having fun baking eclairs!! Fod glazing, I prefer making thinner ganache as I prefer thinner glaze on eclairs. I find 1:1 ratio ganache better suited for filling or truffles.
can you use salted butter if you dont have unsalted
Hi, Lavina. Yes, you can use salted butter. Just omit the added salt.
Than you Shenee for getting back to more so soon ,I only had salted butter and wanted to make them
but was not sure they would turn out .