
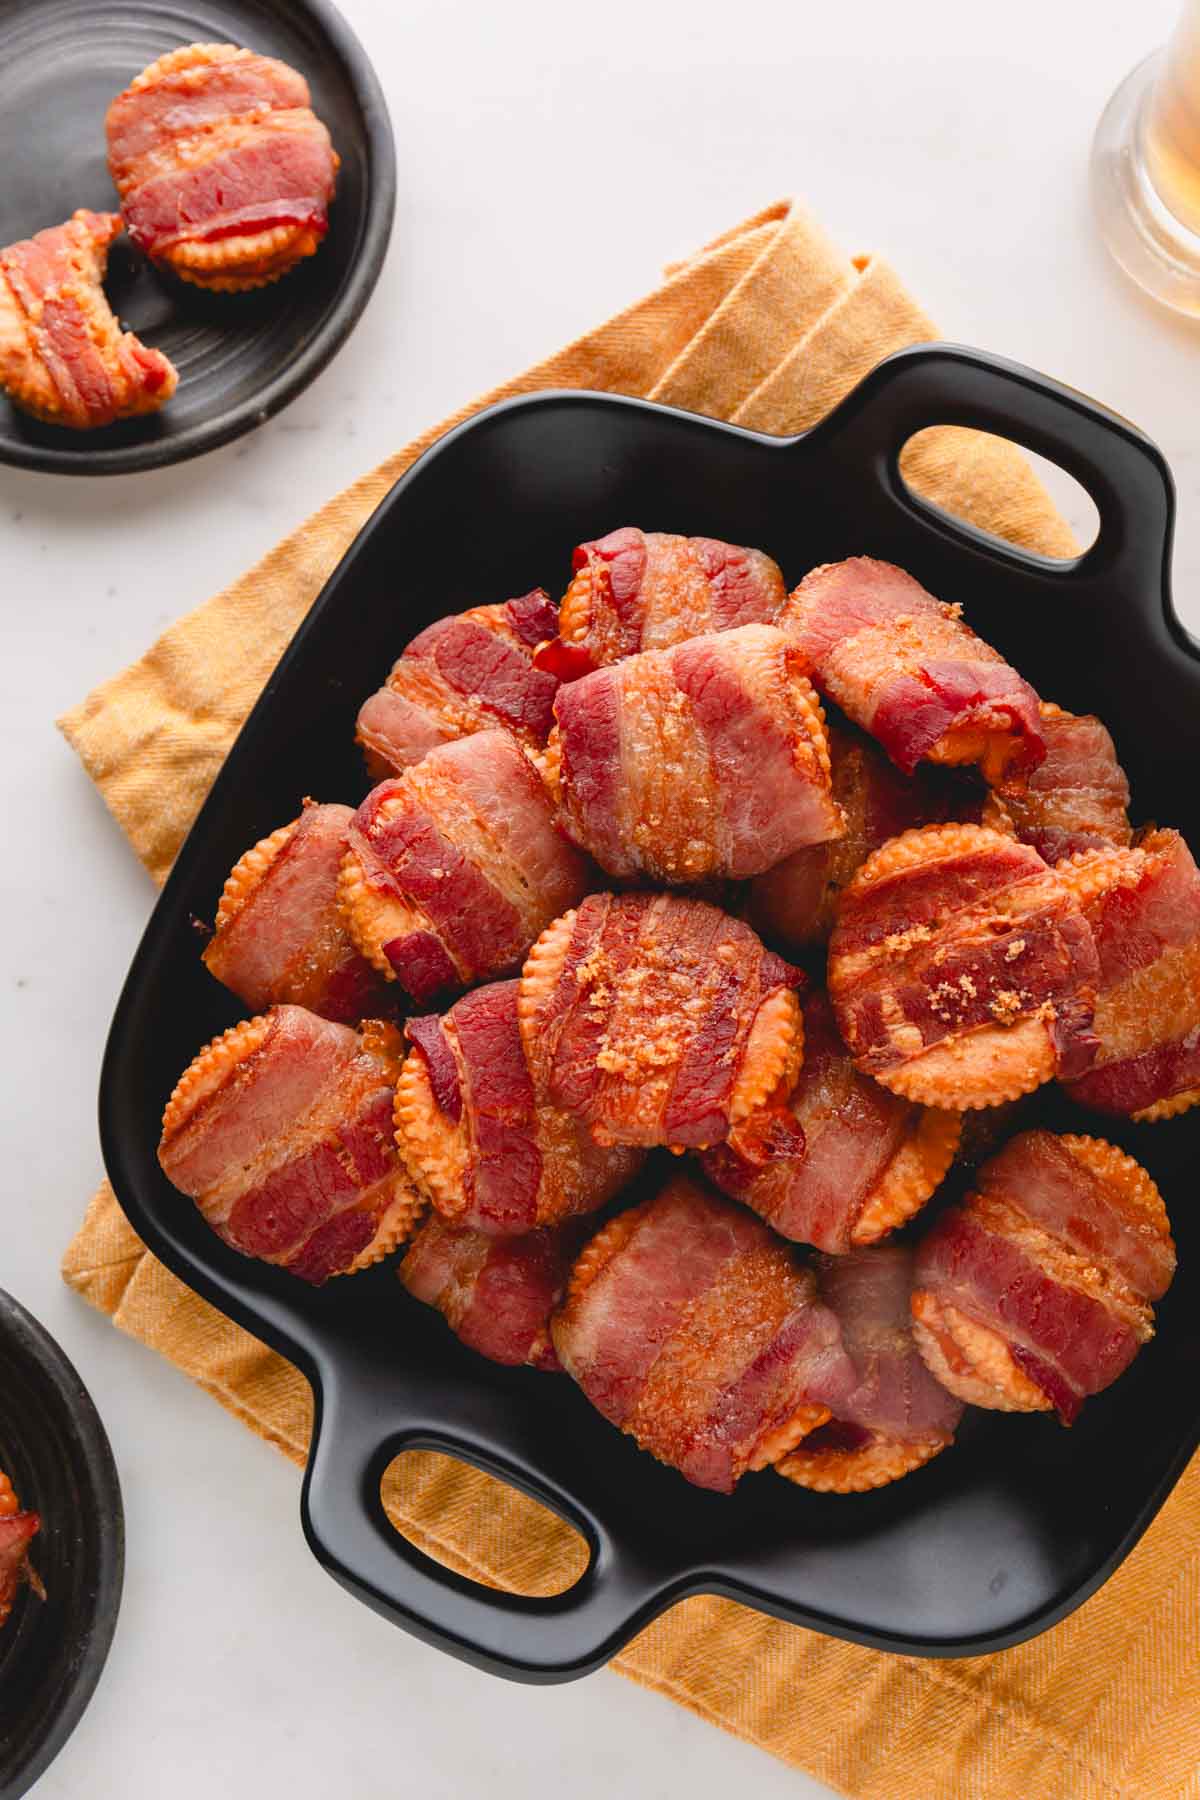
Made with four ingredients, these cheesy bacon crackers are sweet, savory, salty, and perfect for snacking. Addictively delicious, they’re the perfect make-ahead appetizer or snack!
Why you’ll love this recipe
I first tried bacon wrapped crackers at a Christmas party hosted by my sister-in-law, and it was love at first bite. I’ve been making them ever since. However, I added a few modifications to my version – using cheese and doubling the crackers for even more deliciousness.
- Simple – All you need are four basic ingredients to create a showstopping appetizer.
- Easy – With just 15 minutes of prep time, these bacon Ritz crackers are quick to assemble, letting the oven do all the hard work.
- Flavor – Every bite offers a savory, cheesy flavor with a satisfying crunch and soft, gooey cheese. What’s not to love?
Prepare bacon crackers for holiday parties, game day celebrations, or fun afternoon snacks. Serve them on their own, or use them to create the best charcuterie board. No matter what, they’re guaranteed to be an instant favorite!

Key Ingredient Notes
- Bacon strips – Choose thinly sliced bacon to ensure it cooks evenly and doesn’t overwhelm the rest of the flavors. Cut each strip in half to make it easier to wrap around them around the crackers.
- Crackers – I use Ritz crackers, but you can substitute any crackers you like best. I recommend plain or buttery varieties for the best flavor!
- Cheese – I use cheddar cheese slices, but you can use any flavor of cheese you like best. Mix and match different varieties to discover what you like best!
- Brown sugar – Use light or brwon sugar for this recipe. Read about the differences in my sugar 101 post, and learn how to soften brown sugar if it becomes a bit too hard.

How to make cheesy bacon crackers
Before you begin, preheat your oven to 350°F, and line a baking sheet with parchment paper or a silicone mat.
- Cut the bacon in half, and cut the cheese slices into small squares, no bigger than the crackers.

- Arrange the bacon strips in an even layer on the prepared baking sheet.
- Layer each bacon strip with a cracker, cheese, and another cracker.

- Wrap the bacon around the crackers.
- Sprinkle a little bit of brown sugar where the bacon ends meet. Place them seam-side down on the baking sheet, and sprinkle a little more brown sugar on top.

- Bake for 20-25 minutes or until the bacon is nice and crispy.
- Serve at room temperature, and enjoy!

Video Tutorial
Tips for Success
- Slice the bacon. Before you begin, make sure to slice your bacon in half. Otherwise, it will engulf your crackers, and all you’ll taste is the bacon!
- Keep an eye on your oven. The baking time will vary, and your crackers can burn very quickly. To prevent this, keep a careful eye on your oven, and remove the crackers as soon as the bacon is crispy and the cheese is melted.
- Make it in an air-fryer! I make small portions for snacking all the time in my air-fryer. It takes less cooking time, so start checking after 10 minutes and keep a close eye on it.

Storing Tips
- Store cooled bacon wrapped crackers in an airtight container in the fridge for up to 3 days.
- Freeze leftovers for up to 1 month!
- Thaw frozen bacon crackers in the refrigerator. Then, reheat them in the oven at 250°F for about 20 minutes or until warmed through.

FAQs:
No, if preferred, you can simply layer all the ingredients, and bake. I recommend using club crackers for layering, because they’re longer, meaning you’ll still get a bit of all the ingredients in each bite.
Yes, I love to add jalapeño slices for a kick of heat! You can also add a dash of red pepper flakes or cayenne pepper for extra spice.
I love the gooey texture and salty flavor of the cheese, but you can omit it if you’re not a fan or need to keep this recipe dairy-free!
More Easy Appetizers

Cheesy Bacon Crackers
Ingredients
- 12 thin bacon strips
- 48 crackers
- 2 oz sliced cheddar cheese
- 2-3 tablespoons brown sugar
Instructions
- Preheat the oven to 350°F (177°C).
- On a baking sheet lined with parchment paper, or silicone mat, arrange the bacon strips.
- Cut the bacon strips in half.
- Cut the cheese slices into 1-inch squares. They should be smaller than the crackers.
- Layer cracker, cheese and cracker in the middle of each bacon strip.
- Wrap the bacon around the crackers. Sprinkle a little bit of brown sugar where the bacon ends meet. Place the seam side down.
- Sprinkle a little more brown sugar on top of each piece.
- Bake for 20-25minutes, or until bacon is nice and crispy.
- Serve at room temperature.
⭐️ Did you make this recipe?
Please leave a review and let us know how you liked it!
Video
Tips & Notes
– Store cooled bacon wrapped crackers in an airtight container in the fridge for up to 3 days.
– Freeze leftovers for up to 1 month!
– Thaw frozen bacon crackers in the refrigerator. Then, reheat them in the oven at 250°F for about 20 minutes or until warmed through.
Nutrition
This recipe was originally published on February 7th, 2017.


Mine burned at 25 minutes ! I was watching. The tops looked fine, but after pulling them out and transferring to a plate I saw that the bottoms were burnt. I will try again and only bake 20 minutes.
Hi, Kimberly! Thanks for sharing your feedback!! Hope you were still able to enjoy them!
Hi yess!! I did them for 350 for 20-25 minutes. I think I might have done 30 minutes and they turned out wonderful! I think next time instead of cheddar I might do a creamier cheese like gouda! Thanks so much for the clarification. They were a hit!
I’m so glad to hear they were a hit!! Thank you again for reaching out for trying my recipe and for your feedback!
Ok currently making these and I’m just hoping I’m doing the right thing. In your blog you talk about 250 degrees for 2 hours and then the recipe says 350 degrees for 20-25 minutes. ***panicking*** WHICH IS IT!? Thanks
Oh my goodness. Laura, I’m so sorry for the confusion. I recently updated the recipe with new baking temp and time. You can bake them for 1.5-2 hours at 250°F, as my original recipe stated. However, I had great success baking them at 350°F for 20-25 minutes. Again, I apologize for this mistake, I just updated the post. Thank you for letting me know! I hope yours still turned out ok.
I haven’t made these yet – although they look wonderful. Will the bacon cause the cracker to get soggy?
Sure, but they still have texture.
I was looking for something different for a cocktail party. Made a sample today and I’m sure they’ll be a hit!! I also tried one with cream cheese and fresh sliced seeded jalapeños and no brown sugar. They were good too but for the party I think I’ll stick with your recipe!! Yum!
Hi, Val. I’m so happy you tried and loved the recipe!! Thank you for your feedback!! Hope your guests loved it too!
Do you think these could be frozen?
I could not find the video.
Me either
Hi, Faye. Sorry about that. Maybe try this video that I shared on Facebook: https://www.facebook.com/SweetandSavorybyShinee/videos/1910303185668908/
Hi, loved your recipe..I made these for baby shower, attached a pineapple chunk with a toothpick ,and a sprinkle of
Brown sugar…amazing..thanks again
Hey, Joanne! Pineapple sounds like a great addition. Thanks for trying the recipe and your feedback. 🙂
Cute video!
Thanks, Megan!
These are delicious and so easy to make. I added a sprinkle of cayenne pepper for a little heat.