
This decadent chocolate cake with chocolate mousse filling is a chocolate lover’s dream! Made with four layers, it’s showstopping in appearance but is surprisingly simple to make.

Why you’ll love this chocolate cake
I have to warn you that this chocolate cake recipe with mousse filling is so delicious that it’s been known to cause fights over the last slice!
I’ve tested and retested the recipe to make sure it’s perfect and holds its shape, and let’s just say that no one in my family ever complains about testing.
- Flavor – Made with espresso-infused cake, chocolate mousse filling, and a rich chocolate ganache topping, every bite of this cake is packed with rich, chocolate flavor. My favorite!
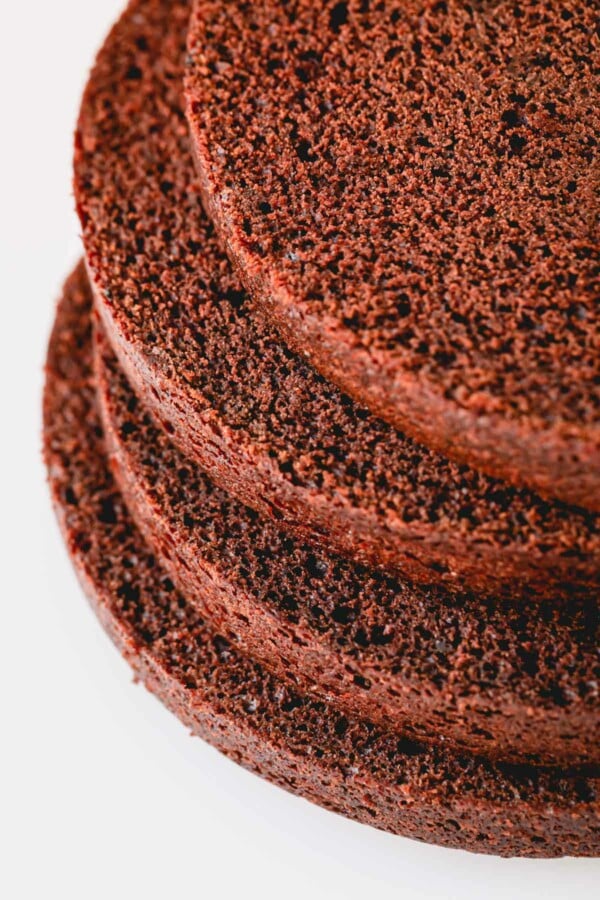
- Texture – The cake is perfectly fluffy and moist, pairing nicely with the creamy filling.
- Appearance – Once you slice into the cake, you’ll reveal four layers of cake and filling, encased by the solidified ganache for a homemade recipe that looks like it belongs in a bakery case.
Serve your chocolate cake with chocolate mousse filling on its own. Or, go all out with a scoop of homemade vanilla ice cream, whipped cream, or even powdered sugar, and berries on top!
Key Ingredient Notes
Chocolate Cake
- All-purpose flour forms the base of the cake batter. I haven’t tested this recipe with a gluten-free flour, but it should work if you use a 1:1 all-purpose gluten-free flour blend!
- Sugar – We use granulated sugar over other types of sugar to sweeten both the cake batter and the mousse filling.
- Unsweetened cocoa powder – A must-have for both the cake batter and mousse filling! While natural and Dutched cocoa powders are not interchangeable, you can use either one for this recipe.
- Leaveners – Both baking soda and baking powder contribute to the soft, fluffy consistency of the cake.
- Salt helps balance the sweetness of the cake and enhances the rest of the ingredients.
- Instant espresso coffee – Trust me on this. It doesn’t make your dessert taste like coffee but is my secret to creating the best, boldest chocolate taste. If needed, feel free to use decaf espresso.
- Milk – I use 2% milk, but you can use any kind you have on hand.
- Greek yogurt – This adds a subtle tang to the cake and keeps it moist and tender. Let your yogurt come to room temperature before you begin!
- Pure vanilla extract – I always have a batch of homemade vanilla extract on hand, but store-bought varieties are also fine. Just make sure to use high-quality pure vanilla extract, not the imitation stuff!
Chocolate Frosting and Ganache
- Chocolate chips – We use bittersweet (or semi-sweet) chocolate chips in both the filling and ganache. You can never have too much chocolate, right?
- Heavy cream creates a creamy texture and rich flavor in both the mousse and ganache.
- Nutella – This adds an extra element of flavor to the filling, offsetting some of the sweet chocolate taste with a delicious nutty taste.
- Softened butter – This is optional but creates a picture-worthy shiny ganache!

How to make this chocolate cake recipe with mousse filling
Before you begin, preheat the oven to 350°F, and grease two 9-inch round cake pans.
1. Make the Chocolate Cake
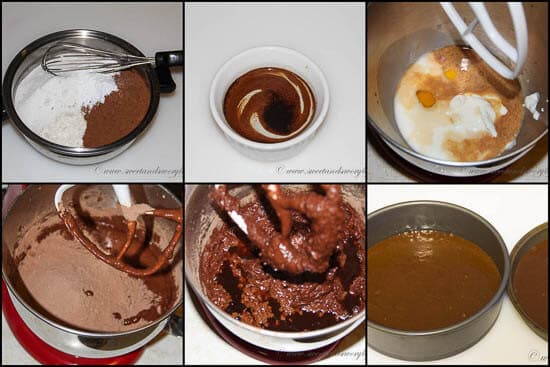
- Whisk the flour, sugar, cocoa powder, baking soda, baking powder, and salt in a medium bowl.
- Mix the water and instant espresso coffee in a second small bowl until smooth. Set the mixture aside.
- Mix the eggs, milk, yogurt, and vanilla in a mixing bowl fitted with a paddle attachment until well combined.
- Next, add half the flour mixture, and mix for a minute. Then, add the remaining flour, mixing until just combined, and stir in the espresso water.
- Pour the cake batter into the prepared cake pans, and bake until a toothpick inserted into the center comes out clean, about 30-35 minutes.
- Place the pans on wire racks to cool for 10 minutes. Then, remove the cakes from the pans, and allow them to cool completely.
2. Prepare the Chocolate Mousse Filling
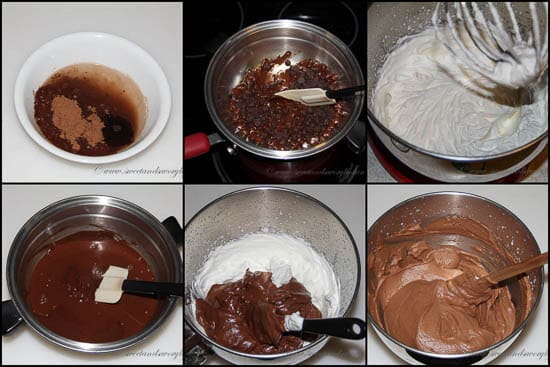
- In a small bowl, dissolve the cocoa powder and instant expresso in hot water.
- In a double boiler, melt the chocolate chips until nice and smooth. Then, remove the boiler from the heat, and let the chocolate cool slightly.
- In a stand mixer fitted with a whisk attachment, whip the heavy cream with the sugar until hard peaks form.
- Stir the cocoa mixture and Nutella into the melted chocolate.
- Add half the whipped cream, and gently fold to combine. Then, fold in the remaining whipped cream just until no streaks remain.
- Transfer the filling to the fridge until the cake is completely cooled. If you layer the cake too soon, it’s likely to crumble!
Achieve the best filling
I walk you through all the steps in even more detail in my chocolate mousse filling post.
3. Assemble the Chocolate Cake with Chocolate Mousse Filling
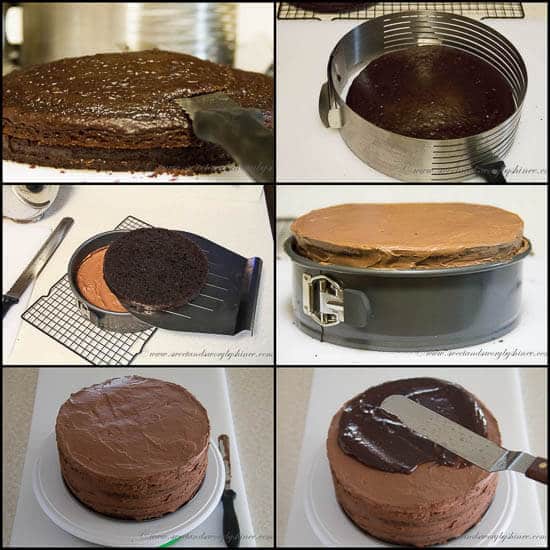
- Slice each cake horizontally to create two equal layers. If your cakes turn out with a small hump, just slice it off!
- Place the first layer in a springform pan. Then, spread a little less than ⅓ of the filling on top.
- Repeat, adding the next layer of cake and mousse until the cake is built, ending with a very thin layer of mousse on top.
- Transfer the cake to the fridge to chill for at least 2 hours or ideally overnight.
Use the right knife
For the best results, use a long serrated knife. I love this Zenker Layer Cake Slicer Kit!
4. Prepare the Chocolate Ganache
- Bring the heavy cream to a simmer in a small saucepan on the stove. Be careful not to let it come to a boil!
- Pour the hot cream over the chocolate chips, and let the mixture sit for a good 2 minutes.
- Mix to melt the chocolate and create a smooth consistency.
- Stir in the butter. This creates a beautiful shine!
- Remove the springform sides from the cake pan. Then, for a smooth glaze pour the chocolate on top while it’s still runny. Or, let the ganache cool before spreading for a frosting-like consistency. Both versions are tasty!
Perfect your ganache
Take a look at my post on how to make chocolate ganache for even more tips and tricks!

Tips for Success
- Bring all the ingredients (except the heavy cream!) to room temperature before you begin to allow for easy mixing.
- Keep your heavy cream chilled! Warm heavy cream doesn’t whip properly. Warm cream won’t reach stiff peaks, no matter how long you whip it.
- Don’t overwhip the cream, or it will curdle. Overwhipped cream gets clumpy, separates, and eventually turns into butter.
- Allow the cake to cool completely before slicing and layering. Otherwise, it’s likely to crumble, sink, and fall apart!
- Create even cake layers by trimming any lumps with a serrated knife.
- Measure the flour correctly! I highly recommend using a scale to measure the dry ingredients, especially flour. It’s really easy to over-measure flour by volume, which will lead to a dense and heavy cake that no one wants to eat. If you don’t have a scale, instead of scooping the flour with a measuring cup, spoon the flour into a measuring cup and then level the top off with the back of a knife. This is called “spoon and level” method. Don’t be tempted to shake the measuring cup or pack the flour down!
- Avoid overbaking the cakes, keep a close eye on the oven, and remove the pans as soon as the cakes set.
- If you don’t want to use a double boiler to melt the chocolate for the ganache, you can also use the microwave. Place the chocolate chips in a microwave-safe bowl, and microwave in 30-second intervals, stirring after each addition. Do not overheat, or the chocolate will burn and clump!
Make-Ahead Tips
No matter what, this chocolate cake with chocolate mousse filling requires a bit of planning in order to prepare all the components. However, you can prepare all the components up to a day in advance.
- Cake: Allow the cakes to cool completely. Then, slice, and wrap each layer with plastic wrap. Store the layers in the fridge for up to 2 days, or freeze for up to 3 months.
- Mousse: Transfer the whipped mousse to an airtight container, or cover the bowl with plastic wrap, and refrigerate for up to 24 hours. Let the filling sit on the counter to soften before you use it.
- Ganache: Store ganache in the fridge for up to 5 days. You can also freeze ganache in an airtight container for up to 1 month. Thaw in the fridge overnight before using.
Storing Tips
Once assembled, you can cover the cake, and store it in the fridge for up to 5 days. I don’t recommend freezing the assembled cake as it’s likely to become too soggy once thawed.

FAQs:
Yes, if you leave the cake at room temperature, it’s likely to become soft and runny. Then, your cake will fall apart!
Yes, if you leave the mousse uncovered, it’ll develop a crust when exposed to the cold air.
Yes! The ganache does not get hot enough to negatively impact the taste or texture of the mousse.
More Chocolate Cake Recipes

Supreme Chocolate Cake with Chocolate Mousse Filling
Ingredients
For cake:
- 2 cups (250 g) all-purpose flour
- 1 ½ cups (300 g) granulated sugar
- ¾ cup (90 g) unsweetened cocoa powder either natural or Dutch-processed Note 1
- 1 ½ teaspoons baking soda
- 1 ½ teaspoons baking powder
- ½ teaspoon table salt
- ½ cup (120 ml) hot water
- 1 teaspoon instant espresso powder Note 2
- 2 large eggs at room temperature
- 1 cup (240 ml) milk at room temperature Note 3
- ½ cup (120 ml) Greek yogurt at room temperature
- 1 tablespoon pure vanilla extract
For mousse filling:
- ½ cup (120 ml) hot water
- 4 tablespoons (30 g) unsweetened cocoa powder Note 4
- ½ teaspoon instant espresso powder
- 1 ½ cup (260 g) chocolate chips Note 5
- 2 cups (480 ml) heavy cream cold
- 2 tablespoons granulated sugar
- 1/3 cup Nutella
For chocolate ganache:
- ½ cup heavy cream
- 1 cup chocolate chips
- 1 tablespoon softened butter optional
Instructions
- To make the cakePreheat the oven to 350°F (175°C). Grease two 9-inch round cake pans.
- In a medium bowl, whisk together flour, sugar, cocoa powder, baking soda, baking powder and salt. Set aside.
- In a small bowl, mix together water and instant espresso coffee. Set aside.
- In a mixing bowl with paddle attachment, mix together eggs, milk, yogurt and pure vanilla extract until well combined. Add half of the flour mixture for a minute, then add the remaining mixture and mix until just combined. Stir in the espresso water.
- Pour the batter into two cake pans. Bake for about 30-35 minutes, or until inserted toothpick comes out clean. Cool on wire racks for 10 minutes. Then remove the cakes from the pan and cool completely.
- Meanwhile, let’s prepare the chocolate mousse filling. In a small bowl, dissolve cocoa powder and instant espresso powder in a hot water.
- In a double boiler, melt chocolate chips until nice and smooth. Remove from heat and cool slightly.
- In a mixing bowl with whisk attachment, whip the heavy cream with the sugar until hard peaks form.
- Stir in the cocoa mixture and Nutella into the melted chocolate. Add half of the whipped cream and mix everything together with folding motion. Fold in the remaining whipped cream and mix well until no white streaks remain. Refrigerate until the cake is cooled completely.
- To assemble the cake, slice the cakes horizontally into two equal layers, using a long serrated knife. If your cakes got a small hump as pictured, just slice it off.
- Put the first cake layer into a springform pan and spread about a little less than 1/3 of the mousse filling. Then put the next layer of the cake and spread the mousse and so on until the cake is built. Make sure to leave a bit of mousse to cover the top of the cake. A very thin layer of mousse on top is all you need. Refrigerate the cake for at least 2 hours or overnight.
- Once the cake is cooled, make the chocolate ganache. In a small saucepan, bring heavy cream to a simmer. Do not boil. Pour hot cream over chocolate chips, and let it sit for good 2 minutes. Then mix well until smooth for couple minutes. Stir in butter to add some shine.
- Remove the springform sides. Pour the ganache over the cake while the ganache is still runny, if you want smooth glaze. Or, you can let it cool and thicken a little bit to spread as a frosting.
⭐️ Did you make this recipe?
Please leave a review and let us know how you liked it!
Tips & Notes
– Store leftover cake covered in the fridge for up to 5 days.
– I don’t recommend freezing this recipe as it’s likely to become soggy once thawed!
Nutrition
This recipe was originally published on March 7th, 2014.


This is my favorite chocolate cake I’ve made it for my birthday for two years in a row! Great recipe! Thank you!
Oh my, so happy you love this recipe. It’s truly delicious and one of my absolute favorite too. Thanks for your feedback, Laura!
This is my all time favorite chocolate cake, frosting is just so heavenly. My question is, is this cake freezer friendly? With holidays being such a busy season, I’m looking for desserts i can bake ahead of time
Hi, Faith. So happy that this cake has become your favorite!! Unfortunately, this frosting is not suitable for freezing.
Have been making the recipe for 8 years now. Not the sponge – use the cake mix. But the mousse – the best thing ever, easy to make and is so delicious!!
Yay, so happy you love this mousse filling. It’s truly my favorite too! Thank you for your feedback, Kristina!!
My family doesn’t like Nutella. Do I have to use it or can I substitute it?
You can just omit it and/or increase the chocolate chips by 1/4 cup. Hope you enjoy, Vanessa. Let us know how it turns out.
hello,
I would like to ask you to replace in this recipes the water with milk? cause when I prepare the cake in general I use likuide milk or yogurt ,(Albanian yogurt prepared by myself,cause I’m from Albania) . thnks
Can you freeze this cake?
Yes, you can.
Does the recipe not have butter?
Hi, Bianca. No butter in the cake.
Thank you for sharing this recipe. Works perfectly. I made it using traditional flours but I will try making the vegan version for a friend.
My family says it’s a winner!!
This cake recipe is the best chocolate cake I have ever had. Super easy and fun to make! Delish!
So happy to read this, Kim! Thank you for your feedback!