
This stunning, yet easy pineapple layer cake is perfect for any summer celebration! Super tender cake with burst of pineapple in every bite!
And it’s surprisingly simple to make.
Why you’ll love this cake recipe:
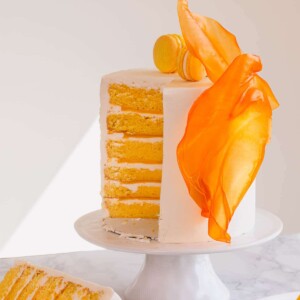
I get it, your first thought, when you look at this beautiful cake, is pure doubt. You’re thinking there’s no way that you can make something like that in your own kitchen, right?
Well, let me tell you that even though this pineapple cake recipe seems overwhelming, it’s quite simple and your friends and family are going to love it and beg you to make more!
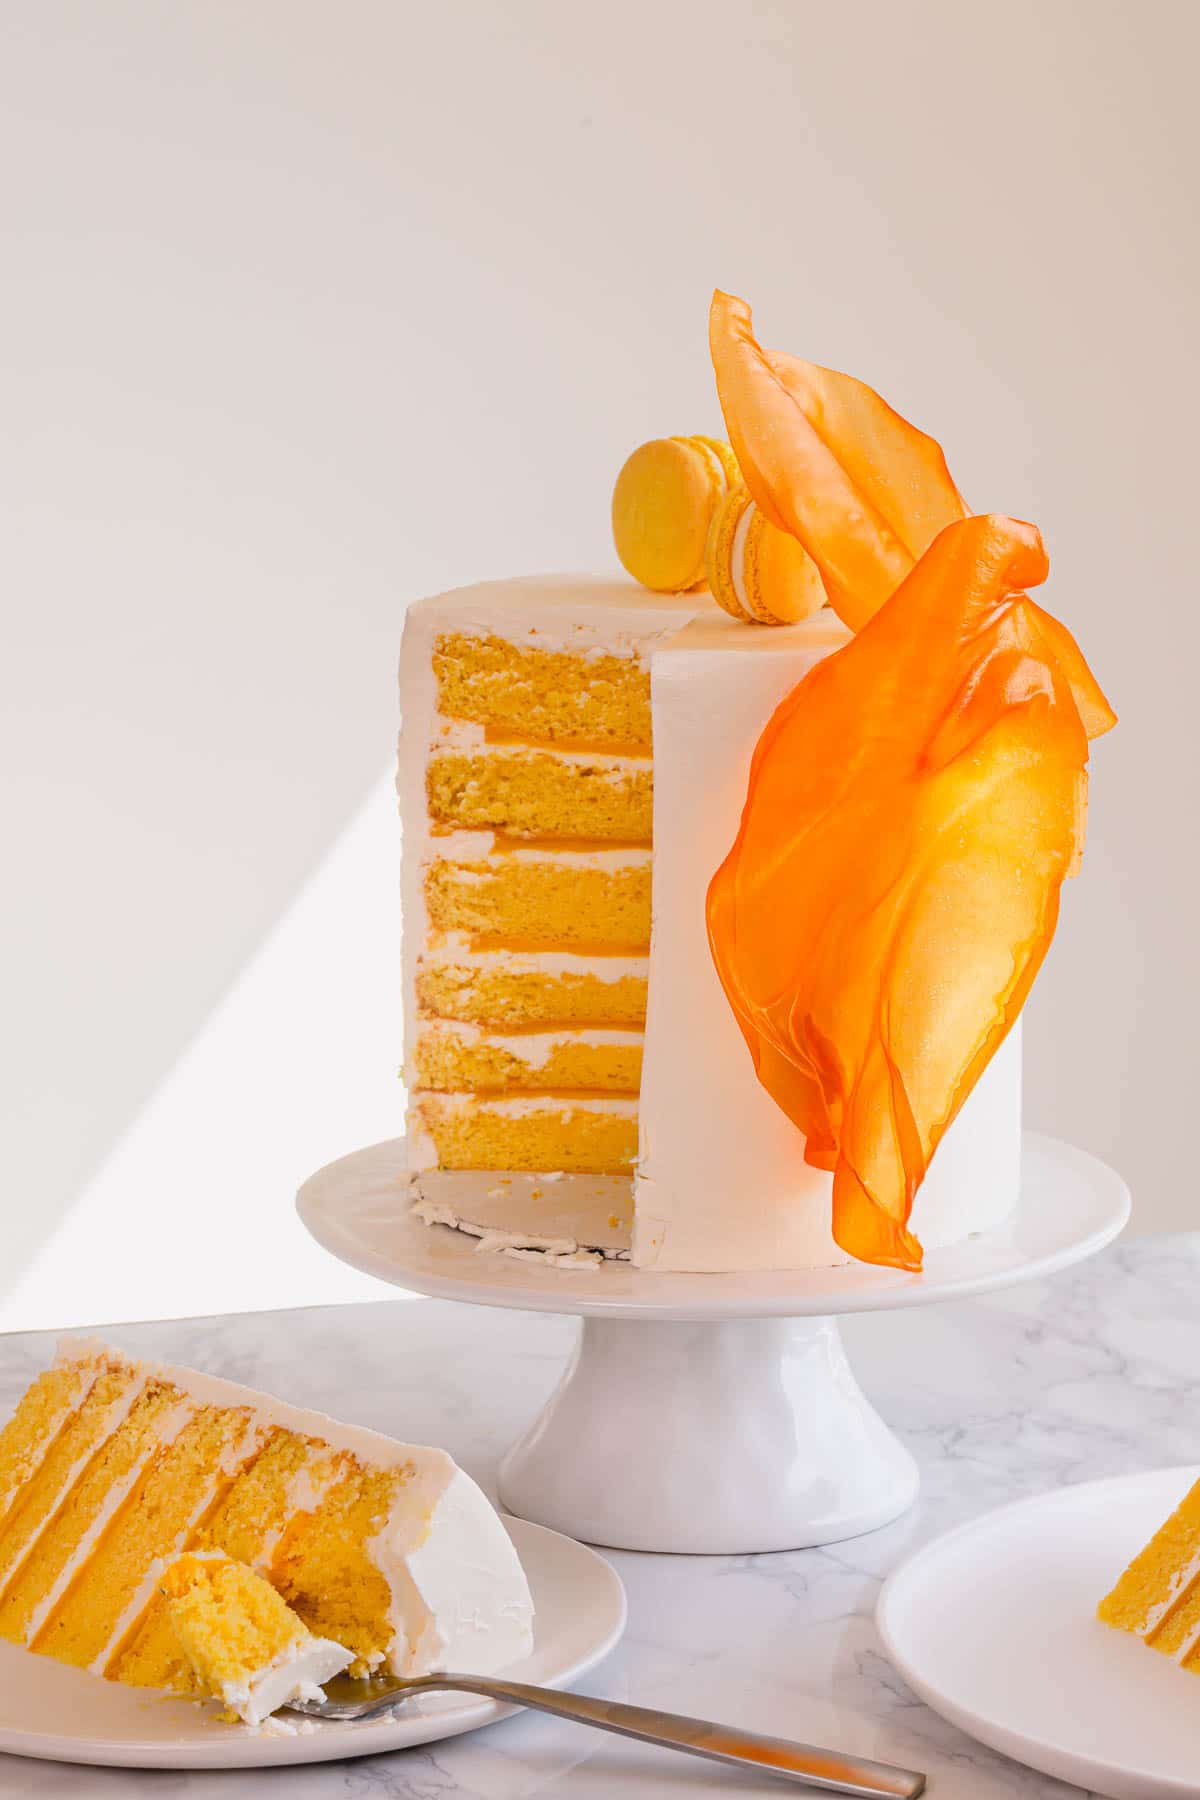
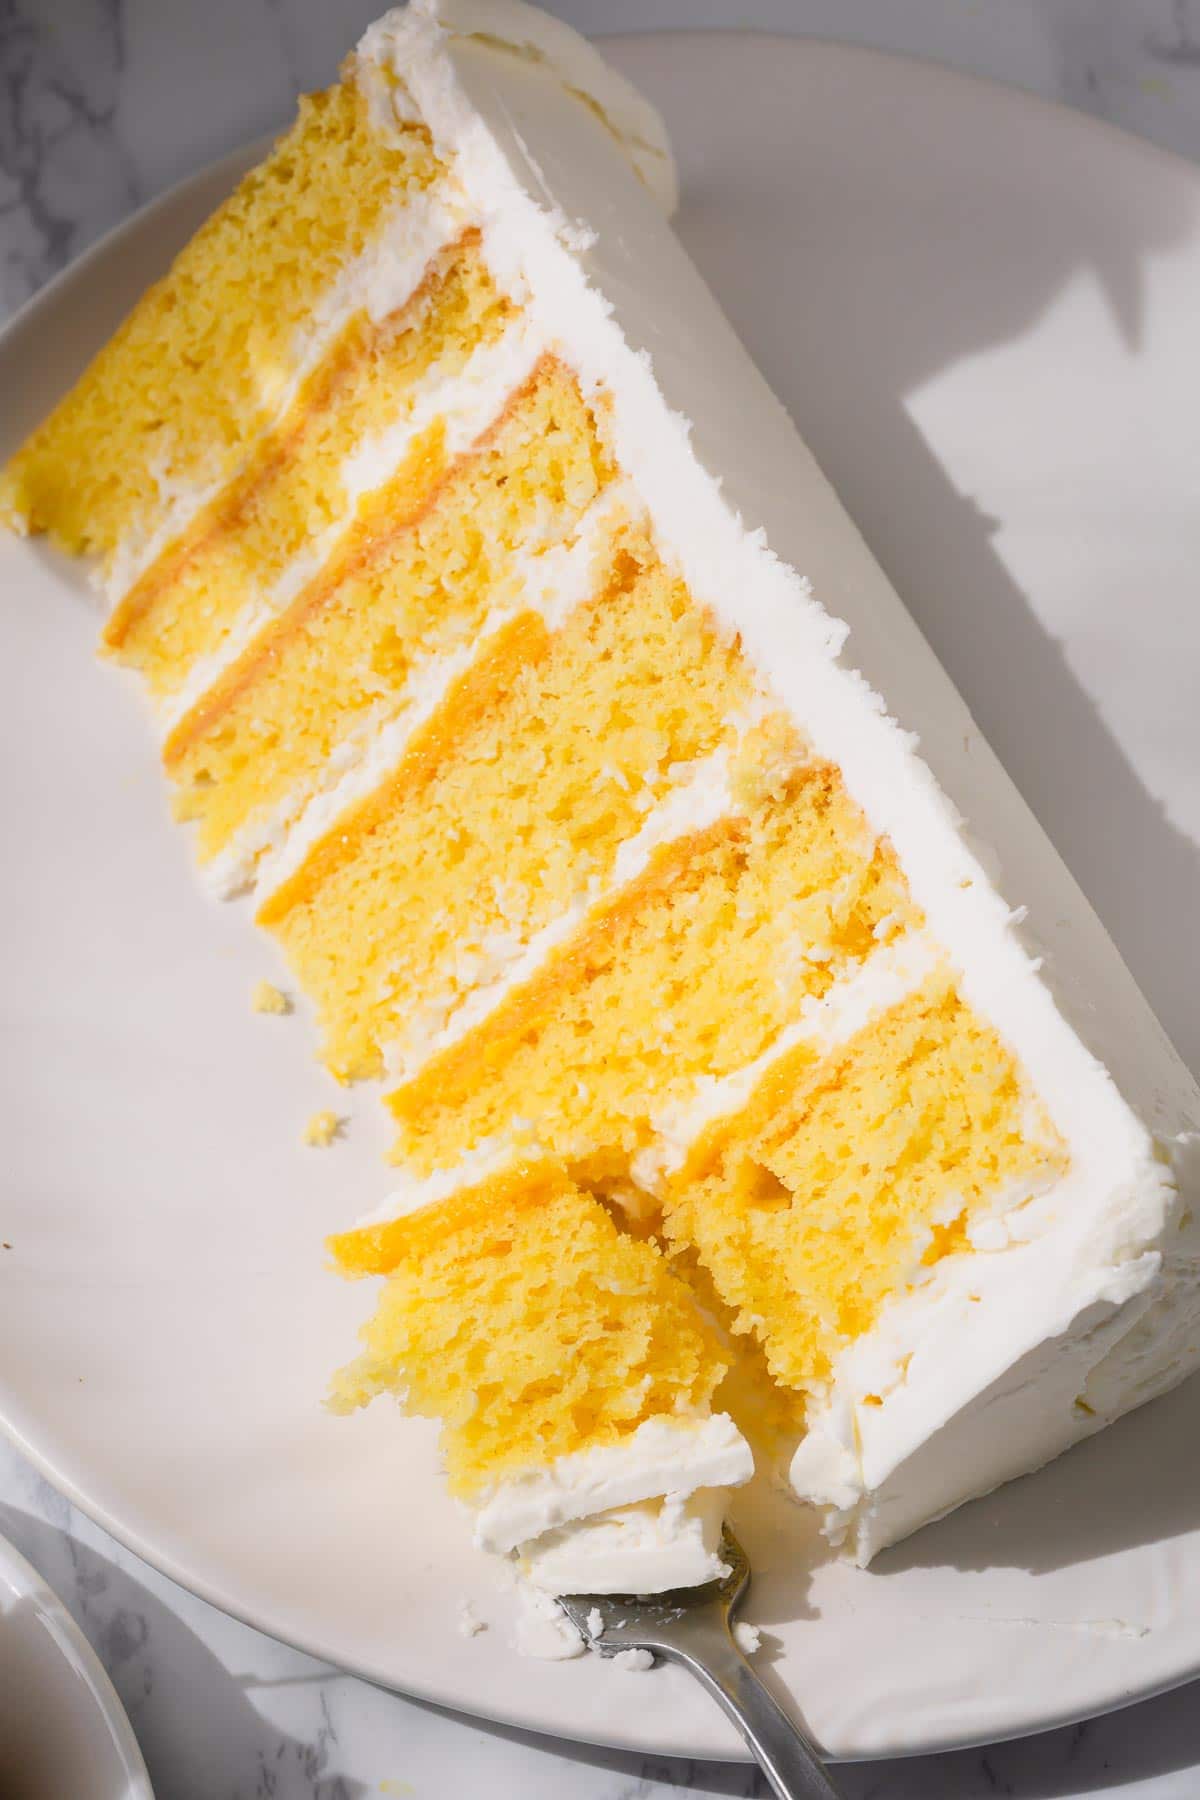
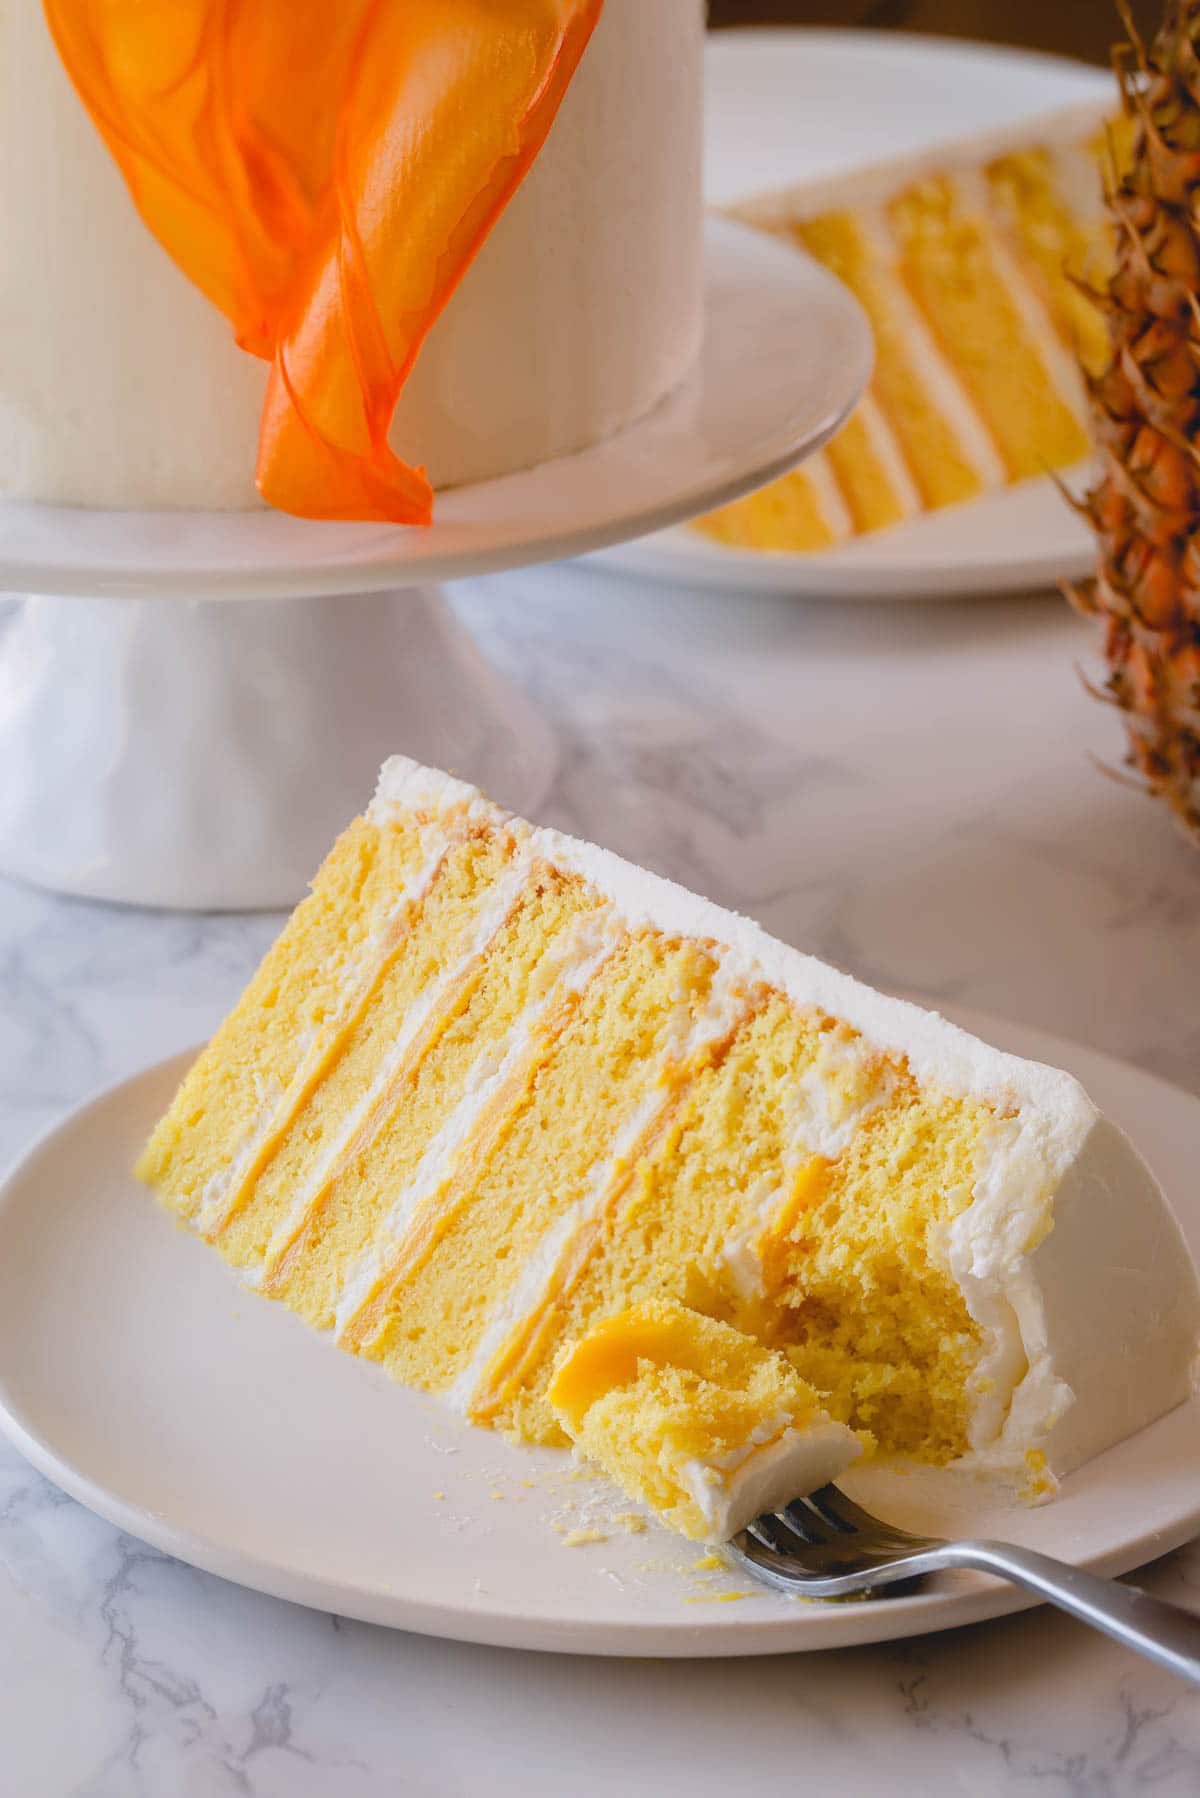
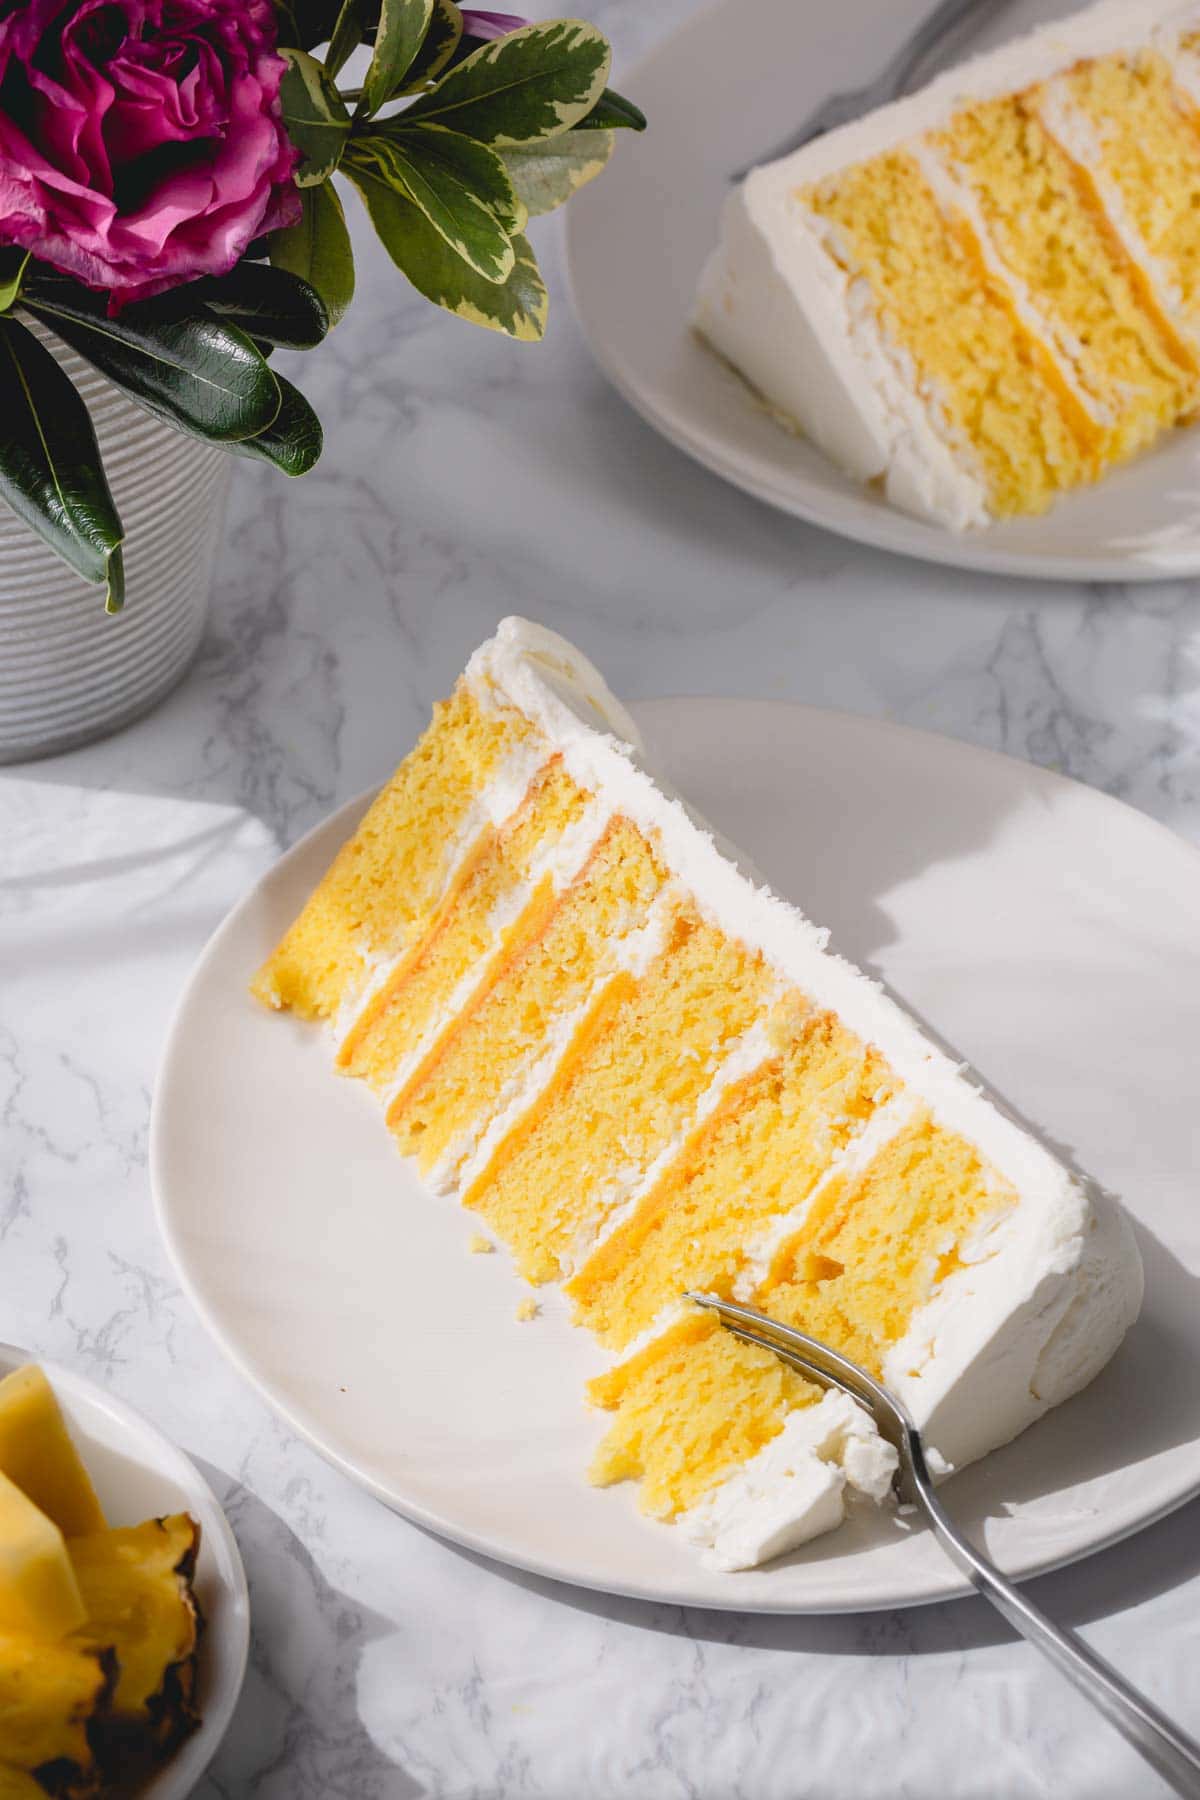
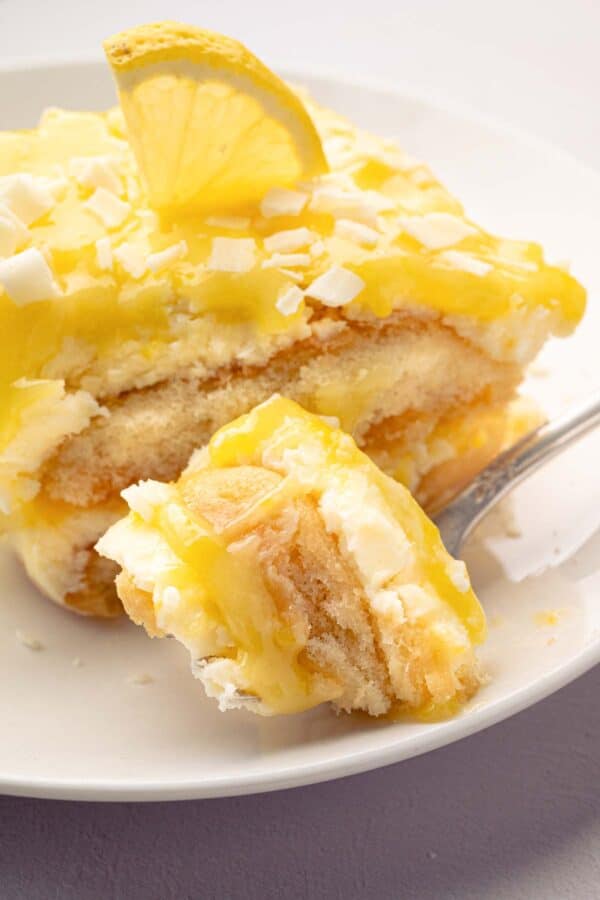
This pineapple cake is the perfect cake for any summer celebrations. Each sponge cake layers are soaked with pineapple juice, then filled with bright and flavorful pineapple curd and tangy cream cheese frosting! The combination of sweet and tangy is out of this world.
Then we finish it off with a coat of Swiss meringue buttercream for a flawlessly smooth finish! Don’t worry, I’ll show you how to frost this tall cake like a pro with 10 easy tips below.
4 Components of this cake:
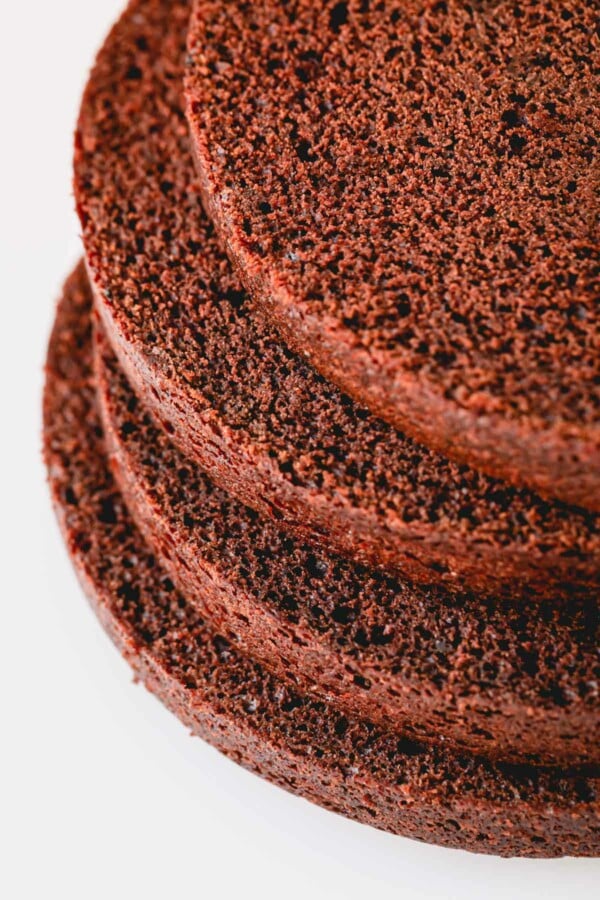
Simple sponge cake
A light & airy sponge cake is a perfect base for this recipe. I’ve already shared a detailed step-by-step tutorial of this 3-ingredient sponge cake in a dedicated post, so I won’t repeat myself here.
Pineapple curd
This pineapple curd is what gives this cake its beautiful and refreshing pineapple flavor. I teach you exactly how to make it in the recipe card below.
Cream cheese frosting
Sweet and tangy cream cheese frosting pairs beautifully with sponge cake and pineapple curd. Check out my ultimate cream cheese frosting recipe for more detailed tutorial.
Swiss meringue buttercream
Swiss meringue buttercream gives this beautiful cake a flawless finish, thanks to its super sturdy texture! It’s an ideal frosting for cake decorating and in my opinion, when it comes to taste and texture, nothing beats it!
How to Assemble a Layer Cake:
Once you have all 4 components of the cake ready to go, it’s actually pretty simple to assemble it.
3 Tips Before Starting:
- Bake the sponge cakes at least a day in advance. Slicing a day old cake is much easier, as it becomes sturdier and less fragile.
- Use piping bag for fillings and frostings. It’s much faster and easier to fill the layers!
- The following tools will make the process so much more enjoyable: a cake turntable, offset spatula, cake scraper, disposable piping bags.
Tip
I like my cake layers to be no thicker than 1-inch, that way it’s easy soak them with pineapple juice for melt-in-your-mouth texture.
How to assemble the cake
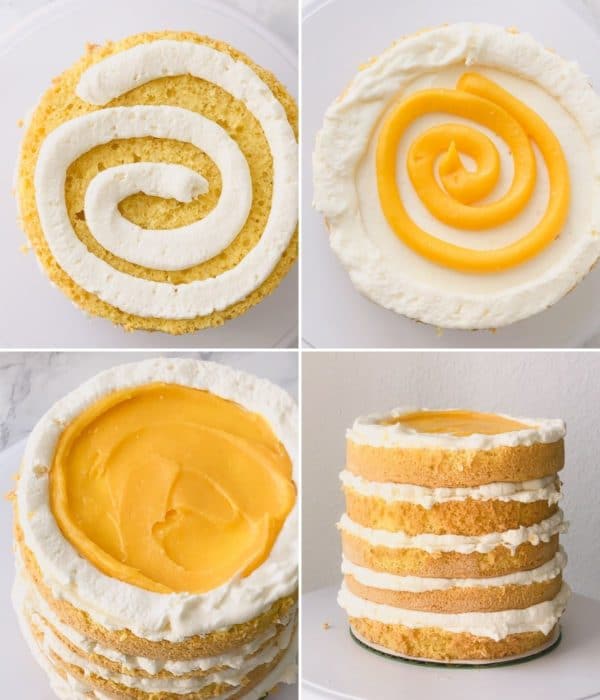
- First layer: sponge cake.
- Then generously drizzle pineapple juice all over the cake layer.
- Then spread cream cheese frosting evenly, followed by a dollop of pineapple curd. TIP: Pipe a border with cream cheese frosting to create a well for the curd.
- Place the next cake layer and repeat the process until you run out of ingredients.
Tip
When layering each cake layer, pay extra attention on stacking them straight on top of each other to create perfectly straight cake.
Don’t overcomplicate it though. It doesn’t have to be fancy. In the end, it’s all going to taste amazing!
How to Frost a Tall Cake:
I know it can be intimidating to frost a tall cake, but I’ve shared 10 tips (plus a BONUS tip) on how to frost a tall cake like a pro in the video below. It’s way more efficient to show you than to describe it with works.
Make-Ahead Tips:
Each component of this cake can be prepared in advance. In fact, I highly recommend to break this project up over a few days, so you won’t get overwhelmed to make everything in one day!
Plus, the assembled cake can be frozen as well!! How amazing is that?
- Sponge cake can be made up to 1 month in advance. Wrap the cakes with plastic wrap and place them in a freezer bag. Refrigerate for up to 1 week, or freeze for up to 1 month.
- Pineapple curd can be made up to 1 week in advance. Store in the fridge. You can also freeze it for up to 1 month in an airtight container.
- Cream cheese frosting also can be prepared in advance. Refrigerate it in an airtight container for up to 3 days, or freeze it for up to 3 months.
- Swiss meringue buttercream freezes well too! Store it in the fridge for up to 2 weeks, or freeze it for up to 3 months.
Hope you’ll try this pineapple layer cake recipe, and please let me know if you do!
Pineapple Layer Cake
Ingredients
Sponge Cake:
- 6 large eggs at room temperature
- 1 cup (200g) granulated sugar divided Note 1
- 1 ½ cups (180g) plain cake flour
- ½ teaspoon salt optional
- 1 ½ cups canned pineapple juice
Pineapple Curd:
- 1 cup (240ml) canned pineapple juice Note 2
- 2 large eggs
- 2 large egg yolks
- ½ cup sugar
- 2 tablespoons cornstarch
- 5 tablespoons (70g) unsalted butter cubed and softened
Cream Cheese Frosting:
- 8 oz cream cheese at room temperature
- ¼ cup unsalted butter at room temperature
- 2 cups powdered sugar
- 1 teaspoon pure vanilla extract or vanilla bean paste
- 1/8 teaspoon coarse kosher salt
Vanilla Swiss Meringue Buttercream:
- 6 egg whites Note 3
- 1 ½ cups (300g) granulated sugar
- ½ teaspoon coarse kosher salt
- 1 ½ cups (340g) unsalted butter softened and cubed Note 4
- 1 vanilla bean split and scraped or 1 teaspoon vanilla bean paste
Instructions
To make sponge cake:
- Preheat the oven to 350°F (177°C). Line three 6-inch cake pans with parchment paper on the bottom. No need to grease the pans.
- Separate egg whites and yolks, making sure not even a little bit of egg yolk gets into the whites. (TIP: It's easier to separate an egg when it’s cold right out of the fridge.)
- In another mixing bowl with whisk attachment, beat egg whites at medium low speed until foamy. Add ½ cup of sugar 1 tablespoon at a time and continue to whisk until stiff peaks, gradually increasing the speed to medium high, 7-10 minutes.
- In a mixing bowl with a whisk attachment, whisk together egg yolks and the remaining ½ cup of sugar until pale and tripled in volume, about 5 minutes.
- Using a spatula, add 1/3 of the whipped egg whites into the egg yolk mixture and gently fold until mostly smooth. Add the remaining egg whites and gently fold until smooth.
- Sift flour and salt into the egg mixture and gently fold the batter until all the flour is evenly incorporated.
- Evenly divide the batter into the prepared pans and smooth the top. Tap the pans a few times on the counter and then run a butter knife through the batter to remove any trapped air pockets.
- Bake the cakes until inserted toothpick comes out clean, 25-30 minutes. Don’t open the oven for at least the first 20 minutes!
- Let the cake cool for 5 minutes in the pan. When the pan is cool to touch, run a knife around the edges of the pan and invert onto a cooling rack. Peel off the parchment paper and cool the cake completely. Once cooled, wrap with plastic wrap and refrigerate, preferably overnight. It'll be easier to slice when the cake is thoroughly chilled.
To make pineapple curd:
- Pour pineapple juice in a medium saucepan and cook it over medium high heat for about 15 minutes to reduce down to ¼ cup.
- In a small bowl, whisk eggs and egg yolks.
- To temper the eggs, slowly pour the reduced pineapple juice into the eggs while whisking constantly.
- Now transfer the mixture back into the saucepan and add sugar and cornstarch.
- Reduce the heat to medium and cook the mixture, stirring constantly, for about 8-10 minutes, or until thickened.
- Remove from heat and stir in butter.
- Place a fine mesh sieve over a medium bowl and pour in the curd.
- Cover the curd with a plastic wrap to contact to prevent skin forming. Refrigerate until cooled completely, about 2 hours, or up to 1 week.
To make cream cheese frosting:
- In a mixing bowl with paddle attachment, beat cream cheese and butter on medium high speed until fluffy, about 1 minute.
- Add powdered sugar and beat on low speed for a minute. Then increase the speed to medium high and continue to beat until smooth and fluffy, about 3 minutes.
- Stir in vanilla extract and salt. Whip again until incorporated, about 30 seconds.
- Keep cream cheese frosting in an airtight container in the fridge for up to 3 days, or freeze for up to 3 months. Re-whip before using. To thaw frozen frosting, transfer into the fridge and thaw it overnight.
To make Swiss meringue buttercream frosting:
- In a small saucepan, bring a small amount of water to a boil. Reduce the heat to simmer.
- In medium heatproof bowl (I used my stand mixer bowl), whisk together egg whites and sugar and place it over the saucepan with simmering water. (This is a makeshift double boiler. Make sure the bottom of the top bowl doesn’t touch the water.)
- Cook the egg white mixture until sugar is completely melted and it reaches 160°F (70°C) stirring continuously, about 5 minutes. (This's my favorite thermometer!)
- Now, remove the bowl with egg white mixture from heat. Then whisk it on medium speed for a minute, and then slowly increase the speed to medium high and beat until stiff peaks form and the mixture is cool to touch, about 10 minutes. (It may take longer with a hand-mixer.)
- Once the meringue reached stiff peaks, scrape the side of the bowl with a spatula and add salt.
- Turn on the mixer on medium speed and start adding butter, one tablespoon at a time. Make sure the butter is fully incorporated before adding the next piece. (NOTE: It's normal if buttercream starts to curdle half way. Just keep adding the butter!)
- Keep whisking the buttercream until smooth, light and fluffy, about 10 minutes.
- Now, switch to a paddle attachment and add vanilla bean. Beat the buttercream until well combined, about a minute.
To assemble the cake:
- Slice each sponge cake horizontally into 1-inch thick cake layers. (I use this Wilton cake leveler.)
- Place a 6-inch cake board on a platter and smear a tablespoon or so frosting in the middle.
- Place the first layer of cake and generously drizzle about 4 tablespoons of pineapple juice all over the cake.
- Then spread about ¼ cup of cream cheese frosting all over the cake layer. And pipe a border around the edges with cream cheese frosting.
- Spread ¼ cup of pineapple curd in the middle.
- And place the next cake layer and repeat the frosting and filling layers until all the cake layers are stacked. Make sure each layer is stacked straight up. And refrigerate the cake if you feel like frosting is getting too soft and cake is sliding. Sometimes it could happen if it’s too hot and if you take too long to assemble the cake.
- Using the remaining cream cheese frosting, crumb coat the cake all around. Just a thin layer of frosting is all you need for crumb coating. Refrigerate the cake for at least1 hour to set, or overnight.
- Once the cake is chilled and pretty solid, frost the cake with Swiss meringue buttercream. I like to put the frosting in a piping bag and pipe around the cake and on top. And smooth the sides of the cake using a tall cake scraper. The finish smoothing the frosting on top with an offset spatula.
- And finish decorating the cake however you like. Chill the cake in the fridge for at least an hour, or until ready to serve.
⭐️ Did you make this recipe?
Please leave a review and let us know how you liked it!
Tips & Notes
• Sponge cake can be made up to 1 month in advance. Wrap the cakes with plastic wrap and place in a freezer bag. Refrigerate for up to 1 week, or freeze for up to 1 month.
• Pineapple curd can be made up to 1 week in advance. Store in the fridge.
• You can store cream cheese frosting in an airtight container in the fridge for up to 3 days, or freeze for up to 3 months. Re-whip before using. To thaw frozen frosting, transfer into the fridge and thaw it overnight.
• Swiss meringue buttercream can be made in advance and frozen for up to 3 months, or refrigerated for up to 2 weeks. Thaw the frozen buttercream on the counter overnight. Whip it before using.
Nutrition


can this cake be store in the freezer after it is fully frosted?
Hi, Maya. Yes, it can be frozen.
I was really excited to try out this recipe, but was left a little disapointed with the outcome. The recipe directions for the most part were easy and straightforward. The only edit I would make is that under Ingredients list for the cake, it says use 1 1/2 c of pineapple juice, however when following directions, it never tells you to add the juice at any stage. The curd was ok, I think that the addition of 2 tbsp of cornstarch gave it dryer texture.
The final cake when they came out were very “bread-y.” There also wasn’t much flavor. I think a different flavoring agent would work better like maybe by adding crushed pinneaple or a thicker concentrate.
Hi, Chris! So sorry the recipe didn’t match your expectations! Thank you so much for your thorough feedback. The pineapple juice is for drizzling the cake layers at the assembling stage. The sponge cake is a dryer cake and really needs a good soak of juice or simple syrup. I think you’d have much better experience if you had drizzled the cake layers with pineapple juice. Again I appreciate your feedback!
The list of ingredients for the cake includes pineapple juice. However, there’s no mention of that in the instructions.
Can I make this cake in a 9×13 pan and bake for about 25-30 min?
Hi, Destiny. Unfortunately, this isn’t an ideal cake for 9×13 pan.
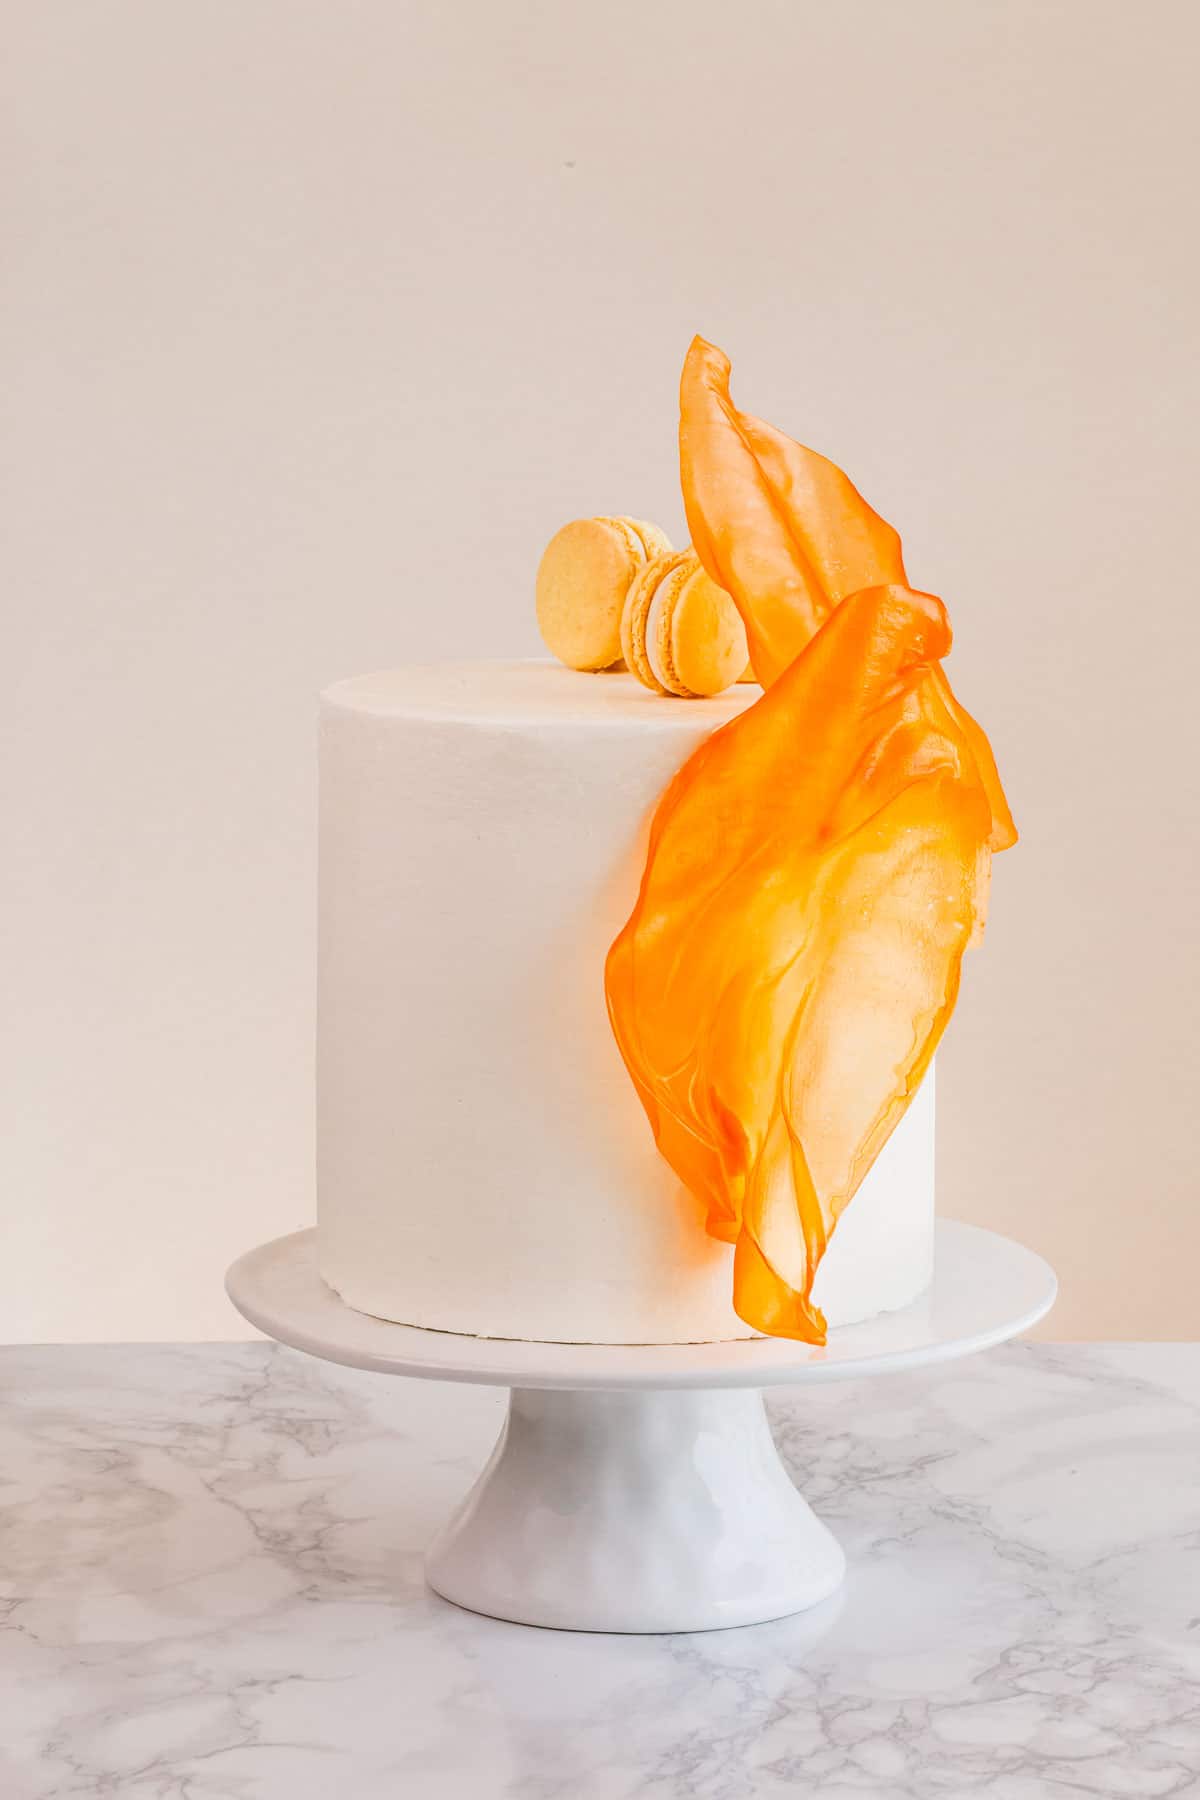
How did you make the decoration on the top?
Hi, Charlie. Those are called rice paper sails. Here’s the tutorial for it. And thank you for asking, I’ll update the post to include this detail.