
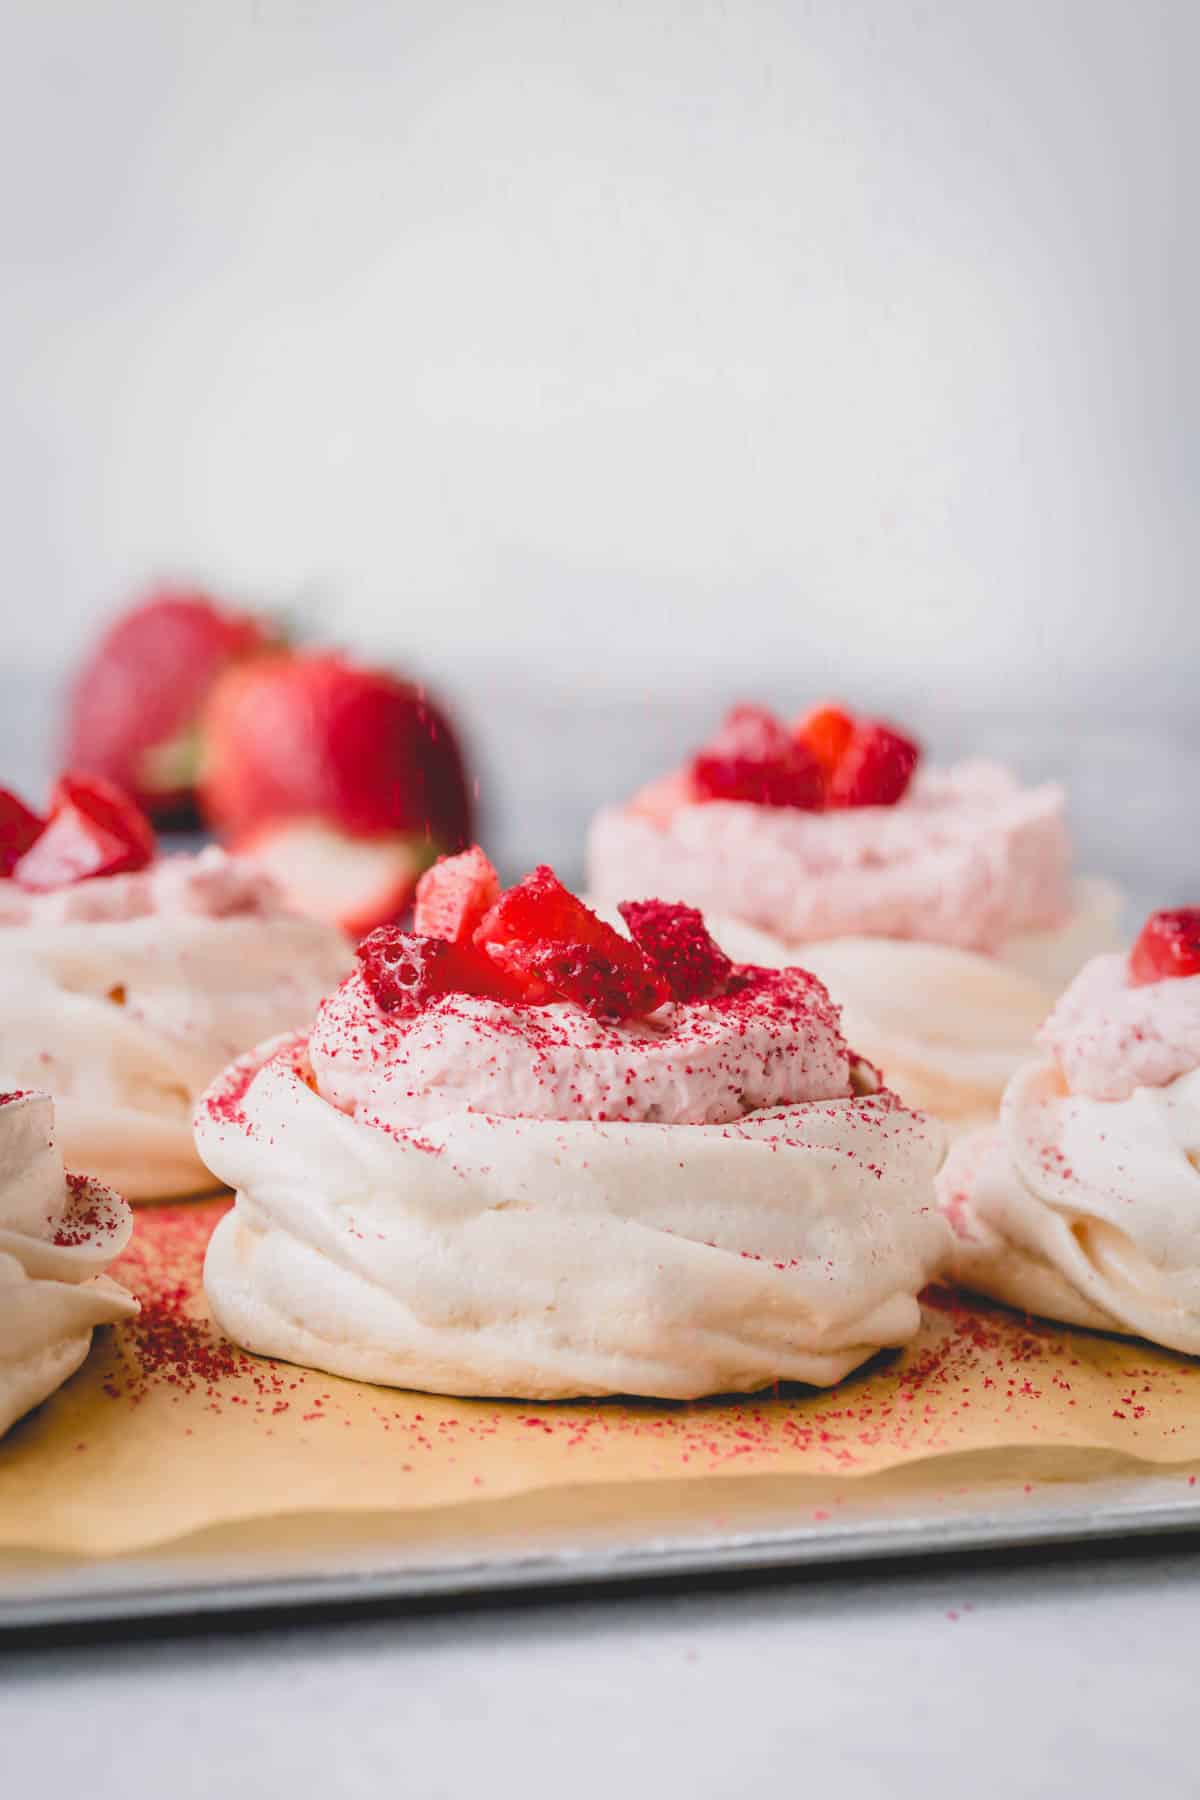
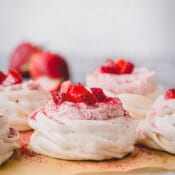
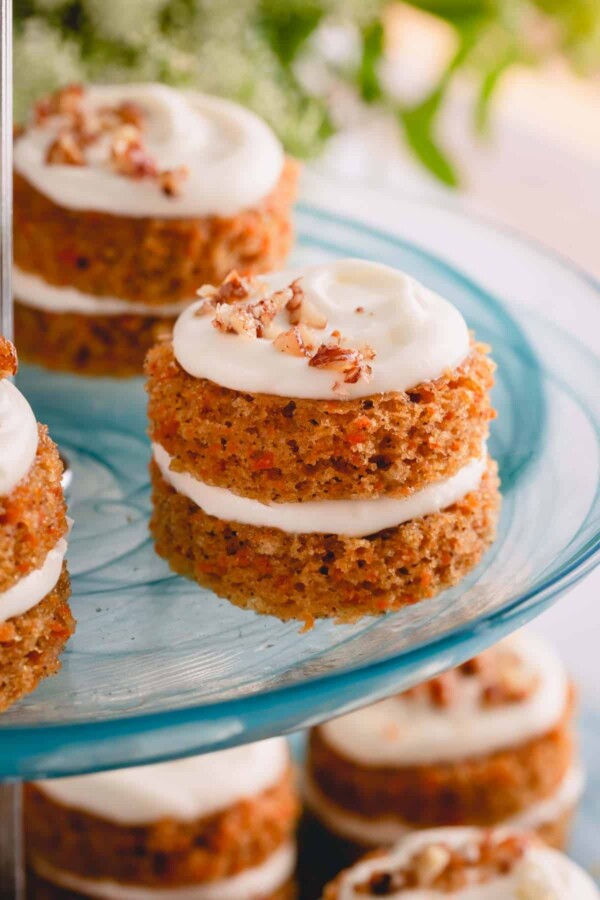
Dreamy, creamy, and oh-so-delicate, this mini Pavlova with fresh strawberries is a light and sweet dessert sure to impress your guests! With my top tips and simple ingredients, you’ll make the perfect Pavlova every time.
What is Pavlova?
Texture is the name of the game when it comes to Pavlova, and these mini strawberry Pavlovas are no exception!
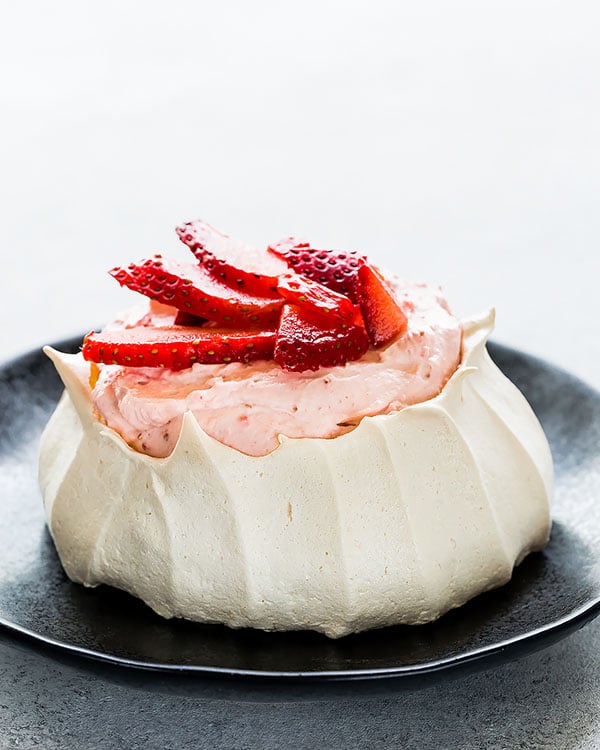
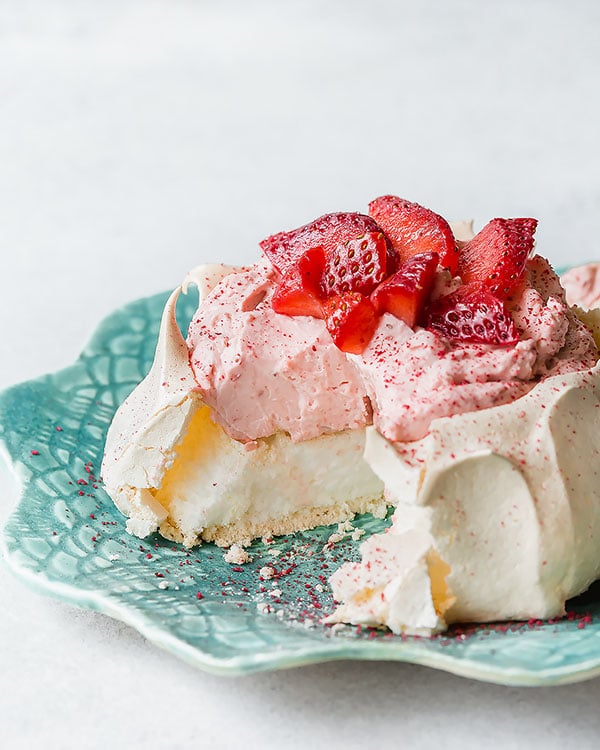
Pavlova is a light and airy meringue-based cake with a soft marshmallowy center and delicately crisp meringue crust on the outside.
They’re topped with sweet whipped cream filling and fresh fruits, making them effortlessly impressive, yet incredibly easy to make.
Why you’ll love mini Pavlovas:
While a large Pavlova cake is grand and impressive, mini Pavlovas are my go-to for a few reasons!
- Quick & easy: Unlike traditional Pavlova cake, mini ones can be ready as little as 2 hours.
- Make-ahead: The desserts are great for preparing in advance and assembling right before serving.
- Versatile: Pavlova has an irresistible charm that makes it perfect for any occasion.
Follow my step-by-step instructions below, and make sure to review my time-tested tips and tricks! Also, check out these delightful raspberry mini Pavlovas.
Key Ingredient Notes
For the mini Pavlovas
- Granulated sugar sweetens the meringue but also plays a major role in stabilizing the egg whites and providing structure. That’s why reducing the sugar isn’t an option! The sugar needs to dissolve into the egg whites. You’ll get the best results using superfine sugar.
- Cornstarch is responsible for giving the Pavlova a soft and fluffy center.
- Egg whites are the most essential ingredient because they form the base of the mini Pavlova cakes. Keep your eggs cold until you’re ready to separate the whites and yolks. Then, follow my tips for handling egg whites below.
- Cream of tartar – This is an optional ingredient. However, I like to add it, because it helps to stabilize the meringue. You can totally omit the cream of tartar if you don’t have it on hand, though!
- Kosher salt – All you need is a pinch to balance the sweetness.
- Pure vanilla extract is added just for flavor! I like to use this homemade vanilla extract.
- White distilled vinegar gives the Pavlova that soft, marshmallow-y texture in the center due to its acidic qualities. Since the cream of tartar is also an acid, you can increase the cream of tartar to 3/4 teaspoon, and use it in place of vinegar if needed.
For the strawberry whipped cream
- Freeze-dried strawberries – Freeze-dried fruits are light, airy, crunchy, and easy to grind into a powder because they have all their water content removed. They keep their color and flavor and have a much longer shelf life than fresh berries.
- Heavy whipping cream – Cold heavy cream straight from the fridge will whip up more quickly. It’s important to use heavy whipping cream or heavy cream because of their high fat content. Half-and-half and whole milk don’t contain enough fat.
- Granulated sugar – To sweeten the whipped cream.
- Fresh strawberries gives each mini Pavlova a fresh, fruity flavor.
How to make mini Pavlova:
Before you get started, preheat your oven to 350°F, and line 2 baking sheets with parchment paper.
1. Make the Pavlova base
- Whisk the cornstarch and sugar in a small bowl, and set it aside.
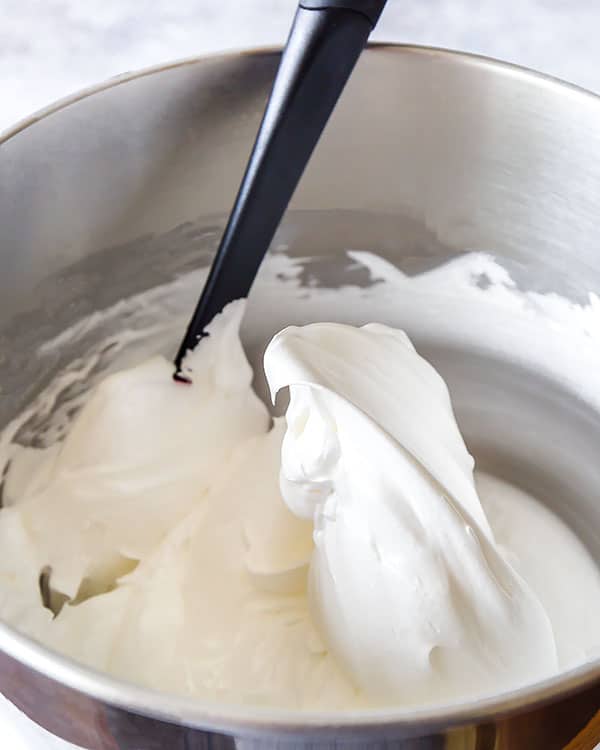
- Add the egg whites to a large, clean mixing bowl fitted with a whisk attachment, and beat until frothy.
- Stir in the cream of tartar and salt, and continue to beat on medium-high speed.
- Add the sugar and cornstarch mixture slowly, 1 tablespoon at a time, while the mixer is still running on medium-high speed.
- Increase the mixer speed to high, and continue beating the egg whites until stiff peaks form. At this point, the mixture should look smooth and shiny.
- Pour the vanilla extract and white distilled vinegar into the egg white mixture, and using a spatula, gently fold it to combine.
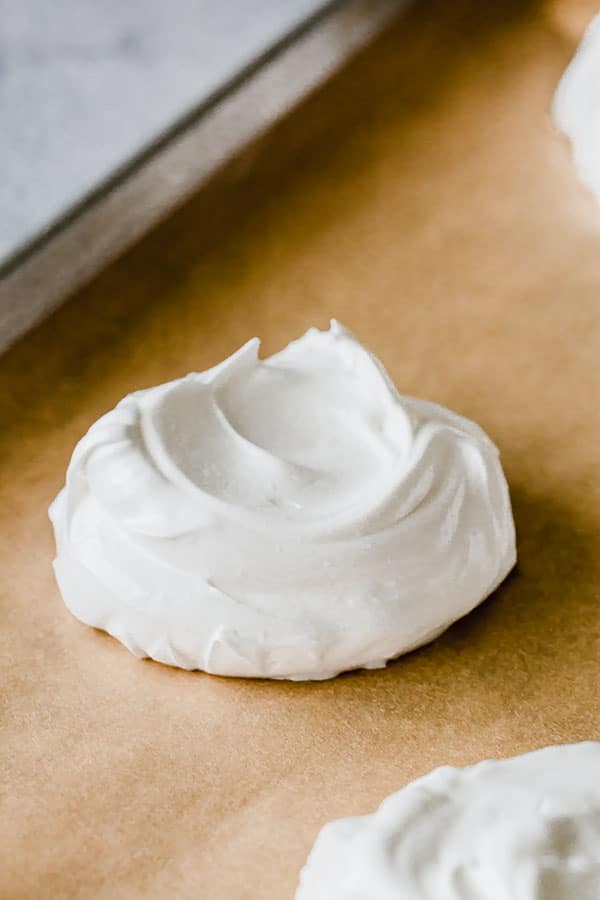
2. Form the mini Pavlova
- Spoon the batter into 8 rounds on the prepared baking sheets. I like to use a large cookie scoop for uniform Pavlovas. (2 scoops per Pavlova.)
- Use the back of your spoon to make a shallow well in the center of each round.
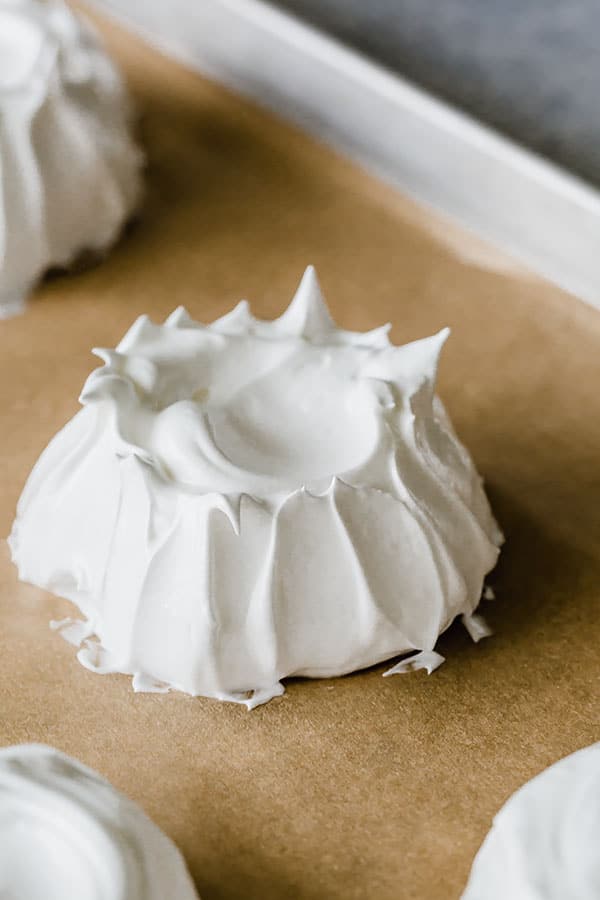
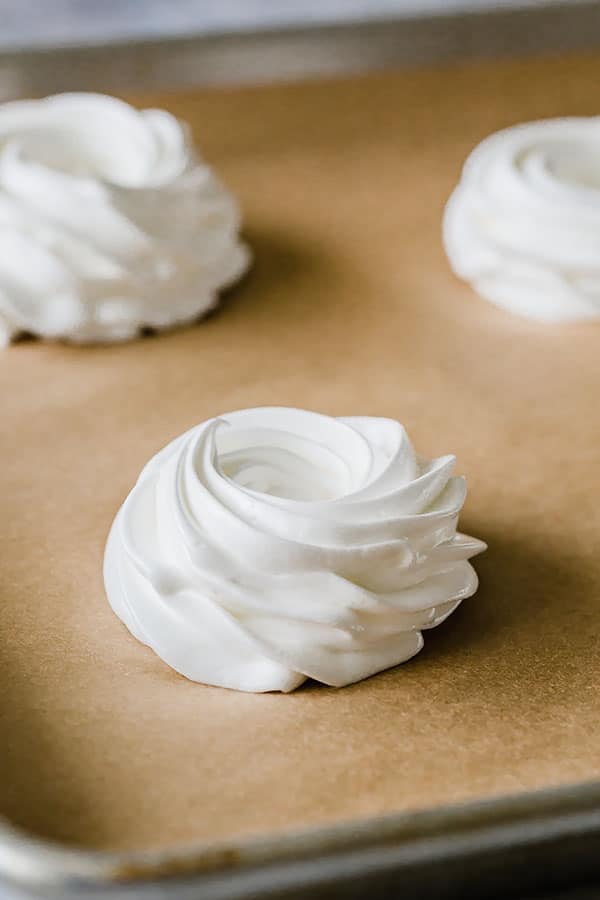
Bakery-worthy appearance
For a more stunning and delicate appearance, you can add a decorative design by swiping up the sides of the meringue with a back of the spatula, as pictured below on the left.
Or pipe the Pavlova batter into nests, as pictured below on the right, using a piping bag fitted with a decorative tip (I used a Wilton 1M tip).
If your parchment paper moves around while you’re forming the rounds, glue it down using a dab of meringue batter under each corner.
3. Bake
- Place the baking sheets in the oven, and immediately decrease the oven temperature to 300°F.
- Bake for 30 minutes.
- Then, turn the oven off, crack open the oven door, and let the mini Pavlova cool for at least an hour while still in the oven with the door ajar.
4. Make the strawberry whipped cream filling
- Make strawberry powder:
- Crush the freeze-dried strawberries into a powder using a small food processor.
- Set aside 1 tablespoon of the strawberry powder to dust over the finished Pavlovas.
Skip the food processor
You can place the freeze-dried berries between 2 pieces of parchment paper, or in a freezer bag. Then, crush them using a rolling pin. Keep rolling over the berries until they’ve turned into a fine powder.
- Make the whipped cream:
- Pour cold heavy cream into a large mixing bowl.
- Beat the cream on low speed until it starts to thicken.
- Add the sugar and strawberry powder, and mix on medium speed for 1-2 minutes.
- Increase the speed, and mix until stiff peaks form. Don’t over-mix! Overmixing will turn the mixture into sweet butter.
5. Assemble the mini Pavlova treats
- Fill each mini Pavlova with strawberry whipped cream filling, and top them with freshly chopped strawberries.
- Dust with the reserved strawberry powder.
Tips for Handling Egg Whites:
The egg whites are the main ingredient, and they can make or break the Pavlova recipe. Therefore, it’s crucial that you handle them with care and follow my advice below!
- It’s easier to separate egg whites while the eggs are cold from the fridge. However, room-temperature egg whites whip up bigger and better. So, separate the egg whites as soon as you bring them out of the fridge. Then, let them sit on the counter for about 30 minutes.
- Egg whites don’t like grease or fat. So, make sure your bowl and whisk are nice and clean. Otherwise, the egg whites won’t whip properly.
- Stainless steel or glass bowls are the best because plastic bowls tend to absorb fat and grease.
- Be careful when separating the whites and yolks. Egg whites simply don’t whip into fluffy meringue with stiff peaks when they’ve been in contact with fat or egg yolk. That’s why I can’t stress this enough!
Tips for Success:
- An electric mixer is a must because egg whites take a while to form into hard peaks. A stand mixer will make the process easier, but a handheld mixer is okay, too.
- Line your baking sheets with parchment paper or silicone mats so the mini Pavlovas don’t stick.
- Space them out on the baking sheets, because they will spread a little.
- Low and slow baking is essential. That’s why I preheat the oven to 350°F first and reduce the heat to 300°F later. That initial high temperature helps the cake to shape without spreading too much and creates a better (stronger) crust. Just don’t forget to reduce the heat as you put the cake in the oven!
- Humidity is the enemy of baked Pavlova! That’s why you need to assemble the cakes right before serving or serve them within 2 hours without refrigerating. When refrigerated, Pavlova loses its delicate crispness and becomes gummy. If you live in a humid climate, keep the baked Pavlova in the oven overnight or until you’re ready to assemble.
- A flat spatula/turner is the best tool for transfering the baked Pavlovas to a serving platter.

Make-Ahead Tips:
Pavlova is not a last-minute dessert, because it requires slow baking and even slower cooling time. That’s what makes it a perfect make-ahead dessert for any special occasion! I usually make mine at night after dinner, which is another bonus for hot summer days when you don’t want to turn on the oven during the heat of the day.
- You can prepare the Pavlova base and strawberry whipped cream filling 1-2 days in advance.
- Store the Pavlova base at room temperature, away from any humidity. I like to keep them in the cooled oven.
- Store the whipped cream filling in an airtight container in the refrigerator.
- When you’re ready to assemble the mini Pavlovas, let the filling come to room temperature for about 30 minutes first. If the frosting is too stiff, re-whip it with 2-3 tablespoons of fresh heavy whipping cream until it’s nice and fluffy again.
- Pavlova is best when it’s assembled right before serving.
- Consume the assembled Pavlova within 2 hours.
Storing Tips:
Assembled Pavlova doesn’t keep well, because the whipped cream filling softens the Pavlova base as it sits, making it sticky and gummy. So, it’s best to enjoy them immediately after adding the topping and strawberries!
Leave the mini Pavlova in the cooled oven while you prepare the strawberry whipped cream filling. Alternatively, you can store the Pavlova in an airtight container at room temperature until you’re ready to assemble at a later time.
Pavlova FAQs:
Both meringue and Pavlova are made primarily with whipped egg whites, but they differ in texture. For instance, meringue has a dry, crisp texture throughout. Meanwhile, Pavlova has crisp edges and a soft, marshmallow-like center.
Pavlova is a delicate, lightly sweetened meringue-like dessert topped with fluffy whipped topping and fresh fruit. It has crisp edges and a soft, pillowy center.
Think twice before trashing those leftover egg yolks! Use them to make homemade vanilla ice cream, homemade vanilla pudding, all-butter pie crust, egg yolk cookies, or classic crème brûlée.
More Meringue Recipes:

Strawberry Mini Pavlova
Ingredients
For mini Pavlovas:
- 1 cup (200 g) granulated sugar
- 2 tablespoons (16 g) cornstarch
- 4 (140 g) egg whites
- ¼ teaspoon cream of tartar optional
- ¼ teaspoon kosher salt
- ½ teaspoon pure vanilla extract
- 1 teaspoon white distilled vinegar
For Strawberry Whipped Cream:
- 1 cup (20 g) freeze-dried strawberries
- 1 cup (240 ml) heavy whipping cream cold
- 2 tablespoons (30 g) granulated sugar
- Fresh strawberries chopped, for topping
Instructions
- To make the Pavlova base, preheat the oven to 350°F (177°C). Line 2 baking sheets with parchment paper.
- In a small bowl, whisk together sugar and cornstarch. Set aside.1 cup granulated sugar, 2 tablespoons cornstarch
- In a large clean mixing bowl with whisk attachment, or using handheld electric mixer, beat the egg whites until frothy.4 egg whites
- Stir in cream of tartar and salt and continue to beat on medium high speed. (Cream of tartar is optional here, it stabilizes the egg whites and helps to whip bigger and better.)¼ teaspoon cream of tartar, ¼ teaspoon kosher salt
- Add sugar/cornstarch mixture one tablespoon at a time, while mixer is running on medium high speed. Increase the speed to high and continue to beat the egg whites until hard peaks form. The mixture will look smooth and shiny.
- Add vanilla extract and white distilled vinegar, and gently fold the mixture with a spatula.½ teaspoon pure vanilla extract, 1 teaspoon white distilled vinegar
- Spoon the batter into 8 rounds on the prepared baking sheets. Make a shallow well in the center of each round. (TIP: Take a little bit of meringue batter and smear under 4 corners of the parchment paper, so it doesn’t move.) Alternatively, you can put the batter into a piping bag with decorative tip (I used Wilton 1M tip.) and pipe the nests instead.
- Place the baking sheets in the oven and immediately turn the oven temperature down to 300°F (150°C).
- Bake for 30 minutes. And then turn the oven off and let it cool for at least an hour with oven door ajar. Store cooled mini Pavlovas in air tight container at room temperature, or in the cooled oven until ready to assemble.
- To make the strawberry whipped cream filling, run the freeze-dried strawberries in a small food processor until powder. Or you can place the fruits in between 2 parchment paper sheets, and roll with a rolling pin until fine powder. Reserve a tablespoon or so of strawberry powder for dusting.
- Pour cold heavy whipping cream in a mixing bowl.1 cup heavy whipping cream
- Beat the cream on low speed (speed 2 or 4 on stand mixer) until slightly thickens.
- Add sugar and prepared strawberry powder. Continue to mix on medium speed (speed 4) for a minute or two. You can increase the speed to 6 on stand mixer until the mixture reaches hard peaks. Keep a close eye on it, you don’t want to over-beat it, or it’ll turn into sweet butter.2 tablespoons granulated sugar
- To assemble the treats, fill the Pavlovas with strawberry whipped cream filling and top with fresh strawberries. If desired, dust the assembled Pavlovas with reserved strawberry powder. Serve immediately, or within 2 hours.Fresh strawberries
⭐️ Did you make this recipe?
Please leave a review and let us know how you liked it!
Tips & Notes
– You can prepare Pavlova base and whipped cream frosting 1-2 days in advance, but store them separately.
– Keep Pavlova base at room temperature, away from humidity. Store the strawberry whipped cream frosting, covered, in the fridge.
– When ready to assemble, bring out the frosting 30 minutes prior to assembling. If the frosting is too stiff, whip it with 2-3 tablespoons of fresh heavy whipping cream until nice and fluffy. Egg Yolk Recipes: With leftover egg yolks, you can make rich homemade ice cream, homemade pudding, all-butter pie crusts, egg yolk cookies, and/or crème brûlée.
Nutrition
This recipe was originally shared on June 6th, 2018.


I’m allergic to corn and potato. Do you know if I can use Arrowroot or Tapioca starch as a substitute for the corn starch? Thanks.
Hi, Lorene. Unfortunately, I’ve never tested this recipe with arrowroot or tapioca.
Hi! Can I make these a day in advance?
Hi, Hannah. Yes, you can. Keep the meringue base in the cooled oven away from moisture. And assemble right before serving.
After some failed attempts with other mini pavlova recipes, this recipe worked amazing for me! SO THANK YOU! You rock. I do, however, have a few questions to keep perfecting this:
(1) Why use regular granulated sugar here as opposed to bakers or superfine sugar? I found my meringue to still have sugar crystals by the time I piped it in (but feared keep whisking it for too long).
(2) I loved the texture and crunch of my meringue a few hours after baking, but leaving in the oven overnight and using midday the next day resulted in a very CHEWY, GUMMY meringue. Any suggestions for a better storage method?
(3) Can I make smaller meringue cookies with this batter?
Hi, Diego. Thank you for your comment and feedback. So happy my recipe worked for you. So, I need to update my recipe to specify on granulated sugar. My granulated sugar is pretty fine, even though it doesn’t have any label that it’s super fine, or caster, so I assumed all granulated sugar is fine like that. Thanks for the note.
As for gummy meringue, pavlova turn gummy and soft when they’re exposed to moisture/humidity. So place them in the coolest and driest place you can find. As for meringue cookies, this won’t be ideal batter, because you want your meringue cookies dry and crisp all the way inside. Here’s my meringue cookie recipe: https://www.sweetandsavorybyshinee.com/french-meringue-meringue-mushrooms/
This is my go-to pavlova recipe. Turns out perfectly every time but you have to be patient and add the sugar slowly and mix well after in order to dissolve the sugar. If you’re pavlova is grainy you didn’t mix the sugar enough. I’ve made these at least a dozen times and the flavour and texture are amazing.
You’re so right, Cee Dee! Adding sugar slowly is crucial for a perfect Pavlova!!! So happy you keep coming back to my recipe! And thank you so much for your feedback!
This looks AMAZING!!! I will definitely try this at home.
Thank you so much for sharing this refreshing recipe.
Keep sharing:)
Thank you, Chaitali!
Worst pavlova I’ve ever made oversoft, grainy and revolting. Binned the lot, only picked these for a cooking time for minis.
Hi, Paul. So I have no idea how to take your feedback. The last part of your comment completely puzzles me. What do you mean by “only picked these for a cooking time for minis”? Do you mean you made a different recipe and only used the time instruction from my recipe?? If so, how is that a fair rating?? Besides, grainy pavlova indicates that you didn’t properly mix the meringue. It’s very important to add sugar into the egg whites ONE TABLESPOON at a time. This means you add 1 tablespoon of sugar, mix until is fully incorporated and then add the next tablespoon of sugar. This method ensures the sugar dissolves into the meringue. If the sugar is added too quickly, then it doesn’t get a chance to fully dissolve, creating grainy texture and weak meringue. Hope this helps, and you’ll try again!
Made these today for the first time and they came out very soft. Not sure why, since I have made other recipes, but without the vinegar. Could that have something to do with it? Weather today is sunny , warm (but fine in the house) and dry.