My no-fuss, easy sourdough bread recipe is perfect for beginners. This tutorial includes step-by-step photos, detailed instructions and video demo to walk you through the entire process.
What is sourdough bread?
Sourdough is a type of yeast-risen bread made with naturally fermented wild yeast instead of commercial yeast. It has a subtle tang, crackly crust, and soft, chewy interior.
Sourdough bread calls for sourdough starter, a mixture of flour and water left to ferment until active and bubbly. It’s what gives sourdough bread its quintessential tang and chewy texture.
Why you’ll love this recipe:
Sourdough bread baking is a labor of love! It takes time, patience, and finesse to achieve a springy, tangy sourdough loaf.
I’ve removed the guesswork for you with this reliable and thoroughly tested sourdough bread recipe!
- Hassle-free recipe anyone can follow
- Step-by-step instructions with photos
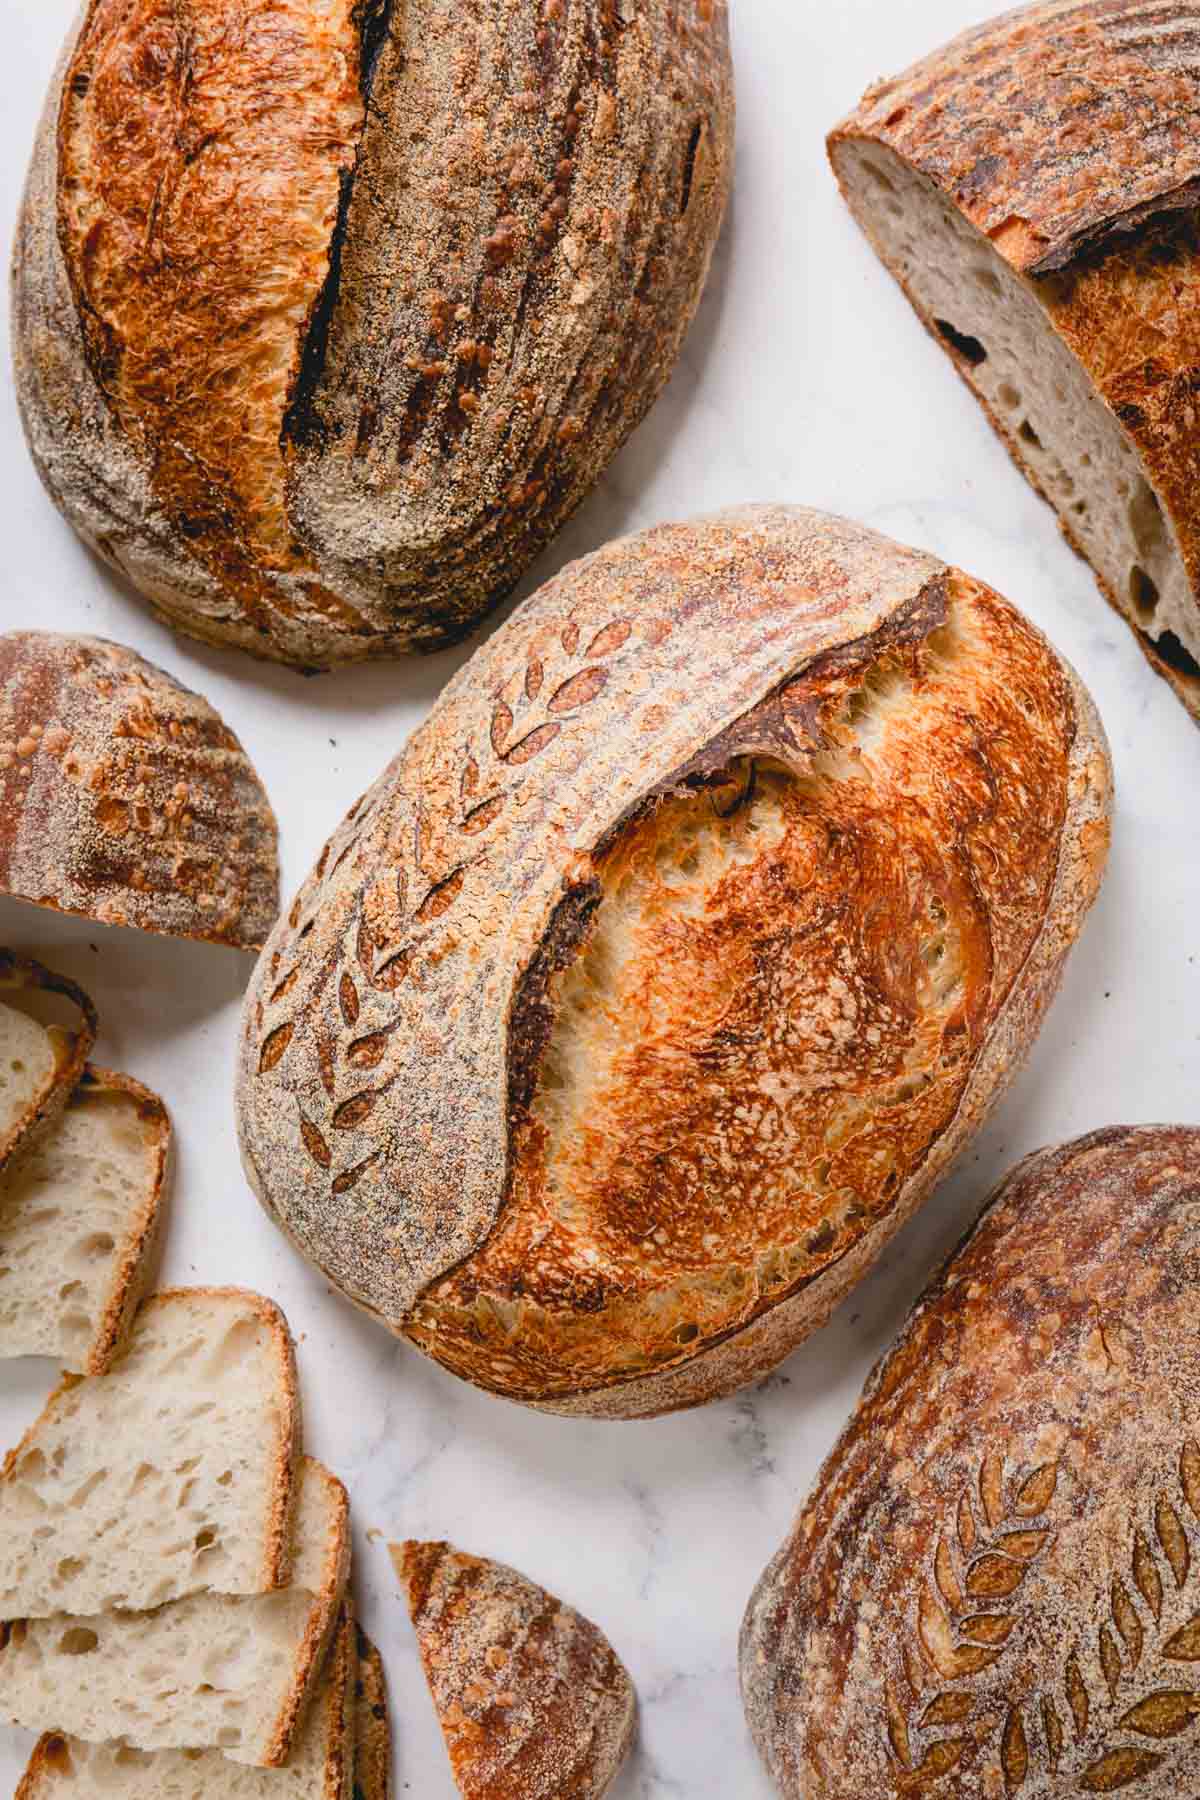
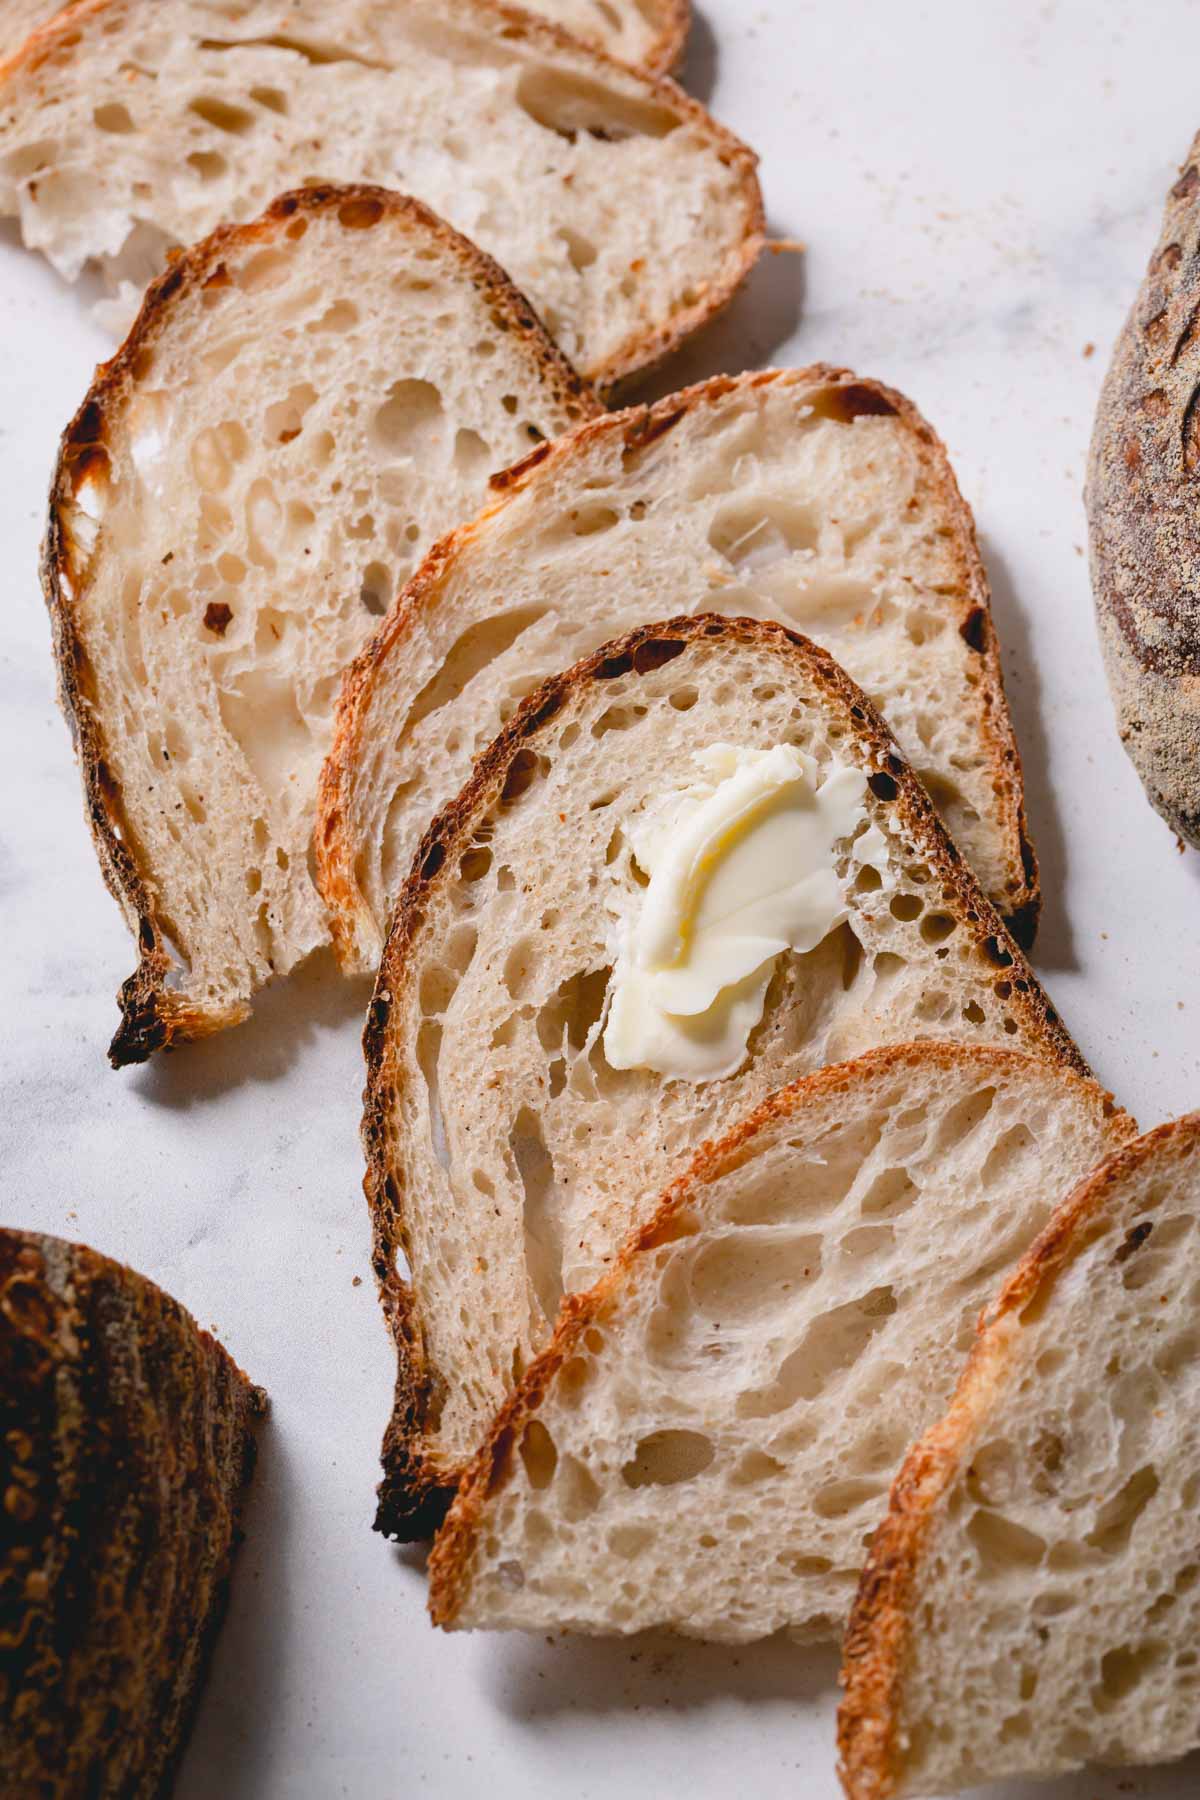
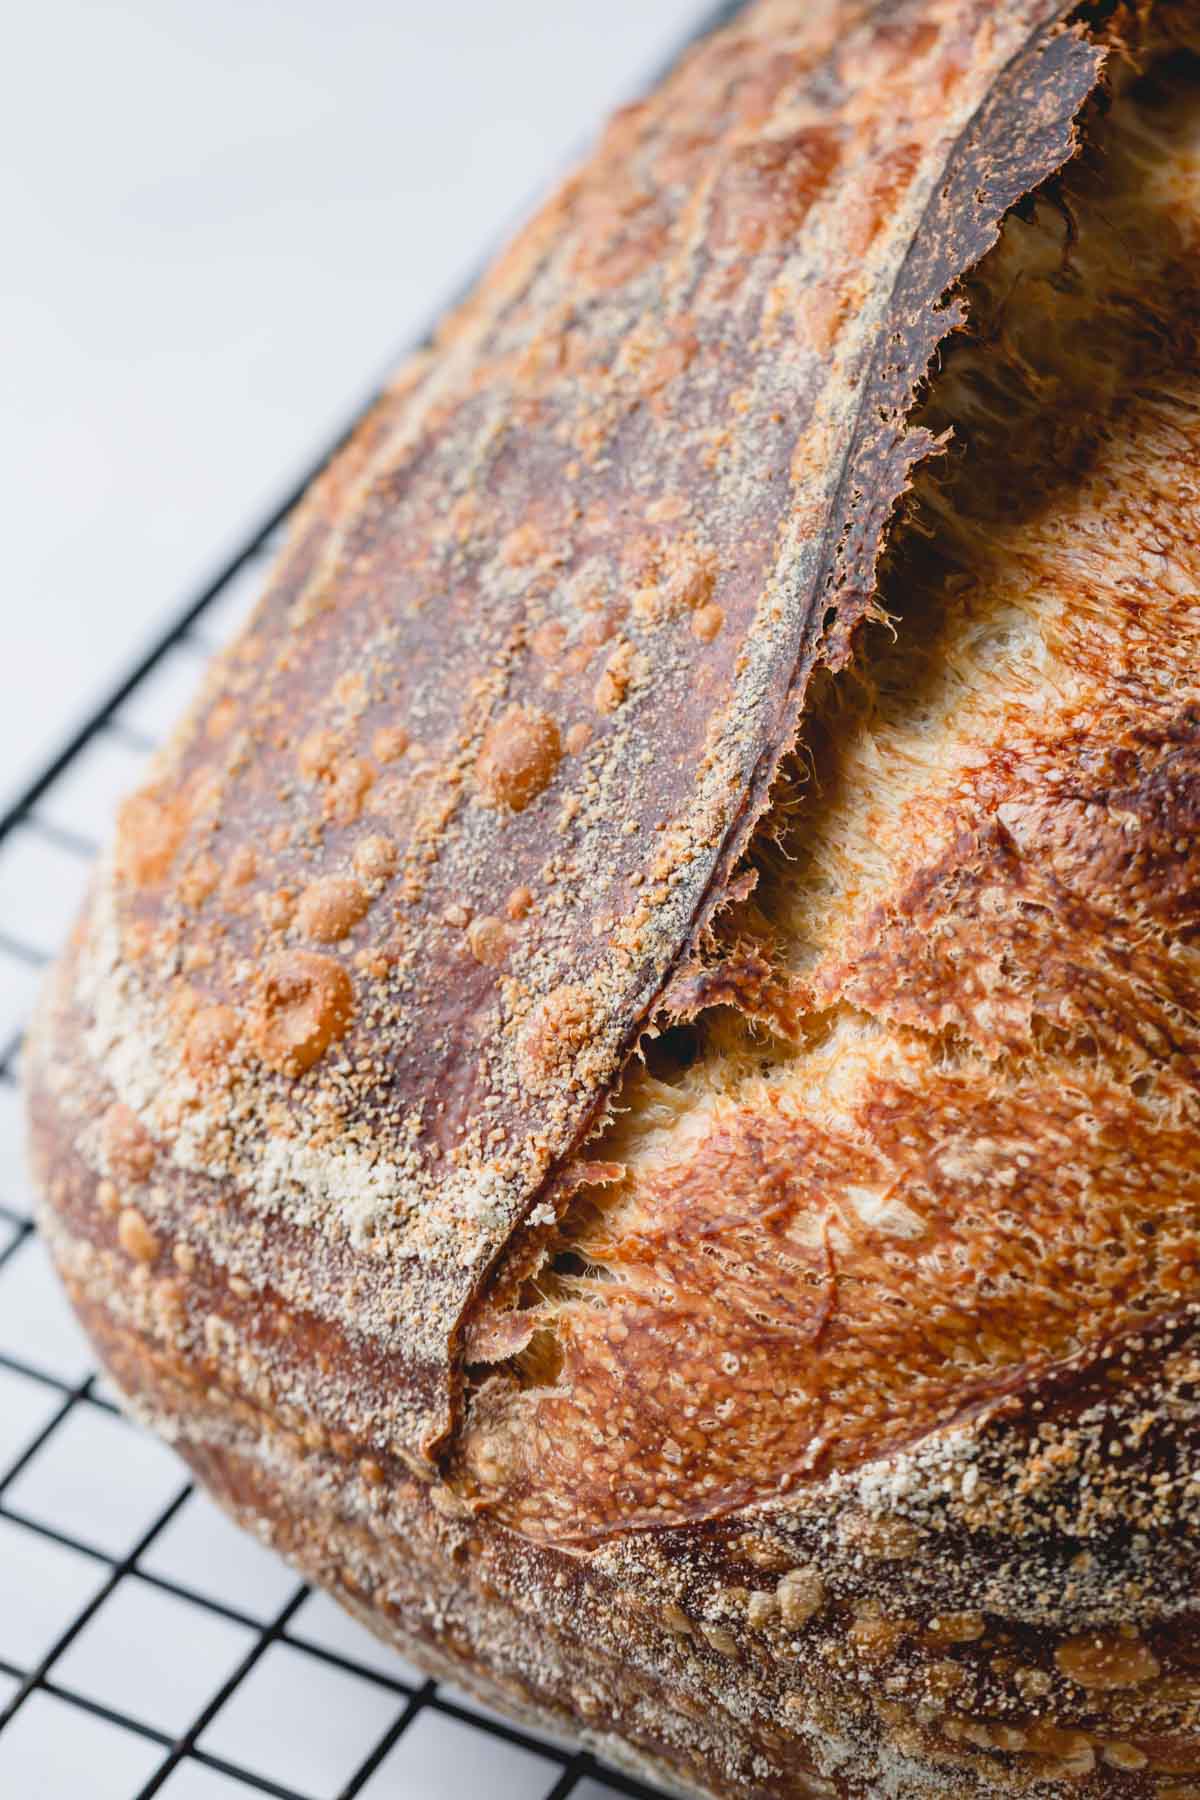
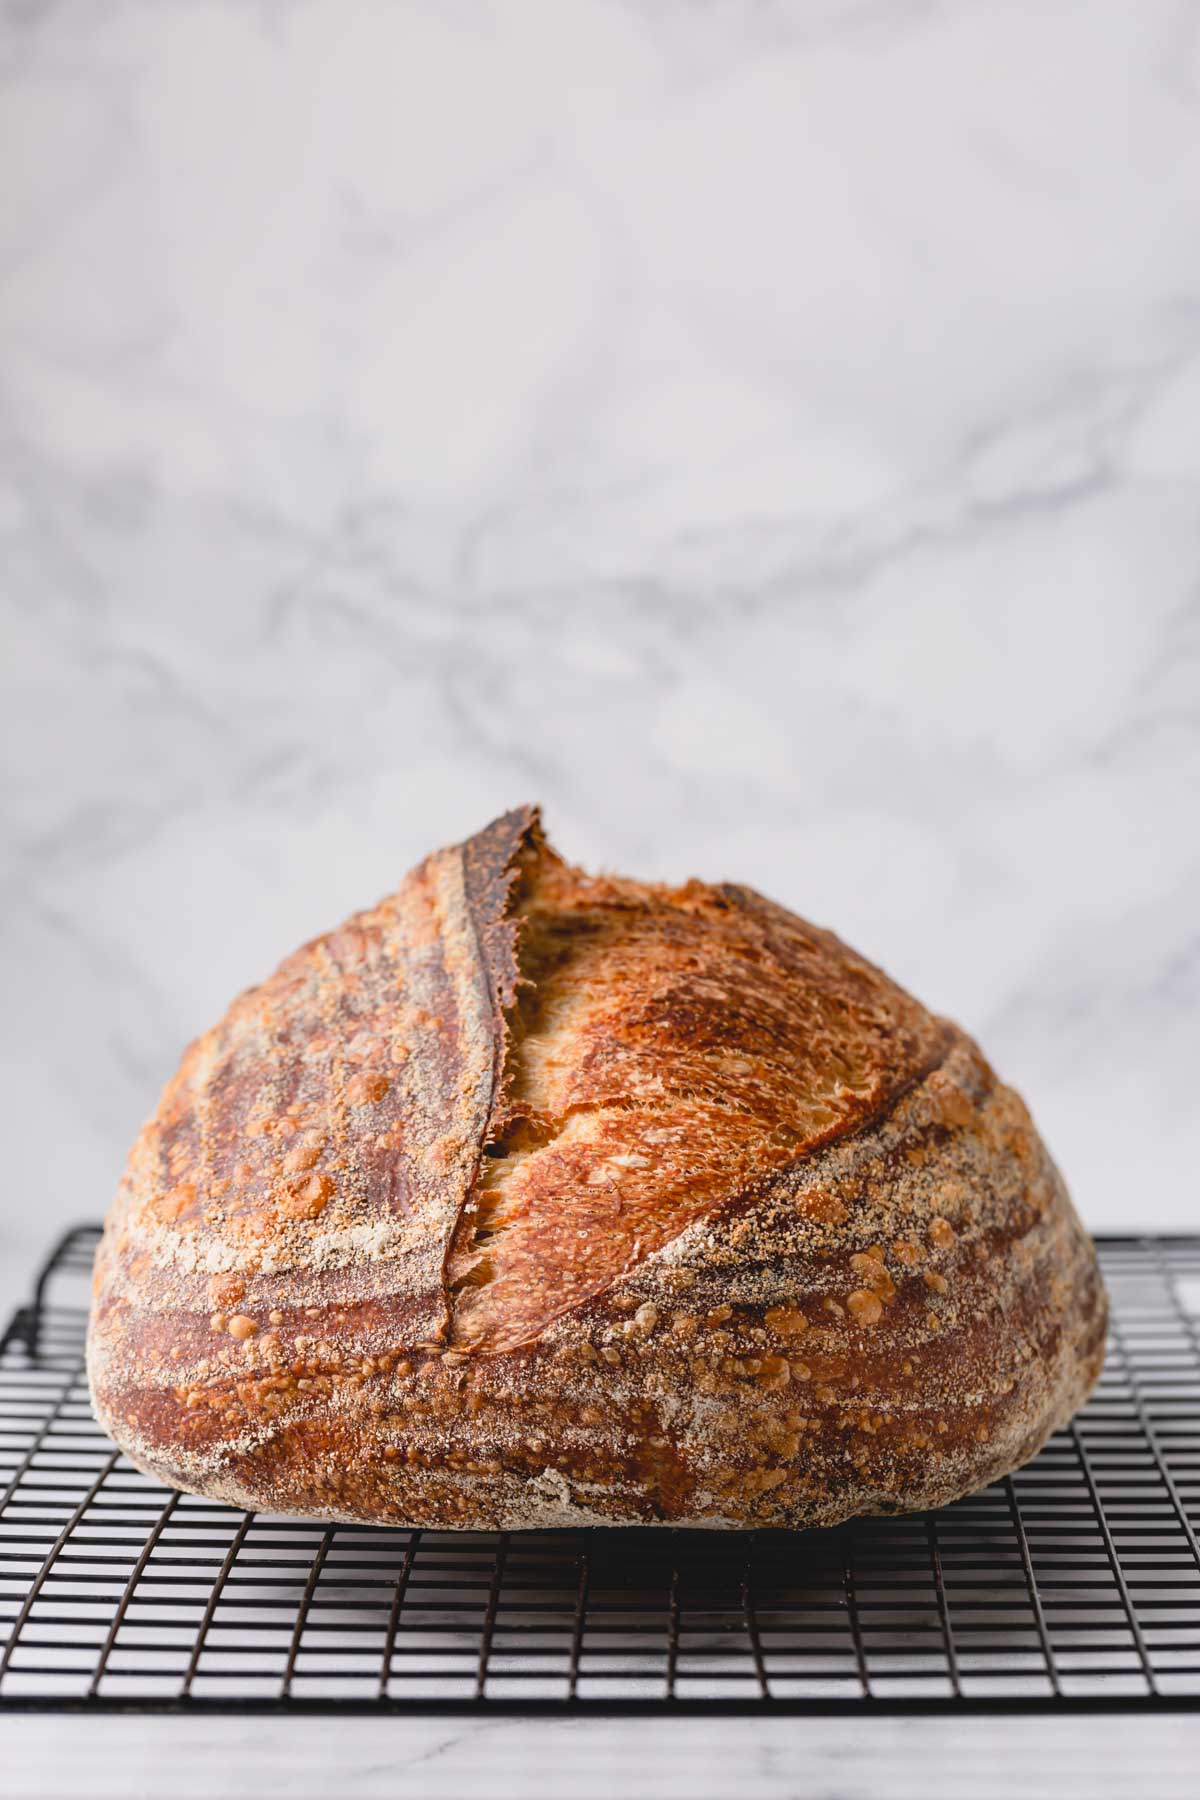
- A golden brown, crispy crust
- An open, lacey crumb
Don’t let homemade sourdough bread intimidate you! If you’re ready to get your feet wet with sourdough, you’re in the right place. The more you handle, knead, proof, and bake with it, the more confidence you will have!
Ingredients:
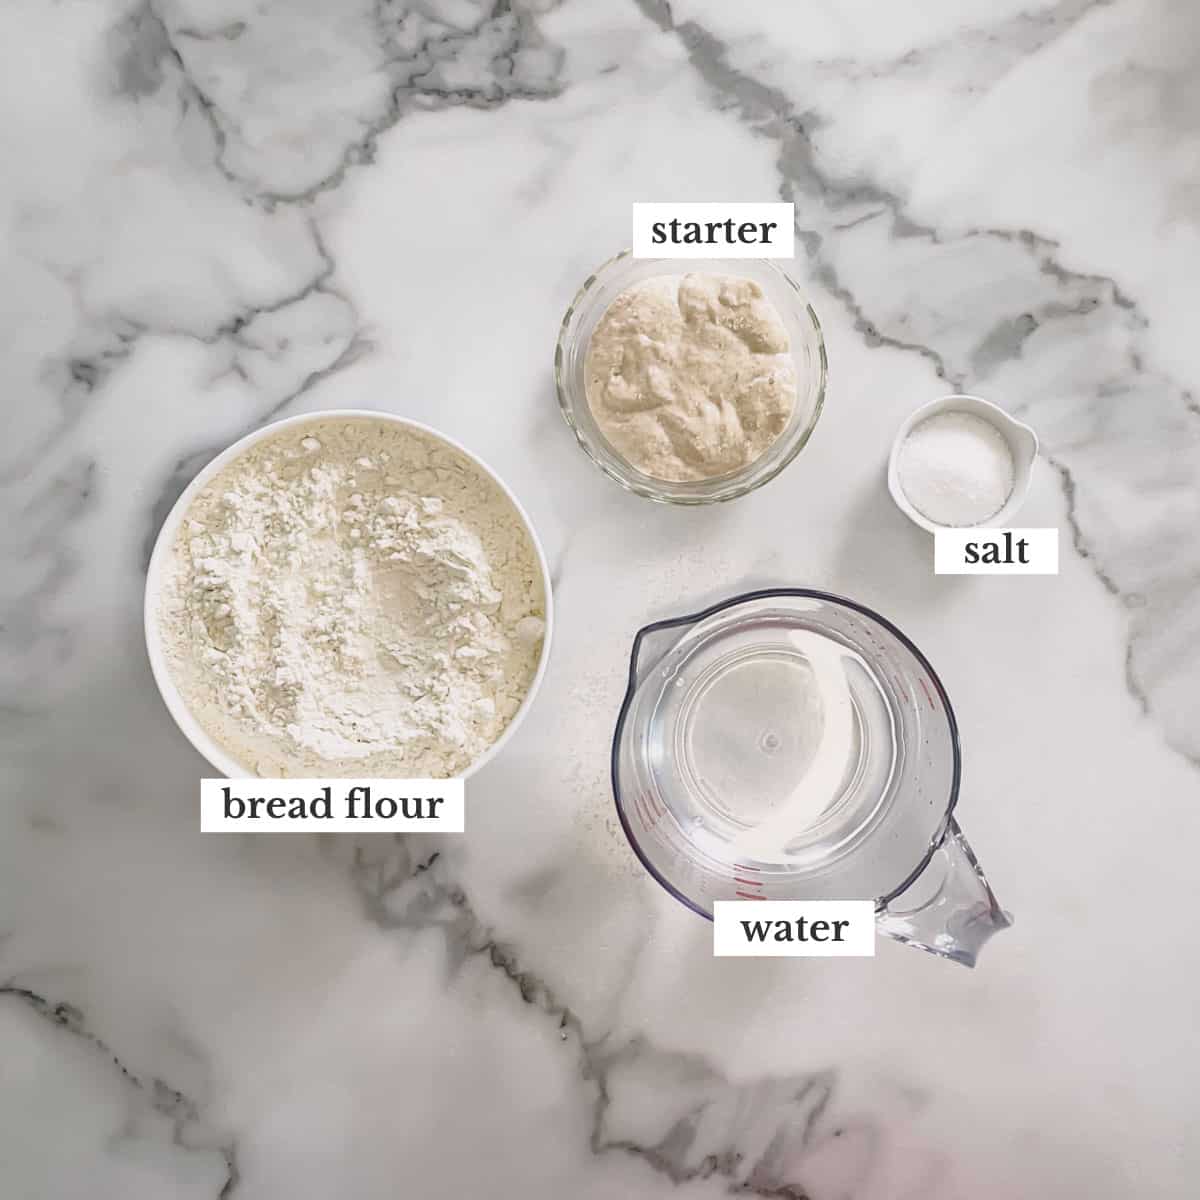
This artisan sourdough bread recipe requires four simple ingredients, plus brown rice flour for dusting.
- Warm water – With sourdough, precision is key. Piping hot water kills yeast, and cold water slows down fermentation. For best results, temp the water with a thermometer and adjust it as necessary. Ninety degrees is the ideal temp! If you take the time to do this, your efforts will be rewarded.
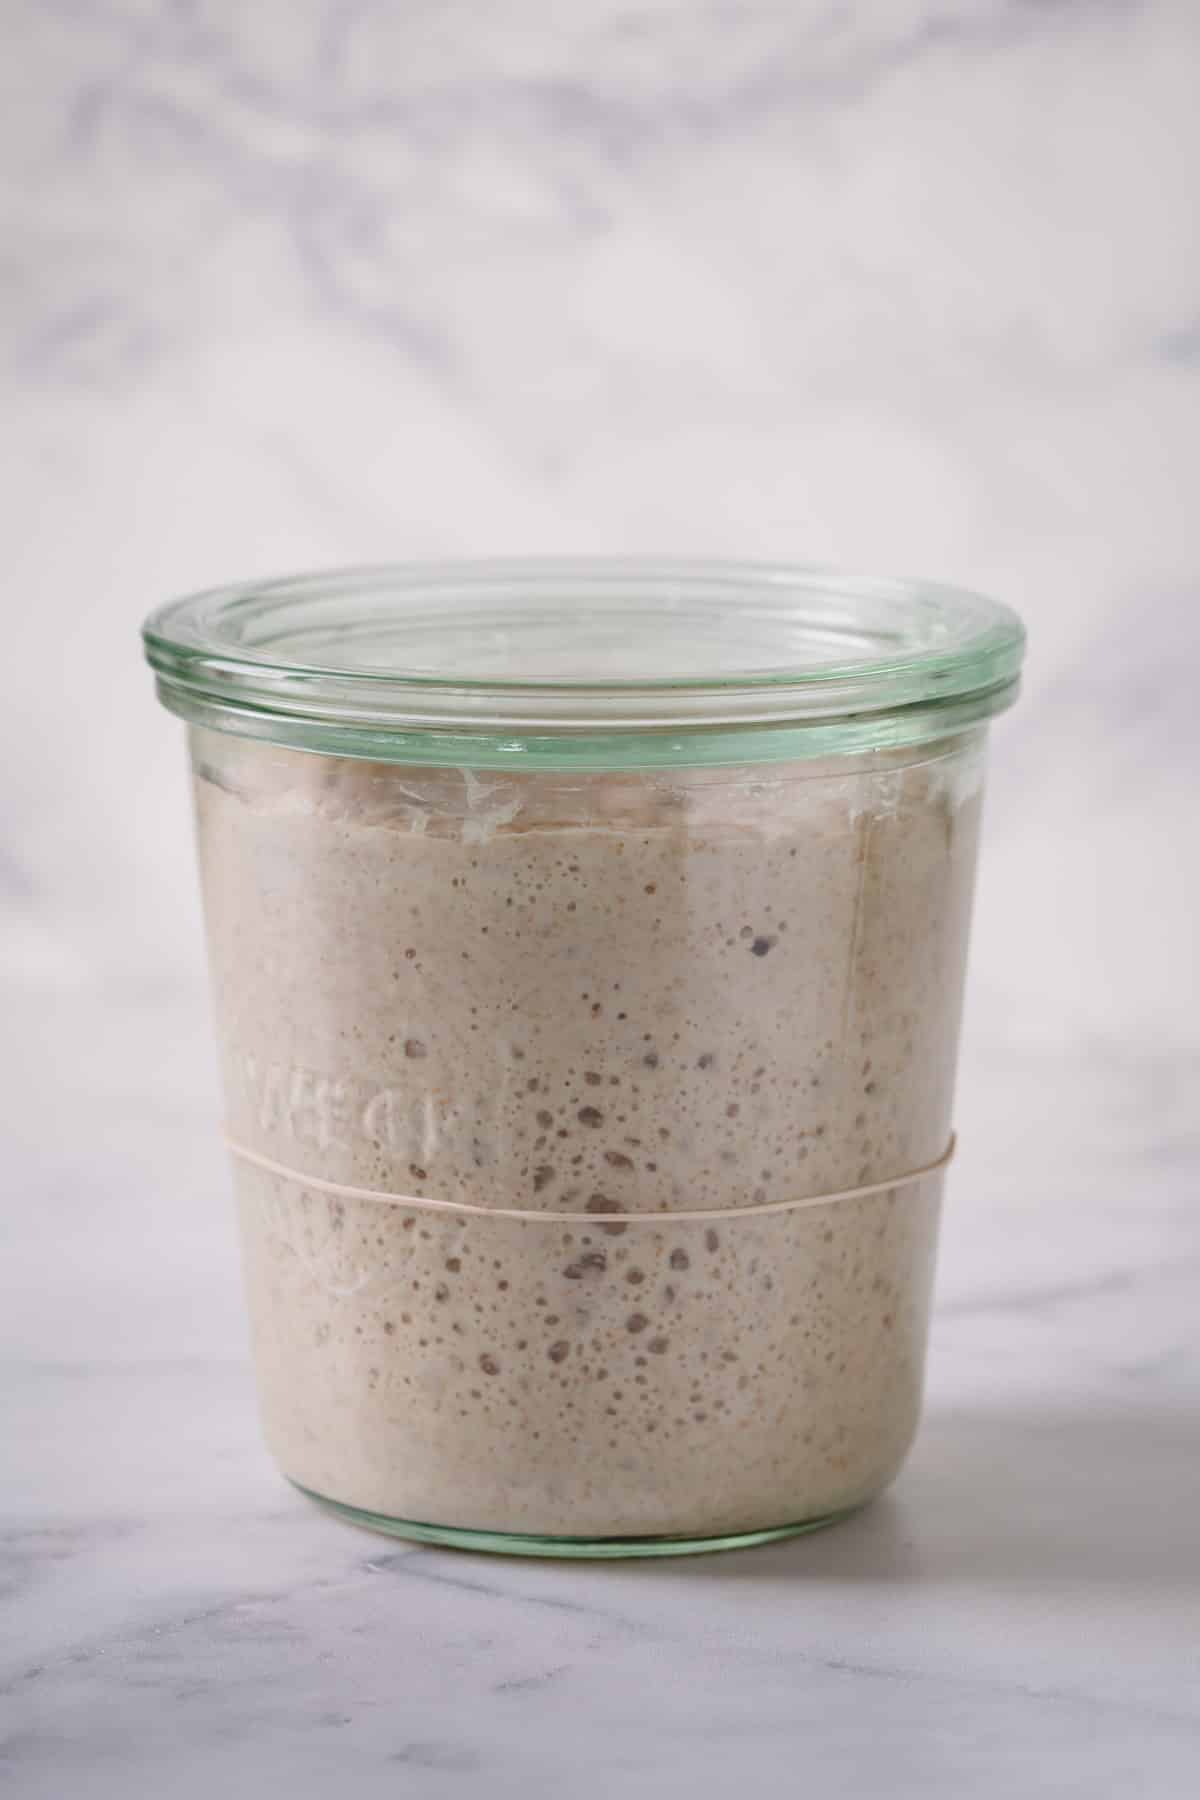
- Ripe sourdough starter – Starter is considered ripe or active when it’s tripled in size, bubbly, and ready to bake with. You can make it beforehand, buy it online, or borrow some from a friend or neighbor.
- Bread flour – Bread flour has a high protein content. More protein equals more gluten, which gives bread it’s interior structure and chewy texture. I recommend Bob’s Red Mill or King Arthur brand since they list the protein content on the bag.
- Salt – Salt is crucial for a flavorful loaf of bread. Do not forget to add it or the bread will taste bland!
- Brown rice flour – For dusting the banneton! Skip all-purpose flour this time. Brown rice flour makes releasing the dough a breeze.
How to make this recipe:
Sourdough recipes require multiple steps. But don’t let that scare you. All the steps are simple, and I’ve provided photos and videos to walk you through it.
1. Feed the starter
- It’s important to feed the starter 8 to 12 hours before you plan to use it. Ripe starter should look lofty, bubbly, and foamy.
- This indicates it’s active and ready to bake with. I like to use the float test, and drop a small amount into water. If it floats, you’re good to go!
2. Mix the dough
- In a large mixing bowl, combine warm water and ripe starter. Mix until the starter is broken up and combined with the water.
- Add bread flour and salt.
- You can use a spatula, your hand, or a stand mixer with a dough hook to knead the dough until the flour is mixed in. It should take about 2 minutes, then let it rest for five.
- Kneading the dough develops gluten, which traps air in the dough, ultimately giving the loaf a better rise and structure in the finished product.
- Knead it again for 5 minutes, or 8 minutes if doing it by hand. It should be very sticky and that’s exactly how you want the dough to be at this stage! Cover the dough with plastic wrap and let it rest for 30 minutes.

3. Lamentation/Bulk Fermentation
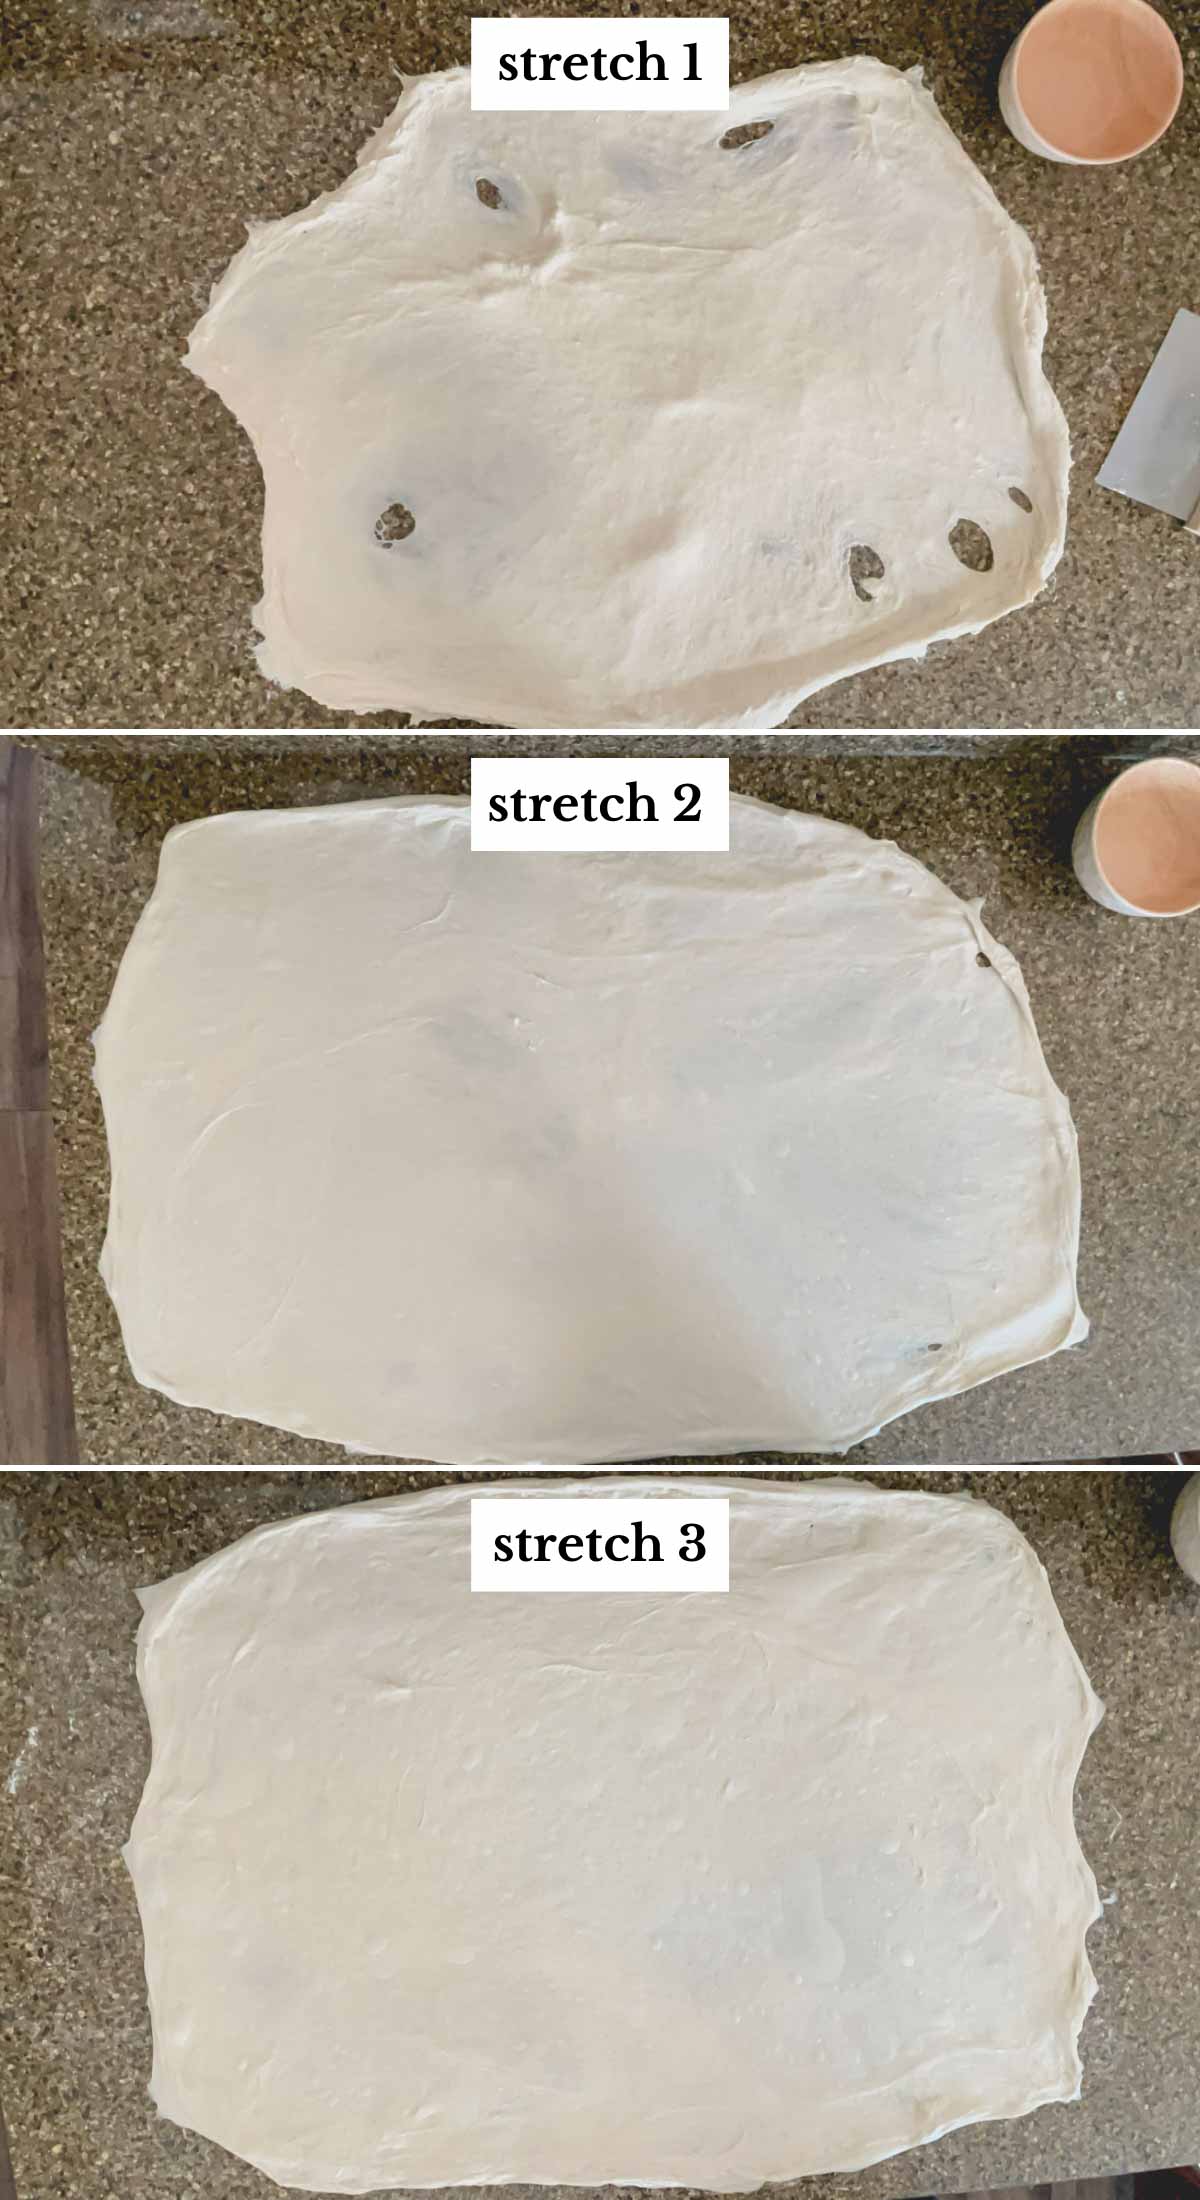
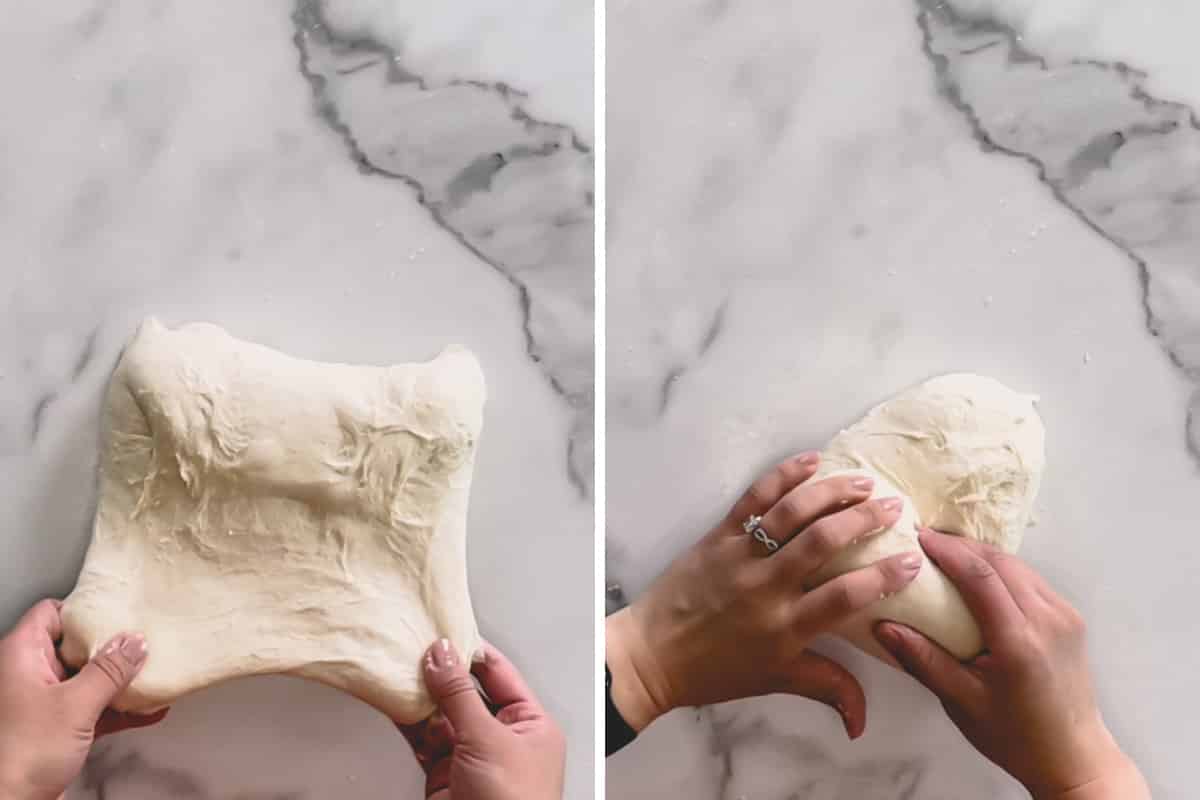
Lightly spray a large work surface with water and transfer the dough onto it. Carefully stretch the dough out as far and thin as it can go.
It’s totally normal if the dough tears at the first stretch, which indicates weak gluten formation. As the gluten structure develops and strengthens, the dough will stretch better and won’t tear as easily.
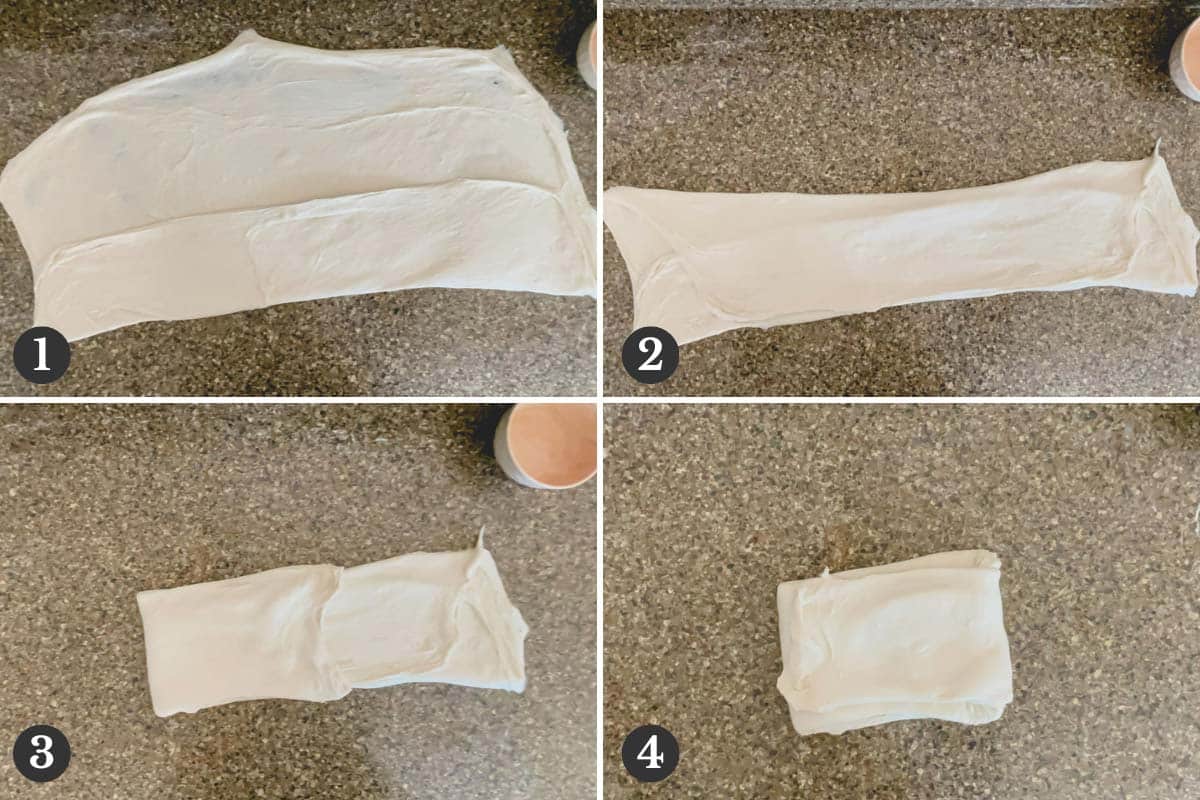
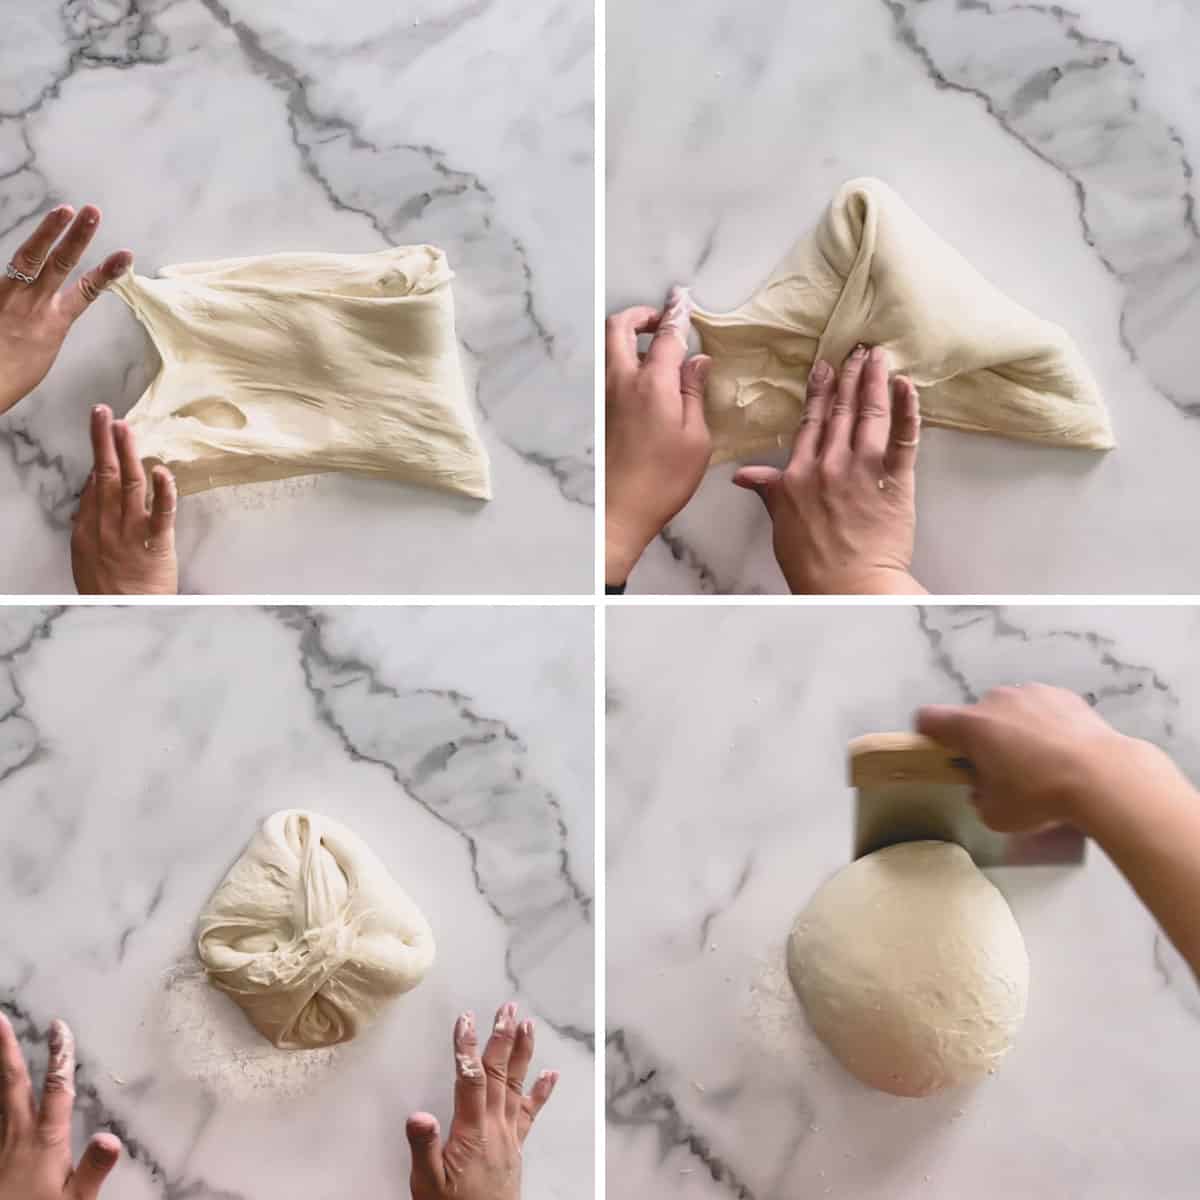
Now, lift the bottom end of the dough and fold it over the center. Repeat with the top side.
Then take each side and fold into the center to form a small rectangle.
Tip
Lightly spray your hands with water to prevent the dough from sticking to them.
Finally, tuck the corners in to form a smooth ball.
Use a bench scraper to turn the dough into a tight ball.
Put the dough back into the large bowl, cover with a shower cap or saran wrap, and bulk ferment for 5 to 6 hours at room temperature.
Tip
If possible, repeat the lamination process above 1 to 2 times about 1 hour apart during the bulk fermentation stage.
It encourages gluten formation, which gives you a lacey crumb texture.
4. Pre-shape & final shape
- Lightly spray your hands and work surface with water again. Turn the dough onto the counter, then stretch and fold the dough again as described above.
- Form the dough into a tight ball again and let it rest 10 minutes. Resting the dough allows it to relax, so it’s easier to shape.
- Shape the dough into a log. To do this, stretch the top portion a little bit, then fold it over the center. Repeat with the bottom portion. Now, roll the log-shaped dough as if you’re rolling a burrito. Tightly pinch the seams.
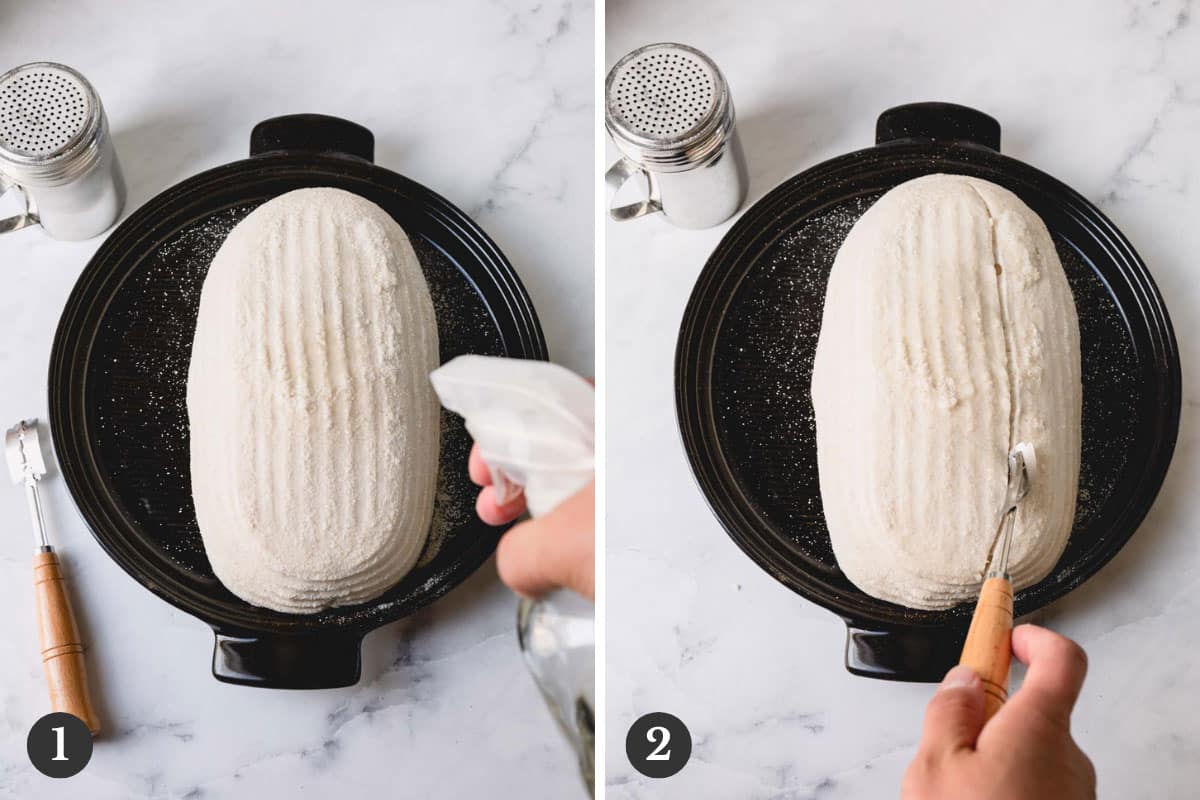
- Generously dust the banneton basket with brown rice flour and put the dough into it, seam-side up. If you don’t do it seam-side up, the impressive-looking swirl won’t be on top.
5. Proofing
- Cover the banneton with saran wrap or a shower cap. Let it proof for 1 hour at room temperature, then cold proof in the refrigerator for 8 to 10 hours.
- If you don’t have time to cold proof, proof 2 hours at room temperature and bake immediately. Cold proofing develops more flavor.
6. Bake
- Preheat the oven to 425 degrees Fahrenheit, with the bread cloche inside, for at least an hour.
- Poke test: Poke the dough inside the banneton with your finger about 1/2 inch deep. If the dough springs back immediately, it’s under-proofed. If it doesn’t spring back at all, it’s over-proofed. It should spring back slowly, leaving a slight indentation.
- Very carefully invert the proofed dough onto the hot cloche. If you don’t have a bread cloche, a Dutch oven works too. Spray the top of the dough with water and use a lame to score it in your desired pattern. Cover & bake for 45 minutes.
Tip
Spraying the bread with water creates steam, which encourages a crispy crust with nice blistering.
- Remove the cover and bake the bread 15 more minutes.
- Carefully transfer the sourdough loaf to a cooling rack and cool for at least 3 hours. I know it’s torture to wait, but it’s worth it! The dough will taste gummy if you cut it immediately.
Tips for Success:
- High-protein bread flour is crucial. The higher protein content produces more gluten, which gives you a better rise! When it comes to sourdough, the little details matter.
- Don’t skip the bulk fermentation stage. In this stage, the goal is to build structure in our dough by strengthening the gluten. If you skip this step, you’ll end up with tough, under-proofed bread. A strong gluten structure allows the dough to retain as much gas as possible, which yields that desired open crumb in the final bread.
- Bulk fermentation happens faster in warmer temperatures. Typically, 5-6 hours of bulk fermentation is ideal. But it depends on the room temperature. If you let your dough bulk ferment for too long, or in too warm environment, you’ll compromise the structure. Be sure to check on your dough!
- When in doubt, poke your dough. If the dough isn’t ready yet, it will spring right back. If you’ve left it too long, it won’t spring back at all. It should spring back slowly when it’s ready.
- Weigh your ingredients! There’s a reason the measurements are in grams, not cups. Cups are not precise enough. Invest in a kitchen scale for the best results!
Sample Schedule:
To make things easy, I’ve provided a sample schedule for you. These are the times I incorporate each step.
Sample schedule with cold proofing:
This is the schedule I use when I cold proof overnight before baking. I highly recommend cold proofing!
- 9:30 p.m. – Feed the starter
- 8:00 a.m. – Mix the dough
- 9:00 a.m. – Laminate and bulk ferment for 5-6 hours (you may perform 2-3 laminations 1 hour apart during this time)
- 2:00 p.m. – Pre-shape & final shape
- 2:30-3:30 p.m. – Proof at room temperature
- 3:30 p.m. to 7:00 a.m. – Cold proof
- 7:00 a.m. – Bake
- 12:00 p.m. – Slice & enjoy!
Sample schedule without cold proofing:
Although I recommend cold proofing, I know life is busy. If you don’t have time to cold proof, follow this sample schedule instead.
- 9:30 p.m. – Feed the starter
- 8:00 a.m. – Mix the dough
- 9:00 a.m. – Laminate and bulk ferment for 5-6 hours (you may perform 2-3 laminations 1 hour apart during this time)
- 2:00 p.m. – Pre-shape & final shape
- 2:30-5:00 p.m. – Proof at room temperature
- 5:00 p.m. – Bake
- Slice & enjoy the next morning!
Storing Tips:
- Sourdough bread is best enjoyed within 24 hours of baking it.
- Store cooled sourdough bread in a large tea towel or a large plastic bag.
- A large sealed plastic bag will ensure the inside stays soft, but softens the crust. A large tea towel ensures the crust stays crisp, but the bread dries out faster. Choose whichever feels more important to you!
- If the sourdough loaf is cut, place the loaf cut-side down before you cover with a towel.
FAQs:
Yes! It must be at room temperature first, then you can freeze it whole or sliced. If freezing it whole, wrap the entire loaf in plastic wrap, then place in a large sealed freezer bag. If freezing it sliced, place the slices in a ziplock bag. For best results, use within 3 months.
The main culprit for dense or gummy bread is under-proofing. This means you didn’t let it rise long enough. Proofing dough is crucial because it lets the yeast release carbon dioxide which is what gives bread it’s light and bouncy texture.
More Bread Baking Resources:
- Types of Flour and Uses – Learn about the different types of flours and when to use them.
- No-Discard Sourdough Starter Maintenance – Learn how to maintain and feed your sourdough starter.
- Favorite Sourdough Bread Tools – All my must-have sourdough bread tools. These tools simplify the kneading and baking process!
- The Easiest and Fluffiest French Bread – Now that you’ve conquered sourdough, why not make a classic French baguette?

Easy Sourdough Bread
Ingredients
- 350 grams warm water about 90°F
- 100 grams ripe sourdough starter
- 500 grams bread flour Note 1
- 10 grams salt
- brown rice flour for dusting
Instructions
Before you start:
- Feed the starter 8-12 hours prior to making the bread dough. You need a nice and ripe starter. Test the starter by dropping a small amount into a water. If it floats, it’s ripe and ready to use!
To mix the dough:
- In a large mixing bowl, combine warm water and ripe starter. Mix until most of the starter is broken up and mixed into the water.
- Add flour and salt.
- Use a silicone spatula, or your hand, or the dough hook attachment, knead the dough until all the flour is incorporated, about 2 minutes. Let it rest for 5 minutes.
- Then knead it again for 5 minutes, if using a stand mixer, or about 8 minutes, if kneading by hand. (Note: Don’t be alarmed by soft and sticky dough. It’s exactly as it should be, and it’ll get easier to handle.) Cover the dough with plastic wrap (or shower cap) and rest for 30 minutes.
To laminate & bulk ferment the dough:
- Turn the dough out onto a clean counter, lightly sprayed with water. Gently stretch the dough out as far as it can go. Then lift the bottom end and fold it over the center of the dough. Then do the same with the top side of the dough. Now, lift the sides of the dough and fold it over onto the center as well. Then tuck the corners to form a nice smooth ball. Using a bench scraper, turn the dough into tight ball to create a surface tension. Please watch my video demonstration for better understanding. (TIP: Lightly dampen your hands with water. It minimizes the dough sticking to your hands.)
- Put the dough back into the bowl, cover and bulk ferment for 5-6 hours at room temperature (around 70°F). (Note: If you have time, I also encourage you to do additional 1-2 lamination about 1 hour apart. It helps to strengthen the gluten structure and promotes nice open crumb.)
To pre-shape:
- Turn the dough out onto a clean counter, lightly sprayed with water. With lightly dampened hands, stretch and fold the dough again as described in step 6. Form the dough into a tight ball and let it rest for 10 minutes, covered. Resting allows the dough to relax and it’ll be easier to shape it.
- Flip the dough smooth side down and stretch the top portion slightly and fold it over the center. Do the same thing with the bottom portion. You should now have a log shaped dough. Then from the short end, roll the dough as if you’re rolling a burrito. Tightly pinch the seams.
- Generously dust the banneton basket with brown rice flour and put the bread dough into it, seam-side up.
To proof the dough:
- Cover the banneton with plastic wrap, or the same shower cap. And let it proof for 1 hour at room temperature, then place it in the fridge for overnight, 8-10 hours, for cold proofing. OR proof the dough for 2 hours at room temperature and bake right away. (Note: Slow cold proofing helps to develop more flavor. But in my experience, it didn’t affect the oven spring.)
To bake the bread:
- Preheat the oven with bread cloche to 425°F (218°C) for at least 1 hour. (If using Dutch oven, you may or may not preheat it. I’ve tried either way and didn’t see significant difference.)
- Poke test: Poke the dough in the banneton with your finger about half an inch deep. If the dough springs right back, then it’s under-proofed. If the dough doesn’t spring back at all, it’s over-proofed. You want your dough spring back slowly and leave a small indentation.
- Carefully invert the proofed bread dough onto the hot cloche. Spritz the top of the bread with water and score it to your desired pattern. Cover and bake for 45 minutes. (TIP: Spraying water helps to create more steam and encourages a good oven spring. The bread crust also gets nice blisters from water sprays.)
- Then remove the cover and bake the bread for another 15 minutes.
- Carefully transfer the bread onto a wire rack and cool completely for at least 3 hours before slicing into it. (TIP: If sliced too soon, the bread will be unpleasantly gummy.)
⭐️ Did you make this recipe?
Please leave a review and let us know how you liked it!
Video
Tips & Notes
– Sourdough bread is best enjoyed within 24 hours of baking it.
– Store cooled sourdough bread in a large tea towel or a large plastic bag.
– A large sealed plastic bag will ensure the inside stays soft, but softens the crust. A large tea towel ensures the crust stays crisp, but the bread dries out faster. Choose whichever feels more important to you!
– If the sourdough loaf is cut, place the loaf cut-side down before you cover with a towel.
Nutrition