These stunning raspberry sugar cookies are made with my go-to no-spread, no-chill sugar cookie recipe and given a boost of flavor with crushed freeze-dried raspberries! They’re a beautiful light pink color and are made extra special with the addition of textured royal icing. Perfect for Valentine’s Day!

Table of Contents
- Why you’ll love this recipe:
- Key Ingredient Notes:
- How to make raspberry sugar cookies:
- 1. Prepare the sugar cookie dough
- 2. Shape and bake the cookies
- 3. Decorate the raspberry sugar cookies
- How to create textured royal icing on decorated cookies:
- How to decorate with gold leaf:
- Tips for Success:
- Make-Ahead Tips:
- Storing Tips:
- FAQs:
- More Valentine’s Day Recipes:
- Raspberry Sugar Cookies Recipe
Pin this now to find it later
Pin ItWhy you’ll love this recipe:
Whipping up a batch of sugar cookies is my absolute favorite way to celebrate a holiday!
Freeze-dried raspberries infuse my classic sugar cookie recipe with a fruit taste and a festive pinkish/red color. Then, I like decorating my raspberry sugar cookies with textured royal icing for added charm.
- Flavor – Raspberry sugar cookies are rich and buttery without being overly sweet. You’ll notice a hint of tartness from the raspberries, too!
- Texture – My tried-and-true recipe guarantees a soft, tender cookie with crisp edges.
- Looks – Heart-shaped cookies are covered in pink icing and dotted with gold leaf flakes, making these cookies unbelievably elegant.
Your friends and family will be thrilled to receive these memorable sugar cookies on Valentine’s Day!

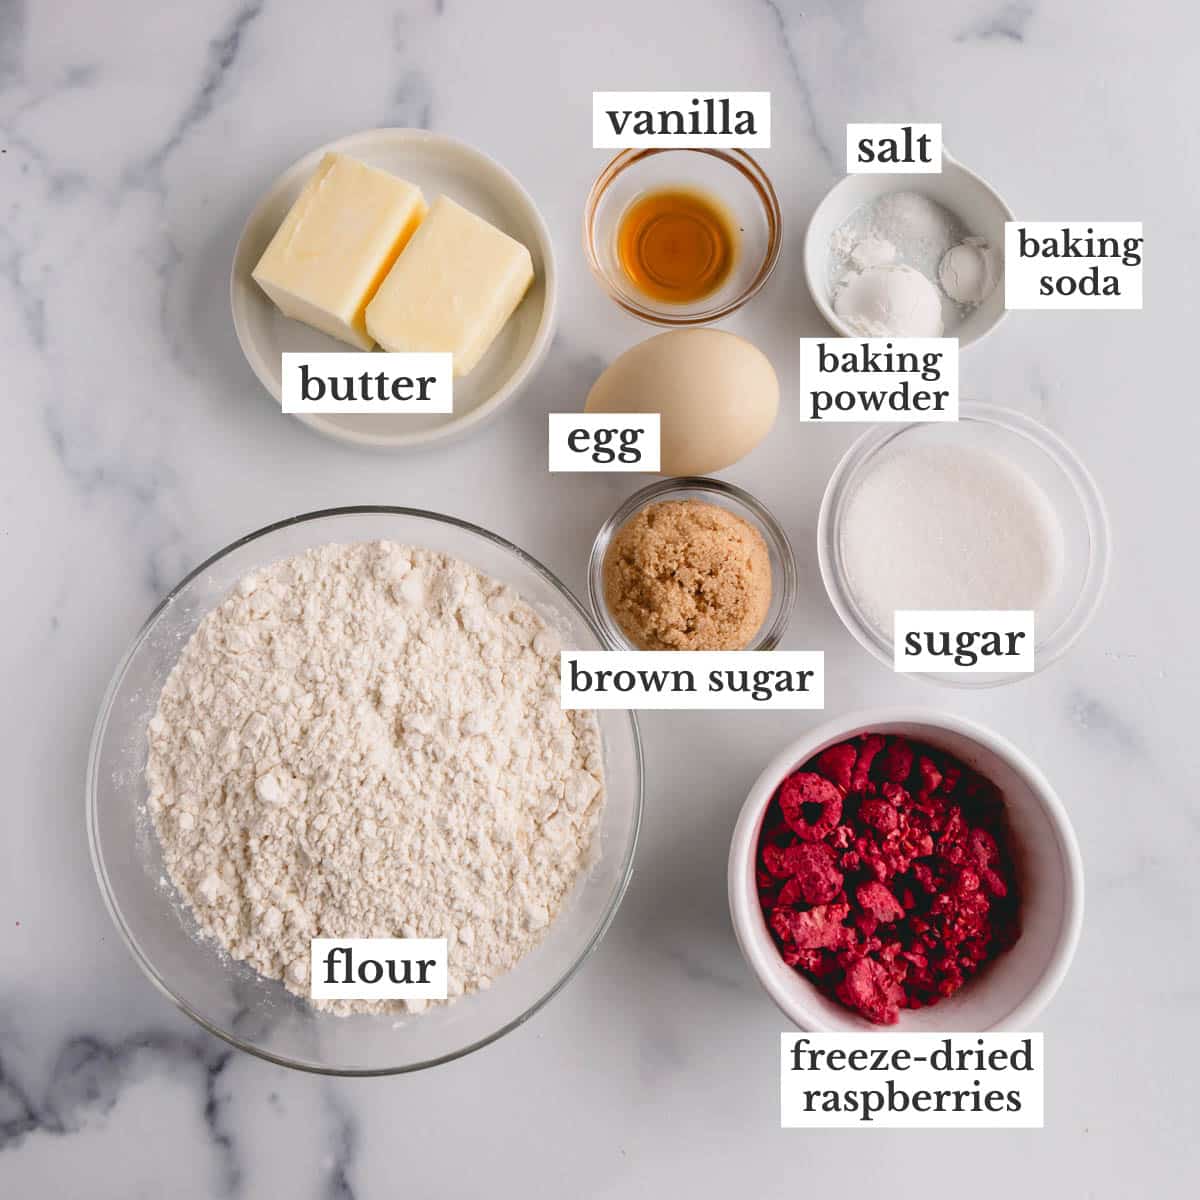
Key Ingredient Notes:
For sugar cookies
- All-purpose flour – Measure your flour using the spoon and level method or a kitchen scale. I prefer to use a scale because it’s more accurate! All-purpose flour is my go-to for this recipe. Therefore, I don’t recommend any flour substitutes.
- Freeze-dried raspberries – These berries have all their water content removed, making them extra brittle, crisp, and easy to crush into a powder. They’ll infuse the cookies with color and flavor.
- Sugars – I use both granulated and brown sugar to sweeten the cookies, and create a soft and tender texture. Light brown sugar is best because dark brown sugar yields darker cookies.
- Cornstarch – This also plays a role in creating soft and tender cookies.
- Baking powder – It helps the cookies rise but not too much! The tops will still stay perfectly flat for decorating.
- Coarse kosher salt – A pinch of salt enhances the sweet flavor of the sugar cookies.
- Unsalted butter – Let your butter naturally warm to room temperature. You’ll know it’s ready when you can easily indent it with your finger.
- Egg – Your egg should come up to room temperature as well. Room-temperature eggs incorporate more easily into the batter, which results in a lighter, softer cookie.
- Pure vanilla extract – Use either store-bought or homemade vanilla extract. Just don’t use imitation vanilla!
For decorating
- Royal icing – You’ll need ½ batch of this royal icing recipe to decorate the cookies. It’s made with just 4 ingredients and can be prepared up to 2 weeks in advance.
- Pink food coloring – The freeze-dried raspberries give the cookie dough a naturally pink color, but the icing requires a few drops of food dye.
- Edible gold leaf – An optional ingredient. However, if you opt to use it, it’ll really make your cookies stand out!
How to make raspberry sugar cookies:
1. Prepare the sugar cookie dough
- Crush the freeze-dried raspberries using a rolling pin or a food processor. For the rolling pin method, place the berries between two sheets of parchment paper (or in a plastic bag), and roll the rolling pin over the raspberries until they turn into a powder.
- Sift the crushed raspberries through a fine mesh sieve. Toss out any seeds and large bits.
- Mix the raspberry powder, flour, sugars, baking powder, and salt in an electric mixing bowl fitted with the paddle attachment.
- Add the butter, and mix on low speed until the mixture is evenly moistened and resembles wet sand, about 1-2 minutes.
- Add the egg and vanilla, and mix for about 30 seconds or until just combined.
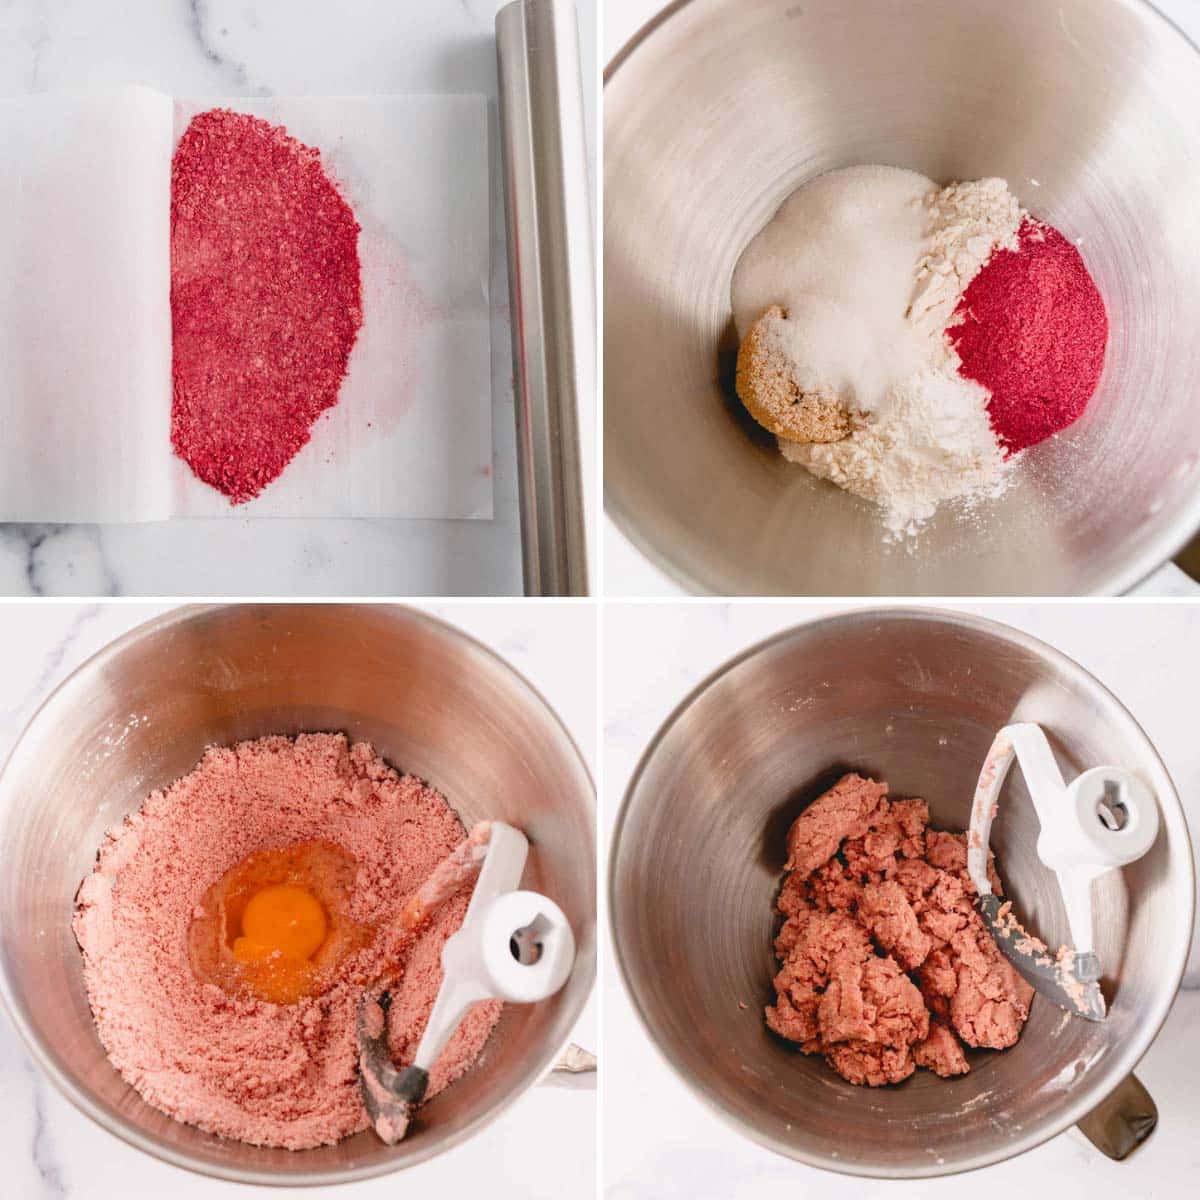
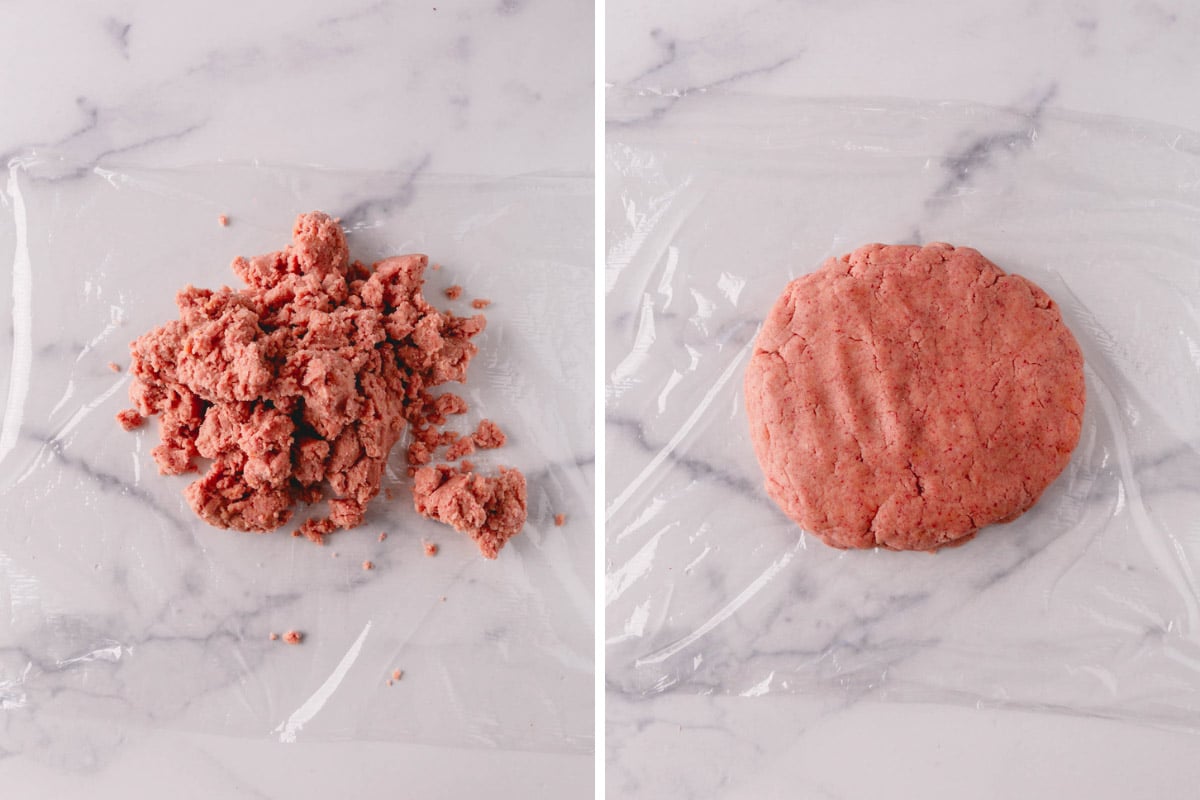
- Divide the dough into 2 equal parts. Then, knead each part into a smooth ball.
- Place each dough ball between 2 parchment sheets, and roll them out into ¼-inch thick discs.
prevent slipping
To prevent the parchment paper from moving around while rolling out the dough, place a silicone mat under it to keep it in place. This adjustable rolling pin is a game changer for evenly rolled-out dough!
2. Shape and bake the cookies
Before you get started, preheat your oven to 350°F, and line 2-3 baking sheets with parchment paper or silicone mats.
- Cut out the cookies using your favorite heart-shaped cookie cutters.
- Arrange the cookies on the prepared baking sheets.
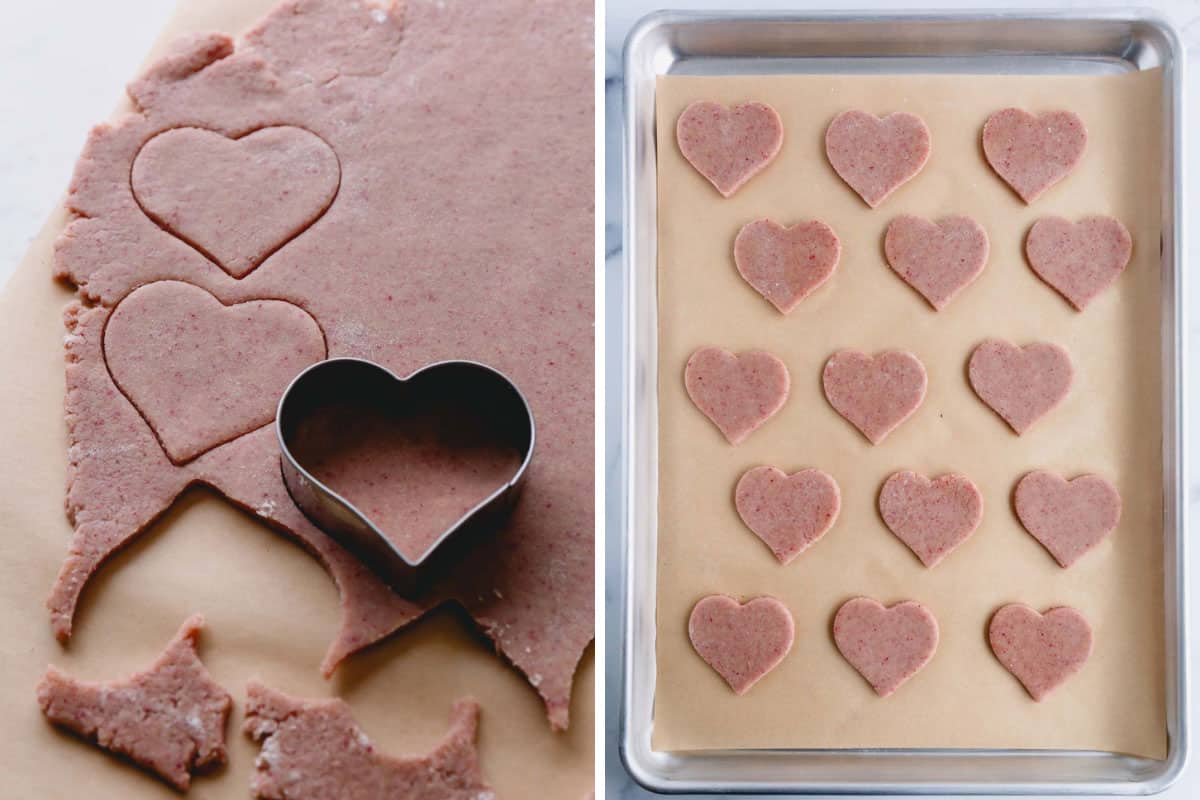
- Gather the scraps of dough, roll them out, and chill before cutting more cookies. Repeat this process until all of the dough is used up.
- Bake the cookies for 10-13 minutes or until the edges turn a light golden color.
- Cool the cookies on the baking sheet for 5 minutes. Then, transfer them to a cooling rack to cool completely.
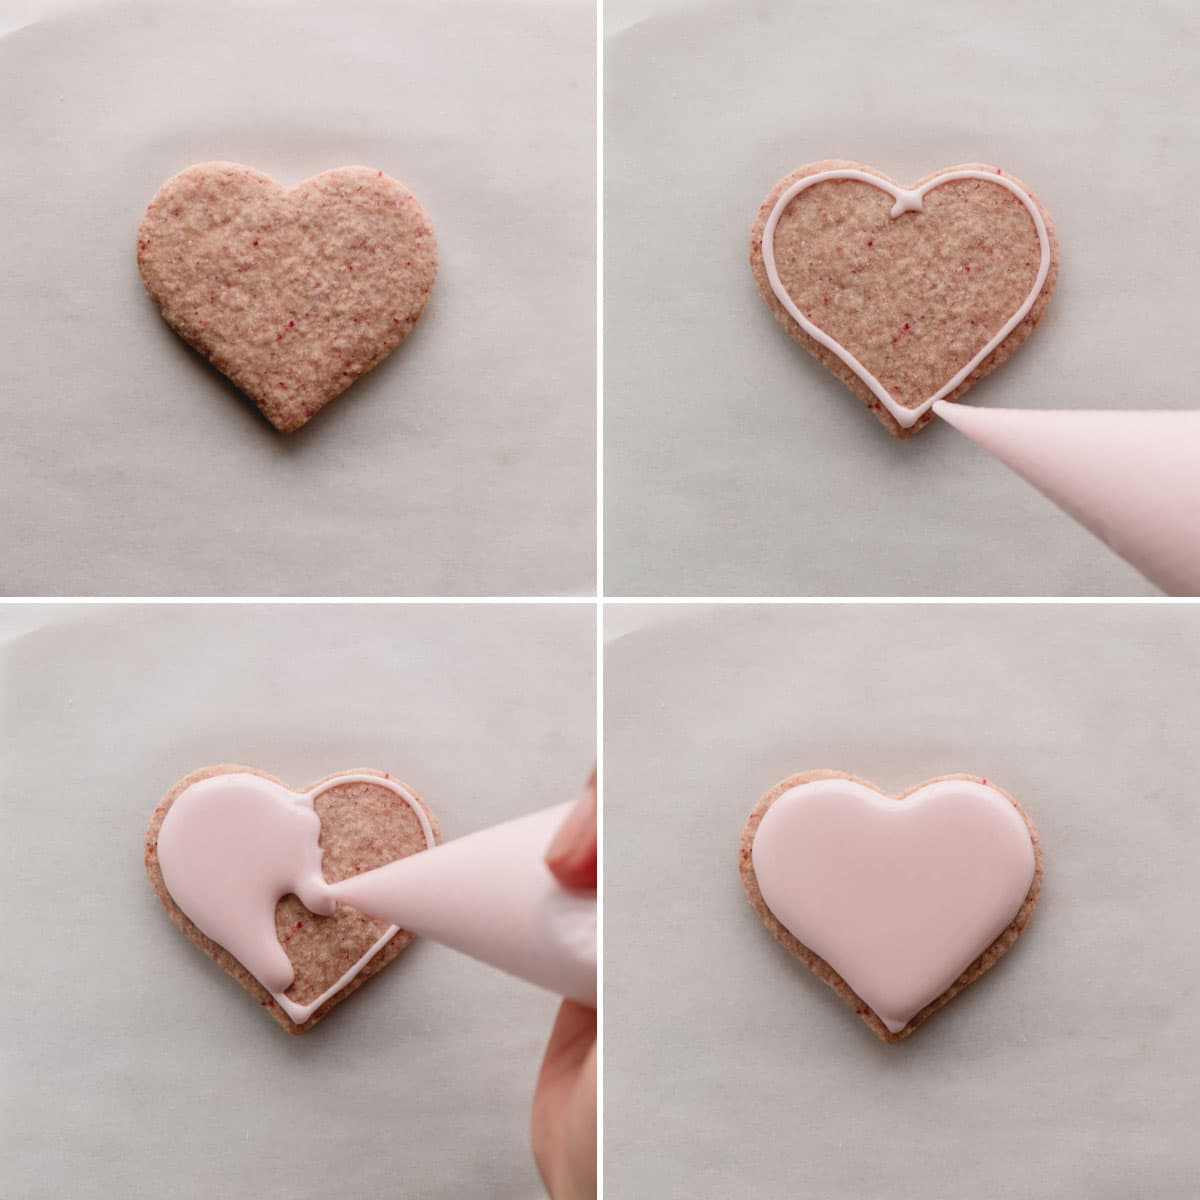
3. Decorate the raspberry sugar cookies
- Make a half-batch of this royal icing recipe.
- Add a few drops of pink food coloring to the prepared icing.
- Transfer the icing into a tipless piping bag.
- Cut a small opening in your tipless piping bag. Then, outline the cookies with the royal icing.
- Flood the inside of the cookies with more icing, using the same icing consistency for flooding as you did for outlining.
How to create textured royal icing on decorated cookies:
While I love a smooth and flawless finish, textured icing adds an extra special touch to the decorated cookies. To achieve a textured finish:
- Cut parchment paper into 2×2-inch squares. You’ll need 1 cut square for each cookie. If you’d like, you can skip this step and use these small hamburger patty parchment squares instead.
- Crinkle each square slightly. Then, flatten the squares.
- Outline and flood the cookies with royal icing in a tipless piping bag with a small opening.
- Immediately after flooding, place a square of prepared parchment paper onto the wet icing, and gently press it down. Ensure that the paper evenly covers the entire decorated area. Don’t remove the square from the cookie just yet!
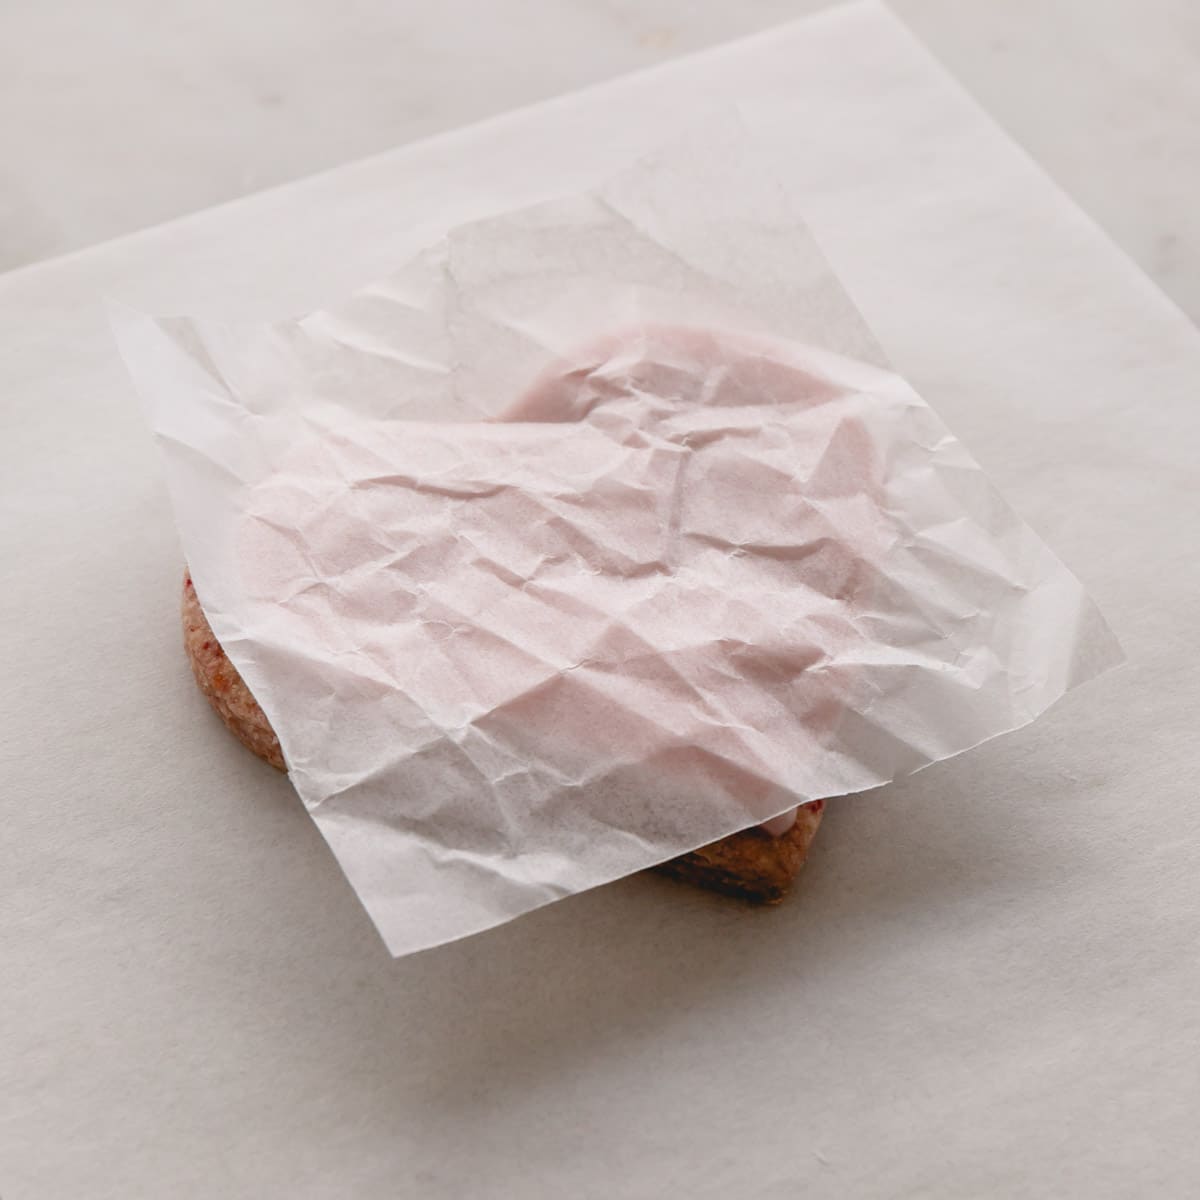
- Repeat the above steps with all of your cut cookies. Let the icing fully set before removing the parchment square. Overnight is best!
- Once the icing is set, gently remove the parchment square from each cookie.
- Place a few pieces of edible gold leaf on the cookies for added elegance.
How to decorate with gold leaf:
- Add gold leaf after your icing has fully set.
- Use tweezers and a scribe to handle the gold leaf, because it tends to cling to your fingers.
- Avoid excessive handling of the gold leaf. The more you handle gold leaf, the more likely it’ll peel off the cookies.
Tips for Success:
- Weigh your ingredients when possible. For the best results, get a kitchen scale and weigh any ingredients with a weight measurement. Using a scale is the most accurate way to measure and is easier, too!
- Don’t overmix the icing. Overmixing can weaken the protein structure of the egg whites, resulting in the icing not setting properly.
- Use marshmallows to keep your cookies soft. Place decorated or undecorated cookies on a wire cooling rack, on top of a baking sheet layered with mini marshmallows. Cover and store on the kitchen counter.
- Store baked cookies at room temperature. The fridge causes sugar cookies to dry out, and condensation isn’t good for icing or edible gold leaf.

Make-Ahead Tips:
- Royal icing – This can be prepared up to 2 weeks in advance or frozen for up to 2 months.
- Cookie dough – Raspberry sugar cookie dough can be made up to 3 days in advance or frozen for up to 3 months. Wrap the prepared dough tightly in plastic wrap, and store it in the fridge. To freeze, the dough should be flattened into discs, wrapped in plastic, and placed in a freezer bag.
- When you’re ready to bake your sugar cookies, let the chilled dough come up to room temperature for about 30 minutes before rolling and shaping.
- When you’re ready to decorate your sugar cookies, let the icing come up to room temperature for about 30 minutes before transferring it to a piping bag.
Storing Tips:
- Store decorated raspberry sugar cookies at room temperature for up to 1 week. The decorated cookies can be placed in an airtight container after the icing has fully set.
- Decorated sugar cookies can be frozen in an airtight container for up to 1 month. Allow the icing to harden fully before freezing.
- Thaw frozen cookies on the counter at room temperature for 8-12 hours without opening the lid. Keeping the lid closed will prevent condensation from forming.
FAQs:
No, freeze-dried raspberries have zero water content, making them dry, crunchy, and easy to crush into a powder. Fresh raspberries are filled with water, which would cause the dough to become too moist.
Overworking the dough, incorrectly measuring flour, and rolling the cookies too thin can result in hard cookies. Mix the dough for the time specified in the recipe, and use a kitchen scale to measure your flour. Roll out the dough to a thickness of ¼-inch, and remove the cookies from the oven as soon as the edges turn golden brown.
Freeze-dried raspberries are found at most grocery stores near the dried fruit or in the baking aisle. You should be able to find them at local grocery stores like Wal-Mart and Target, and they’re available on Amazon.
More Valentine’s Day Recipes:

Raspberry Sugar Cookies
Ingredients
For sugar cookies:
- 1/3 cup (15 g) freeze dried raspberries
- 3 cups (375 g) all-purpose flour
- ½ cup (100 g) granulated sugar
- ¼ cup (50 g) packed brown sugar Note 1
- 1 tablespoon cornstarch
- ½ teaspoon baking powder
- ¼ teaspoon coarse kosher salt
- 1 ½ sticks (170 g) unsalted butter at room temperature
- 1 large egg at room temperature
- 2 teaspoons pure vanilla extract
For decorating:
- ½ batch of royal icing
- Pink food coloring
- Edible gold leaf optional
Equipment
- 1 fine mesh sieve
- 1 Mixing Bowl with a Paddle Attachment
Instructions
TO PREPARE THE DOUGH:
- Place the freeze-dried raspberries in between parchment paper (or plastic bag) and crush them with a rolling pin. (Alternatively, you can use a small food processor and pulse until powder.)1/3 cup freeze dried raspberries
- Sift the crush raspberries through a fine mesh sieve and discard the seeds and large bits.
- In a mixing bowl with a paddle attachment, mix the prepared raspberry powder, flour, sugars, cornstarch, baking powder, and salt.3 cups all-purpose flour, ½ cup granulated sugar, ¼ cup packed brown sugar, ½ teaspoon baking powder, ¼ teaspoon coarse kosher salt, 1 tablespoon cornstarch
- Add butter and mix on low speed until the mixture is evenly moistened, 1-2 minutes. The mixture should resemble wet sand.1 ½ sticks unsalted butter
- Add egg and vanilla extract and mix until just combined, about 30 seconds. The dough will be crumbly, but it should stick together when you squeeze it in your hand.1 large egg, 2 teaspoons pure vanilla extract
- Divide the dough into 2 equal parts. Knead it into a smooth ball. Place each dough ball between 2 parchment sheets and roll it out into ¼-inch-thick disc. (TIP: Place a silicone mat under the parchment paper to roll it out, so it stays in place. And this adjustable rolling pin is nice for rolling out even dough.)
- At this point, you can move on to shaping and baking the cookies right away. Or you can put the dough into plastic bags and refrigerate for up to 3 days or freeze for up to 3 months.
TO SHAPE AND BAKE COOKIES:
- Preheat the oven to 350°F (175°C). Line 2-3 baking sheets with parchment papers, or silicone mats.
- Using cookie cutters, cut out the cookies and arrange them on the prepared baking sheets. Refrigerate the cookies for at least 5 minutes before baking.
- Gather the scraps of dough, roll out and then chill before cutting more cookies. Repeat until all the dough is used.
- Bake the cookies for 10-13 minutes, or until the edges start to turn light golden color.
- Cool the cookies on the baking sheet for 5 minutes, then transfer them onto a cooling rack to cool completely before decorating.
TO DECORATE:
- Make half batch of this royal icing recipe and add a few drops of pink food coloring. Transfer the royal icing into tipless piping bag.½ batch of royal icing, Pink food coloring
- For the textured icing look, cut out 2×2-in (5x5cm) square parchment papers and crumble them slightly, then flatten. (I use these small hamburger patty parchment papers.)
- First, outline the cookies with royal icing in a tipless piping bag with a small opening.
- Then, flood the cookies with more icing. I use the same consistency of royal icing for outline and flooding.
- To create the textured icing look, immediate after flooding the cookies, place the prepared parchment paper on top of the wet icing and lightly press it so that the paper touches the entire surface of the icing.
- Repeat the steps with all the cookies. Let the icing set completely, preferably overnight. Then gently peel off the parchment paper.
- If using, place a few pieces of edible gold leaf on the cookies. I use tweezers and scribe to handle the gold leaf as it tends to cling to the fingers more. TIP: Avoid excessive handling of the gold leaf. The more you handle them, the higher the risk of the gold leaf peeling off.Edible gold leaf
Tips & Notes
– Prepare the royal icing up to 2 weeks in advance, or freeze it for up to 2 months.
– Prepare the cookie dough up to 3 days in advance, or freeze it for up to 3 months.
– Store prepared cookie dough in the fridge, wrapped tightly in plastic. Thaw frozen cookie dough overnight in the refrigerator.
– To bake, let the chilled cookie dough come to room temperature for 30 minutes before rolling, shaping, and baking as the recipe instructions state.
– To decorate, let the icing come to room temperature for 30 minutes before transferring it to a piping bag. Storing Tips:
– Once cooled, leftover decorated cookies can be stored in an airtight container at room temperature for up to 1 week.
– To prevent them from sticking together, place a piece of parchment paper between each layer.
– Freeze decorated cookies for up to 1 month.
– Thaw frozen cookies on the counter at room temperature for 8-12 hours without opening the lid. Keeping the lid closed will prevent condensation from forming.
Nutrition