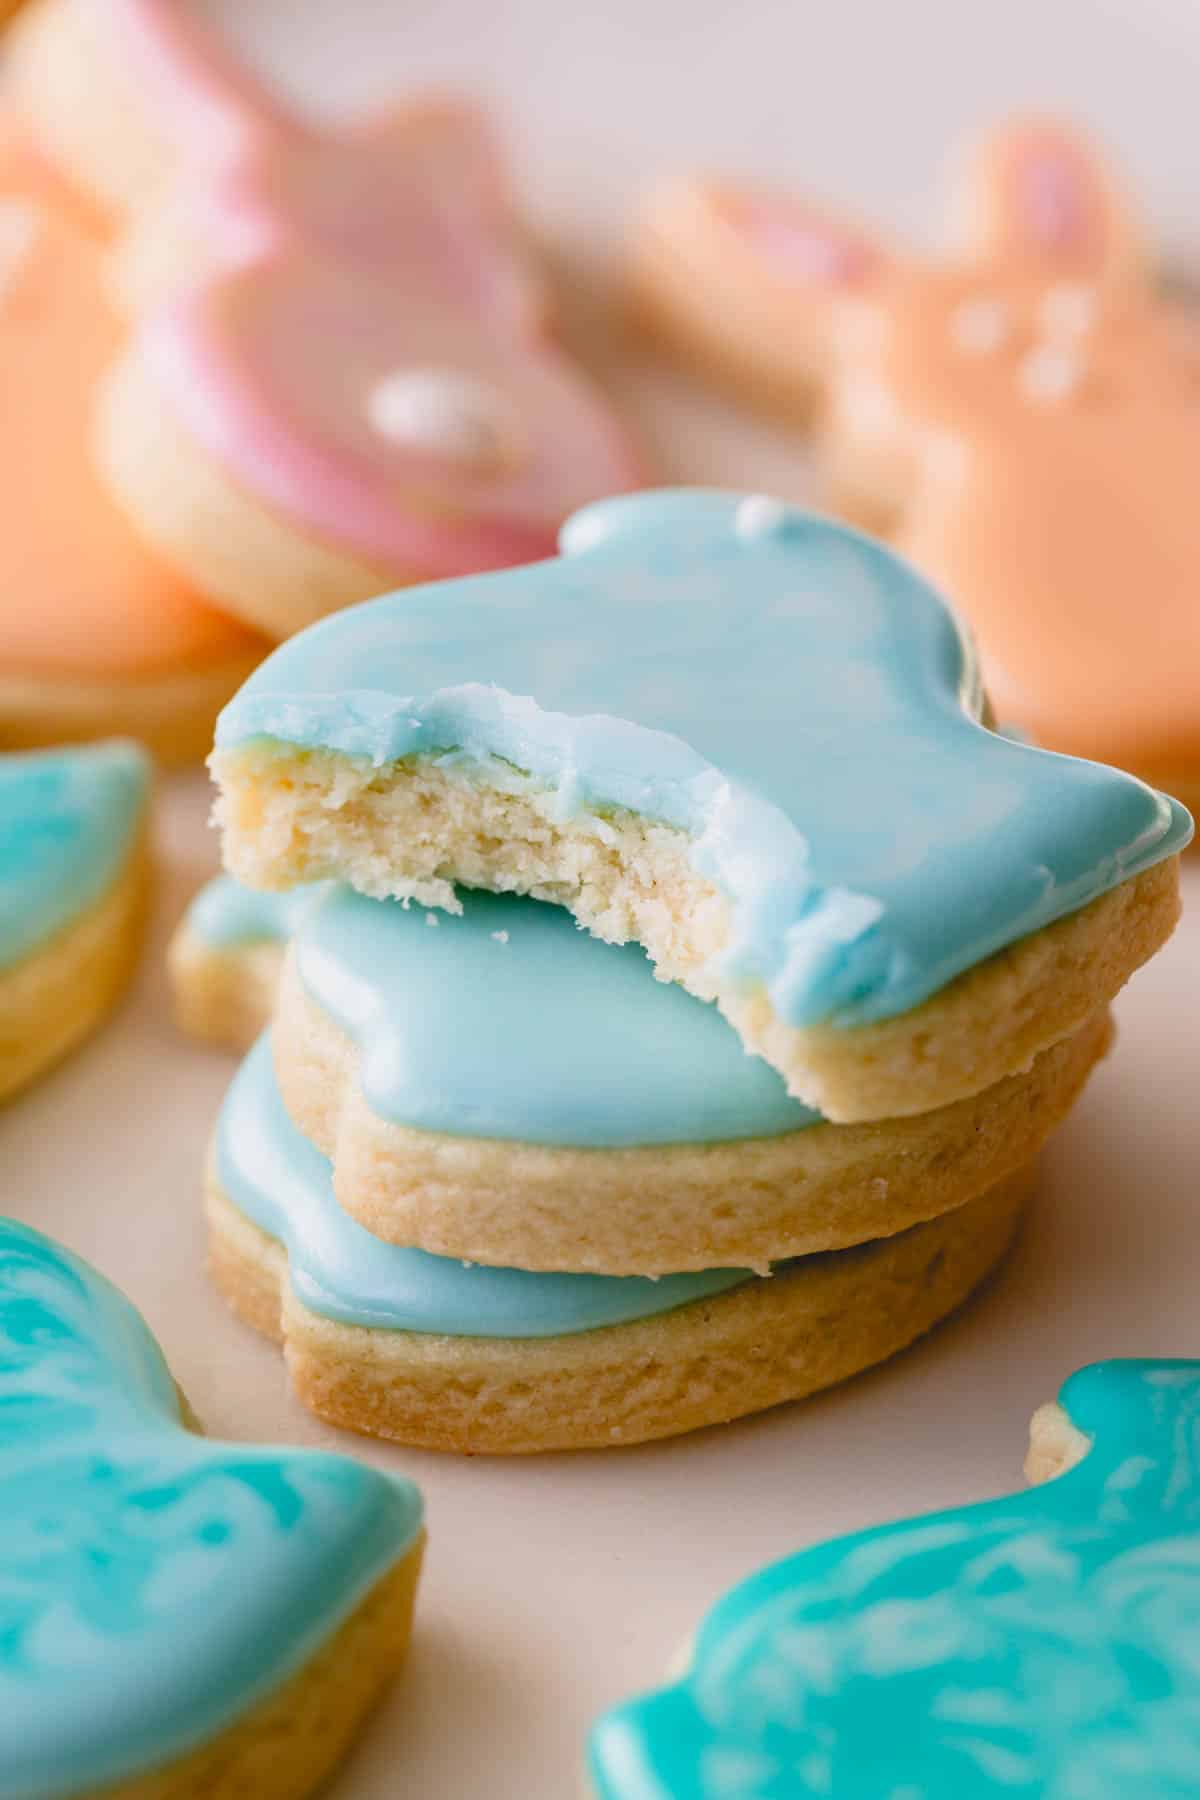
These festive Easter sugar cookies are buttery in flavor with crisp edges and decorated with silky smooth and puffy royal icing.
BONUS: Learn how to create defined sections of royal icing on sugar cookies.

Why you’ll love this recipe:
Decorated Easter sugar cookies are only a hop, skip, and jump away!
If you’ve been following me for a while, you know I won’t let a holiday pass without making my go-to sugar cookie recipe!
- Decorated with my beginner-friendly royal icing.
- Tips and tricks are included for creating a separated icing design without any color bleed.
- The cookies have the most irresistible, rich, buttery flavor, with sharp edges and perfectly flat tops.
- No chilling time is required!
These charming sugar cookies are sure to make Easter egg-stra special!

Key Ingredient Notes:
For the cookies
- All-purpose flour – No substitutions should be made here, as all-purpose flour is my go-to for sugar cookies. For the best results, weigh your flour using a kitchen scale, or use the spoon and level method.
- Sugars – Granulated sugar and brown sugar add texture and sweetness. You can use either dark brown sugar or light brown sugar. Just keep in mind that dark brown sugar will result in slightly darker cookies.
- Cornstarch – Ensures the cookies stay soft and tender.
- Baking powder – Leavens the cookies but doesn’t cause them to spread or become puffy.
- Unsalted butter – Provides the cookies with an irresistible, melt-in-your-mouth texture and helps create light golden edges. Make sure your butter is at room temperature before you get started.
- Extracts – Use pure vanilla extract, or make a batch of DIY vanilla extract. Just don’t use anything artificial! Almond extract is optional, but it definitely adds a little something special to the flavor.
For decorating
- Royal icing – Creates a flawless finish on the decorated Easter sugar cookies!
- Gel food coloring – Use Wilton or Americolor for a vibrant, stunning color.
How to make Easter sugar cookies:
Before you get started, make sure you have a set of Easter cookie cutters on hand. I think bunnies and peeps are adorable!
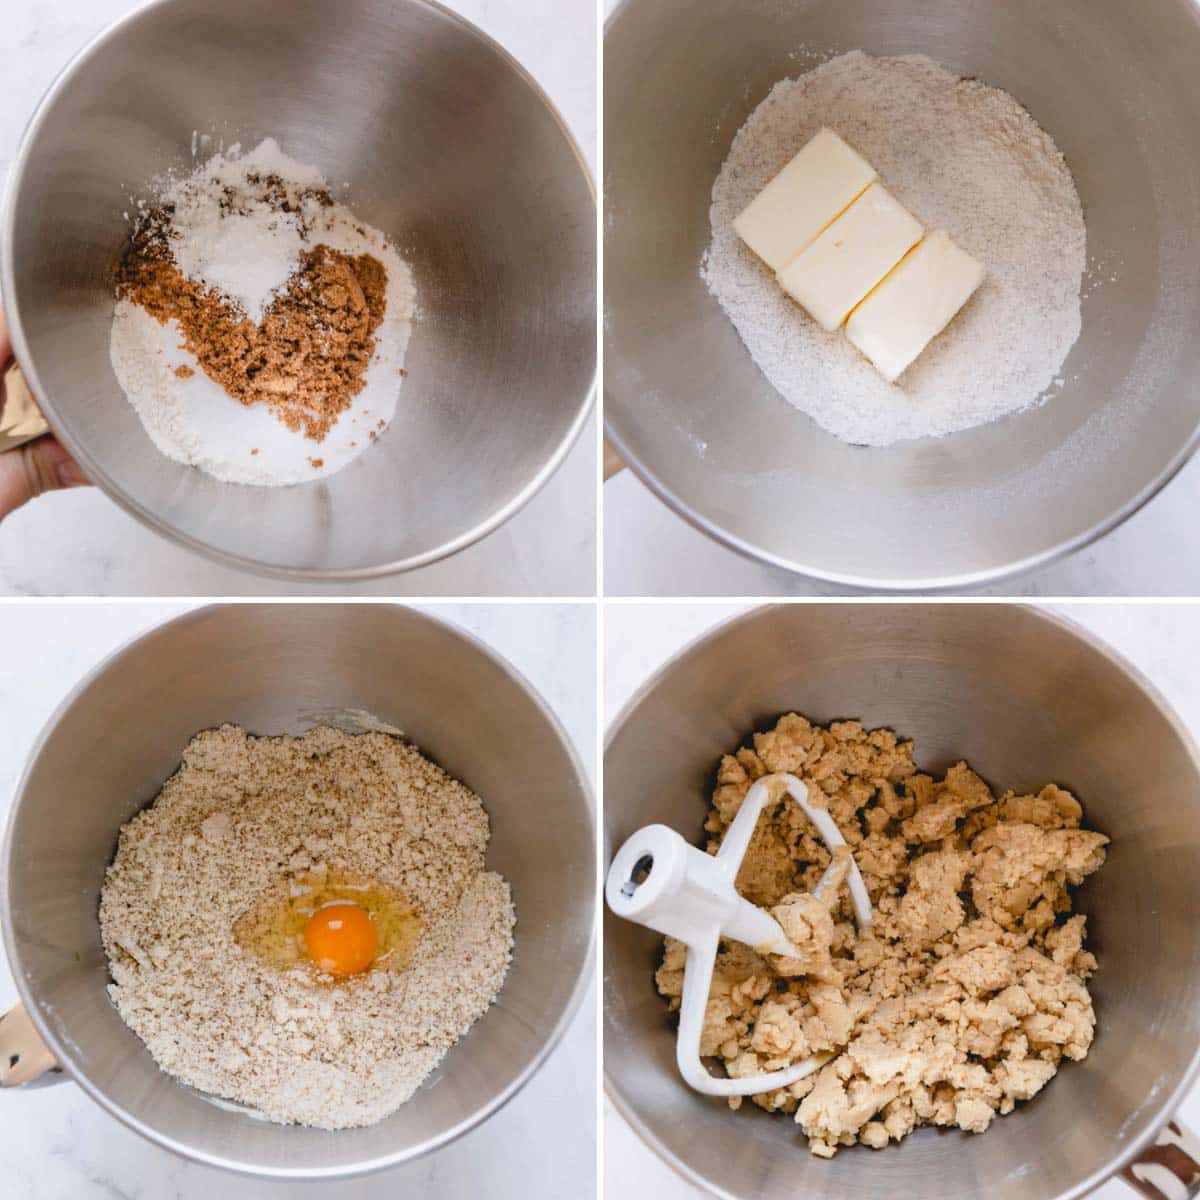
1. Prepare the dough
- Combine the flour, granulated sugar, brown sugar, baking powder, and salt in an electric mixing bowl fitted with the paddle attachment.
- Add the butter, and mix on low speed until the mixture is evenly moistened and resembles wet sand, about 1-2 minutes.
- Add the egg, vanilla extract, and almond extract, and mix until just combined about 30 seconds. You’ll know it’s combined when the dough is crumbly and sticks together when you squeeze it with your hand.
- Divide the dough in half, and knead it into smooth balls.
Store for later
You can shape and bake the cookies immediately, or store the dough for later! Place the dough into plastic bags, and refrigerate it for up to 3 days. Or, freeze the cookie dough for up to 3 months.
2. Shape the cookies
Before you get started, preheat your oven to 350°F, and line 2-3 baking sheets with parchment paper or silicone mats.
- Transfer each dough ball onto a silicone mat, and roll each ball into a ¼-inch thick disc. This adjustable rolling pin is my secret weapon for perfectly even dough every single time!
- Now for the fun part! Use Easter cookie cutters to cut out the cookies. Then, place the cut cookies on the prepared baking sheets.
- Repeat the previous steps using the dough scraps. Continue rolling and cutting until all the dough is shaped into Easter sugar cookies.
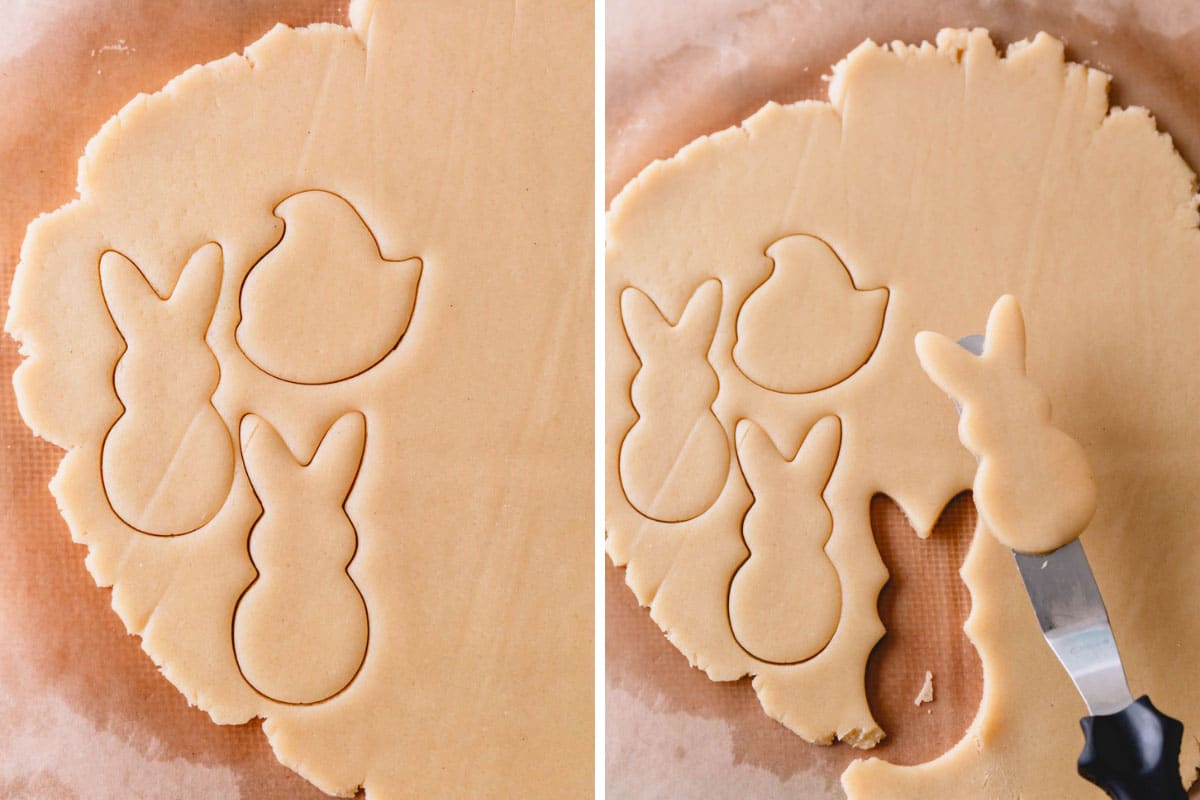
prevent misshapen cookies
Transfer the cookies with an offset spatula to keep the cookies in shape.
3. Bake the cookies
- Bake the cookies for 10-13 minutes or until the edges turn a light golden color.
- Let the cookies cool on the baking sheet for 5 minutes. Then, carefully transfer them to a cooling rack to cool completely.
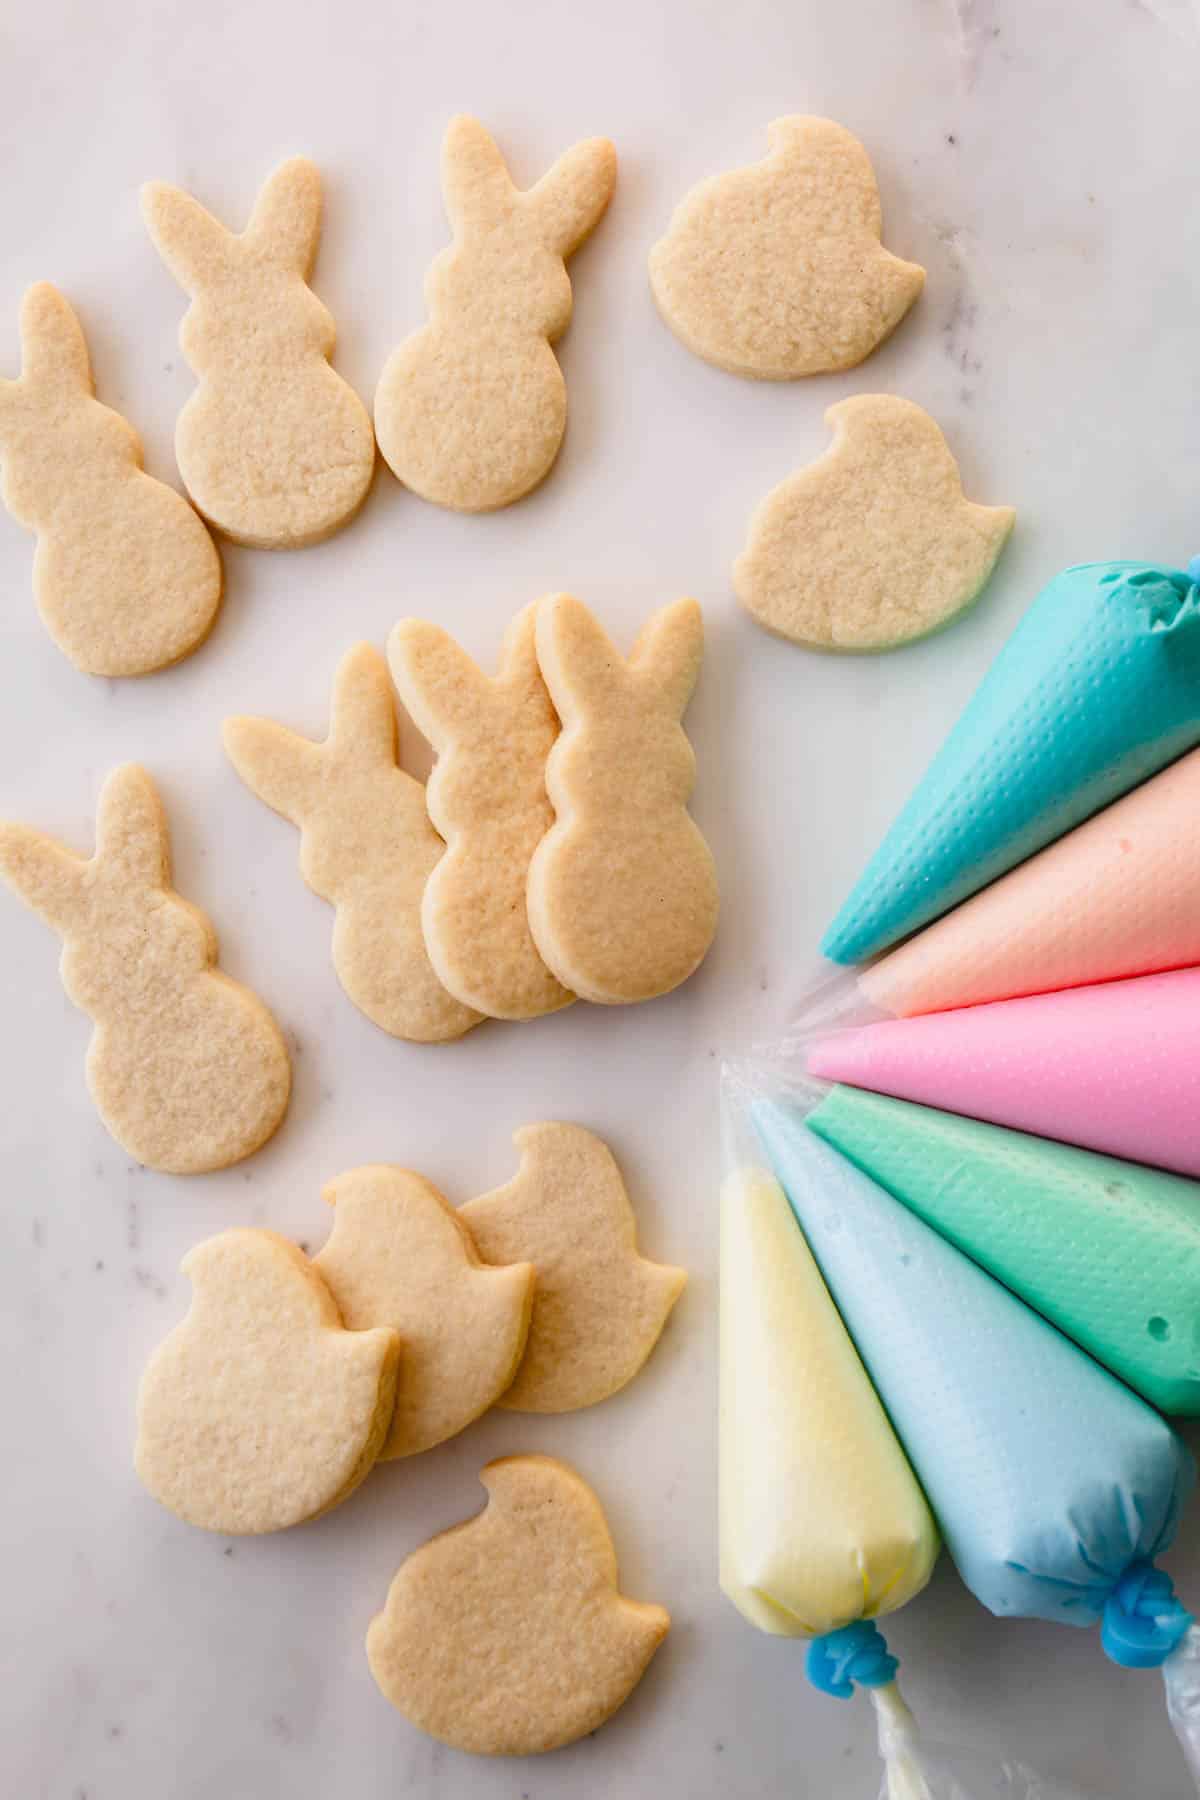
4. Prepare the royal icing
- Prepare 1 batch of 4-ingredient royal icing.
- Divide the icing into several bowls. Reserve 1 bowl for white icing, and use the remaining bowls for your gel food coloring choices.
- Cover the white icing tightly with plastic wrap. Then, add color to the rest of the icing with your chosen gel food coloring. Mix the coloring in until well combined.
- Place each colored royal icing into tipless piping bags, and start decorating!
Avoid oversaturation
Start with a single drop of gel food coloring to prevent oversaturation, and add more as needed. Gel food coloring is more concentrated than liquid food coloring. So, a little bit goes a long way!
I use Americolor and Wilton gel food coloring for the most vibrant icing color. Gel food coloring allows you to use less dye and results in a richer color without watering down the icing. It’s a win-win situation!
How to decorate Easter sugar cookies
Today, I want to show you slightly elevated royal icing decorating technique where we’ll add small detail on bunny ears.
Let me show you how to create a dimention between the sections with royal icing.
Method 1
- Pipe the smaller design (like the bunny ears) first.
- Let it set for 10-15 minutes.
- Then fill in the rest of the design with the second color.
We do this because piping the icing back to back will cause it to blend together, creating a blurry design – and we certainly don’t want that to happen!


Method 2
- Make an outline with your icing, leaving a gap for the detail.
- Let the icing set for 10-15 minutes.
- And then fill in the gaps with another colored icing.

how to create dimention with royal icing
The key here is to take a layered approach, allowing each layer to crust over or solidify for about 10-15 minutes before moving on to your next section.
Allowing each section to rest before moving on ensures a separated design that doesn’t bleed.
Tips for Success:
- Use a kitchen scale to weigh the flour and sugars. Gram measurements are provided because using weight, rather than measuring cups, ensures the most accurate result.
- Roll the dough into an even thickness for consistent baking times. If the dough is uneven, some cookies will be overcooked, while others will be undercooked. They’ll look prettier this way, too!
- Don’t overfill your piping bags. Overfilled bags are harder to pipe with, and you risk icing oozing out of the top.
- Keep the cookies out of the fridge! Undecorated cookies will dry out in the refrigerator, and the icing on decorated cookies can bleed due to condensation.

Make-Ahead Tips
Cookie dough
You can prepare your Easter sugar cookie dough up to 3 days in advance, or freeze it for up to 3 months.
- Flatten each dough ball into a disc before wrapping them tightly in plastic wrap.
- Place the wrapped discs in the fridge or the freezer.
- Thaw frozen dough overnight in the fridge. Then, let it sit at room temperature for 15-30 minutes before rolling it out.
Royal icing
You can make the royal icing up to 2 weeks in advance, or freeze it for up to 2 months.
- Prepared icing should be stored in an airtight container. It can be left on the counter at room temperature or placed in the fridge or freezer.
- Frozen icing should be thawed overnight in the fridge. Then, allow it to sit at room temperature for about 30 minutes before transferring it into piping bags.
Storing Tips:
- The icing may take up to 24 hours to fully set. Once it is set, the decorated cookies can be transferred to storage containers.
- Always store Easter sugar cookies at room temperature. Refrigeration will dry out your cookies and lead to icing color bleed, ruining all your hard work baking and decorating!
- Decorated cookies will stay fresh for up to 1 week and can be frozen for up to 1 month.
- Thaw frozen cookies on the counter for 8-12 hours, keeping them sealed in the container they were frozen in. Do not open the lid until the cookies are fully thawed. Otherwise, condensation may form, which can cause the icing colors to bleed!
Sugar Cookies FAQs:
The icing on decorated Easter sugar cookies requires 8-24 hours to fully dry. I prefer to let them dry overnight before transferring the decorated cookies to a storage container.
I only recommend using royal icing for decorated cookies with a separated design. Royal icing hardens, allowing you to create detailed designs that don’t blend together. Regular icing is easy to smudge because it doesn’t fully dry like royal icing does.
My favorite way to keep sugar cookies soft is by using marshmallows and a cooling rack! Sprinkle mini marshmallows on a baking sheet. Then, place a wire cooling rack over the marshmallows. Layer the cookies on the cooling rack, and cover the cookies and baking sheet with a lid. This trick works for decorated and undecorated cookies!
More Easter Recipes:

Easter Sugar Cookies
Ingredients
For sugar cookies:
- 3 cups (375 g) all-purpose flour
- ½ cup (100 g) granulated sugar
- ¼ cup (50 g) packed light brown sugar Note 1
- 1 tablespoon (8 g) cornstarch
- ½ teaspoon baking powder
- ¼ teaspoon coarse kosher salt
- 1 ½ sticks (170 g) unsalted butter at room temperature
- 1 large egg at room temperature
- 2 teaspoons pure vanilla extract
- ¼ teaspoon almond extract optional
For decorating:
- 1 batch of royal icing
- Gel food coloring of your choice pink, baby blue, green, yellow are perfect for Easter cookies
Equipment
- Peeps and bunny cookie cutter set
Instructions
TO PREPARE THE DOUGH:
- In a mixing bowl with a paddle attachment, mix flour, sugars, cornstarch, baking powder and salt.3 cups all-purpose flour, ½ cup granulated sugar, ¼ cup packed light brown sugar, 1 tablespoon cornstarch, ½ teaspoon baking powder, ¼ teaspoon coarse kosher salt
- Add butter and mix on low speed until the mixture is evenly moistened, 1-2 minutes. The mixture should resemble wet sand.1 ½ sticks unsalted butter
- Add egg, vanilla, and almond extracts and mix until just combined, about 30 seconds. The dough will be crumbly, but it should stick together when you squeeze it in your hand.1 large egg, 2 teaspoons pure vanilla extract, ¼ teaspoon almond extract
- Divide the dough into 2 equal parts. Knead it into smooth balls.
- At this point, you can move on to shaping and baking the cookies right away. Or you can put the dough into plastic bags and refrigerate for up to 3 days or freeze for up to 3 months.
TO SHAPE AND BAKE COOKIES:
- Preheat the oven to 350°F (175°C). Line 2-3 baking sheets with parchment papers, or silicone mats.
- Place each dough ball on a silicone mat and roll it out into ¼-inch-thick disc. (TIP: This adjustable rolling pin helps you roll out an even dough.)
- Using easter cookie cutters, cut out the cookies and arrange them on the prepared baking sheets.
- Gather the scraps of dough, roll the dough, and cut out more cookies. Repeat until all the dough is used.
- Bake the cookies for 10-13 minutes, or until the edges start to turn light golden color.
- Cool the cookies on the baking sheet for 5 minutes, then transfer them onto a cooling rack to cool completely.
TO DECORATE THE COOKIES:
- Make the royal icing and divide it into several bowls. Cover white icing tightly with a plastic wrap. Color each icing with chosen gel food coloring and mix until well combined. (TIP: Start with drop of coloring to prevent oversaturation.)1 batch of royal icing, Gel food coloring of your choice
- Place each colored royal icing into tipless piping bags and decorate the cookies.
⭐️ Did you make this recipe?
Please leave a review and let us know how you liked it!
Tips & Notes
– Prepare the royal icing up to 2 weeks in advance, or freeze it for up to 2 months.
– Prepare the cookie dough up to 3 days in advance, or freeze it for up to 3 months.
– Store prepared cookie dough in the fridge, wrapped tightly in plastic. Thaw frozen cookie dough overnight in the refrigerator.
– To bake, let the chilled cookie dough come to room temperature for 30 minutes before rolling, shaping, and baking as the recipe instructions state.
– To decorate, let the icing come to room temperature for 30 minutes before transferring it to a piping bag. Storing Tips:
– Once cooled, leftover decorated cookies can be stored in an airtight container at room temperature for up to 1 week.
– To prevent them from sticking together, place a piece of parchment paper between each layer.
– Freeze decorated cookies for up to 1 month.
– Thaw frozen cookies on the counter at room temperature for 8-12 hours without opening the lid. Keeping the lid closed will prevent condensation from forming.
Nutrition