
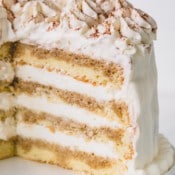
Melt-in-your-mouth tender and light sponge cake layers are soaked with intense espresso and filled with fluffy eggless tiramisu cream. This tiramisu layer cake is a dreamy dessert for any occasion.
Why you’ll love this cake:
OMG, this cake is the best!! So many reasons you’ll love it:
- Incredibly light and delicate, this cake is simply melt-in-your-mouth! All thanks to fluffy sponge cake layers generously soaked with espresso!
- The eggless tiramisu cream filling is the star of the show! It’s so creamy and fluffy – just dreamy!! Sure, it’s not an authentic tiramisu filling, but that doesn’t mean it’s not perfect!
- And it’s a perfect make-ahead cake that only gets better as time goes!
Key Ingredient Notes:
- Espresso powder – I use an instant espresso powder, because it’s so convenient and easy to use. In a pinch, you can substitute a strong coffee.
- Amaretto liqueur – This sweet and nutty liqueur adds the signature tiramisu flavor. My go-to brand of quality amaretto is Disaronno.
- Mascarpone cheese – It’s a soft Italian cheese that has a unique and subtle flavor. Although I highly recommend using mascarpone cheese, you can use cream cheese instead, but keep in mind the flavor will be slightly different.
How to make this layer cake:
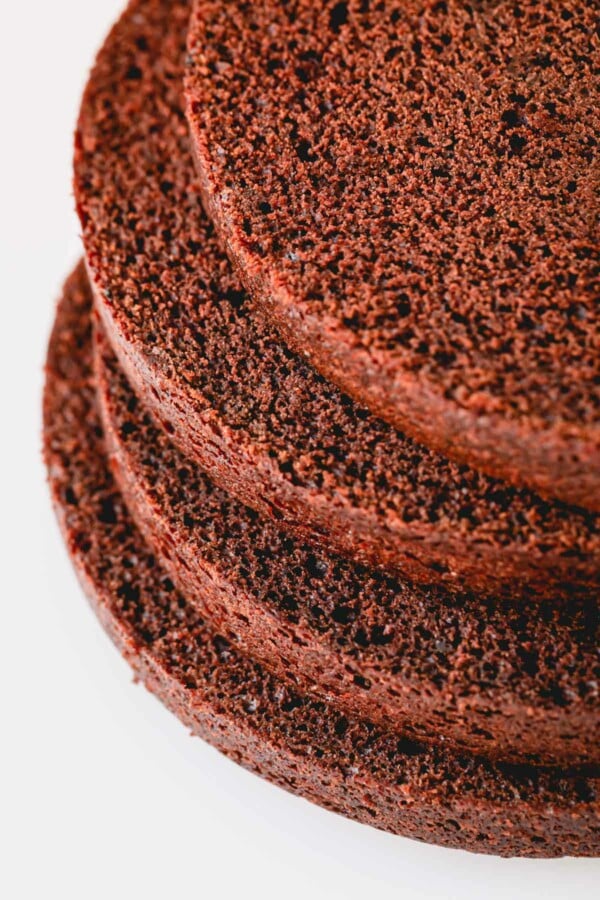
1. Sponge cake
We’ll start with making cake layers, which can be made up to a month in advance. The light and airy sponge cake layers are sturdy enough to soak up all the espresso and make an ideal base for this layer cake.
And since I have a dedicated post on how to make this classic sponge cake (with step-by step photos and even video), I won’t bore you with details.
2. Mascarpone Cream Filling
This is the BEST part of the cake, I think! I absolutely adore this cloud-like filling that is not overly sweet, ultra-fluffy and light!!
This delicate filling is best when it’s made right before assembling the cake.
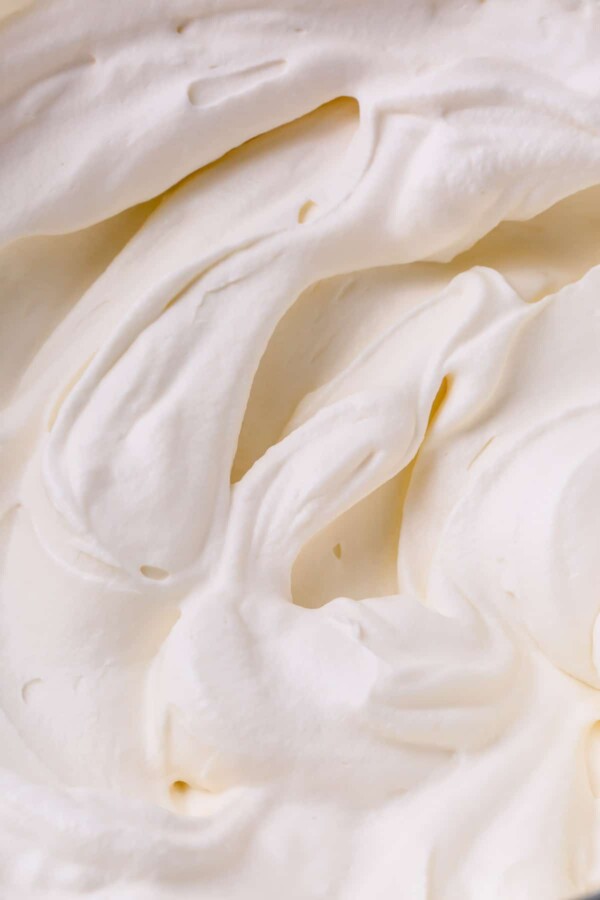
- Combine mascarpone cheese, sweetened condensed milk and vanilla and whisk it until well combined.
- In a separate bowl, whip heavy cream until stiff peaks form.
- Fold in half of the whipped cream into mascarpone mixture, then add remaining whipped cream and gently fold until well combined.
3. Espresso Syrup
It’s not really a syrup, but it won’t be a tiramisu without this mixture!
- Dissolve espresso powder in 1/2 cup of hot water.
- Stir in amaretto liqueur.
4. Assembling
You can assemble the cake a day or two prior to serving. The beauty of this cake is that it gets better as time goes, because sponge cake layers soak up all the flavors from the filling and becomes even better!
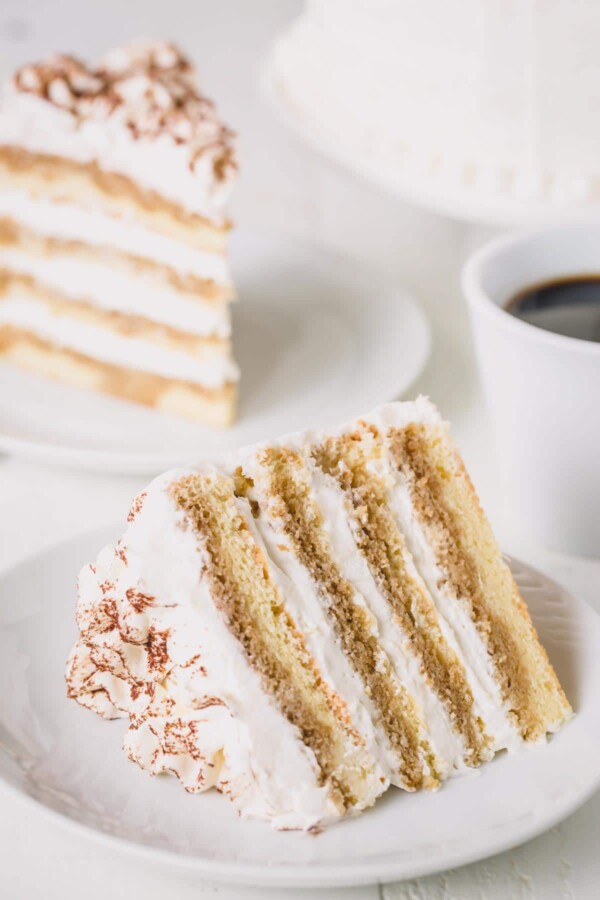
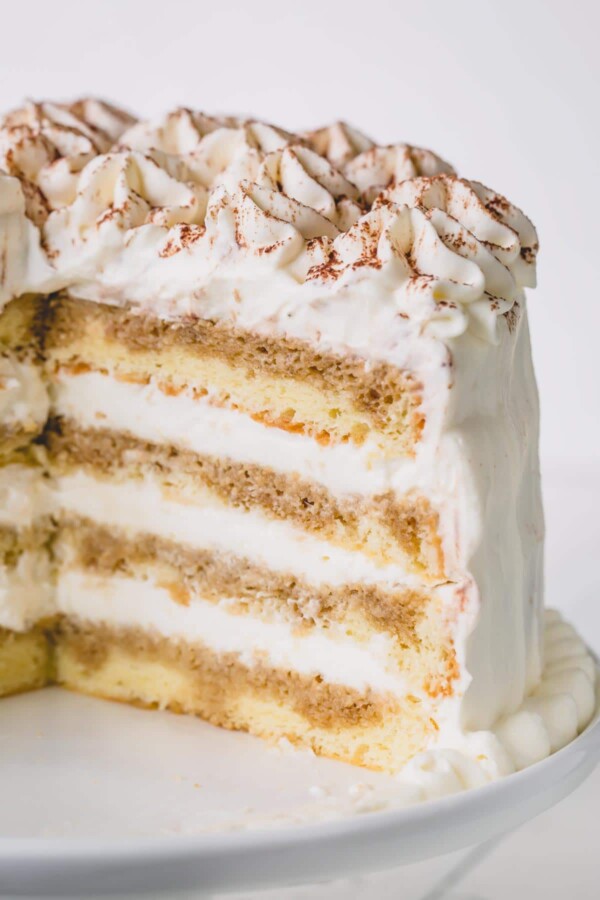
- Slice the cakes into 4 even layers.
- Put a dollop of filling on a cake board and place the first cake layer.
- Drizzle 1/4 of espresso mixture evenly all over the cake.
- Then spread a generous amount of filling over the cake layer.
- Place the next cake layer and repeat steps 3 and 4 until the last layer.
- Once all the layers are stacked, cover the cake with half of the remaining filling to crumb coat the cake. Refrigerate it for at least 1 hour to firm up.
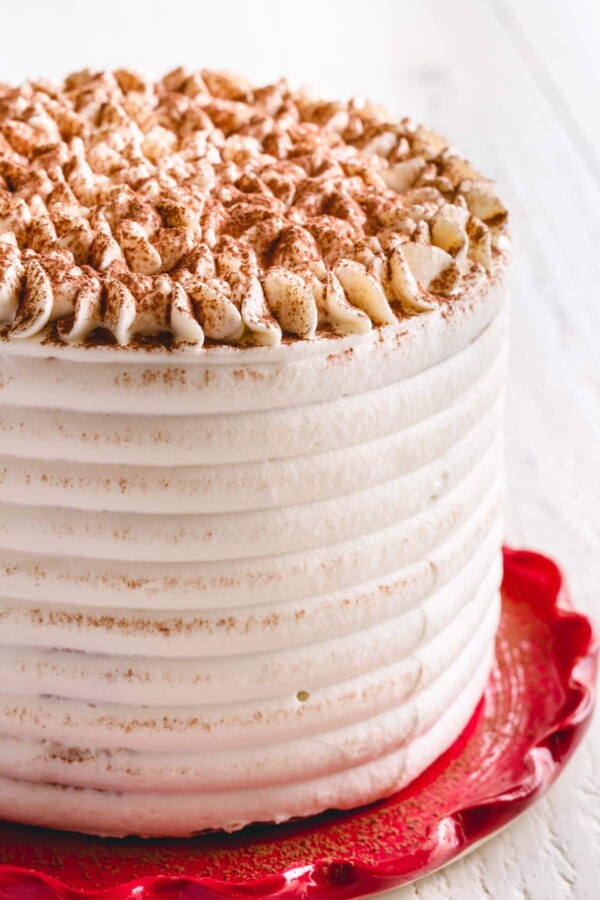
- Then frost the cake with the remaining filling and decorate, as desired. Since the filling is soft and fluffy, you won’t achieve perfectly smooth and hard frosting.
- Dust the final cake with cocoa powder and refrigerate until ready to serve.
Tip
If you want, you can also add shaved chocolate in between the layers. It’s a great addition, but it’s not necessary. Just a little something.
Hope you’ll make this tiramisu layer cake!! I promise you won’t regret it!

Tiramisu Layer Cake
Ingredients
For sponge cake:
- 6 large eggs at room temperature
- 1 cup (200 g) granulated sugar divided Note 1
- 1 ½ cups (180 g) cake flour
- ½ teaspoon salt
- 1 teaspoon pure vanilla extract
- ¼ teaspoon almond extract
For coffee syrup:
- ½ cup (120 ml) hot water
- 2 teaspoons instant espresso powder Note 2
- 3 tablespoons (45 ml) amaretto liqueur Note 3
For tiramisu cream:
- ½ cup (120 ml) sweetened condensed milk
- 8 oz (225 g) mascarpone cheese softened Note 4
- 1 teaspoon pure vanilla extract
- 2 cups (480 ml) heavy whipping cream cold
- 1 tablespoon (5 g) unsweetened cocoa powder for dusting, optional
Instructions
To make sponge cake:
- Preheat the oven to 350°F (177°C). Line bottom of two 9 or 8-inch cake pans with parchment paper. No need to grease the pans.
- Separate egg whites and yolks, making sure not even a little bit of egg yolk gets into the whites. (TIP: It's easier to separate the egg when they're cold right out of the fridge.)
- In a mixing bowl with whisk attachment, whisk together egg yolks, ½ cup of sugar, vanilla and almond extracts until pale and tripled in volume, about 5 minutes.
- Meanwhile, sift flour and salt.
- In another mixing bowl with whisk attachment, beat egg whites at medium low speed until foamy.
- Add remaining ½ cup of sugar 1 tablespoon at a time and continue to whisk until stiff peaks, gradually increasing the speed to medium high, 7-10 minutes.
- Using a spatula, add 1/3 of the whipped egg whites into the egg yolk mixture and gently fold until mostly smooth. Add the remaining egg whites and gently fold until smooth.
- Add sifted flour into the batter in 3 stages, whisking the batter well after each addition.
- Pour the batter into prepared pan and smooth the top.
- Bake the cake for 25-30 minutes, or until inserted toothpick comes out clean. Don’t open the oven for at least the first 20 minutes!
- Let the cake cool for 5 minutes in the pan. Then run a knife around the edges and invert onto a cooling rack. Cool completely. Once cooled, wrap with plastic wrap and refrigerate for at least 2 hours or preferably overnight. It’ll be easier to cut when the cake is thoroughly chilled.
To make espresso syrup:
- Dissolve espresso powder in 1/2 cup of hot water. Then stir in amaretto liqueur.
To make tiramisu cream filling:
- In a mixing bowl with whisk attachment, beat mascarpone cheese, sweetened condensed milk and vanilla extract until combined.
- In a separate bowl, whip the heavy cream until hard peaks form.
- Gently fold in half of whipped cream into mascarpone cheese mixture. Then add the remaining whipped cream and mix until well combined. Refrigerate until ready to use.
To assemble the cake:
- Once the cake is completely cooled, slice each cake horizontally into 2 even layers.
- Put a dollop of filling on a cake board and place the first cake layer.
- Drizzle 1/4 of espresso mixture evenly all over the cake.
- Then spread a generous amount of filling (about 1 cup) over the cake layer.
- Place the next layer and repeat until all the layers are stacked.
- Cover the cake with half of the remaining filling to crumb coat the cake. Refrigerate it for at least 1 hour to firm up.
- Then frost the cake with the remaining filling and decorate, as desired. (I used Wilton 1M tip for the top.) NOTE: Since the filling is super soft and fluffy, you won't achieve perfectly smooth and hard frosting.
- Dust the final cake with cocoa powder and refrigerate until ready to serve.
⭐️ Did you make this recipe?
Please leave a review and let us know how you liked it!
Tips & Notes
– The sponge cake, tightly wrapped in a plastic wrap, can be refrigerated for up to 1 week, or frozen for up to 1 month.
– Cake can be assembled 1-2 days in advance.
Nutrition
This recipe was originally published on June 17th, 2013.


Does it taste just as good with the strong coffee?? What’s the difference between PLAIN cake flour and cake flour??
Hi, Tina. Oh, silly me, there’s no difference between *plain* cake flour and cake flour. No idea why I put it that way. Thanks for pointing it out. And as for the strong coffee, it’s a personal preference. Espresso powder/espresso shots are highly concentrated. It’s hard to duplicate its bold and rich flavors with a strong coffee.
Hello! Planning to make this cake in a day or two. Do you think maple syrup could substitute well for sweetened condensed milk in the Tiramisu Cream?
Hi, Madison. Thanks for reaching out. I don’t recommend it. Maple syrup has completely different flavor profile and I don’t think you’ll like maple syrup flavor in your tiramisu cake.
Thank you for your quick reply! I made it with sweetened condensed milk as the recipe says and it was amazing. Wonderful recipe and I will make again.
Yay, so glad you loved it. Thanks so much, Madison!
This recipe looks so good. I’m planning to make it for Father’s Day. Just a few questions. I generally freeze my cake rounds for a couple days and then decorate while frozen, would that be an issue with this sponge? Also wondering if this cake is good served straight from the fridge, or should it sit at room temp for a little while? Last question.. could I add a small amount of Kahlua to the filling or would it throw off the texture? Thanks in advance!
Just made this! It was wonderful! I only had 9” pans but I made the recipe as shown and just had thinner cakes. It worked out fine. The only thing that I would adjust if using a 9” pan is maybe making more coffee syrup since you will have more surface to drizzle it over. I used kahlua instead of amaretto. Definitely making this again! Thank you for the recipe.
Yay, so happy you tried my recipe and loved it!! Thank you for your feedback, J!!
Hi, I plan on making this yummy cake for my parents anniversary. I have a sister-in-law that is pregnant and I’m wondering how can I still use the liquor but burn off the alcohol? Thank you
Hi Shinee,
Thanks for this recipe can’t wait to try this out. In the frosting recipe should the mascarpone be at room temperature or should it be chilled?
Hi, Sravani. It should be at room temperature.
In the instructions for the sponge cake, you don’t mention when to add the vanilla extract or almond extract…. So I forgot to add it. Can I just add to the icing instead? Or should I start over with the cake?
Hi, Ashley. OMG, I’m so sorry for my mistake! The extracts should have went into the egg yolks. But don’t worry about it, you can totally omit it. In fact, my 3-ingredient sponge cake (the base recipe for this one) doesn’t call for those extracts. Don’t even worry about adding them to the icing. Just make the filling and soak the cakes with the coffee syrup as instructed. They’ll turn out just as great! Again, I apologize for my mistake and hope you’ll enjoy the cake. And thank you for asking!
Hi! I am so excited to make this cake and was wondering if 1) I could use regular all purpose flour and 2) would the cake store in the fridge for a day prior to making the frosting/layering? Thank you!
This cake was super easy to make. I used 8 inch cake ans and didn’t change anything about the recipe. The cream icing was so yummy!
Awesome, Robin! Thank you for sharing your feedback. So glad you enjoyed the cake!
This is a yummy cake! I made it for Easter. I used 9 inch pans and used the 1.5 multiplier. Worked fine except I forgot to use it on the syrup and cream. I had enough cream (less the decorative touches), but I had to try to make up a bit more for the top layer. Overall, really good. I’ll try to remember to take a picture of it before it is all gone. Takes up a lot of room in the frig.
Hi, Teena! Thank you for sharing your feedback! I’m glad you enjoyed the cake, and bummer on being short on syrup and cream. But glad it all worked out in the end. 🙂