
Cheesy, creamy, and dippable, 3-ingredient bean dip takes less than 30 minutes to make! It requires minimal effort for maximum flavor and pairs perfectly with chips and tacos.

Why you’ll love this bean dip recipe:
Who can resist a classic bean dip covered in melty cheese? Here’s why you need this irresistible dip:
- Only 3 ingredients and 5 minutes of prep time
- Delicious addition to your favorite Mexican recipes
- Budget-friendly for a crowd
Enjoy this hot and bubbly dip with a side of tortilla chips, nachos, crackers, or sliced bell peppers!
Key Ingredient Notes:
This easy bean dip requires three simple ingredients, so make them count!
- Refried beans – Since refried beans are the foundation of this recipe, it’s important to buy a quality brand with good flavor. Rosarita and Gebhardt are solid choices.
- Salsa – As for salsa, make sure it’s not too runny. The thicker, the better! Or the dip will get too runny. Also, you can choose hot, medium, or mild, whatever your heart desires. I love mine spicy!
- Cheese – I used a mix of sharp cheddar cheese, mozzarella, and Monterey jack cheese, but you can use whatever you have on hand.
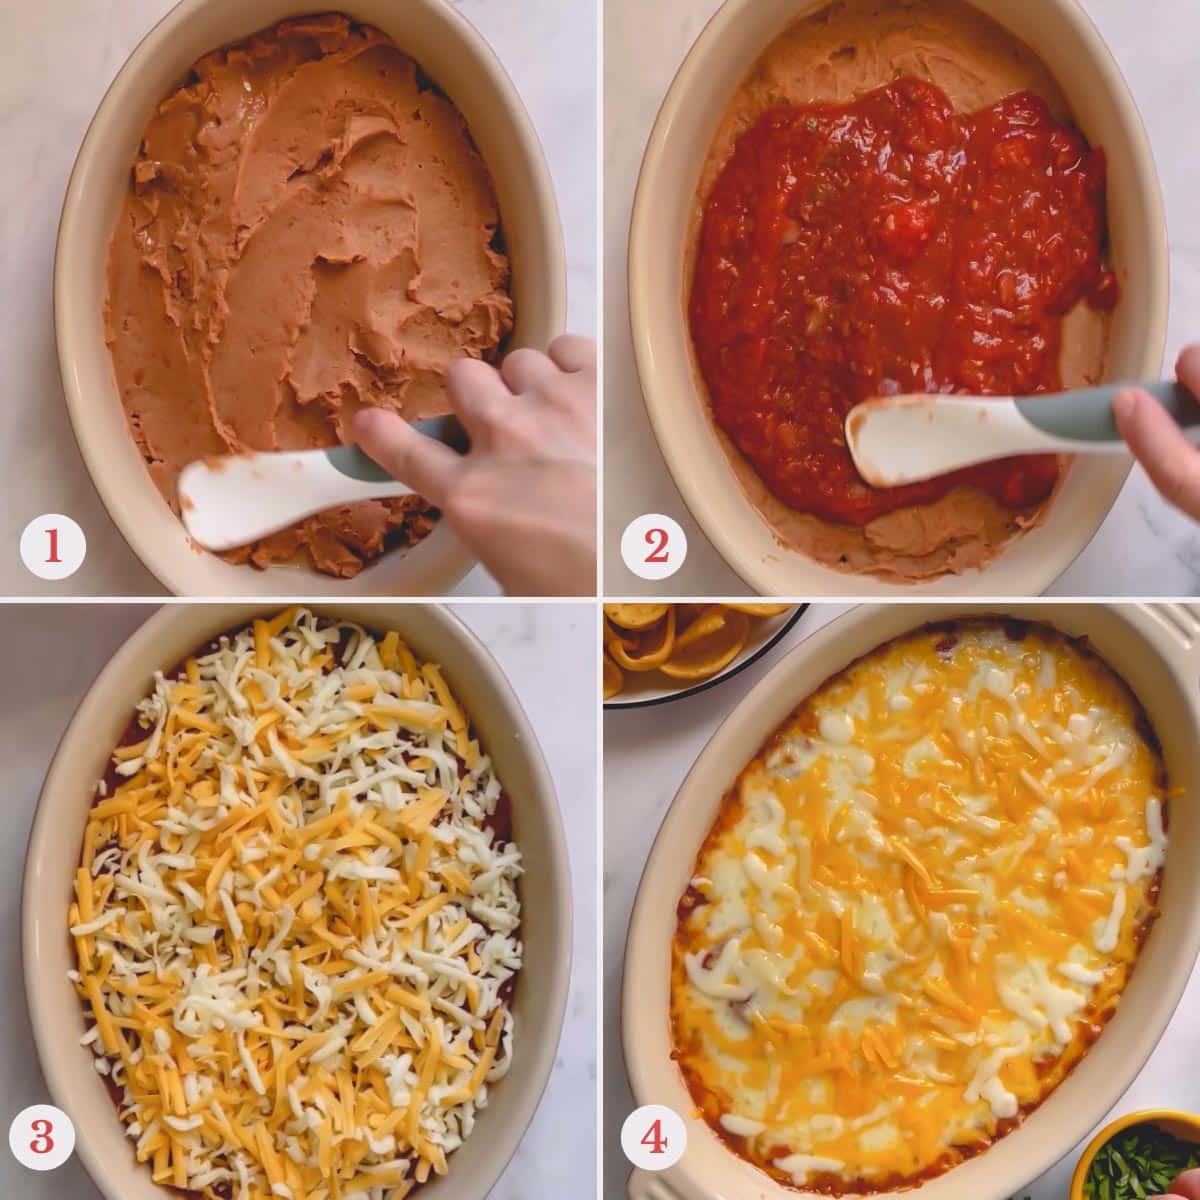
How to make bean dip:
- First, preheat the oven so it’s up to temperature once you’ve assembled the dip. Lightly spray the baking dish with nonstick spray.
- Layer the refried beans and the salsa in the baking dish. Sprinkle the shredded cheese evenly over the top.
- Bake until the cheeses are hot and bubbly – about 25 minutes or so.
- Top with fresh cilantro, if desired. And serve with tortilla chips.
Variations:
- If you prefer, you can swap out the refried beans for refried black beans!
- Toppings aren’t necessary, but always delicious! Sour cream, sliced avocado, cherry tomato halves, pickled jalapenos, diced red onion, or scallions are great options!
- For a little heat, stir canned green chiles into the refried beans before layering.
- For a flavor boost, stir taco seasoning into the refried beans before layering.

Make-Ahead Tips:
Since refried bean dip is so quick to put together, it doesn’t save much time assembling ahead of time but you certainly can! Cover the homemade bean dip with plastic wrap and refrigerate until ready to bake.
Storing Tips:
- Store bean dip in an airtight container in the refrigerator for up to 4 days.
- For best results, reheat the dip in the oven at 350 degrees Fahrenheit. The microwave works too if you’re short on time.
- To freeze, transfer the cooled bean dip into a sealed freezer-safe container. Use within 2 months for best results.
- Let the bean dip defrost in the refrigerator and then reheat in the oven or microwave.
Leftover Ideas:
- Use it to make quick tostadas! Top baked corn tortillas with leftover bean dip and cooked ground beef. Add your favorite toppings and enjoy!
- Spread into a flour tortilla with extra cheese for an easy, flavorful quesadilla. Grill or warm in a hot skillet.
- Top tortilla chips with lots of cheese and leftover dip then bake! Top with lettuce, sour cream, and diced tomatoes for kid-friendly nachos!

More Amazing Dips:
If you love a cheesy dip, try one of these delicious dips!
I found this bean dip recipe in one of the cookbooks I own, The Mystery Writers of America Cookbook, edited by fabulous suspense novel writer and former editor-in-chief of Cosmopolitan, Kate White (I’m sure you know her!)
Now, go ahead and add this to your next game day menu. 😉

3-Ingredient Bean Dip
Ingredients
- 1 (16oz/450gr) can refried beans Note 1
- 16 oz (450g) salsa Note 2
- 12 oz (350g) grated cheese Note 3
For serving:
- Fresh cilantro chopped, for garnish, optional
- Tortilla chips
Instructions
- Preheat the oven to 350°F (175°C). Lightly spray 8×8-inch (20x20cm) baking pan with a cooking spray.
- Layer the beans and salsa in the prepared baking dish. Spread the cheeses evenly on top.
- Bake it for about 25 minutes, or until cheese is bubbly and slightly brown.
- Top with fresh cilantro and serve warm with tortilla chips.
⭐️ Did you make this recipe?
Please leave a review and let us know how you liked it!
Tips & Notes
– Store bean dip in an airtight container in the refrigerator for up to 4 days.
– For best results, reheat the dip in the oven at 350 degrees Fahrenheit. The microwave works too if you’re short on time.
– To freeze, scoop the cooled bean dip into a sealed freezer-safe container. Use within 2 months for best results.
– Let the bean dip defrost in the refrigerator and then reheat in the oven.
Nutrition

This recipe was originally published on September 28th, 2015.


Nice recipe excpet I don’t see how to layer the base, is it beans on bottom, then salsa in middle (cheese last of course)? Thanks Susie E.
Yes, spread the beans on the bottom, then salsa and top with cheese. There’s a video in the post that shows the entire process. 😉
Love simple, this is a great dip Shinee!! Even without the beer. (!)
Thanks, Allie!
Yes I does. Thank you.