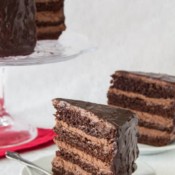
For serious chocolate lovers! This decadent chocolate cake with chocolate mousse filling is THE thing to satisfy your chocolate craving!
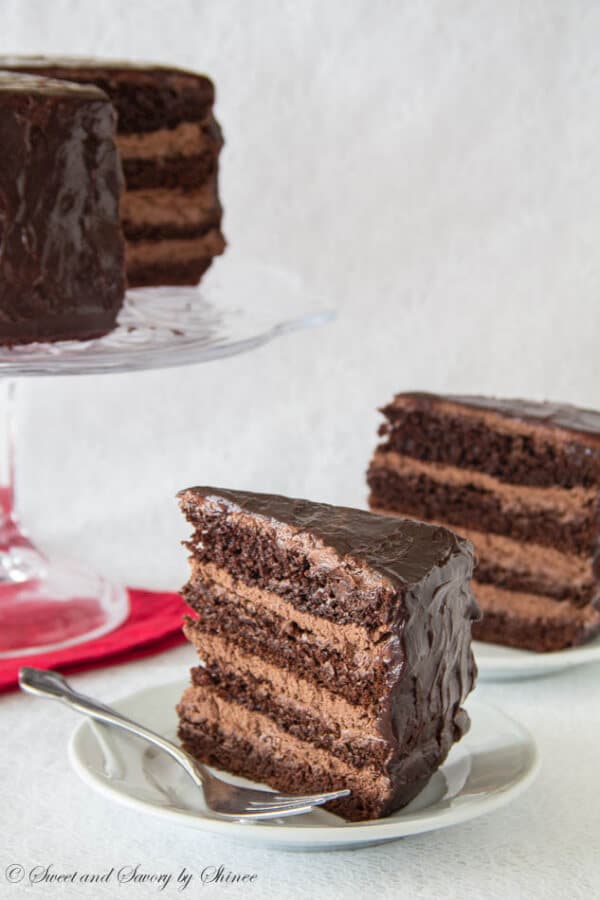
Table of Contents
I have to warn you, this cake is SO delicious it might just become a reason for a fight in your family. 🙂
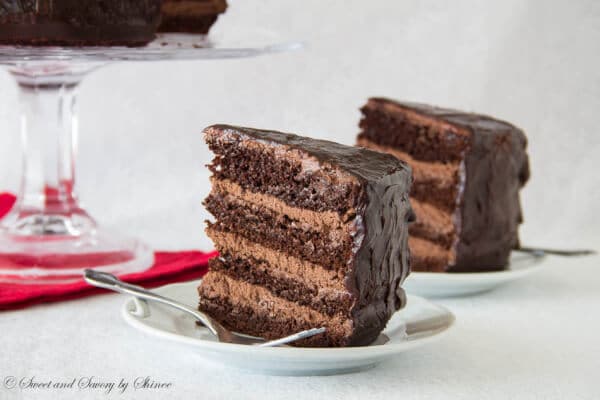
I made this chocolate cake for my husband for Valentine’s Day. The cake turned out amazing. Rich and moist, irresistibly chocolaty. Although just two of us could have finished the whole cake without problem, we shared it with our family. (Yep, we’re that awesome! 😉
Couple weeks later when I was visiting, my mother-in-law told me about the drama over the last piece of cake. My father-in-law loves chocolate and, apparently, he was savoring the cake one small piece at a time. When he came back to enjoy his last piece of this heavenly dessert, it was nowhere to be found. No one knew where it is, and no one would admit eating it. Yep, just like that, the last slice of the cake had disappeared without a trace. Sadly, my poor father-in-law had been grumpy for a week, wondering about the mystery of the missing cake.
That was a great excuse for me to bake this cake again.
The first one had a small issue that I needed to fix. The problem was that I was lazy and baked the whole cake in one deep 9-inch cake pan, instead of two. This caused an ugly sinkhole in my final cake. See below.
I know it doesn’t really matter, as it still tastes wonderful.
However, I think it’s important to understand the reason behind the problems, so we can avoid them later. So, here is the explanation.
Since the batter is very runny due to high amount of liquid, there isn’t enough structure to hold a high rise even after the cake is baked completely. That’s why it’s important to bake them in two separate pans.
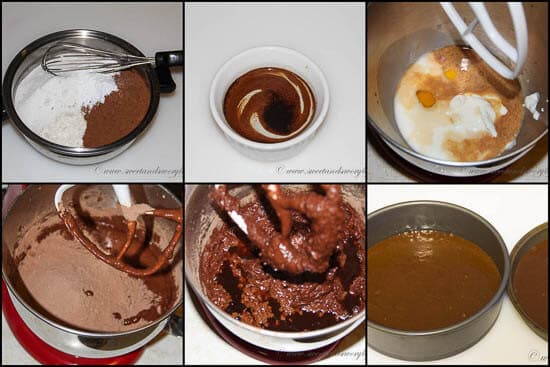
Now, here is the step-by-step instruction for this amazingly delicious cake.
If you don’t have instant espresso powder, use strong coffee instead, or skip it. You really won’t taste the coffee, it just enhances the chocolate flavor.
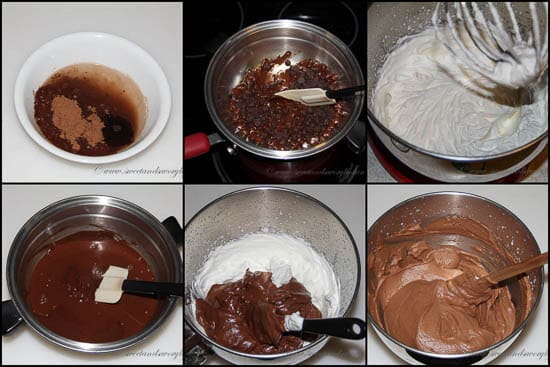
While the cake is cooling, prepare the chocolate mousse filling.
To assemble the cake:
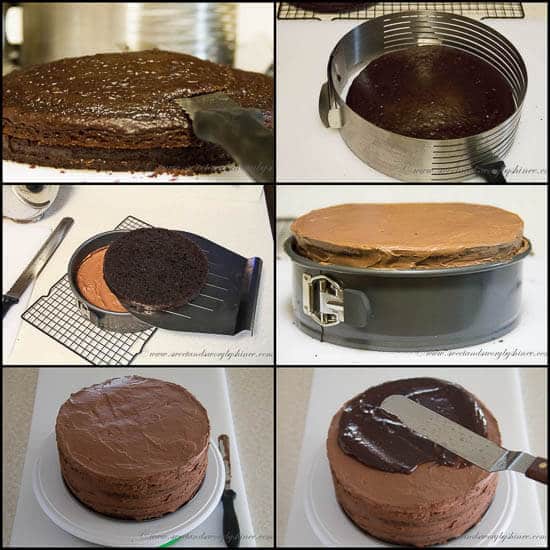
To slice the cake into even layers, I used this Zenker Layer Cake Slicer Kit. It makes perfectly even layers and I love it. Make sure that the cake is completely cooled before slicing though, otherwise it’ll break easily.
You can find the detailed recipe for chocolate ganache here on my blog.
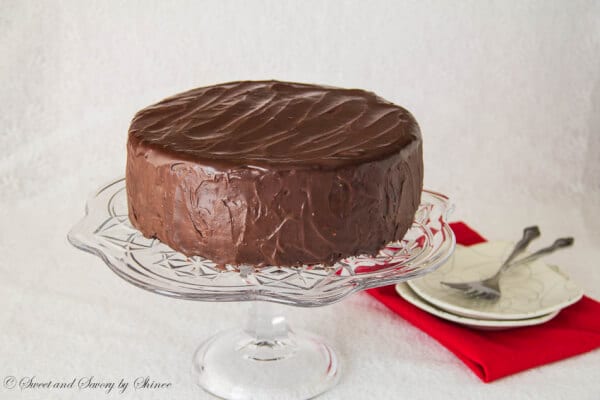
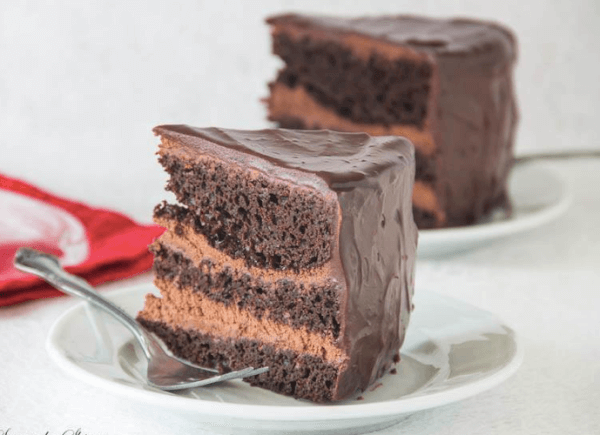
Voila!
It paired really well with my homemade vanilla bean ice cream!
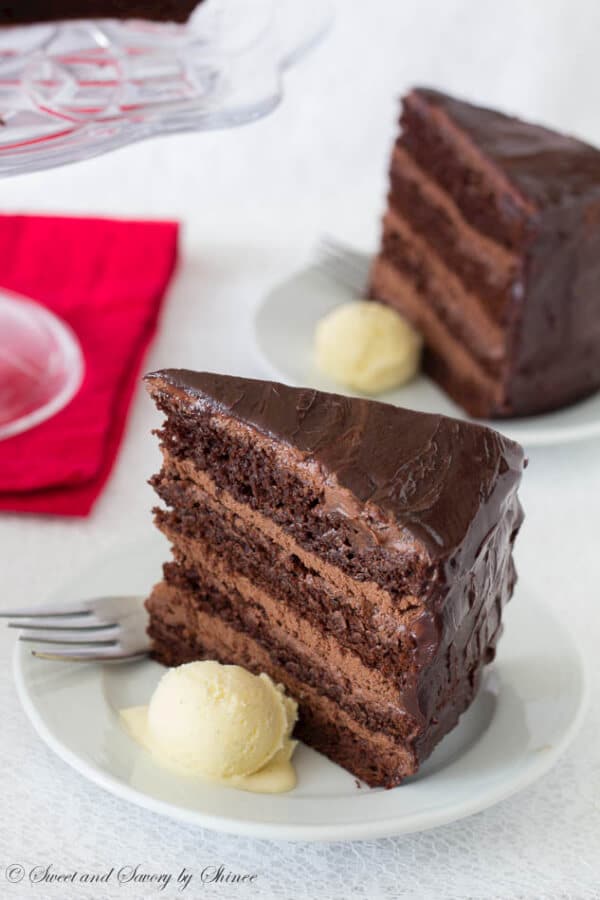
Hope you’ll try this cake soon. And please don’t fight over that last piece of cake. Enjoy!

Supreme Chocolate Cake with Chocolate Mousse Filling
Ingredients
For cake:
- 2 cups 250gr all-purpose flour
- 1 ½ cups 300gr sugar
- ¾ cup 90gr unsweetened cocoa powder
- 1 ½ teaspoons baking soda
- 1 ½ teaspoons baking powder
- ½ teaspoon salt
- ½ cup 120ml hot water
- 1 teaspoon instant espresso coffee
- 2 large eggs at room temperature
- 1 cup 240ml milk, at room temperature
- ½ cup 120ml Greek yogurt, at room temperature
- 1 tablespoon pure vanilla extract
For mousse filling:
- ½ cup 120ml hot water
- 4 tablespoons 30gr unsweetened cocoa powder
- ½ teaspoon instant espresso coffee
- 1 ½ cup 260gr bittersweet chocolate chips
- 2 cups 480ml heavy cream, cold
- 2 tablespoons sugar
- 1/3 cup Nutella
For chocolate ganache:
- ½ cup heavy cream
- 1 cup chocolate chips
- 1 tablespoon softened butter optional
Instructions
- To make the cakePreheat the oven to 350°F (175°C). Grease two 9-inch round cake pans.
- In a medium bowl, whisk together flour, sugar, cocoa powder, baking soda, baking powder and salt. Set aside.
- In a small bowl, mix together water and instant espresso coffee. Set aside.
- In a mixing bowl with paddle attachment, mix together eggs, milk, yogurt and pure vanilla extract until well combined. Add half of the flour mixture for a minute, then add the remaining mixture and mix until just combined. Stir in the espresso water.
- Pour the batter into two cake pans. Bake for about 30-35 minutes, or until inserted toothpick comes out clean. Cool on wire racks for 10 minutes. Then remove the cakes from the pan and cool completely.
- Meanwhile, let’s prepare the chocolate mousse filling. In a small bowl, dissolve cocoa powder and instant espresso powder in a hot water.
- In a double boiler, melt chocolate chips until nice and smooth. Remove from heat and cool slightly.
- In a mixing bowl with whisk attachment, whip the heavy cream with the sugar until hard peaks form.
- Stir in the cocoa mixture and Nutella into the melted chocolate. Add half of the whipped cream and mix everything together with folding motion. Fold in the remaining whipped cream and mix well until no white streaks remain. Refrigerate until the cake is cooled completely.
- To assemble the cake, slice the cakes horizontally into two equal layers, using a long serrated knife. If your cakes got a small hump as pictured, just slice it off.
- Put the first cake layer into a springform pan and spread about a little less than 1/3 of the mousse filling. Then put the next layer of the cake and spread the mousse and so on until the cake is built. Make sure to leave a bit of mousse to cover the top of the cake. A very thin layer of mousse on top is all you need. Refrigerate the cake for at least 2 hours or overnight.
- Once the cake is cooled, make the chocolate ganache. In a small saucepan, bring heavy cream to a simmer. Do not boil. Pour hot cream over chocolate chips, and let it sit for good 2 minutes. Then mix well until smooth for couple minutes. Stir in butter to add some shine.
- Remove the springform sides. Pour the ganache over the cake while the ganache is still runny, if you want smooth glaze. Or, you can let it cool and thicken a little bit to spread as a frosting.
Nutrition


This has definitely become my go-to recipe for chocolate cake!
I always find though that the melted chocolate hardens in little bits when I fold it into the cream. Any tips/recommendations to prevent that from happening?
Thank so much for your blog!
Hi, Jackie. Happy to hear you love this recipe. As for chocolate hardening issue, do you incorporate half of the whipped cream into chocolate first? Also do you modify anything at all as far as ingredients? Like do you use Nutella, etc?
I definitely love the recipe – it’s a great ‘base’ recipe for moist sponge cakes too! I actually made it again last night for a colleague’s birthday and the chocolate hardening issue didn’t happen anymore 😀 I think that I had let the chocolate cool too much in previous times, and mixing it in with the cold whipped cream made it harden into bits. I did use all the ingredients listed every time. Thanks for getting back to me!
Yay, so good to hear you made it again! And glad you found out why that issue was happening. Thank you, Jackie!
First off, a big thank you for this recipe. I love baking but this was my first try at a cake, and a layered one at that! I followed all the instructions, only thing is since I didn’t have all purpose flour, I used normal flour or maida, as we call it in India. Secondly, before applying the mouse layer, I brushed each cake layer with just a bit of Bailey’s Irish Cream, and lastly, after reading your comments, i let the ganache cool and thicken slightly, as I didn’t want to pour it on. And it was absolutely delicious!! Thank you so much for this recipe. My family loved it.
Yay, Michelle! So happy you made and enjoyed the cake. I love the Irish Cream addition! Thank you for your feedback!
Hello Shinee,
This is the Best Chocolate Cake ever! I made it for my sons Birthday and it was a winner. I couldn’t stop eating it…yummy!
Hi, Debbie! Yay, I’m so glad you all loved the cake! Happy Birthday to your son. And thank you for your feedback!
Hi! Shinee. Made this chocolate cake for my son’s 11th birthday today because he requested for one. Made the cake yesterday and the rest today. Boy oh boy!…was it delicious! A BIG thumbs up from the family.
This is my first time baking a cake at this level and I normally sucked at it. Thank you for the recipe and the steps are easy and straight forward. I had a little help from my daughter too.
I made some changes to the recipe to suit our taste as my son doesn’t like bittersweet chocolate and my husband doesn’t like his cake too sweet. This was what I did:
For the cake, instead of sugar, I used raw sugar. Plaistowe Premium Dutch Processed Cocoa powder.
For the mousse filling, instead of bittersweet chocolate, I used 1 cup of milk chocolate melts and 1/2 cup dark chocolate melts.
Finally for the ganache, I used 1/2 cup of milk chocolate melts and 1/2 cup of dark chocolate melts.
Karen, thank you so much for your feedback and the photo!! Your cake turned out stunning! Wow! And I’m so happy that everyone loved it. And thanks for sharing your changes, it’s helpful!
Hello,
This looks amazing! I am planning on making one tomorrow for a birthday! I am wondering…how many cups of batter goes in each pan?
Thanks!
Hey, Lubna. Sorry for delayed response. But I’ve never measured the batter by cup when I pour into the pans. I just eye ball it. Hope the cake turns out great for you. Let me know.
Made this cake on Saturday for my daughter’s 18th birthday. She specifically requested a chocolate – chocolate mousse cake. The emphasis you put on letting the cake cool was spot on, this recipe would be a disaster if the cake wasnt cooled. I used floss to cut the layers of cake because I don’t trust myself to cut evenly with a knife. I made the rest of the recipe as it was written. My daughter told me it was the best food she had ever put in her mouth. Husband and sons also loved it! Thanks for the recipe!
Aww, Susan. Your cake turned out absolutely beautiful!!! Thank you for sharing the photo and for your feedback. I’m so happy your daughter loved the cake!
Hi Shinee,
This looks amazing! I am going to attempt this on Friday for my sister’s boyfriend who is turning the BIG 3-0!
Given the short time I have I was going to get a pre-made naked cake that is 12 inches circumfrence and 3 inches tall. I just had a couple of questions:
Can I make the mousse a day in advance? – I need the cake for Saturday and can only assemble it on Friday. Is it okay if I make the mousse on Thursday and then assemble it on Friday for celebrations on Saturday? Will it spoil?
Also, do you think it’d be okay if I just cut the cake in half and added the mousse in between, rather than cutting the cake a few times for filling. Will a thick mousse filling instead of a thinner filling be okay?
I am planning on putting choc decorations, srawberries on top of the ganache also, will the cake be sturdy enough to support that?
Thanks in advance.
Hi, Sally. I highly recommend making the mousse when you’re ready to assemble the cake. When you make it a day in advance, it hardens in the fridge, not spreadable. And it curdles, when you try to whip it. I’d suggest cutting the cake into 3 layers. The cake is pretty sturdy for decorations.
Thanks Shinee for your advice.
Since I have to let the mousse set on the cake, would it be okay if I put the mousse on the cake Thursday (place in fridge overnight) and then the ganache and decorations on the Friday?
Yes, you can assemble the cake on Thursday, and decorate it on Friday. I’d cover the cake well to store. Hope you enjoy! Let me know.
Really nice and great cake. Thanks for sharing it here.
Thank you, Ravi, for your feedback. So glad you liked it!
Can I use canned whipped cream. My husband bought the wrong cream .
Oh no! 🙂 I’m honestly not sure, I’ve never used canned whipped cream other than in coffee.
Hi, reading the recipe I noticed there’s no oil or butter. Is that on purpose?
Yes, it’s not a mistake, Liza. It works just fine without oil/butter.
Hi ,i was wondering if i had to use unsweetened cocoa powder for the chocolate mousse? Thank you
Hi, Emma. You’ll need unsweetened cocoa powder.