Incredibly light and tender, these English scones have fluffy cake-like crumb and are quick and easy to make. All you need is a handful of ingredients and 30 minutes of your day!
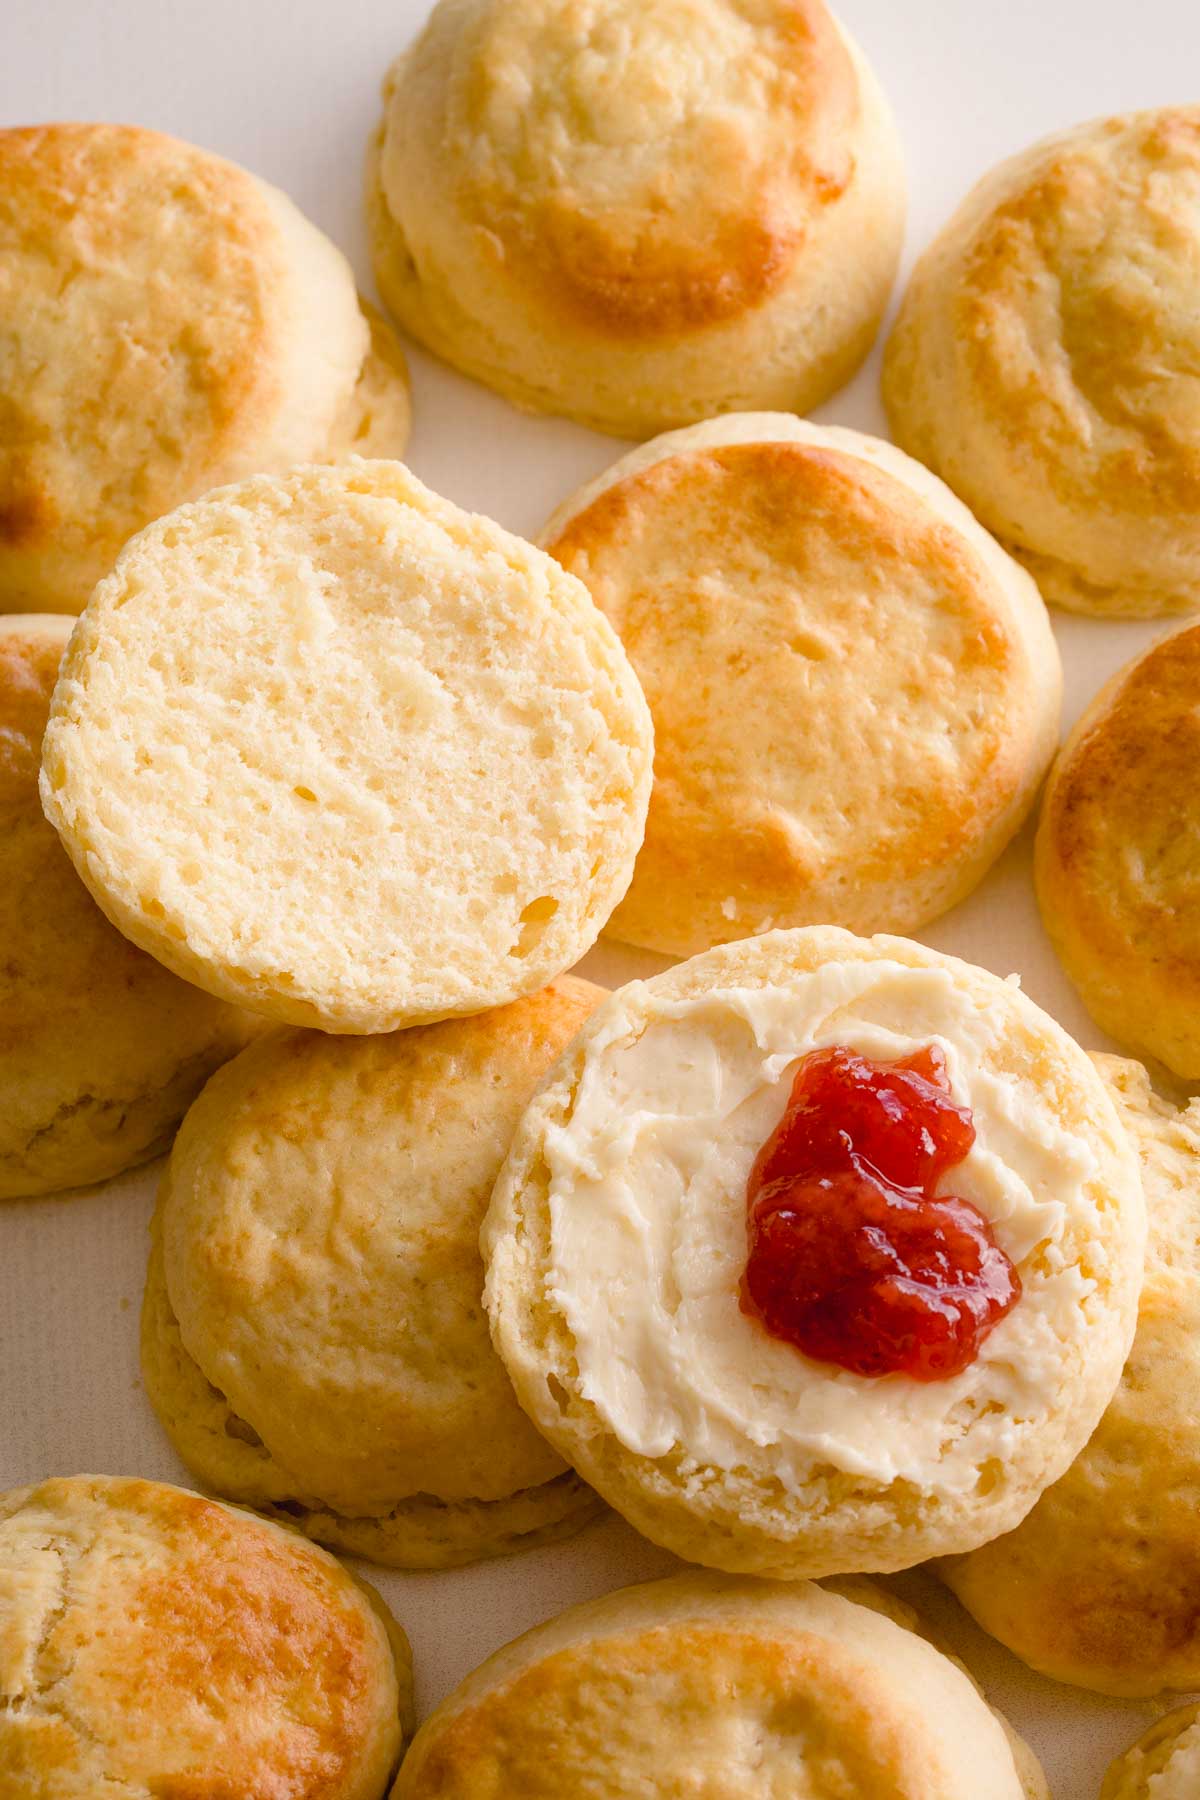
Table of Contents
I’ve never been a fan of scones… Or so I thought…
Until my husband and I had an Afternoon tea at Savoy in London, and we were treated with the most deliciously moist and tender English scones for our first course. The tender cake-like texture was absolutely addicting!! And you betcha, we asked for more seconds!
Why you’ll love these scones:
- Incredible texture: light and tender, cake-like crumbs.
- Not too sweet.
- Quick and easy to make: comes together in less than 30 minutes!
- The secret mixing method ensures tender scones every time!
- Basic ingredients allows you can whip these up any time!
Key Ingredients:
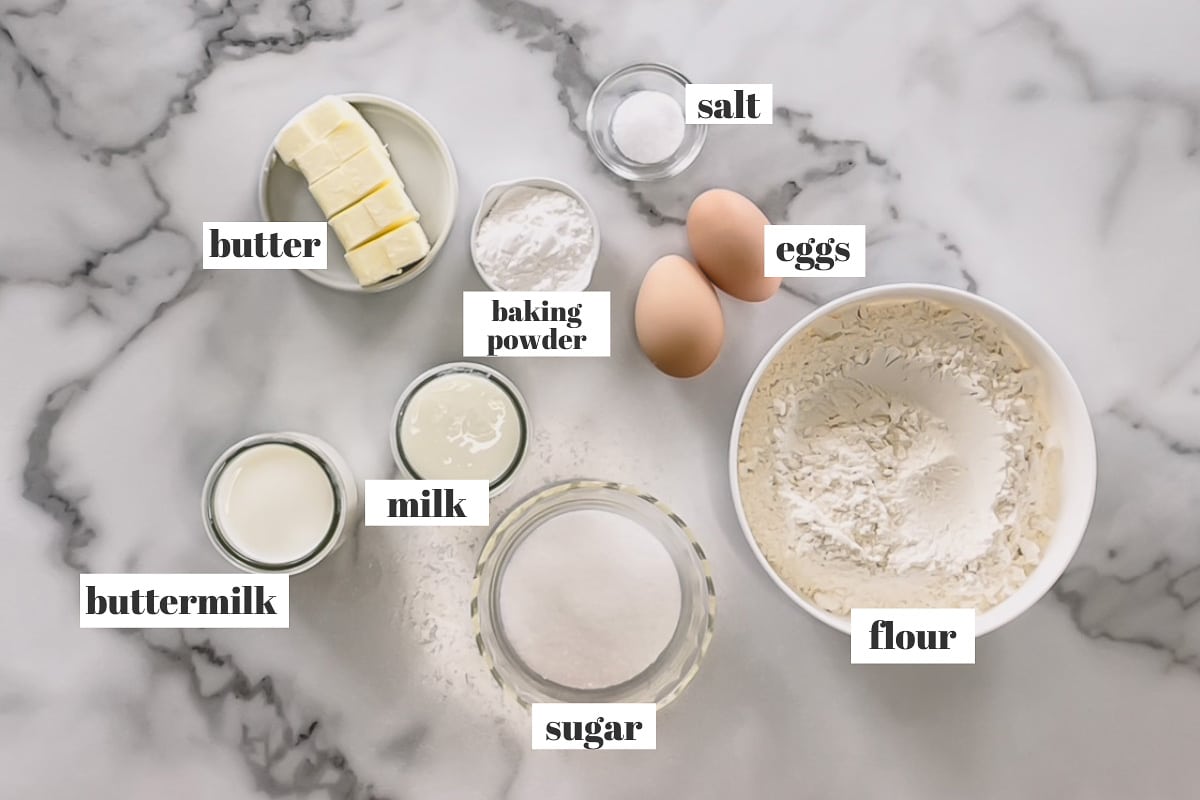
- Flour – All-purpose flour works perfectly for this scones recipe.
- Sugar – A touch of granulated sugar adds just enough sweetness.
- Buttermilk – In a pinch, substitute one of the DIY buttermilk options here.
- Milk – While any type of milk works in this recipe, I recommend whole milk for richness.
- Baking powder – Don’t be alarmed by the amount of baking powder. It helps to create that fluffy soft texture!
How to make these scones:
Disclaimer: I slightly adapted English scones recipe on Cook’s Illustrated.
To make the dough:
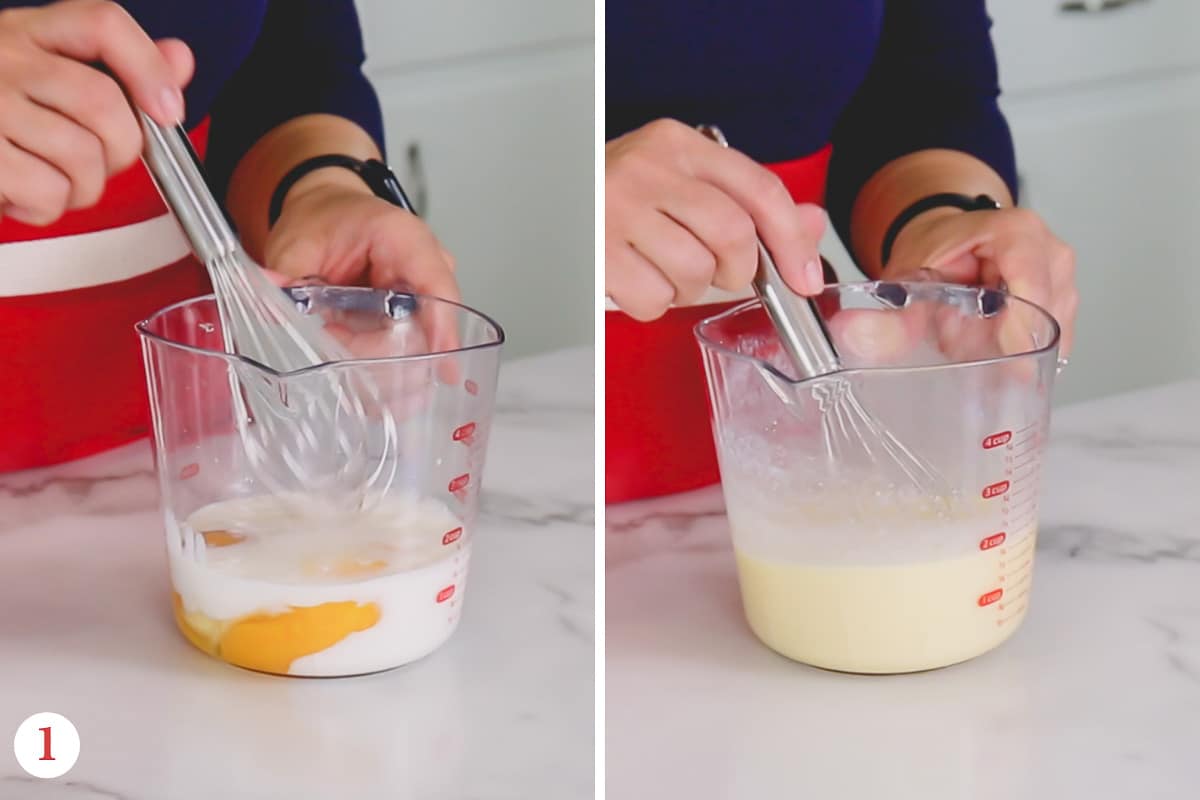
1. We’ll mix together eggs, milk and buttermilk until well combined. Take about 2 tablespoons of the mixture into a separate bowl and set it aside.
2. Next, whisk together flour, baking powder and salt until combiner.
3. Then add softened butter and mix it until butter is evenly distributed. The mixture should resemble wet-sand texture.
Tip
This mixing method ensures light and tender texture, because fat from the butter coats the flour granules therefore limiting gluten formation.
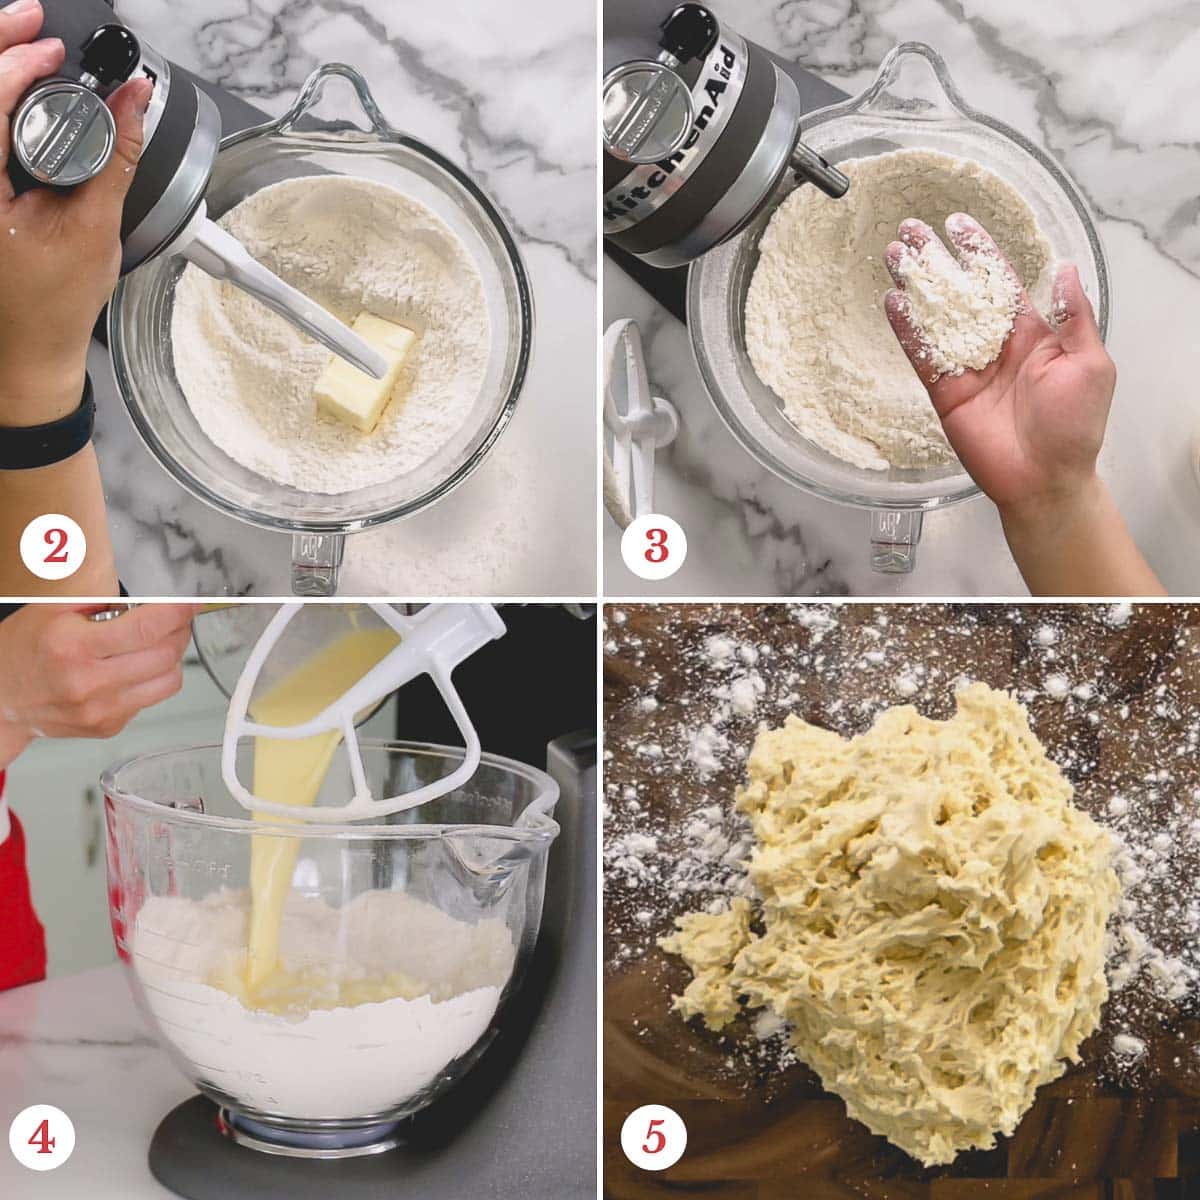
4. Now, it’s time to add wet ingredients into the flour mixture and mix it until combined.
5. Note the dough will be super sticky, but it’s totally normal!!
To shape the scones:
6. Using a silicone spatula, transfer the dough onto the well floured work surface. And gently knead the dough until it’s nice and smooth.
7. Now, roll the dough into 1-inch thick disk.
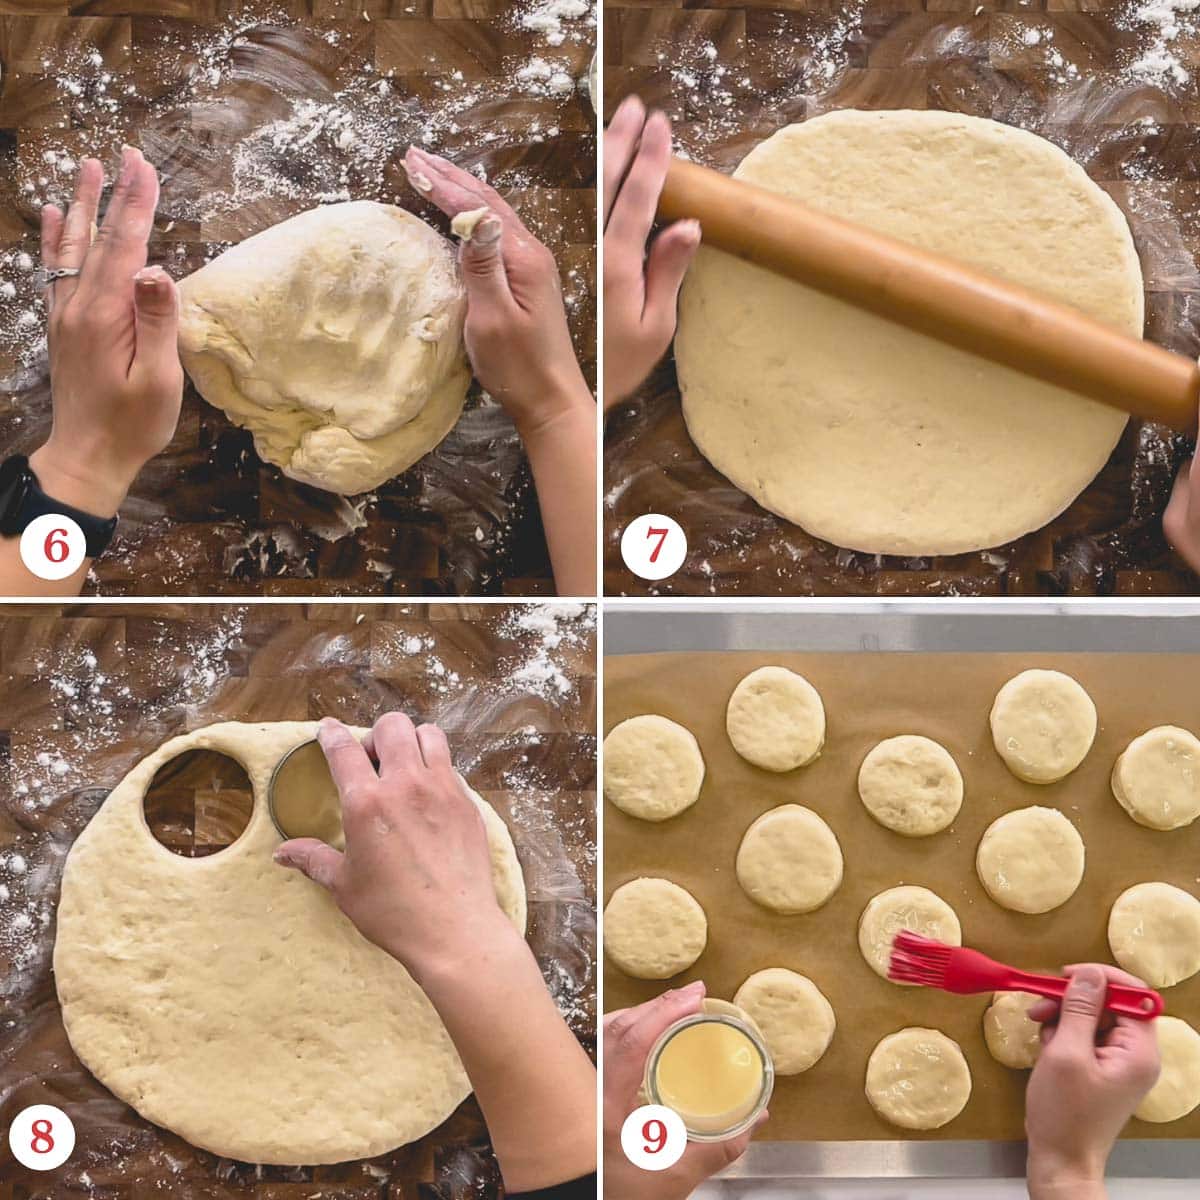
8. Using 2-inch round cookie cutter, cut out as many scones as you can. Arrange the scones on a baking sheet lined with parchment paper, or silicone mat.
9. Brush on reserved egg mixture on top of the scones. And bake the scones for about 15 minutes at 425°F.
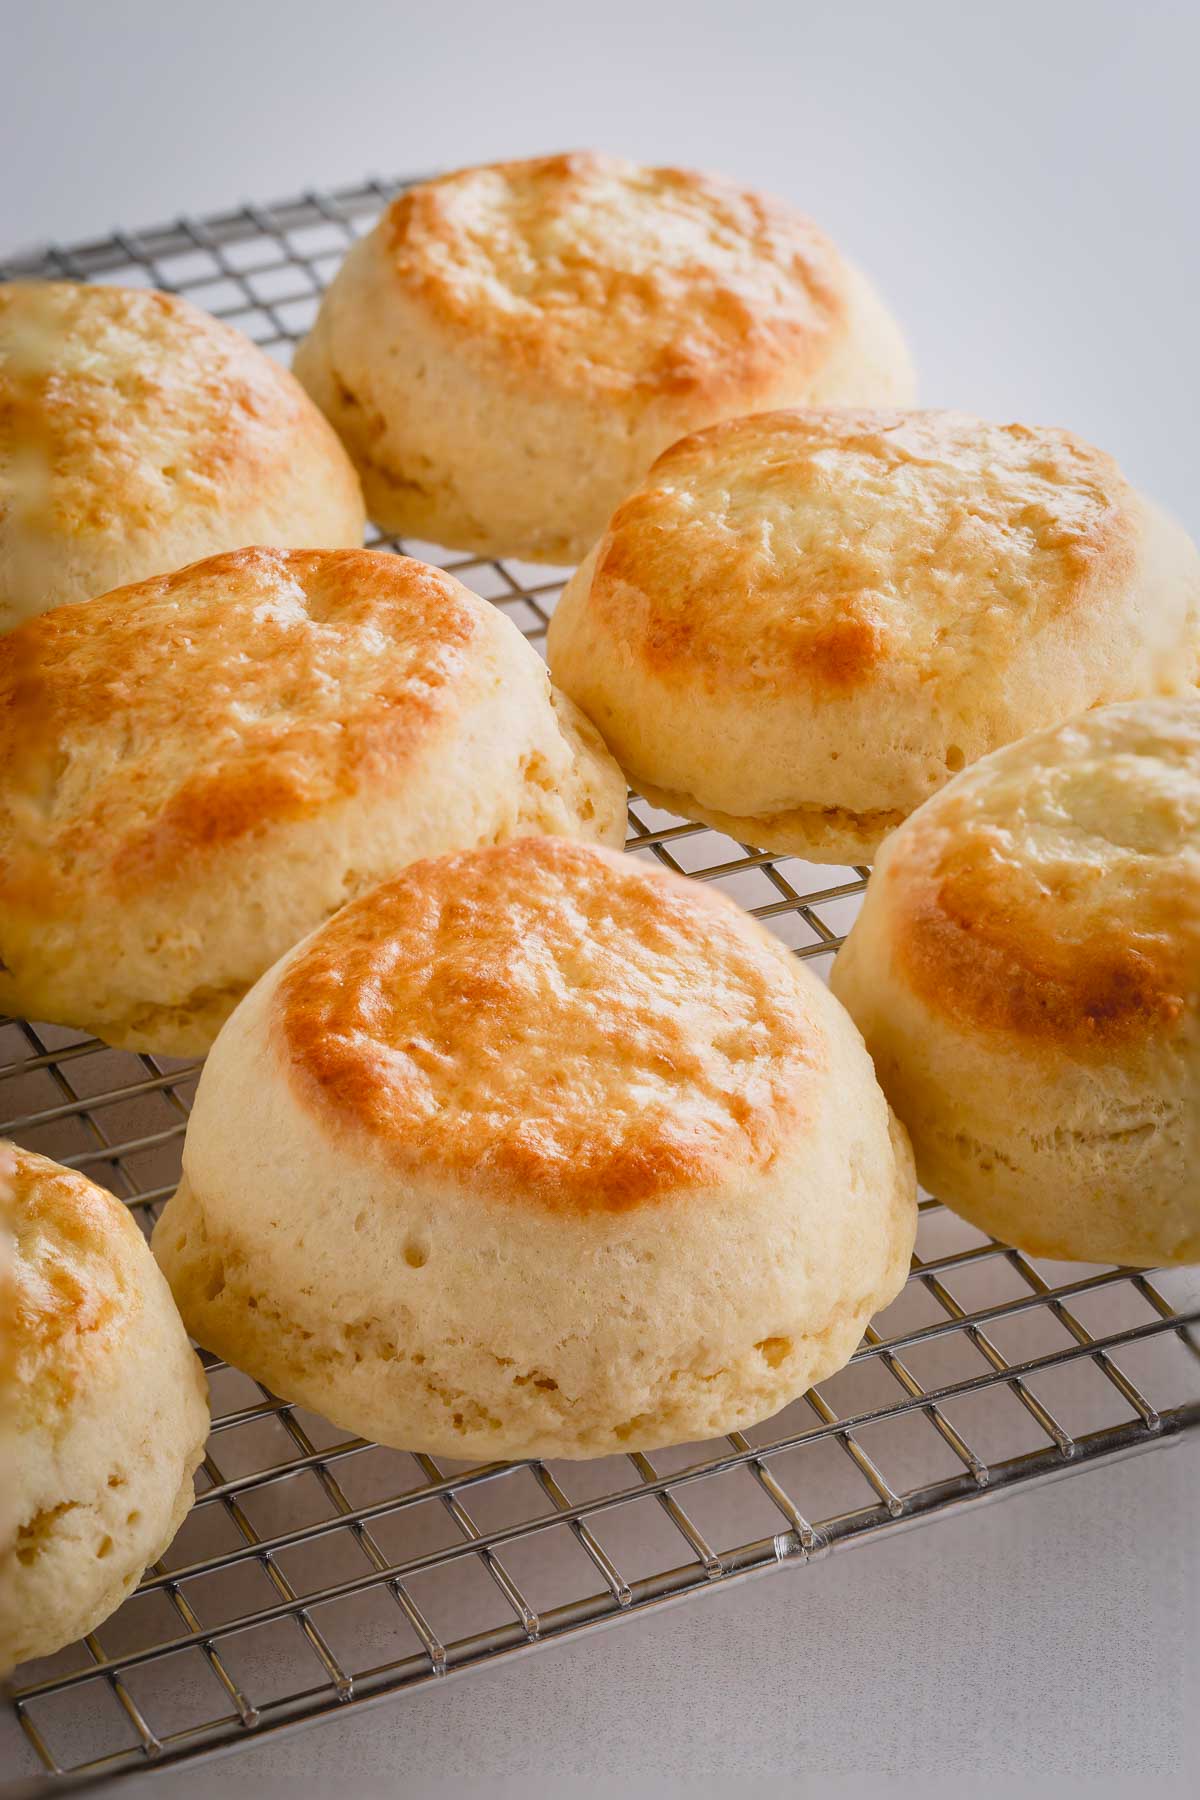
Cool the scones completely on wire rack before serving.
Serving Ideas:
Since these scones are not overly sweet, they’re perfect when smeared with sweet butter and jam!
Traditionally, English scones are served with clotted cream and jam.
British vs American scones:
First, the amount of butter. English scones use way less butter than American version, but they are meant to be served with whipped butter, or clotted cream and sweet jam/jelly.
And unlike American scones, British scones are smaller in size and doesn’t have endless variations. You’ll only see plain scones, or with raisins/currants.
Biscuits vs Scones:
Biscuits are flakier and crumblier than scones.
English scones, on other hand, are quite light, but most importantly, they have delicate cake-like crumbs, that sets them apart from American scones and biscuits.
Freezing Instructions:
These scones freeze beautifully. Simply place the baked and cooled scones in a ziplock bag and freeze for up to 3 months.
When ready to serve, microwave on high for 30-45 seconds, or bring it to room temperature on counter.
Video Tutorial

English Scones
Ingredients
- 2 large eggs at room temperature
- ½ cup (120 ml) buttermilk at room temperature Note 1
- ½ cup (120 ml) whole milk at room temperature Note 2
- 3 ½ cups (435 g) all-purpose flour Note 3
- 1/3 cup (65 g) granulated sugar
- 2 tablespoons baking powder
- ½ teaspoon salt
- 1/3 cup (75 g) unsalted butter softened
Sweet whipped butter:
- ½ cup (115 g) unsalted butter softened
- ¼ cup (60 ml) heavy whipping cream
- 1-2 tablespoons raw honey
Instructions
To make the scones
- Preheat the oven to 425°F (220°C). Line a baking sheet with parchment paper, or silicone mat.
- In a medium cup, beat the eggs, buttermilk and milk. Reserve about 2 tablespoons of mixture in a separate bowl.
- In a mixing bowl with paddle attachment, mix together flour, sugar, baking powder and salt.
- Then add butter and mix until nice and smooth. The mixture should resemble wet-sand texture. (TIP: Thoroughly coating the flour with butter minimizes the formation of gluten, creating tender and light scones.)
- Add egg mixture and mix until just combined. The dough will be quite sticky, but its totally normal. Transfer the dough onto well-floured surface.
- Generously dust the work surface with flour and transfer the dough on the floured surface, using a silicone spatula.
- With floured hands, knead the dough to smooth out the surface and roll it into 1-inch thick disk. Using 2-inch round cookie cutter, cut out as many scones as you can.
- Then gather the dough scraps and repeat the step #5, until all the dough is used.
- Arrange the scones on the prepared baking sheet, brush on the reserved egg mixture on each scone and bake for 13-15 minutes, or until golden brown.
- Cool the scones on wire rack. Serve warm or at room temperature with sweet whipped butter and jam.
To make sweet whipped butter:
- Whip the butter, heavy cream and honey with mixer until nice and fluffy.
Video
Tips & Notes
Nutrition


What is all purpose flour. No such thing here in Ireland. Is it Self raising or plain or Strong?
Hi, John. Thanks for reaching out for clarification. All-purpose flour is just a plain flour.
I’m a Scot, and we are a nation of scone bakers. I do like this simple recipe as it looks so very much like my Grandma’s recipe from many moons ago. So many recipes omit the sugar, but to me, yours is spot on.
Some people here use self-raising flour as they believe that the bicarbonate of soda or baking powder add a bitter taste. Interested to hear your opinions.I found this recipe on Pinterest, and will be giving it a go this afternoon. Thank you!!.
Hey, there! So, self-rising flour is basically a mix of all-purpose flour and baking powder. Baking powder doesn’t add bitter taste. But baking soda does add that weird metallic taste if used too much. This recipe calls for 2 tablespoons of baking powder. If you’d add that amount of baking soda, it’ll be inedible. 🙂 I really hope you love this recipe. Please let me know if you try this recipe. Thanks!
Hi Shinee
Thank you for the lovely recipe. I’m in Australia and I made it exactly as you said. The whole scone came out fantastic but I felt I could taste the baking powder too much. I appreciate your recipe greatly though I will use self raising flour for my next batch. Have a wonderful day
Thank you so much for your feedback, Isa!! Hope self-raising flour works better for you.
This recipe is totally a keeper! I used sour cream in place of buttermilk and it turned out amazing. Thank you so much for the recipe 😊
Love the recipe made for friends its was a huge hit..😍😍😍
Lovely soft scones, goes well with jam and cream and VE day
I made these for Christmas and they were a huge hit! I make them on a regular basis now! Delicious!
Awesome! So happy you loved the recipe. Thank you for your feedback, Leigh!!
Very tasty, not dry not very sweet either but that got fixed with my homemade fig jam so its a perfect scone
Yay, so glad you enjoyed the scones. Thank you for your feedback, Moni!
Hi, Shinee! I’ve never tried making scones before, so I’m very excited about your recipe. Especially because the scones in your photos look scrumptious!
However, I’m absolutely terrified at the amount of baking powder this recipe calls for. Are you sure it’s tablespoons and not teaspoons? I think that may have been the reason behind Holly’s [above comment] absolute gloopy gluey mess.
Hi, Alejandra! Yes, 2 tablespoons of baking powder. I know it’s a lot, but that’s what original recipe from Cook’s Illustrated calls for. They say it yields the lightest and fluffiest scones. And I have to agree with them. Hope you give these a try, and let me know how they turn out, if you do. 🙂
Are you sure your gram conversions are accurate? I really don’t know what went wrong here, I have been making English scones for a long time (being English!) and tried your recipe, followed the instructions to the letter (weighing out number of grams rather than cups) and my ‘dough’ was an absolute gloopy gluey mess that certainly couldn’t be kneaded! I ended up having to get someone to scrape it off my hands and chuck a load of self raising flour in there until the dough reached the right texture. I think this is the first time in my life I’ve managed to mess up scones – I didn’t think that was possible!
Hi, Holly! I’m so sorry to hear your dough didn’t turn out. I just double checked the measurements and everything looks right. I even checked it against the original recipe on Cook’s Illustrated. I’m puzzled as what went wrong. Since you’ve weighed the flour and everything, it should have been accurate. I’m clueless.
Yes thoroughly mixed the ingredients. The scones looked exactly like the ones in the picture!
My only other guess would be the flour amount. If you didn’t weigh the flour when measuring it, it’s very possible you’ve added a bit too much. Excess flour will definitely cause denser scones.