Incredibly light and tender, these English scones have fluffy cake-like crumb and are quick and easy to make. All you need is a handful of ingredients and 30 minutes of your day!
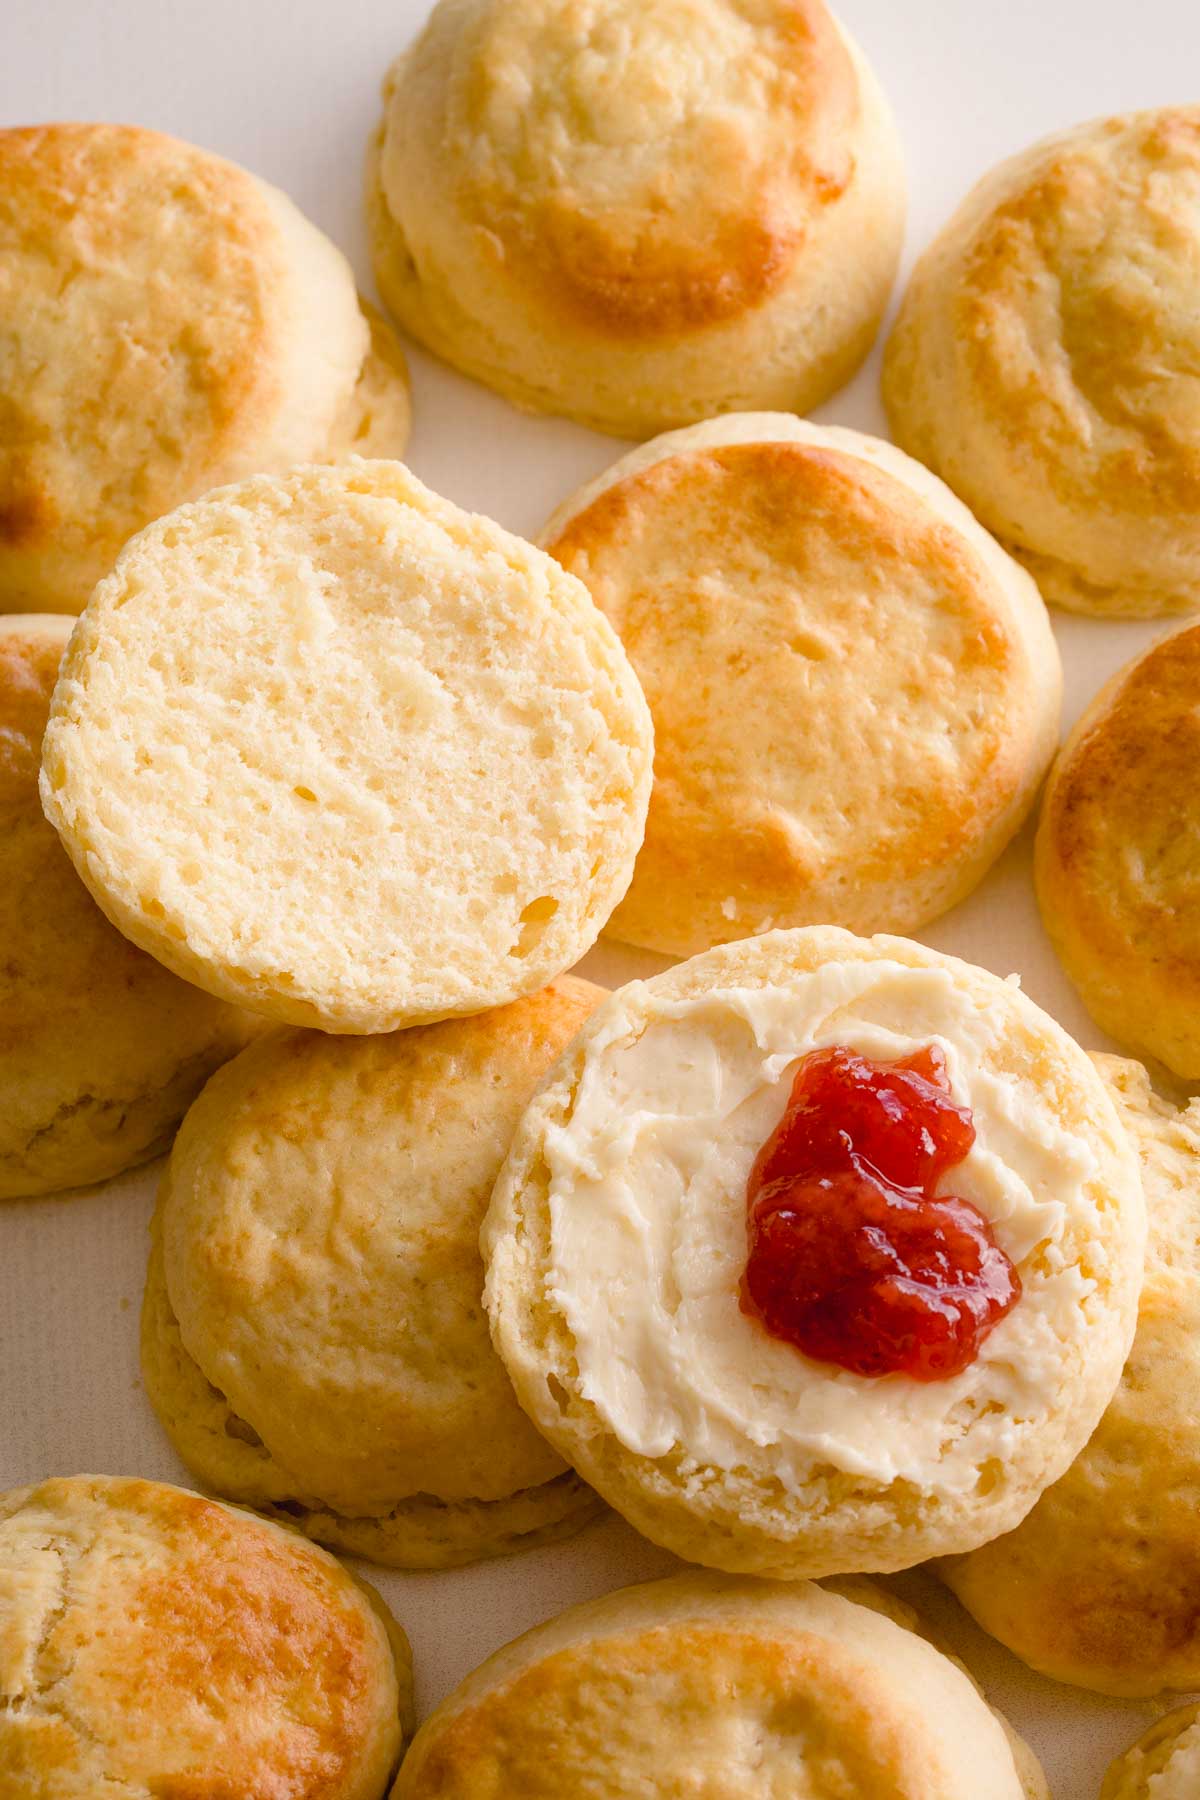
Table of Contents
I’ve never been a fan of scones… Or so I thought…
Until my husband and I had an Afternoon tea at Savoy in London, and we were treated with the most deliciously moist and tender English scones for our first course. The tender cake-like texture was absolutely addicting!! And you betcha, we asked for more seconds!
Why you’ll love these scones:
- Incredible texture: light and tender, cake-like crumbs.
- Not too sweet.
- Quick and easy to make: comes together in less than 30 minutes!
- The secret mixing method ensures tender scones every time!
- Basic ingredients allows you can whip these up any time!
Key Ingredients:
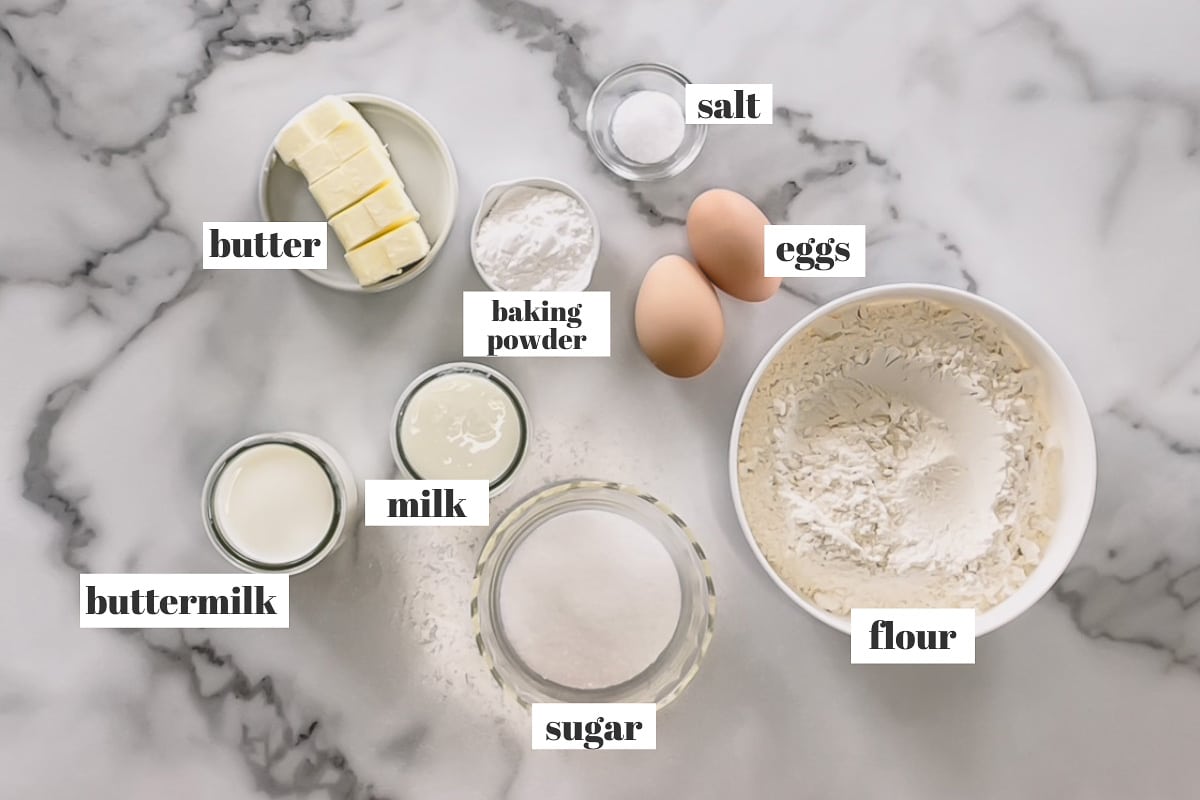
- Flour – All-purpose flour works perfectly for this scones recipe.
- Sugar – A touch of granulated sugar adds just enough sweetness.
- Buttermilk – In a pinch, substitute one of the DIY buttermilk options here.
- Milk – While any type of milk works in this recipe, I recommend whole milk for richness.
- Baking powder – Don’t be alarmed by the amount of baking powder. It helps to create that fluffy soft texture!
How to make these scones:
Disclaimer: I slightly adapted English scones recipe on Cook’s Illustrated.
To make the dough:
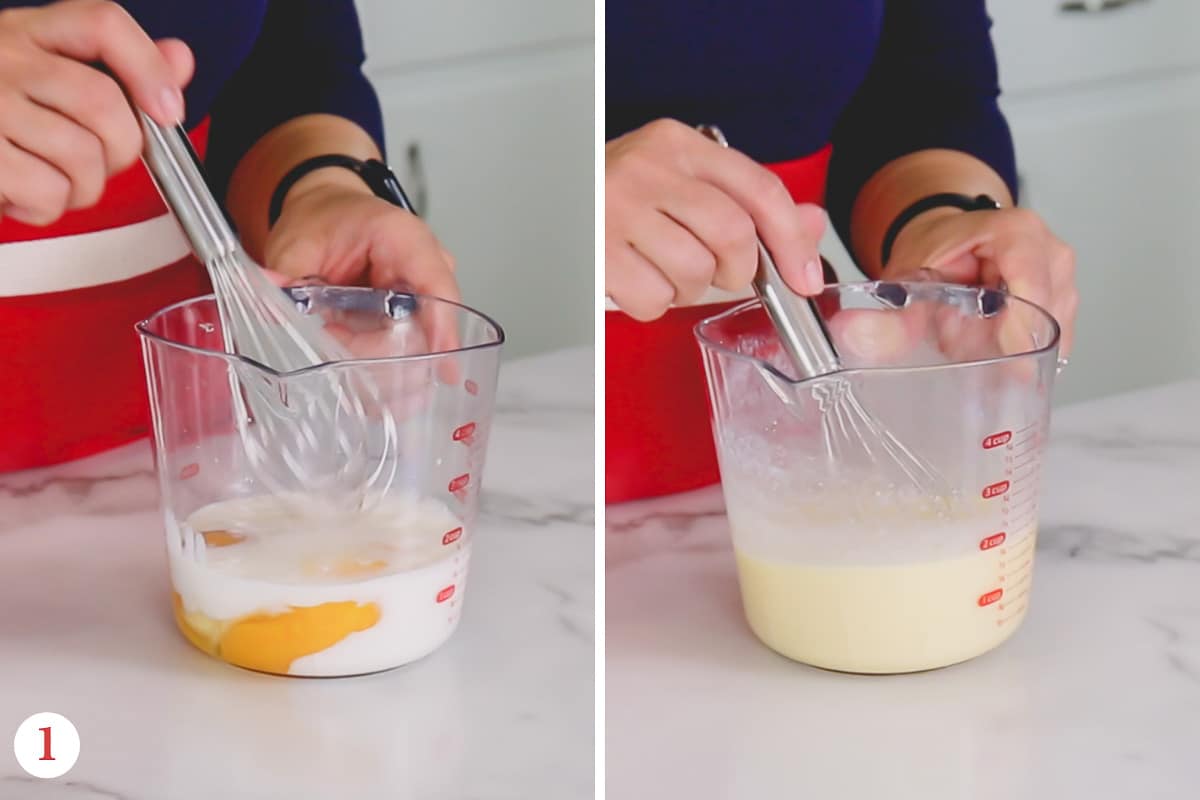
1. We’ll mix together eggs, milk and buttermilk until well combined. Take about 2 tablespoons of the mixture into a separate bowl and set it aside.
2. Next, whisk together flour, baking powder and salt until combiner.
3. Then add softened butter and mix it until butter is evenly distributed. The mixture should resemble wet-sand texture.
Tip
This mixing method ensures light and tender texture, because fat from the butter coats the flour granules therefore limiting gluten formation.
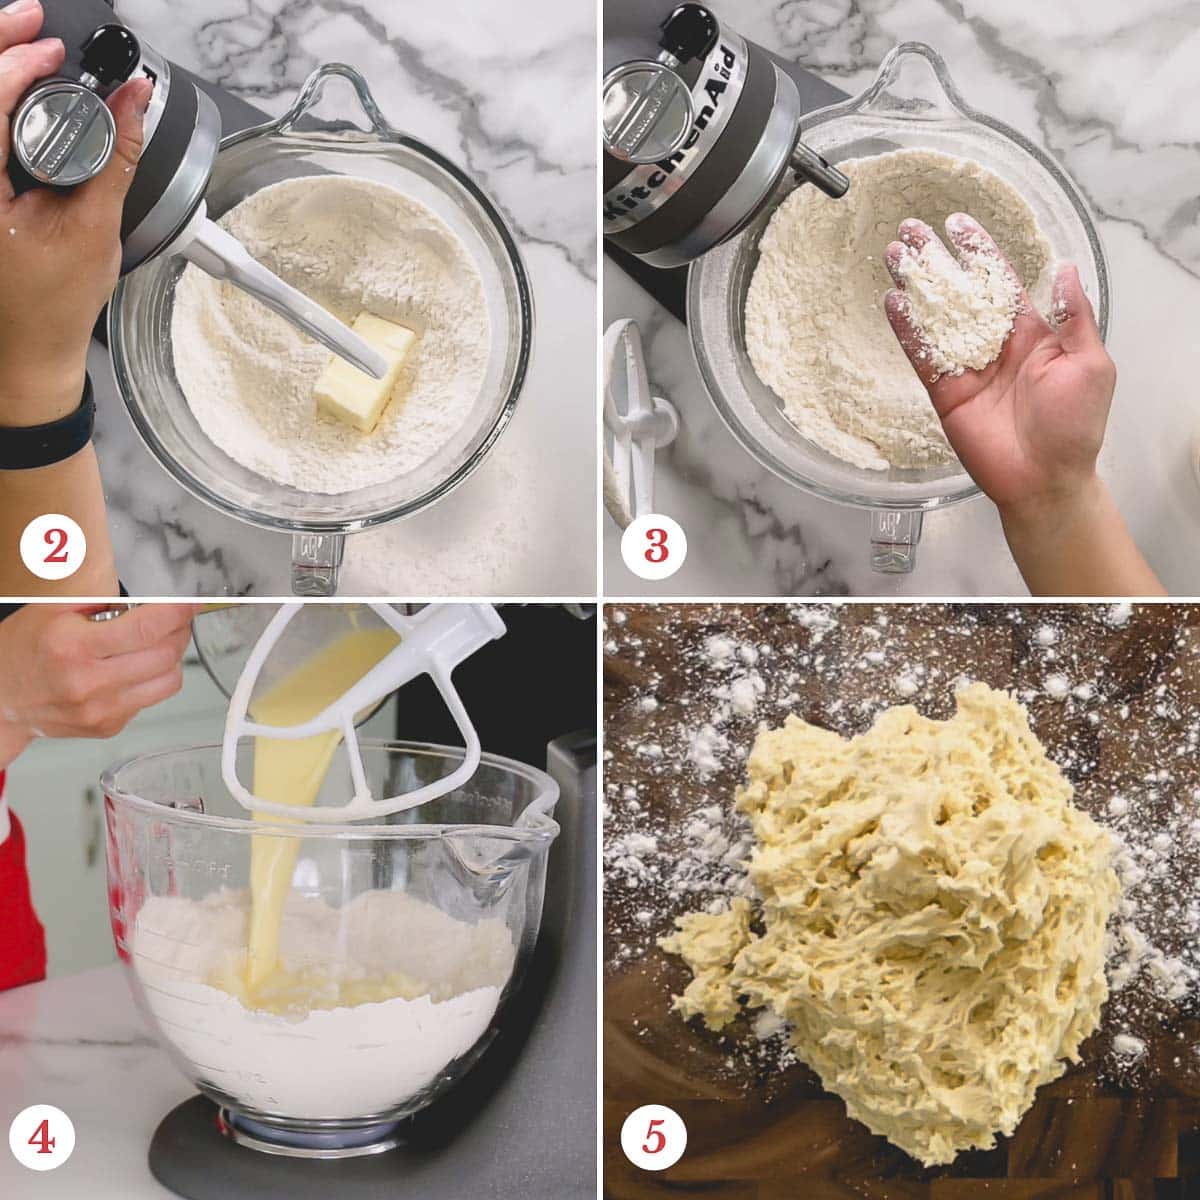
4. Now, it’s time to add wet ingredients into the flour mixture and mix it until combined.
5. Note the dough will be super sticky, but it’s totally normal!!
To shape the scones:
6. Using a silicone spatula, transfer the dough onto the well floured work surface. And gently knead the dough until it’s nice and smooth.
7. Now, roll the dough into 1-inch thick disk.
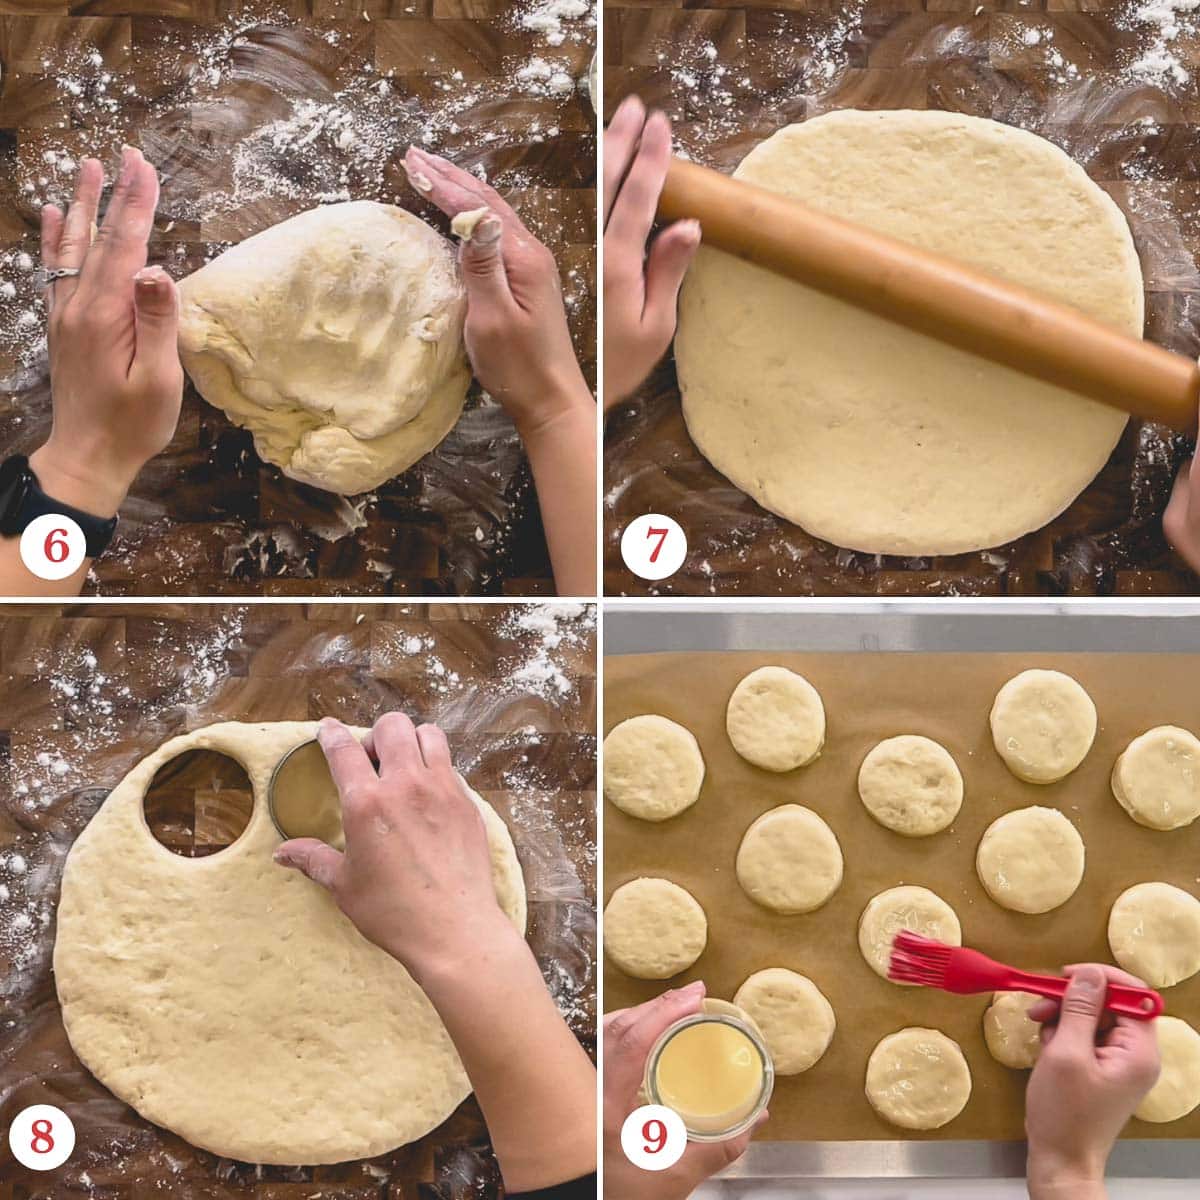
8. Using 2-inch round cookie cutter, cut out as many scones as you can. Arrange the scones on a baking sheet lined with parchment paper, or silicone mat.
9. Brush on reserved egg mixture on top of the scones. And bake the scones for about 15 minutes at 425°F.
Cool the scones completely on wire rack before serving.

Serving Ideas:
Since these scones are not overly sweet, they’re perfect when smeared with sweet butter and jam!
Traditionally, English scones are served with clotted cream and jam.
British vs American scones:
First, the amount of butter. English scones use way less butter than American version, but they are meant to be served with whipped butter, or clotted cream and sweet jam/jelly.
And unlike American scones, British scones are smaller in size and doesn’t have endless variations. You’ll only see plain scones, or with raisins/currants.
Biscuits vs Scones:
Biscuits are flakier and crumblier than scones.
English scones, on other hand, are quite light, but most importantly, they have delicate cake-like crumbs, that sets them apart from American scones and biscuits.
Freezing Instructions:
These scones freeze beautifully. Simply place the baked and cooled scones in a ziplock bag and freeze for up to 3 months.
When ready to serve, microwave on high for 30-45 seconds, or bring it to room temperature on counter.
Video Tutorial

English Scones
Ingredients
- 2 large eggs at room temperature
- ½ cup (120 ml) buttermilk at room temperature Note 1
- ½ cup (120 ml) whole milk at room temperature Note 2
- 3 ½ cups (435 g) all-purpose flour Note 3
- 1/3 cup (65 g) granulated sugar
- 2 tablespoons baking powder
- ½ teaspoon salt
- 1/3 cup (75 g) unsalted butter softened
Sweet whipped butter:
- ½ cup (115 g) unsalted butter softened
- ¼ cup (60 ml) heavy whipping cream
- 1-2 tablespoons raw honey
Instructions
To make the scones
- Preheat the oven to 425°F (220°C). Line a baking sheet with parchment paper, or silicone mat.
- In a medium cup, beat the eggs, buttermilk and milk. Reserve about 2 tablespoons of mixture in a separate bowl.
- In a mixing bowl with paddle attachment, mix together flour, sugar, baking powder and salt.
- Then add butter and mix until nice and smooth. The mixture should resemble wet-sand texture. (TIP: Thoroughly coating the flour with butter minimizes the formation of gluten, creating tender and light scones.)
- Add egg mixture and mix until just combined. The dough will be quite sticky, but its totally normal. Transfer the dough onto well-floured surface.
- Generously dust the work surface with flour and transfer the dough on the floured surface, using a silicone spatula.
- With floured hands, knead the dough to smooth out the surface and roll it into 1-inch thick disk. Using 2-inch round cookie cutter, cut out as many scones as you can.
- Then gather the dough scraps and repeat the step #5, until all the dough is used.
- Arrange the scones on the prepared baking sheet, brush on the reserved egg mixture on each scone and bake for 13-15 minutes, or until golden brown.
- Cool the scones on wire rack. Serve warm or at room temperature with sweet whipped butter and jam.
To make sweet whipped butter:
- Whip the butter, heavy cream and honey with mixer until nice and fluffy.
Video
Tips & Notes
Nutrition


I tried these scones and they did not turn out good. I did exactly what the recipe told me, and my scones looked like the ones in the picture, but they did not taste good at all! They were really dense! So disappointing! Save yourself all the work and money, because these scones are…….. Don’t try them!!!!!!
Hi, there! I’m sorry for your experience. I’m surprised your scones turned out dense. Did you thoroughly mix the dry ingredients with softened butter? This step is crucial for light and cake-like texture of these scones. I’ve made this recipe many times, and always get light scones.
I am so excited to have found this recipe. We have a big group coming for dinner June 6th in honour of friends coming from England and was looking for authentic English scones recipes. I will do my first practice batch tomorrow – can’t wait. They look amazing and thanks for sharing
Yay, I’m so glad you found this, Janet! Please do let me know what you think of these scones. I hope you’ll love them as much as we did. 🙂
Hi Shinee,
I chose your English scones as my Host favorite for this week on Foodie Friends Friday Linky 145. Thanks for linking up! Cindy
Yay! Thank you so much, Cindy!
Thanks for the clarification between American scones, English scones and biscuits. I might make some this weekend.
Sounds great. If you do make it, let me know how they turn out, Quinn. Thanks!
These look wonderful. I’ve mastered white bread and wheat bread. I have a French bread recipe I like…but am looking for one I like better.
But I have had horrible luck with biscuits.
Maybe I’ll give scones a chance. (Yes, I read they’re different than biscuits!) Figured maybe a different “format” of bread might work better.
Thanks for the step-by-step pics. I find those so useful, especially with bread products.
Jennie
p.s. I found your post via “Lou Lou Girls Fabulous Party” (the April 27th one!)
I’m glad my step by step photos are helpful! Definitely give these scones a try. They are now our family’s favorite. Hope you will love it too. Thanks for visiting!
These look great! Thanks for the tutorial and info.
My pleasure, Samantha! I’m glad you find it useful. Thanks for stopping by!
Stopping by from Lou Lou Girls. These would make a wonderful after Church snack. Pinned!
They make a great snack. Thanks, Heaven!
These scones sound delicious and look very pretty too! Beautiful photos and great styling, love the piped butter. I hear ‘ya about American scones….I found that this recipe (adapted from ATK) ends up pretty moist and delicious though: http://thespicetrain.com/2014/11/11/cranberry-scones/
Thank you, Nicole! I’ll give your version a try. They look amazing! Thanks for stopping by and sharing your recipe. 🙂
Yum! I love scones. I’ve tried one recipe once, but the scones were so dense! I’m going to give your recipe a try! Thanks so much!
Sounds great. Let me know how you like these, Ashley.
Oh my! Your description of these is amazing. I can almost taste them! I’ve always thought scones were awful but I think you’ve convinced me to give yours a try for sure!! Yum!
Do try! These are so soft and delicious! Thank you, Jennifer!