
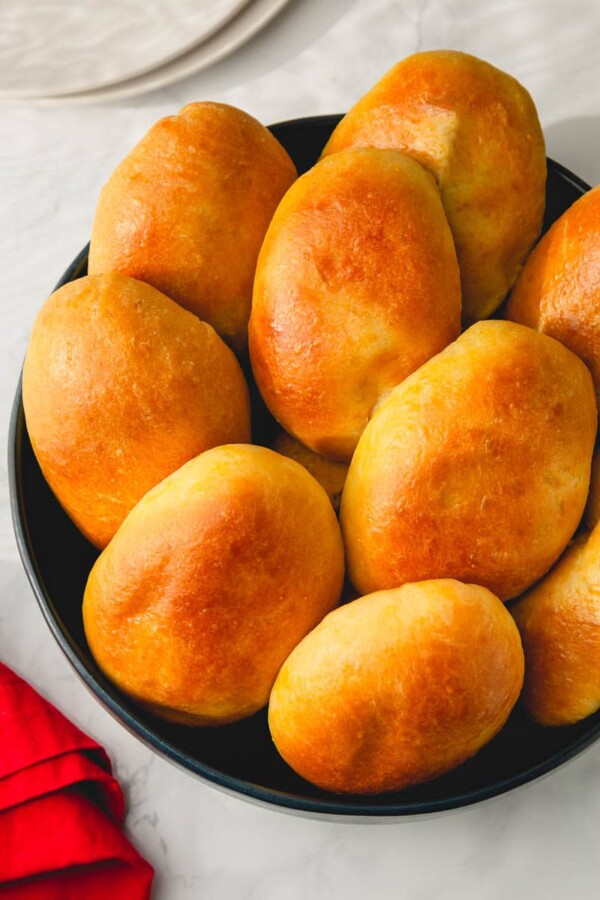
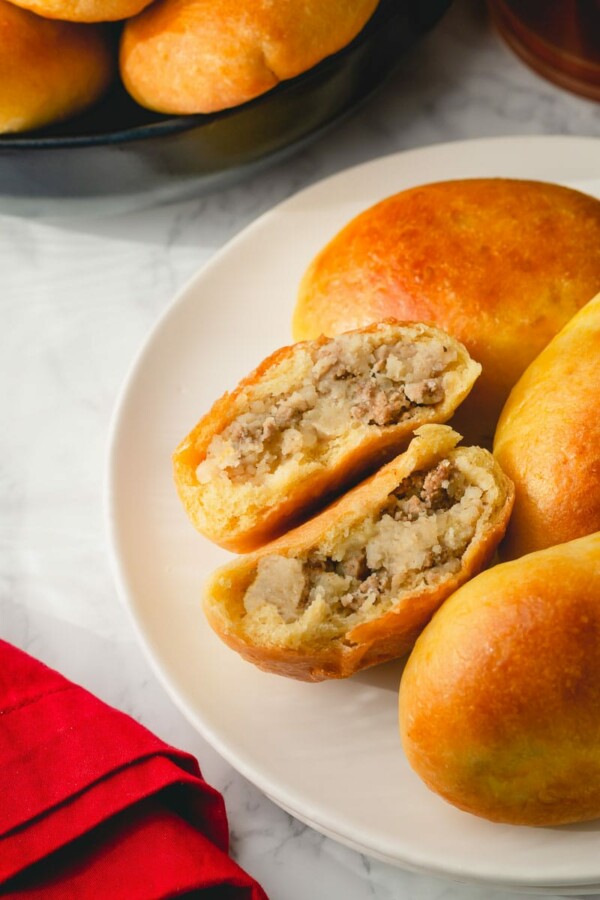
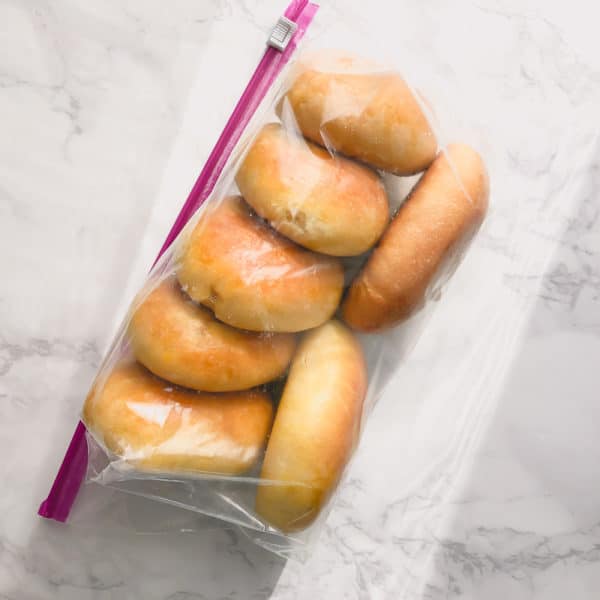
These pillowy soft Russian pirozhki, stuffed with leftover mashed potatoes and ground beef, are baked hand pies made with easy yeast dough.
My classic Russian piroshki (fried version) is equally amazing!
What are Pirozhki?
Pirozhki (пирожки) are Russian hand pies made with yeast dough buns filled with all kinds of filling from sweet to savory! Pirozhki is a plural form of pirojok, and spelled many different ways: pirojki, piroshki, pirozhki. 🙂
They are equally delicious when they’re baked or fried.
I already shared my traditional fried piroshki on here. And today I wanted to share with my baked version, because in my opinion, baked pirozhki dough needs a bit more fat for that fluffy soft texture.
How to make pirozhki:
Yeast dough:
Seriously, this is the easiest yeast dough to make!! I use my KitchenAid stand mixer, but it can easily made by hand too.
My go-to, fool-proof yeast is Red Star Platinum yeast (although I partnered with Red Star Yeast in the past, this post isn’t sponsored! It’s truly my go-to yeast of all times!)
Tip
With this Red Star Platinum instant yeast, you don’t need to proof it or anything.
- Combine dry ingredients.
- Whisk wet ingredients.
- Add wet ingredients into the dry ingredients and mix until the dough is nice and smooth.
- Place the dough in lightly oiled bowl, cover with damp kitchen towel and place it in a warm place. Let it rise for 1-2 hours, or until at least doubled in size.
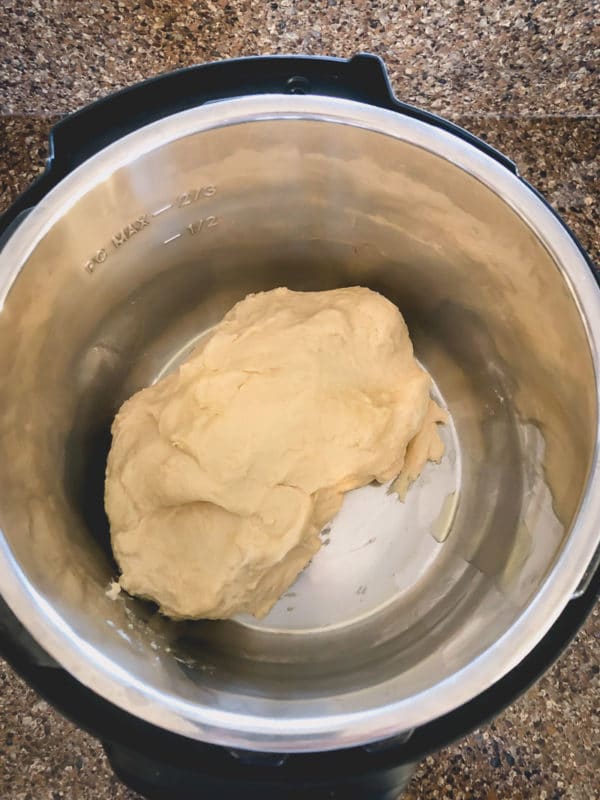
How to proof yeast dough in instant pot
- Set the Instant Pot on “Yogurt” setting.
- Drizzle olive oil in the bottom of Instant Pot insert.
- Place the dough inside and cover with any glass lid, or a plate.
- Let it rise until doubled in size, about 30 minutes.
Mashed potatoes and beef filling:
I use leftover mashed potatoes because we don’t much of it. You can also use cooked rice, stewed cabbage or mushrooms. More filling ideas below.
- Brown 1/2 lb ground beef with onions, garlic and your favorite seasonings.
- Transfer the beef into a bowl and let it cool completely.
- Add mashed potatoes in to the meat and mix until well combined. Taste the filling and salt and pepper to taste.
Assemble pirozhki:
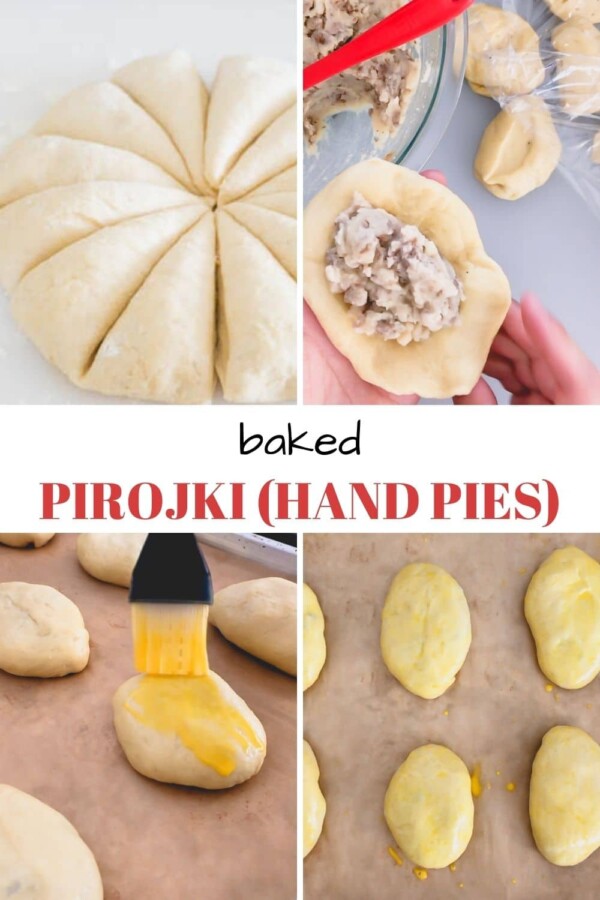
- Turn the proofed dough onto a lightly oiled counter and form into a smooth dough ball. Now divided the dough into 12 equal parts.
- Flatten each dough ball and place a filling in the center.
- Pinch the edges tightly and arrange the hand pies, seam side down, on a baking sheet, lined with parchment paper.
- Brush on egg wash all over and bake in preheated 350°F oven for about 25 minutes, or until nice and golden brown.
Tip
The easiest way to divide the dough into equal parts is to flatten it slightly and cut it as if you’re cutting a pizza. It doesn’t have to be perfect!
What fillings can you use in pirozhki?
You can literally use any filling you would like. Sweet, savory, it doesn’t matter! This dough is so versatile and will pair with both sweet and savory fillings.
Today, I’m sharing my potatoes and meat hand pies. I used leftover mashed potatoes and some browned ground beef!
Other savory filling ideas:
- Stewed cabbage
- Rice and meat
- Cheesy mashed potatoes
- Any kind of meat, like ground chicken, turkey, pork, beef, etc.
Sweet filling ideas:
- Apple pie filling
- Blueberries
- Any jams

How to store piroshki:
These little hand pies are great for making ahead. Refrigerate in an airtight container for up to 5 days.
To reheat:
Microwave, covered, for 30 seconds. And if needed, another 30 seconds.
Tip
Make sure to cover pirozhki when microwaving, or they’ll dry out and become rubbery.
You’re reheat 1-2 pirojki on a plate, cover them with damp paper towel.
Can I freeze piroshki?
Absolutely. These little hand pies freeze beautifully!
Simply place the cooled piroshki in a freezer bag and freeze for up to 3 months.
To reheat frozen meat pies, follow reheating directions above, but for 1 minutes, and more as needed.

Baked Pirozhki
Ingredients
For dough:
- 4 cups (500 g) all-purpose flour
- 1 tablespoon granulated sugar
- 1 packet instant dry yeast Note 1
- ½ teaspoon coarse kosher salt
- ½ cup (120 g) sour cream at room temperature
- 2 large eggs at room temperature
- 2/3 cup (160 ml) milk at room temperature
For filling:
- 1 tablespoon olive oil
- 1 lb (450 g) lean ground beef
- 1-3 garlic cloves pressed
- 1 teaspoon coarse kosher salt
- ½ onion chopped
- 1 cup mashed potatoes
Instructions
To make dough:
- In a large mixing bowl with dough hook attachment, combine flour, sugar, yeast and salt. Mix to combine.
- In a small bowl, whisk together sour cream and eggs until smooth.
- Add sour cream mixture and half of the milk into the flour mixture.
- Mix the dough until it comes together into a smooth ball. Add remaining milk a little at a time, as you may not need all of it. Depending on the humidity and flour type, you may need more or less of the liquid. (You can also easily make this dough by hand.)
- Coat the dough with a little bit of vegetable oil and place it back in the bowl. Cover with damp kitchen towel and place it in a warm place to rise, for about 30-60 minutes. (2 ways to proof the dough: 1. Place the bowl in a microwave with a glass of hot water. Don’t turn on the microwave. Microwave will act as an insulated box. 2. If you have an Instant Pot with Yogurt setting, use it for proofing your yeast dough. It usually takes about 30 minutes in the IP.)
To prepare filling:
- Meanwhile, prepare the filling. Heat olive oil in a large skillet or dutch oven over medium high heat.
- Add the meat, onion, garlic and salt. Cook the meat, breaking it apart with a wooden spoon, until cooked through. Transfer into a large bowl and mix it with leftover rice or mashed potatoes.
To make the hand pies:
- Preheat the oven to 350°F (180°C). Prepare a baking sheet lined with parchment paper.
- Once the dough is doubled in size, take it out onto a lightly floured surface and knead into a smooth ball, 1-2 minutes. Lightly flatten the dough ball into a disk, and divide into 12 equal parts as you slice a pizza. Roll each piece into a smooth ball.
- Take a piece of dough and flatten it with your hands. Put the filling in the center and fold the dough in half. Pinch the edges of the dough to seal, creating a half moon. Then gently flatten it between your palms, making sure the sealed crimps are on flat side. (If it’s not clear, check out the photos above.)
- Arrange the hand pies on the prepared baking sheet.
- In a small bowl, beat 1 egg yolk with 1 tablespoon of water until smooth. Brush the egg wash all over the hand pies.
- Bake the pirojki for 20-25 minutes, or until they're nice and golden color.
- Serve them warm or at room temperature.
⭐️ Did you make this recipe?
Please leave a review and let us know how you liked it!
Tips & Notes
Nutrition


Can I freeze the raw pirozhki when they are assembled and, if yes, how do I proceed once I want to use them?
Thank you!
Hi, Sabrina. I haven’t tested freezing unbaked pirozhki. But if you try, I recommend thawing them in the fridge before baking. Let us know!
Made this recipe twice, with meat (lamb + bulgur+ spices and scalion+eggs+variety of fresh herbs+ cottage cheese. Magnificent results
I baked them, light and fluffy, pure seduction. One more note- I’ve used
Eurasian Legacy Non-GMO, Unbleached, Glyphosate-Free, High-Protein Wheat Flour (from Kazakhstan)m my gluten sensitive family members did not have any problems at all.
Thank you for
Antik, I’m SO glad you tried and loved this recipe. Thank you for much for your feedback!!
I have no stand mixer so would like instructions for a manual recipe (by hand). Thank you.
Hi, Patricka. You can absolutely make the dough by hand. Once it has come together into a ball, simply knead it for 5 minutes.
Oh great! Thanks Shinee. (I somehow managed to sneak in a “k” into my name🤷🏼♀️) I’m eager to make/bake these.
These are amazing 🤩 I made a meat filling and a cabbage filling, both are divine. The dough is so soft and fluffy. Replaced the sour cream with Greek yogurt, as that’s what I had at home. I will definitely be making these again.
Yay, I’m so happy you tried and loved these baked pirojki!! Thank you so much for your feedback, Caroline!
I want these Pirozki’s delivered to my house. sausage spinach mushrooms and whatever else comes with it
Is the Sour Cream needed? I noticed it wasn’t in the fried version.
Hi, Christa. Yes, or your dough won’t come together properly. And I wouldn’t have added it if it wasn’t necessary. Fried and baked versions are so different. You can bake my other fried pirojki, but I prefer the flavor of this dough for baking.
Does the 2eggs in list of ingredients include the egg for the egg wash? Do you add 2eggs in dough recipe? Thank you
Hi, Cyn! Thank you for reaching out and I’m sorry it’s confusing. The 2 eggs go into the dough. I forgot to add egg yolk for egg wash in the ingredient list. Updating the recipe now.