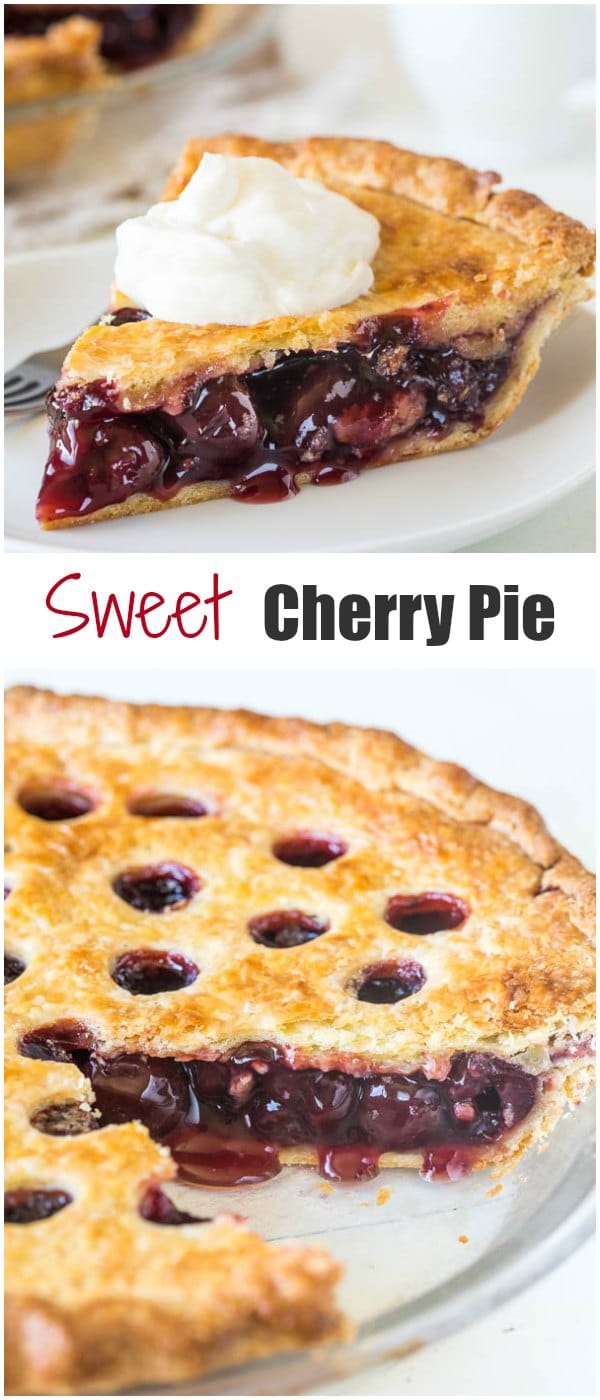
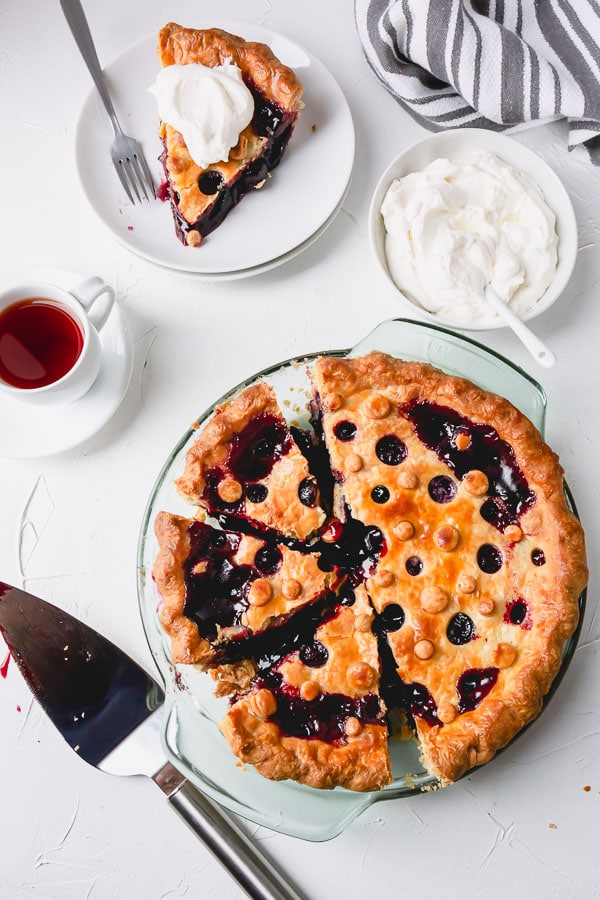
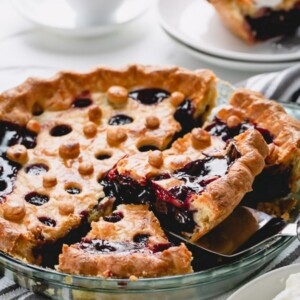
Homemade cherry pie with buttery flaky crust and thick cherry filling is easier than you may think! Besides my tried and tested recipe, you’ll learn 3 tips to avoid runny cherry pie filling and an easy way to make a fun pie crust design.
The Best Cherry Pie Recipe
I’m so, so excited to share my favorite pie recipe with you!! This recipe is not only our family’s favorite, but it’s also our readers’ favorite! I’ve read many heart-warming reviews from those who tried this recipe and I can’t encourage you enough to give it a try too.
It’s simple, it’s easy and it’s insanely delicious. One slice is never enough for me!
Also, this easy cherry pie recipe is a perfect start for those who are just learning to bake a pie! I’ll show you a super simple way to make a fun design for your pie. No lattice skills required!
How to prepare Sweet Cherry Pie Crust
Any great pie starts with a great pie dough. Here’s my go-to all-butter pie crust recipe. I’ve shared everything you need to know on making perfectly buttery, flaky pie crust. After reading that post, I know you’ll be a master of pie crusts in no time!
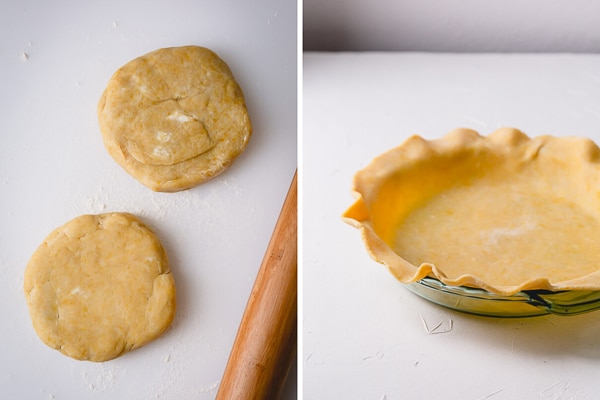
- Step 1. Once you make the dough per recipe, divide into 2 parts and chill them for at least 1 hour in the fridge.
- Step 2. Roll them out into 10-11 inch disks. Line 9-inch pie plate with one of the crusts. Place both the pie plate and other pie crust in the fridge.
Homemade Cherry Pie Recipe Ingredients
- Pie crust – I love my homemade all-butter pie crust, and I highly recommend it. You may use any pie crust you like.
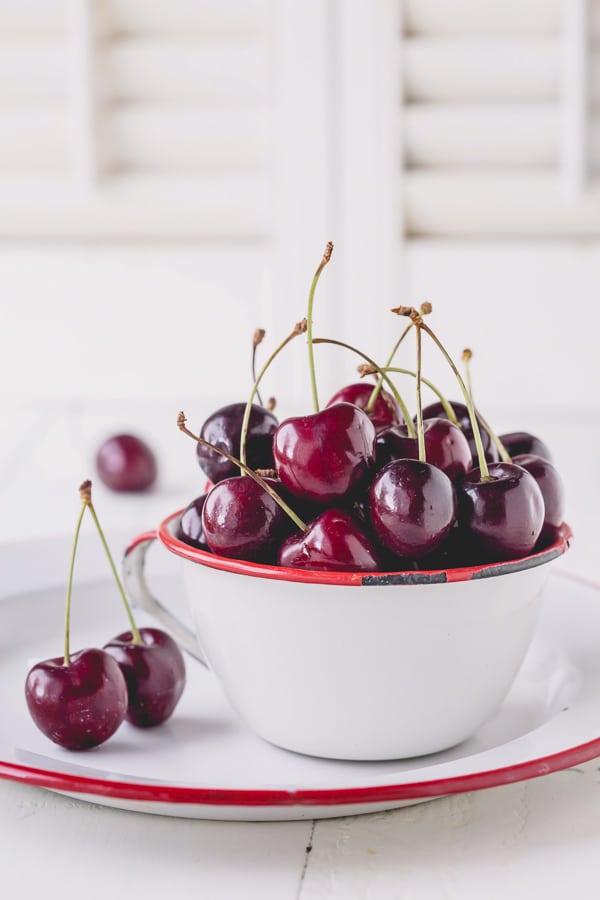
- Cherries – Use pitted sweet bing cherries for this recipe. Either fresh or frozen works for this recipe. You don’t need to thaw frozen cherries.
- Granulated sugar – is to sweeten and thicken the cherry pie filling.
- Cornstarch – thickens the sauce.
- Lemon juice – brightens the flavor and balances out the sweetness. Use freshly squeezed lemon juice.
- Almond extract – adds a perfect hint of almond which pairs perfectly with cherries.
- Egg wash – helps the top crust brown nicely. You may use heavy cream instead as well.
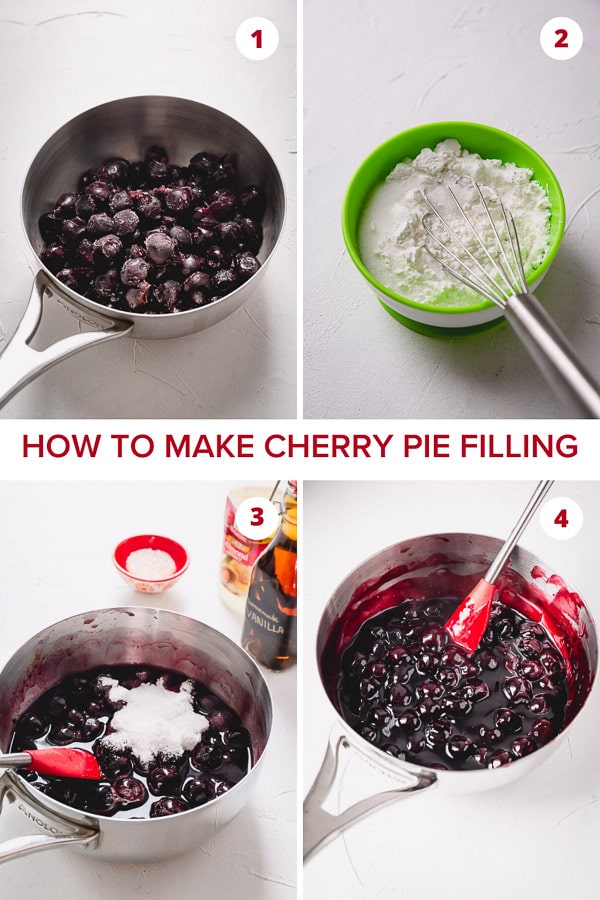
How to make Cherry Pie Filling
This cherry pie filling recipe makes a nice and thick, sweet and syrupy (not cloyingly sweet though) filling with lots of whole fruits. Canned pie filling stands absolutely no chance next to this homemade version from scratch!!
And just because the filling is from scratch, it doesn’t mean you’ll be slaving over it for hours. In fact, it takes practically no effort on your part.
- Step 1. Simply dump frozen or fresh pitted cherries into a saucepan and bring it to a boil.
- Step 2. Whisk together sugar and cornstarch.
- Step 3. Then stir in dry ingredients and flavorings.
- Step 4. Simmer for about 5 minutes, stirring frequently, and voila!
It’s hard to mess up this cherry pie filling.
3 Tips to Avoid Runny Filling:
- Don’t forget the cornstarch. It’s the main thickening agent here and omitting it will result in super runny filling.
- Lemon juice also helps with thickening the mixture. It’s not as crucial as cornstarch, but let’s just say you’ll notice the difference.
- Make sure to simmer the mixture to let it set properly. It usually takes about 5 minutes for me. Don’t forget to give a good stir frequently, so it doesn’t scorch on the bottom.
And of course, make sure to cool the baked pie completely for at least 4 hours before serving. The filling thickens as it cools!
Here’s how I prep cherries:
- Wash them thoroughly in a water bath and then rinse in colander.
- Pit them cherries one by one. Frankly, this’s my least favorite task, but this handy little tool makes this process a breeze. I’ve tried a few different pitting tricks and tools, so far this tool is the winner for its efficiency and accuracy! (Yes, there’s a similar tool with 6 slots, but I don’t trust that every single seed comes out. Even if 1 or 2 seeds get missed, it could potentially lead to someone breaking a tooth! Ask me how I know this!)
- I divide the pitted cherries into freezer bags, 4 cups of cherries in each bag, which is what you need for 1 pie. Then label and freeze! Make sure to squeeze out all the air and flatten the bag for easy storage.
Now that the filling is ready, let’s assemble the whole pie and bake!
How to assemble Homemade Cherry Pie
- Step 1. Pour the hot pie filling into the prepared pie dish.
- Step 2. Put the butter pieces all over.
- Step 3. Roll out the top curst over the filling and brush on the egg wash.
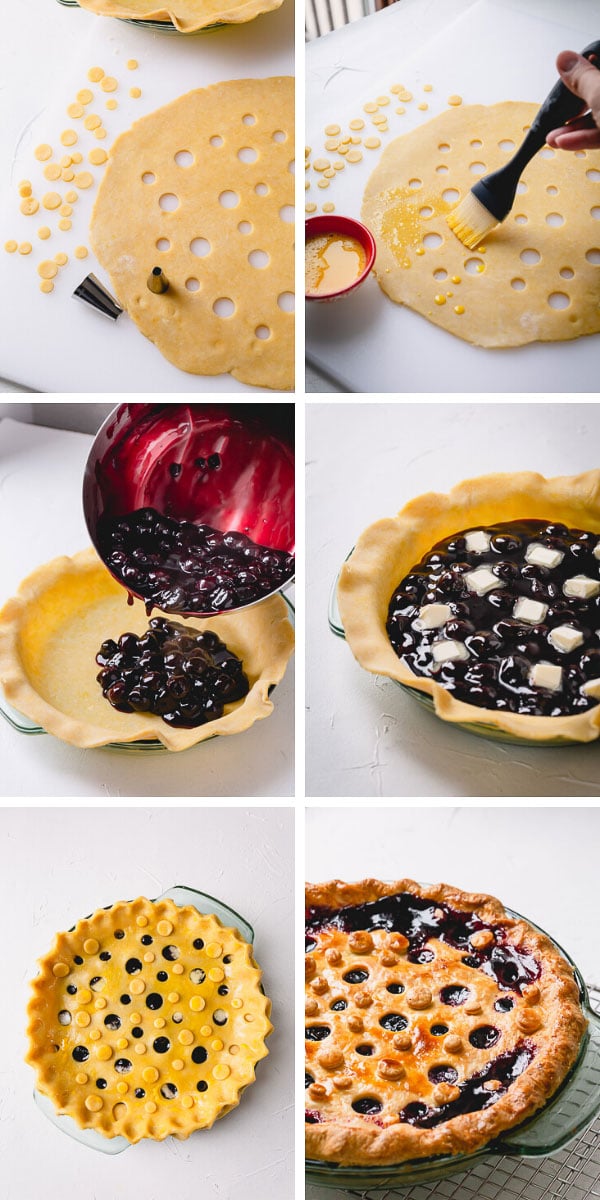
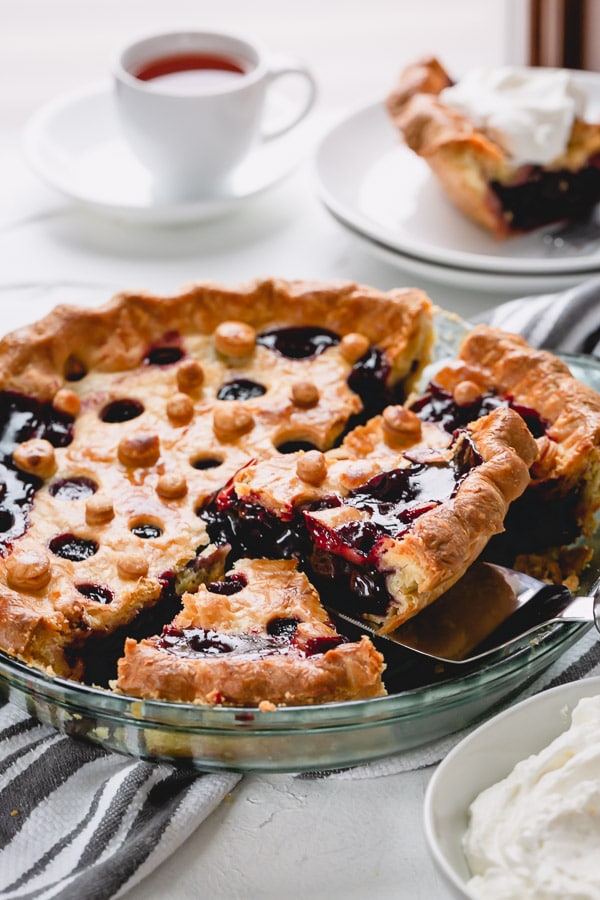
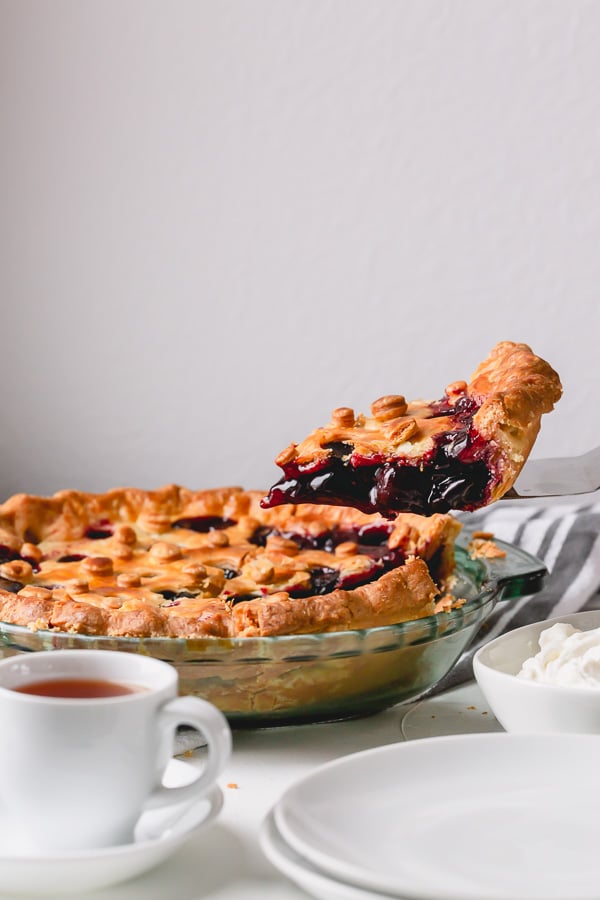
How to decorate Cherry Pie
While a beautiful lattice work is impressive and all, I don’t quite have the patience or time to do that. I just want to bake my pie and eat it! Haha
So if you’re like me, here’s my tip for relatively cute solution… Cut out polka dots using a simple round piping tip. You can use both end to cut out different size rounds.
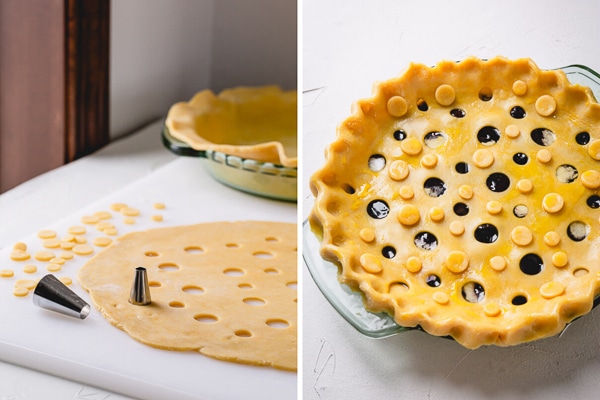
TIP: Brush on egg wash after you cut out the circles and before transferring onto the pie.

How to store Sweet Cherry Pie
Does cherry pie need to be refrigerated?
Cherry pie can be stored at room temperature for up to 2 days, covered with plastic wrap.
Best Cherry Pie FAQs
What cherries are best for pies?
There’re sweet and sour cherries on the market. However, I feel like sweet cherries are more common, and that’s what I use for my cherry pie. During cherry season in summer, I buy a large case of sweet cherries to stock my freezer for the winter. Both fresh and frozen cherries work wonderfully for this cherry pie!
How long to bake a cherry pie?
Bake cherry pie for 45-50 minutes at 375°F, or until the top crust is golden brown.
How do you thicken cherry pie filling for pie?
Proper amount of sugar combined with cornstarch thickens the cherry pie. Be sure to bring the sauce to a boil after adding the cornstarch to activate the thickening properties.
The BEST Cherry Pie
Ingredients
For pie crust:
- 1 ½ cups 190g all-purpose flour
- ¼ teaspoon kosher salt
- ½ cup 113g unsalted butter, cut into ½ tablespoon pieces and frozen
- 1 egg yolk
- 3-4 tablespoons ice water
For cherry pie filling:
- 4 cups pitted sweet cherries fresh or frozen
- ½ cup 100gr sugar
- 2 tablespoons cornstarch
- ¼ teaspoon salt
- 1 tablespoon fresh lemon juice
- 1 teaspoon vanilla extract
- ½ teaspoon almond extract
- 1 ½ tablespoons butter cut into small cubes and frozen
- 1 egg for egg wash
Instructions
- To make the pie dough, in a large mixing bowl with a paddle attachment, mix together flour and salt. (Alternatively, you can use a pastry cutter, instead of stand mixer.)
- Add frozen butter cubes and egg yolk. Mix on lowest/stir speed until the butter pieces are about pea-size.
- Add ice water one tablespoon at a time, until the dough forms into a ball. Depending on humidity, you might not need all the water, or you might need additional couple of tablespoons. That’s why you need to add it one tablespoon at a time until big clumps of dough sticks together. Too much water will make the dough too sticky and hard to work with. TIP: Don’t be alarmed if you see small pieces/swirls of butter in the dough, that’s exactly what you want to see! Those butter pieces will melt during baking and create the most tender and flaky crust.
- Divide the dough into 2 equal parts and wrap each dough ball with a plastic wrap. Refrigerate for at least 1 hour.
- Roll out each dough into a 10 to 11-inch circle on a floured surface. Transfer one crust onto 9-inch pie dish. Refrigerate the prepared pie dish and top crust while making the filling.
- To make the cherry pie filling, place the cherries (if frozen, no need to thaw in advance) in a medium saucepan over medium heat. Bring it to a boil.
- In a separate bowl, mix together sugar, cornstarch and salt.
- Add sugar mixture, vanilla extract, almond extract and lemon juice into the boiling cherries. Mix well.
- Reduce the heat to low and simmer the cherry mixture stirring frequently until thickened, for 4-5 minutes. Remove from heat and cool for a few minutes.
- Preheat the oven to 375°F (190°C).
- To assemble the pie, in a small bowl, beat the egg with 1 tablespoon of water to make an egg wash.
- Bring out the top crust and, if desired, cut out small circles, using a round piping tip, in the middle of the crust within 8-inch radius. Brush on egg wash all over the top crust.
- Remove the prepared pie dish from the fridge and pour the cherry filling.
- Throw in butter cubes in the filling.
- Carefully transfer the top crust with a rolling pin over the filling. Crimp the edges however you like. If you didn’t cut out polka dots, make 3 small slits in the crust for steam to escape.
- Bake for about 45-50 minutes, or until golden brown.
- Let the pie cool completely for at least 4 hours on the counter before serving. The filling will thicken further as it cools.
- Serve with whipped cream, or better yet with vanilla ice cream. Enjoy!
- Store the leftovers in the fridge, covered, for up to 5 days.
Tips & Notes
- Make the pie dough in advance. Refrigerate it for up to 3 days, or freeze it for up to 3 months.
- Make the cherry pie filling in advance. Refrigerate for 1-2 days, or freeze for up to 3 months.
- When ready to bake, assemble the pie per recipe.
Nutrition

This recipe was originally published on September 17th, 2013, and last updated on March 9th, 2020.


Have a Question, how do I boil the cherries, I can’t believe just put them in a pan and boil them??? Sounds Delish…
Hi, Dale. Yes, you put the cherries in a saucepan and boil them on stovetop. 🙂
I made this 🍒 pie earlier today. Next time l’ll add a lit’ more sugar, a touch of cinnamon & definitely bake it an extra 30 mins. Thank you for making the directions so easy to follow, my pie thicken up nicely 😉
Hi, Carolyn. Thank you so much for your feedback and sharing your notes!! I’m glad you found my directions easy to follow. 🙂
Thank you so much for this recipe!! For whatever reason, I’ve not made a lot of pies in my life and I love to bake! This recipe is just wonderful and my pie is almost too cute to eat! So happy to have this recipe. Thank you for sharing it!
Hi, Lisa! So glad you made this cherry pie. It’s one of my favorite pies. And I really need to bake one soon. Thanks for your feedback.
Hi Shinee. I’ll send you the info about my cherry pitter in case I didn’t send it to you correctly before. I bought mine online from Amazon. It is the red one that hold 6 cherries or olives. You just put them in slots inside of gadget and press down with flat hand and they pop right out in container underneath. Just be sure to put them in stem side up. Count the pits to be sure you get them all, of course. It’s very easy and fun to use. It’s called the YouTensils etc. Happy cherry pitting. Mine are always found with 1 cherry that’s moldy! I’m having a hard time getting them fresh so then I have to throw out the whole pound. Do you ever have that problem?
Yes, I found that cherry pitter. Thanks so much for the info, Linda! I do come across a bad cherry or two in a bag, but I never throw out the whole bag because of that. Just toss the bad ones, and the rest is good.
Thank you so much for this great recipe. I’m making it tomorrow for the second time, because it is so good. I even purchased a cherry pitter that does a few at a time. It works so well that it’s almost fun to use. My family really likes this recipe. I love sweet cherries and now I have a really good recipe so we all can enjoy them.Thanks again and best of luck to you.
Aww, Linda, thanks so much! So happy to hear you’re loving this cherry pie! It’s our family’s favorite too. Please tell me more about your cherry pitter that does more than one at a time! I’m about to buy a case of cherries to freeze. And thank you for your feedback.
Loved the pie tips! And the pie itself looks amazing 🙂
Thank you!
Гоё харагдаж байнаа. Болдог бол зурагнаас нь гаргаж авахсан. 🙂 Мундаг бүсгүй юм аа. Бахархаж байна. Амжилт!
Bayarlalaa, Munguu! Boldog bol delgetsnii tsaanaas amsuulj boldog bol te? Hehe 🙂
Made this last night, it came out just like the picture 🙂
https://scontent-b-dfw.xx.fbcdn.net/hphotos-ash3/946721_10101966819230300_1350051246_n.jpg
(Not spam, promise! Just a link to my FB pic.)
You made my day, S! That looks amazing. Thanks so much for sharing the picture! 🙂
looks like an amazing pie!
Yes, it is so delicious! You should make it too. 🙂 Thanks for stopping by.
Pie looks so yummy. I love crispy pie crust.
Thank you, Muugii. Yes, crispy pie crust is the best! 🙂