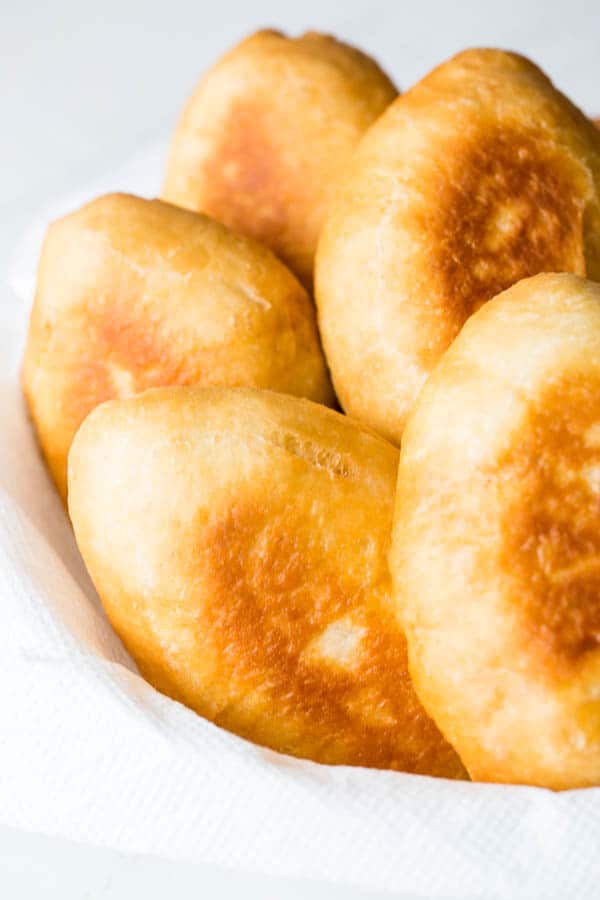
Sharing my mom’s secret to the softest and fluffiest piroshki (Russian hand pies) with simple beef and rice filling, but you can fill yours with whatever your heart desires.
Also try my equally amazing baked pirozhki here!
It’s official!! Dates are set. Tickets are purchased! We’re going to Mongolia next month!! And by we, I mean Grant and I. Unfortunately, it’s a busy season for my husband at the ranch and he won’t be able to join us this time.
But I can’t wait to be in my childhood home and be spoiled with mom’s cooking! I miss her cooking so much. If you’ve been around for a little bit, you’ve probably seen a few of her recipes already. But here’s another one.
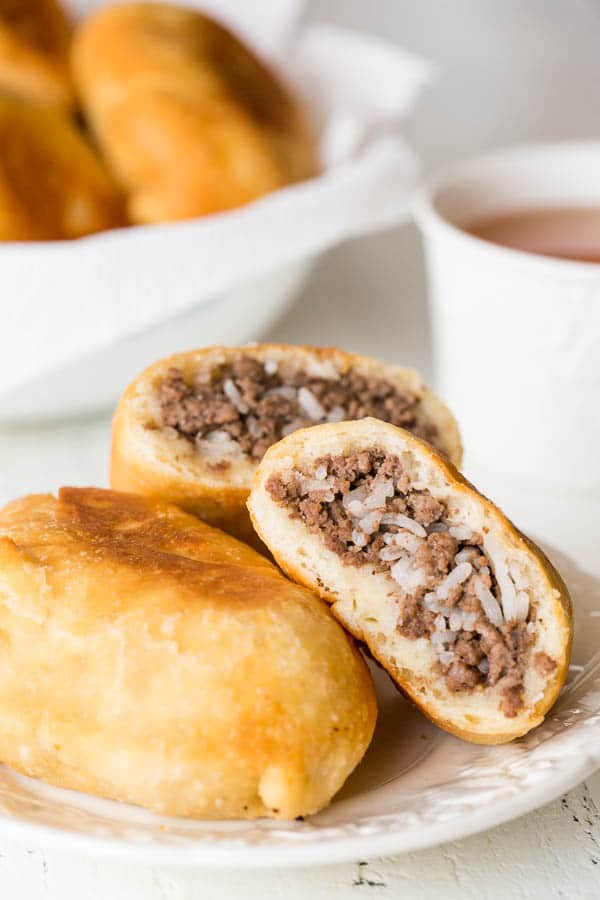
These Russian piroshki (or pirojki, or pirozhiki, however you wanna spell it) are stuffed with simple meat and rice mixture and fried till golden brown perfection! This’s my favorite comfort food straight from my childhood.
It all starts with yeast leavened dough, which is so dreamy soft and fluffy. It’s truly the best part! I’ll share my mom’s secret for that super soft dough in a minute. But first, let me share a word about my trusted Red Start Platinum yeast. As you know, this’s my second recipe in partnership with Red Star Yeast, but it’s definitely not the only recipe I use it in.
I’m seriously a huge fan of their products, mostly because they consistently deliver amazing results.
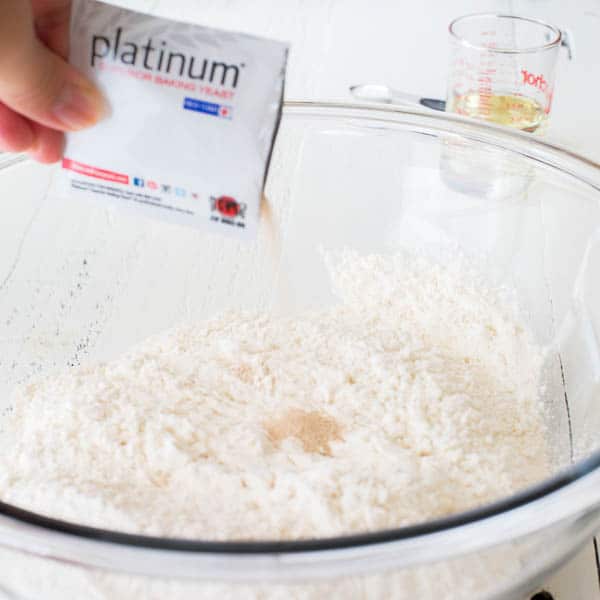
Ok, now the secret to the softest piroshki dough is vegetable oil! That’s it. Stirring in some vegetable (or canola) oil right into the dough yields the softest and most tender dough you’ll ever bite into.
Now, you can fill the dough with whatever filling your heart desires, mashed potatoes, cabbage and meat, all meat, or in this case, meat and rice. Anything works here!
Another quick tip.
You don’t need a thermometer to fry these savory hand pies. Simply drop the end of a wooden spoon into heated oil, and if it’s bubbling up around the wood, that means the oil is ready for frying! Drop those pretty little nuggets into the oil and watch them turn beautiful golden brown. Since we’re using pre-cooked filling, it won’t take long.
By the way, these meat hand pies are perfect portable meal for picnics, potlucks and all the summer activities! Hope you’ll give it a try.
As always, thanks for reading!
More Favorites from Sweet & Savory

Russian Piroshki (Meat Hand Pies)
Ingredients
For dough:
- 4 cups (500g) all-purpose flour
- 1 packet Red Star Platinum Superior Baking Yeast about 1 ½ teaspoons
- ½ teaspoon salt
- 1/3 cup (80ml) vegetable oil
- 1 cup (240ml) warm water more if needed
For meat filling:
- 1 tablespoon olive oil
- 1 lb (450g) lean ground beef
- 2-3 garlic cloves pressed
- 1 teaspoon salt
- 1 cup cooked rice
- Oil for frying
Instructions
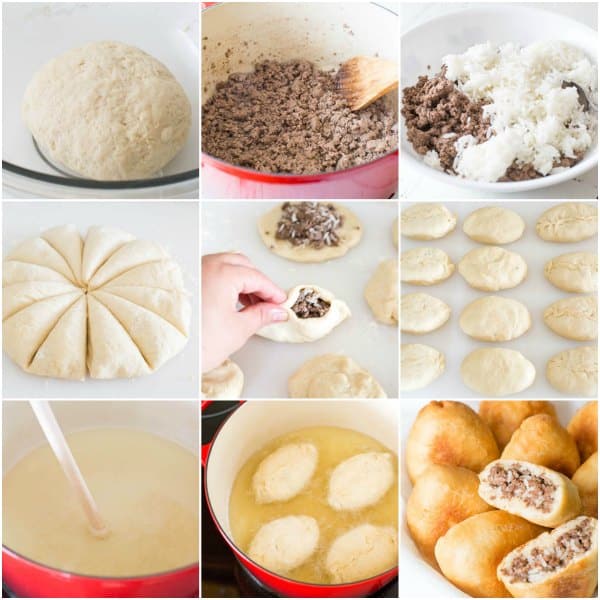
- To make the dough, in a large mixing bowl, combine flour, yeast and salt.
- Add vegetable oil and water and mix until smooth. (If dough is too dry, add more water a little bit at a time until dough smooth and soft. Also, if the dough is too wet, add a little bit more flour.)
- Coat the dough with a little bit of vegetable oil and place it back in the bowl. Cover with damp kitchen towel and place it in a warm place to rise, for about 30-60 minutes. (I put it in a microwave with a glass of hot water. Don’t turn on the microwave.)
- Meanwhile, prepare the filling. Heat olive oil in a large skillet or dutch oven over medium high heat.
- Add the meat, garlic and salt. Cook the meat, breaking it apart with a wooden spoon, until cooked through. Transfer into a large bowl and mix it with rice.
- Once the dough is doubled in size, take it out onto a lightly floured surface and knead into a smooth ball, 1-2 minutes. Lightly flatten the dough ball into a disk, and divide into 12 equal parts as you slice a pizza. Roll each piece into a smooth ball.
- To make the hand pies, take a piece of dough and flatten it with your hands. Put the filling in the center and fold the dough in half. Pinch the edges of the dough to seal, creating a half moon. Then gently flatten it between your palms, making sure the sealed crimps are on flat side. (If it’s not clear, check out the photos above.)
- Once all the hand pies are formed, heat 1-inch oil in a large skillet, or dutch oven. (Tip: You don’t need a thermometer to fry these savory hand pies. Simply drop the end of a wooden spoon into heated oil, and if it’s bubbling up around the wood, that means the oil is ready for frying!)
- To cook the hand pies, drop 4 hand pies in the hot oil and cook until golden brown, 3-4 minutes. Flip and cook until it’s nice and golden. Remove into a bowl, lined with paper towel to absorb excess oil. Continue with the remaining batch.
- Serve piroshki warm or at room temperature.
Nutrition

Special thanks to Red Star Yeast for sponsoring this post. Follow them on Instagram, Facebook, Pinterest, Twitter, Google Plus for more baking inspiration.


I tried piroshki in Seattle on our 5th anniversary trip. LOVED them. I have a Ukrainian exchange student in my AP biology class and we talked about piroshki’s a couple of times. I think am going to make these the morning of their AP exam so they have some breakfast before they start!
I liked the cabbage and beef ones but I’m not sure my students would like that so much so I think I may do half of them potato and breakfast sausage and the other half with a fruit filling.
Hi, Will! Potato and sausage piroshki sounds fantastic. I bet it’ll be a hit. I’ll be trying that too. Thanks for the idea. And hope your students will love it too. Your students are lucky to have you! 🙂 Thanks for the comment.
Can these be frozen before frying and just fry when needed or freeze after fried?
Hi, Tanya! I recommend freezing them after you fried them. It’s dangerous to fry frozen stuff, as hot oil will splatter. However, you can freeze uncooked pirojki and bake them in the oven. Hope this helps.
Will definetly try your piroshki recipe which I happened to stumble upon. Thank you for sharing !!!!
Hope you’ll enjoy them, Rick. Thanks for stopping by!
Is the dough recipe good for fruit & such handpies?
Hi, Mollie. The dough is pretty plain, so I think you can use it for sweet fillings too. Let me know if you give it a try.
Can I use instant yeast that comes in one packet? TY.
Hi, Mike. Yes, you can use instant yeast.
Can these be fozen? Would love to freeze and have for a quick meal this winter.
Hi, Mary. Yes, you can freeze cooked piroshki. When you reheat them, I suggest baking it. I find that the dough gets rubbery, when I microwave them. Hope you’ll enjoy!
How long are they able to stay frozen for? And how long should I bake them for?
Hi, Kayden. If you wrap them well and store in airtight container, they should be good for 1-2 months. Bake at 350°F for about 20 minutes, or so, until they are heated through.
My mom made these all the time growing up, she has sinse passed and we haven’t had a recipe. Excited to try these! Coming across this brought back lots of good memories thanks!
Hi, Jessica! I’m so happy to hear that these piroshki brought good memories of your childhood. I hope it’s similar to what your mom used to make. Let me know if you give it a try.
definitely one of the better dough recipes out there. Instead of 1/2 t salt i added 1 tsp, which was great. Next time will try 1 1/4. The only issue was the consistency of the dough. I had to add more water for it to come together, which was fine, but for some reason the dough was super hard to roll into balls, even after it rested. It wouldn’t come together. In the end it doesn’t matter, we rolled them out flat no problem, but i’m just curious why it’s this way.
Hi, Marina! I’m happy to hear you liked the dough. As for the consistency, I find that weather affects the amount of liquid the dough requires. But I’m not sure I understand the issue you had described. So when you roll the dough between your hands, it won’t shape into a smooth ball? Was the dough nice and soft after some time to raise? My only thought is maybe the dough was a bit on harder side? I’d advise to make the dough a bit softer next time.
I have tried many of your recipes, and I must say, I’m very delighted, they all turned out real good. Thanks!!
Aww, that’s so great to hear, Ana! Thanks so much for your sweet comment and for trying my recipes.
Tried and true family recipe are the best!
Agreed. Thanks, Megan!
Could you bake these?
Yes, you can, Angela. Bake at 350°F for 20-25 minutes.