
Everything you need to know about tempering chocolate, from the simple science behind the process to my go-to (easiest!) method.

If you’re making chocolate dipped truffles or strawberries, or creating pretty chocolate decorations for cakes and cupcakes, you definitely need to master this skill.
5 main reasons to temper chocolate:
- Tempered chocolate has a nice and shiny finish.
- It’s dense and solid.
- It snaps when broken without tearing.
- Plus, tempered chocolate doesn’t melt easily when touched, and doesn’t leave fingerprints.
- Finally, it set quickly within 3-4 minutes.
If you don’t temper the chocolate and simply melt it, then you’ll end up with soft chocolate that takes longer to set, quickly melts at the touch and leave fingerprints easily. And if you try to break it, they don’t snap and kind of tear. They also have a dull matte finish, and sometimes can have white streaks.
Science behind the process:
Once I understood the science behind the tempering process, it made perfect sense to me and it was no brainer to take an extra step to temper the chocolate properly whenever I was using it for coating truffles, chocolate decor and such.
So, let me explain this process in layman terms.
- When we melt chocolate heating it to 113-122°F, cocoa butter melts, dissolving fat crystals and turning chocolate into a liquid.
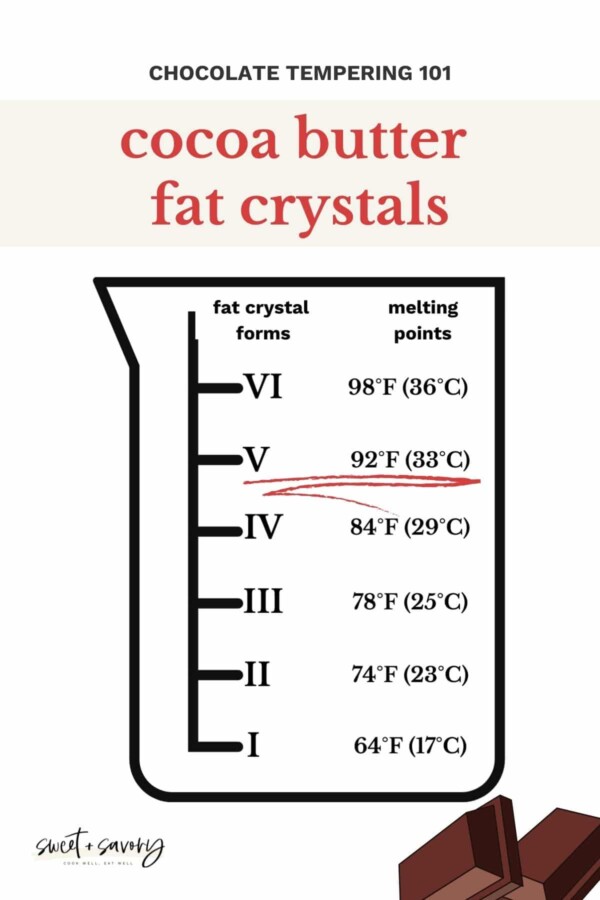
- And when we cool the melted chocolate, cocoa butter starts to solidify and forms fat crystals. Those fat crystals form into one of 6 structures depending on how long the chocolate has been held at a certain temperature and how much it was stirred. These structures are also called phases, or forms, 1 through 6. And each of these phases have different melting points.
- Form 5 is the ideal crystal structure. It’s also called beta crystals. And that’s what we want our chocolate to have when it’s set. When the chocolate forms beta crystals, aka chocolate in temper, it has all the characteristics we want: shiny finish, nice snap and higher melting point, etc. And that’s why we go through so much trouble on tracking the temperature and heating and cooling and heating again process.
- So, in order to ensure our chocolate forms phase 5 structure, we need to control the temperatures carefully. If we cool melted chocolate without any control, fat crystals will take whatever form it wants, which causes the chocolate susceptive to low melting point, white streaks, etc.
- Beta crystals forms at around 90°F (32°C), so that’s why we need to let the chocolate stay at around this temperature to form those beta crystals. However, it takes long time to form those beta crystals at this temperature, and that’s why we want to cool the chocolate all the way down to 82°F (27°C) which will encourage those crystals to form faster. The downside is that along with beta crystal, we’ll also encourage the growth of form 4 crystals. At which point, our melted chocolate could form 2 different crystal structures, but we only want one structure, beta crystals. And that’s why we need to raise the temperature to about 90°F (32°C) at which point form 4 crystals will melt and only beta crystals will stay.
How to temper chocolate:
Now, that we understand what we’re trying to achieve, how do we ensure our melted chocolate forms phase 5 crystal structure?
There’re many different methods, like tabling, seeding, microwave, etc. And I’m going to share 2 simplest ways to temper chocolate.
Method 1 – Seeding:
This’s the most reliable and foolproof method and a thermometer is your best friend here. Also, make sure the room you’re working in isn’t too hot. The ideal room temperature is 65-70°F. It’ll be super hard, if not impossible to work in anything over 75°F.
Tip
When working with chocolate and Bain-marie, be extra careful not let any water or steam get into your chocolate. Or the chocolate will seize and become unusable.
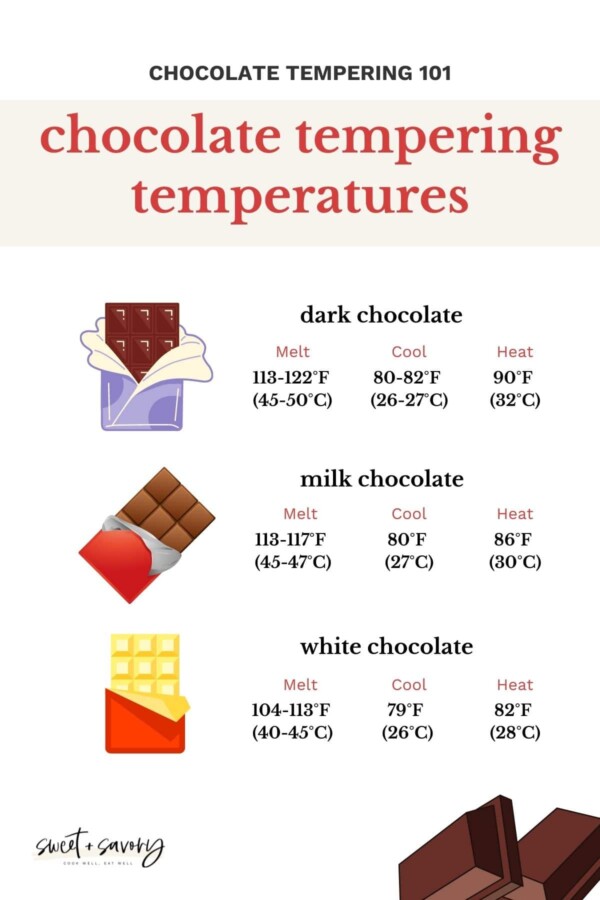
*The following temperature directions applies to dark chocolate only. Adjust the temperatures for milk and white chocolate per chart below.
- Melt 60% of dark chocolate over Bain-marie until it reaches between 113-122°F (45-50°C). *Make sure the bowl with chocolate doesn’t touch the simmering water. And simmer the water very gently, it shouldn’t be boiling!! – Time depends on the amount of chocolate you have. But for 150g chocolate, it takes about 3 minutes.
- Remove from heat and stir in half of the remaining third of chocolate into the mixture and continuously mix it until the chocolate melts, keep adding more chocolate and stirring until it reaches 80-82°F (26-27°C).
- Then, heat the chocolate over Bain-marie until it reaches 90°F (32°C), stirring constantly. Depending on how much chocolate you’re working with, it can take as little as a few seconds.
Tip
It’s important to stir the chocolate quickly and constantly, as it promotes the growth of small crystals.
Method #2 – Microwave
Now, this method is the simplest and once you figure out the time and power of your microwave, it can be the easiest way to temper chocolate without a thermometer. But you need to be open for some experimentations. This method is also ideal for small batches.
Any chocolate you buy is tempered chocolate. And if you melt it without letting it go over 90°F (32°C), you won’t break the temper.
- Chop or grate chocolate into small pieces. The smaller, the better! And place it into a plastic or silicone bowl. Glass bowl heats up easily, which could heat your chocolate too much!
- Microwave the chocolate for 1 minute at 100% power (for 1000Watt microwave!).
- Then stir it well and microwave for 10 seconds at 100% power.
- Continue to microwave it at 10-second increments until the chocolate is fully melted.
Test the chocolate if it’s tempered properly and adjust the time and power accordingly. Again, once your figure out the perfect time for your microwave, you could temper chocolate without a thermometer.
How to test if chocolate is properly tempered:
To test if your chocolate is tempered properly:
- Dip a spoon, or parchment paper into the chocolate.
- Let it set at room temperature. Continue to stir the chocolate while you wait.
- If it sets within 3-5 minutes with a nice sheen and snaps when broken, your chocolate has been tempered.
- If it doesn’t set in 5 minutes, the chocolate may have been heated too much. Simply add a little more chocolate into it and stir quickly to cool it down a bit. And then test again.
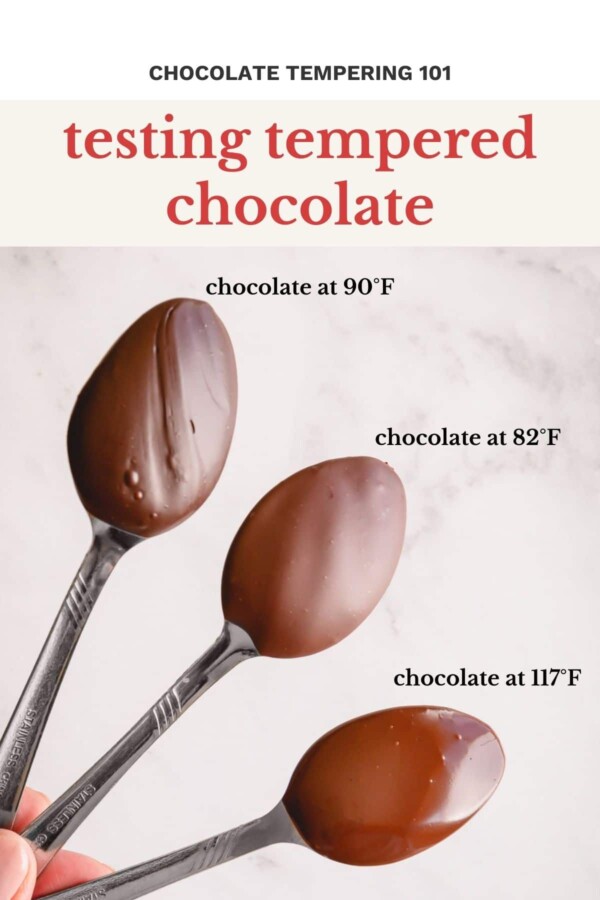
These 3 spoons were dipped in chocolate at different temperatures and allowed to set for period of time. Notice how each spoon has different finish:
- Chocolate in temper – set perfectly with a nice sheen.
- Chocolate is not quite in temper. It had set, but it looks a bit dull.
- This’s a simply melted chocolate. It’s super glossy, because it didn’t set for a long time.
How long can you keep a tempered chocolate?
Tempered chocolate should be used right away before it cools and sets. If it cools down to 80-86°F (26-30°C), reheat it quickly until it reaches 90°F (32°C).
Once the tempered chocolate cools and sets, you’ll need to temper it again. Chocolate can be tempered over and over again!
How to store leftover tempered chocolate:
- Simply pour the chocolate over silicone mat, or parchment paper, spread into a thin layer and let it set.
- Once set, break it into little pieces and store in an airtight container.


Great recipe and video! What thermometer brand do you use, please?
Hi, Malu. Glad my video and recipe are helpful! I use this Thermoworks thermometer (<-affiliate link), and I love it!!
Hi Shinee
Hearty thanks for the detailed video and the note. Simply explained all things without missing minor things. You are really nice🙏🏼
My pleasure. So happy it was helpful for you, Fayiz. I appreciate your feedback.
Hi Shinee!
Just I saw your video on YouTube.
You gave good explanation to making macarons and how to tempting chocolate. I leaned lot of things from your videos. Thank you so much!
Oh, I so appreciate your feedback, Vasugy! Thank you for watching my videos.