
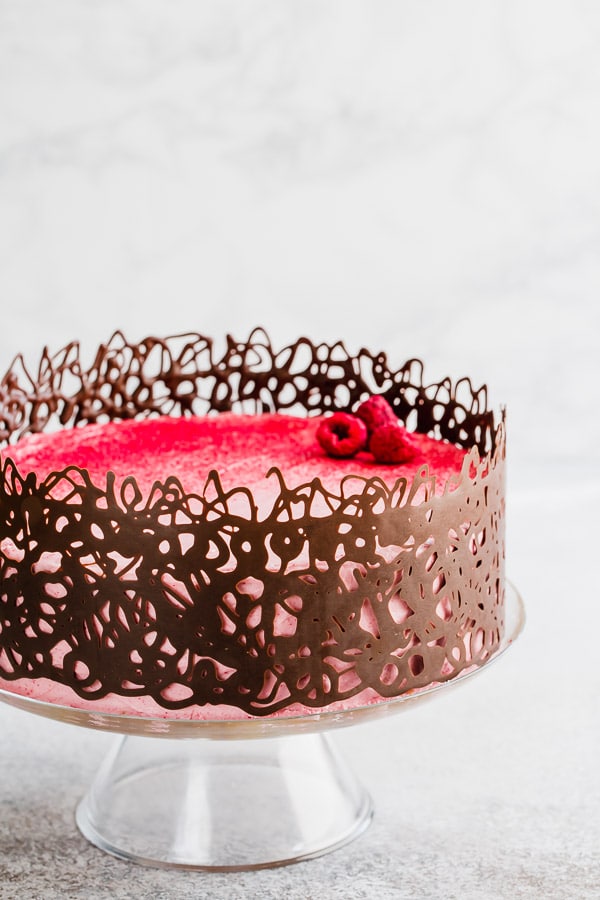
This simple yet elegant chocolate cage is a quick and easy way to decorate your homemade cake. No special skills or equipment required!
Why you’ll love this cake decor:
Cake decorating isn’t necessarily my specialty. I like simple, effortless ways to decorate my cakes.
And that’s why I love this simple chocolate cage idea so much!! You don’t even need a great cake frosting skills to pull this off. Because you’ll hide all the imperfections with the chocolate design you’ll create!
And the best part you only need 1 ingredient and less than 15 minutes!
Things you need:
- Dark chocolate, either bittersweet or semi-sweet, works best for this technique. And I recommend a bar of chocolate over chocolate chips, as chocolate chips are designed to hold its shape better and doesn’t melt as easy.
- I find that wax paper is the easiest to work with, because it’s thinner than most parchment papers, and peels off of chocolate easier. You can also use clear acetate strips, if you have it.
3 tips for perfect chocolate cage:
- This’s the most important part: we need to melt the chocolate gently without raising the temperature of the chocolate over 90°F in order to keep the chocolate in temper. That way your chocolate design will set quickly, have a nice sheen and will stay nice and crisp.
- Work with 2 shorter strips of wax paper so that it’s easier to handle. Measure the circumference of the cake and cut the strips for the same length. For example, if your cake measures 30 inches around, you’ll need two 15-inch strips.
- I used pretty thin decorating tip for piping my chocolate “cage” design (Wilton #2), but if you’d like to make a specific design, like flowers, or hearts, I suggest using a bigger round tip. You don’t want too thin lines, because it won’t be sturdy enough.
Troubleshooting Tips:
If the chocolate doesn’t set within 5 minutes, it means chocolate was heated a bit too much and lost its temper.
But that’s not a lost cause!
Just wait for another 10 minutes, and then place it in the fridge for a few minutes to firm, if needed. Check often every few minutes so it doesn’t firm up too much, or it’ll break.
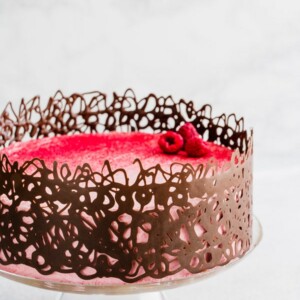
Chocolate Cage – Chocolate Cake Decoration
Ingredients
- 4 oz dark chocolate Note 1
Tools you need:
- Wax paper
- Piping bag
- Round piping tip
Instructions
To prepare wax paper:
- Measure the cake circumference and cut 2 strips of wax paper for that length. (For 9-inch cake, you'll need two 15-inch strips. Height of the strips depends on the design you're planning, whether you want it the same height as your cake, or taller, etc. TIP: Add an inch or so extra room on top of the height of your design.)
- Using a ruler and a pen, draw 2 lines on wax paper strips for guidance, ie how tall your design is going to be.
To melt chocolate:
- Place the chopped chocolate in a medium silicone (or plastic) bowl.
- Microwave for 30 seconds at 50% power. Then stir well and put it back for 15 seconds at 50% power. Stir well and continue microwaving in 15-second increments at 50% power until the chocolate is fully melted, stirring well in between.
- Transfer the melted chocolate in a piping bag with a round tip.
To draw the design:
- Start piping your design within the lines, making sure it's thick enough to stand. Too thin lines will be too fragile.
- Set the chocolate for about 3 minutes at room temperature, or until it's firm yet still pliable. If the chocolate is still in temper, the chocolate will set in less than 5 minutes. (TIP: If the chocolate doesn't set, just wait for another 10 minutes, then place it in the fridge for a few minutes.)
To apply:
- Carefully lift the wax strip with chocolate design, and wrap around the frosted cake. Repeat with the other side.
- Carefully peel off the wax paper. (TIP: If the chocolate is still soft, put the cake in fridge for 30 minutes or longer, and then peel the wax paper off.)
⭐️ Did you make this recipe?
Please leave a review and let us know how you liked it!
Tips & Notes
Nutrition


This looks like a great idea. I was looking for some ideas for my daughters cake and this is brilliant. I’ll let pics when it’s done!!
It’s such a fun idea, Barbie. Hope you cake turned out great!!
Hi I made your collar and it was fun. Thank you for the clear instructions. I learned a lot. My question can this same method be applied to a rectangle cake 9X13? Is it possible to put a chocolate collar on a 9X13 cake?
I’m sure you could, it would be 4 strips of the chocolate lace.
Hi, Patty!! So glad this tutorial was helpful! Thank you for your feedback! I don’t see why you couldn’t do the same for a rectangular cake!! To make it easier, make 4 strips and place on each side.
I did not make this recipe however it looks great.
I’m looking for a GGBO recipe for Rahul’s Choc and Orange Layer cake and Briony’s Dark Choc and Salted Caramel Creation. Do you have them?
Thank you so much.
Hi, Robin. No, unfortunately I don’t.
Hi,
This looks amazing!I did not even realise how easy it was, yet so elegant!I just wanted to know, will this stick to a cheesecake?The filling for the cheesecake will be made of cream cheese and cream.What do you think?
Hi, Haadia. I haven’t tried wrapping a cheesecake. If you have cheesecake filling exposed on the side, I think it’ll stick.
You don’t specify the amount of coconut oil in the ingredient list, but the directions say to add to chocolate in the Instruction section.
Hi, Linda. Thanks for the questions! And I apologize for confusion. I recently updated the recipe as coconut oil isn’t necessary, and I removed it from the ingredient list.