Original Post: https://www.sweetandsavorybyshinee.com/chocolate-cage/
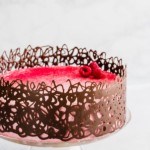
Chocolate Cage - Chocolate Cake Decoration
Servings: 1 cake
Calories: 678kcal
This simple yet elegant chocolate cage is a quick and easy way to decorate your homemade cake. No special skills or equipment required!
Print Recipe
Ingredients
- 4 oz dark chocolate Note 1
Tools you need:
- Wax paper
- Piping bag
- Round piping tip
Instructions
To prepare wax paper:
- Measure the cake circumference and cut 2 strips of wax paper for that length. (For 9-inch cake, you'll need two 15-inch strips. Height of the strips depends on the design you're planning, whether you want it the same height as your cake, or taller, etc. TIP: Add an inch or so extra room on top of the height of your design.)
- Using a ruler and a pen, draw 2 lines on wax paper strips for guidance, ie how tall your design is going to be.
To melt chocolate:
- Place the chopped chocolate in a medium silicone (or plastic) bowl.
- Microwave for 30 seconds at 50% power. Then stir well and put it back for 15 seconds at 50% power. Stir well and continue microwaving in 15-second increments at 50% power until the chocolate is fully melted, stirring well in between.
- Transfer the melted chocolate in a piping bag with a round tip.
To draw the design:
- Start piping your design within the lines, making sure it's thick enough to stand. Too thin lines will be too fragile.
- Set the chocolate for about 3 minutes at room temperature, or until it's firm yet still pliable. If the chocolate is still in temper, the chocolate will set in less than 5 minutes. (TIP: If the chocolate doesn't set, just wait for another 10 minutes, then place it in the fridge for a few minutes.)
To apply:
- Carefully lift the wax strip with chocolate design, and wrap around the frosted cake. Repeat with the other side.
- Carefully peel off the wax paper. (TIP: If the chocolate is still soft, put the cake in fridge for 30 minutes or longer, and then peel the wax paper off.)
Notes
Note 1: Dark chocolate, either bittersweet or semi-sweet, works best for this technique. And I recommend a bar of chocolate over chocolate chips, as chocolate chips are designed to hold its shape better and doesn't melt as easy.
Nutrition
Calories: 678kcal
Carbohydrates: 52g
Protein: 9g
Fat: 48g
Sugar: 27g
Sodium: 23mg