
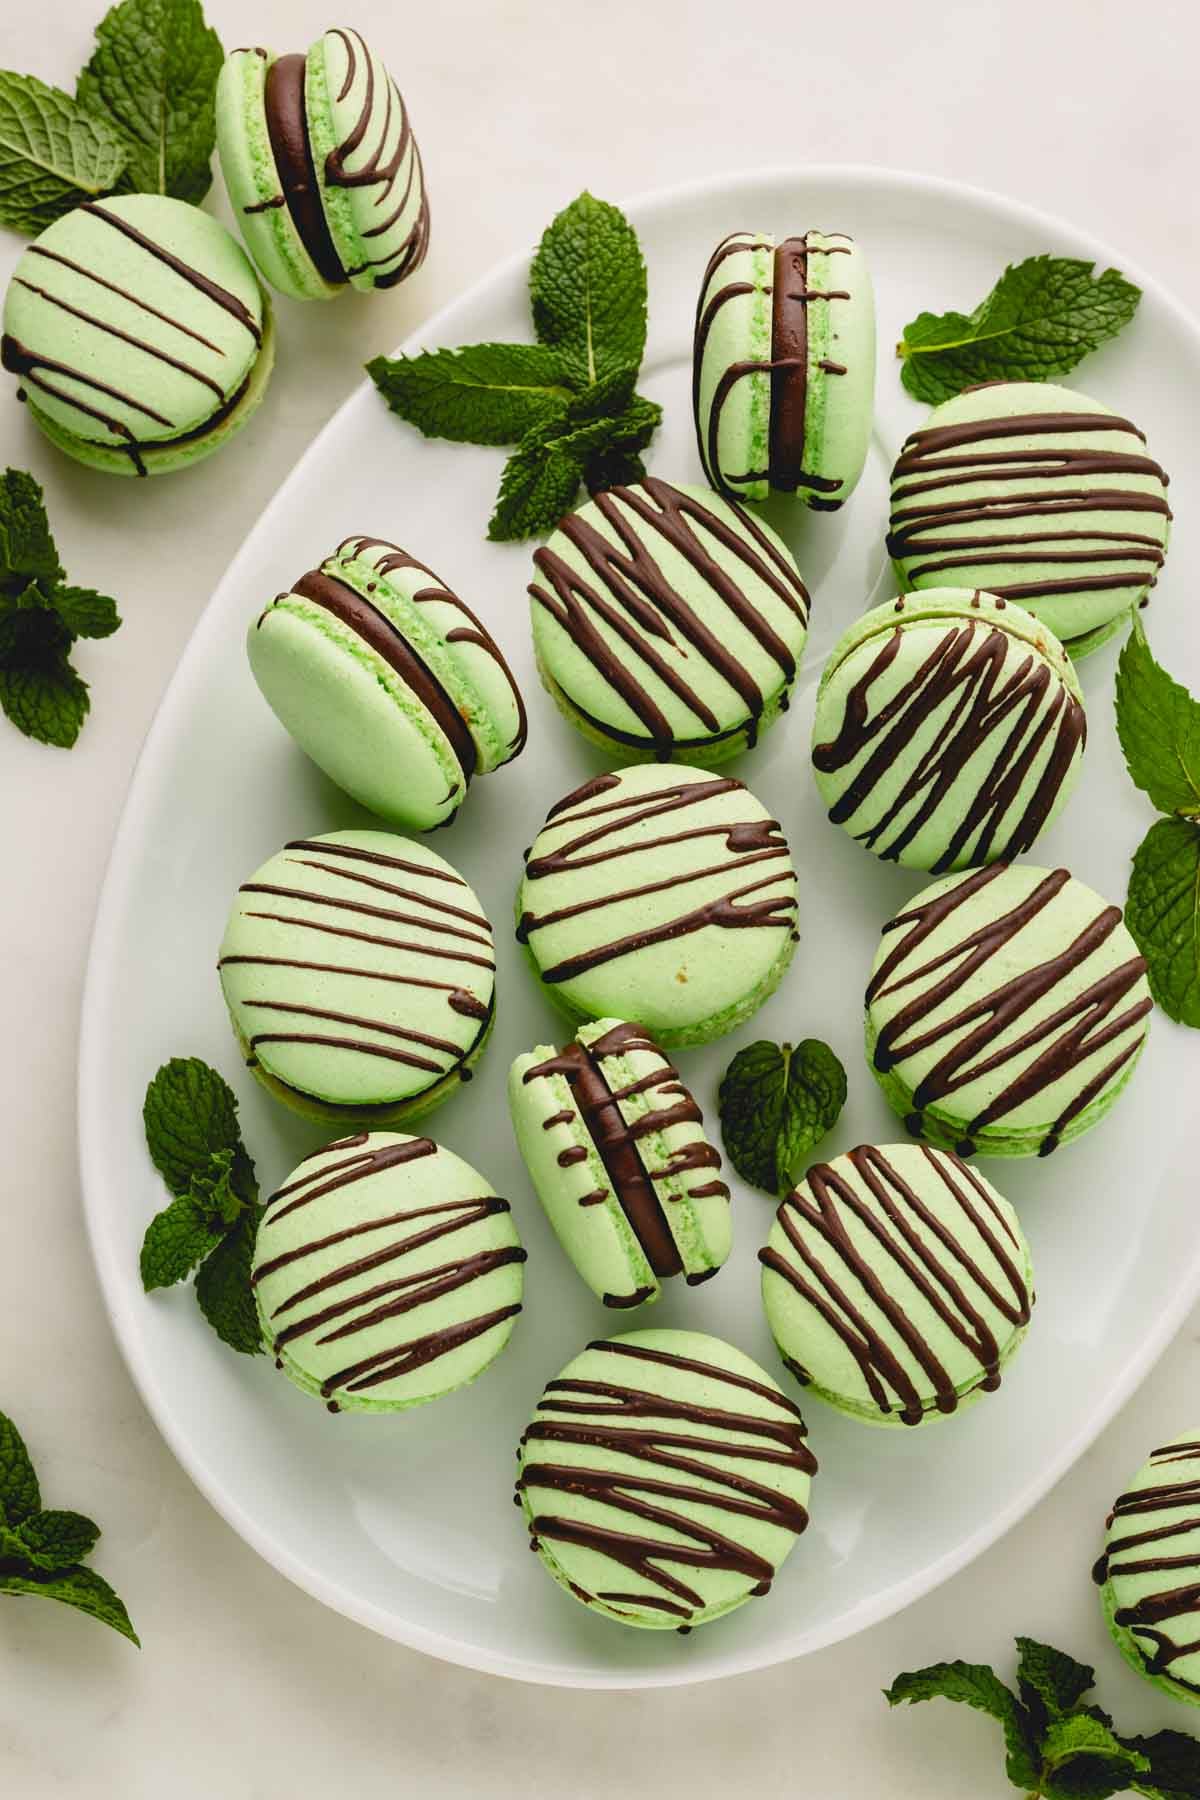
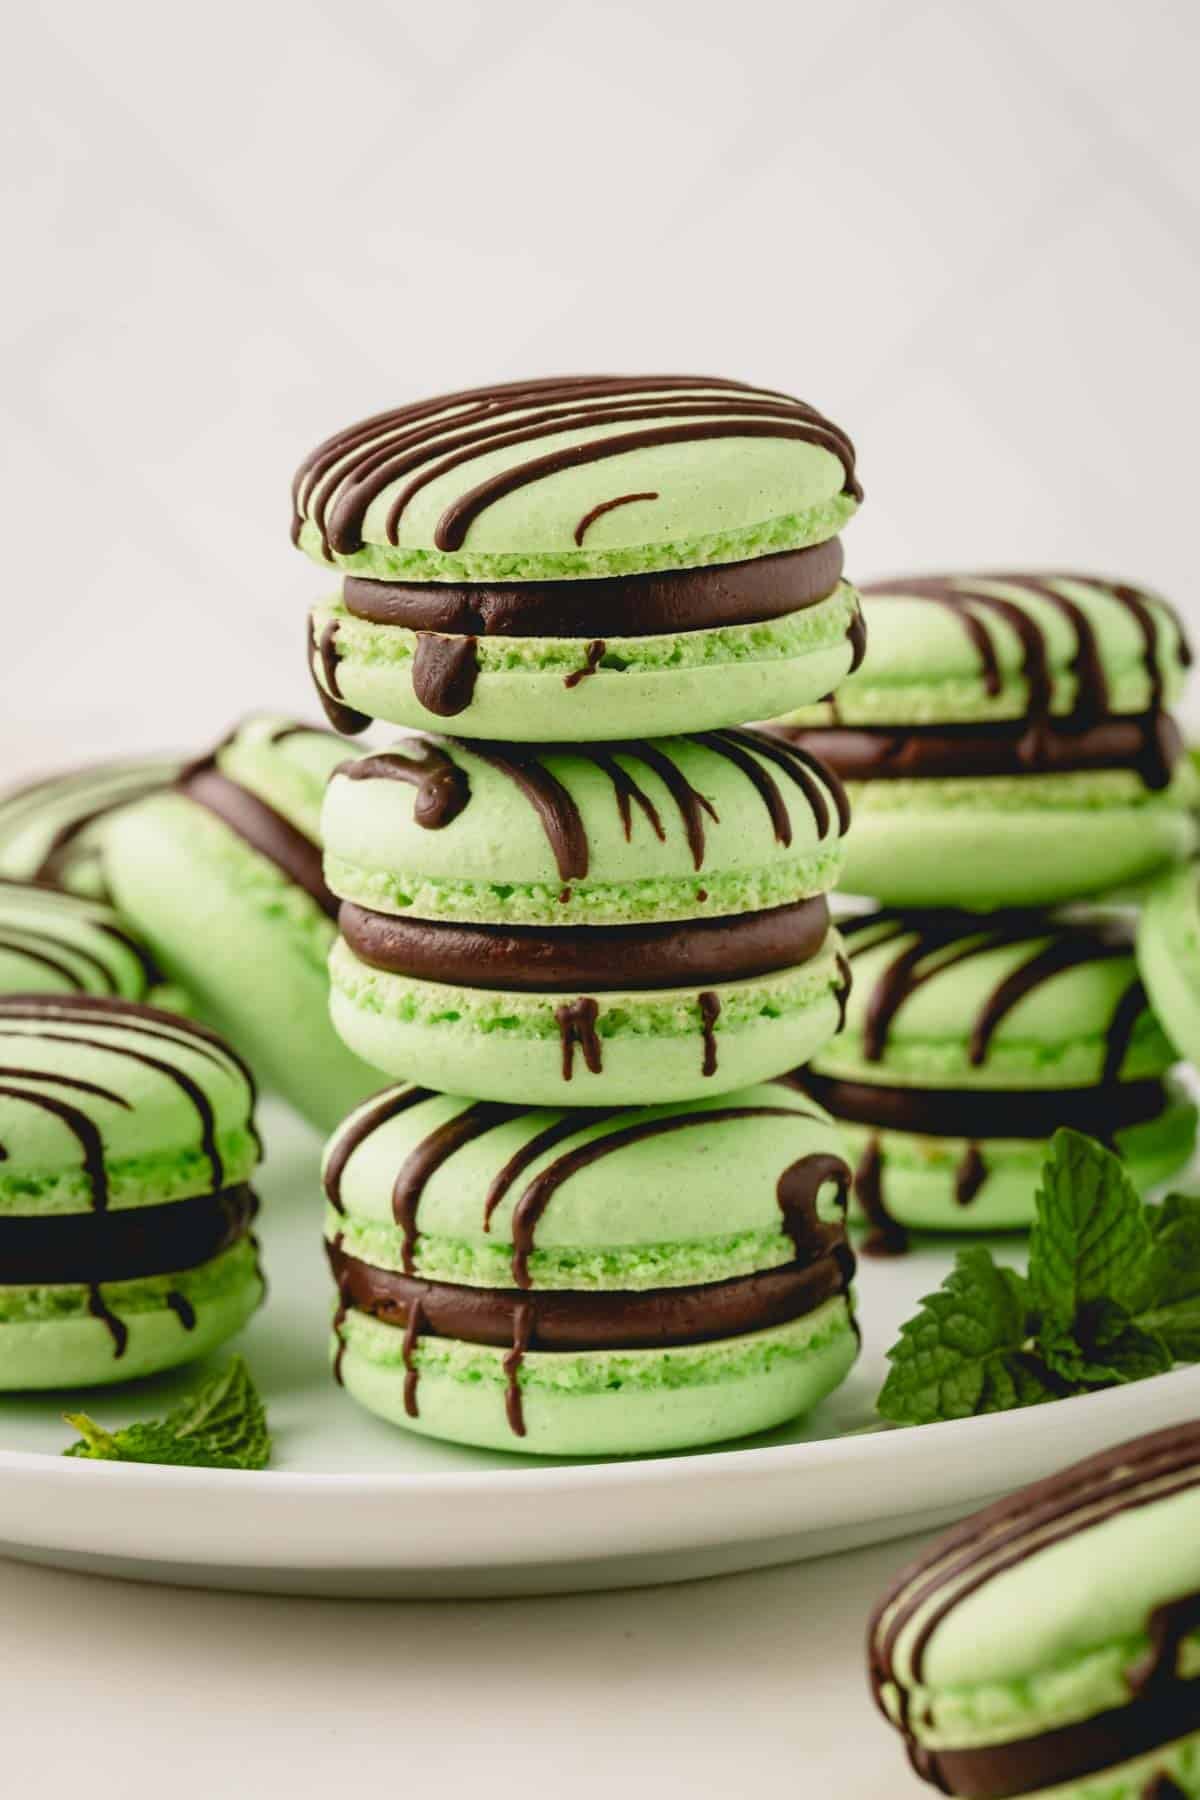
Minty, chocolatey, and surprisingly simple to make! With a silky smooth ganache and a creamy mint candy surprise inside, these mint chocolate macarons taste just like your favorite mint chocolate treat, but fancier!
With my clear, step-by-step instructions, you’ll be able to bake beautiful, bakery-style macarons with confidence.

What’s your favorite thing to do when you’re stressed? For me, it’s baking. But definitely not macarons!
- Almond brownies, sure.
- Chocolate chip cookies, yes!!
But never ever french macarons!
Because if those finicky macarons come out less than perfect, it’ll just make a bad day worse! You know what I mean, right?
Anyhow, I still love baking macarons. Because it brings SO much joy when you pull out a tray full of perfectly round and smooth macarons with beautiful feet. Pure bliss!
If you’ve ever baked macarons, you know what I mean, right?
But if you’re new to baking macarons, I highly recommend starting with my basic macaron recipe.
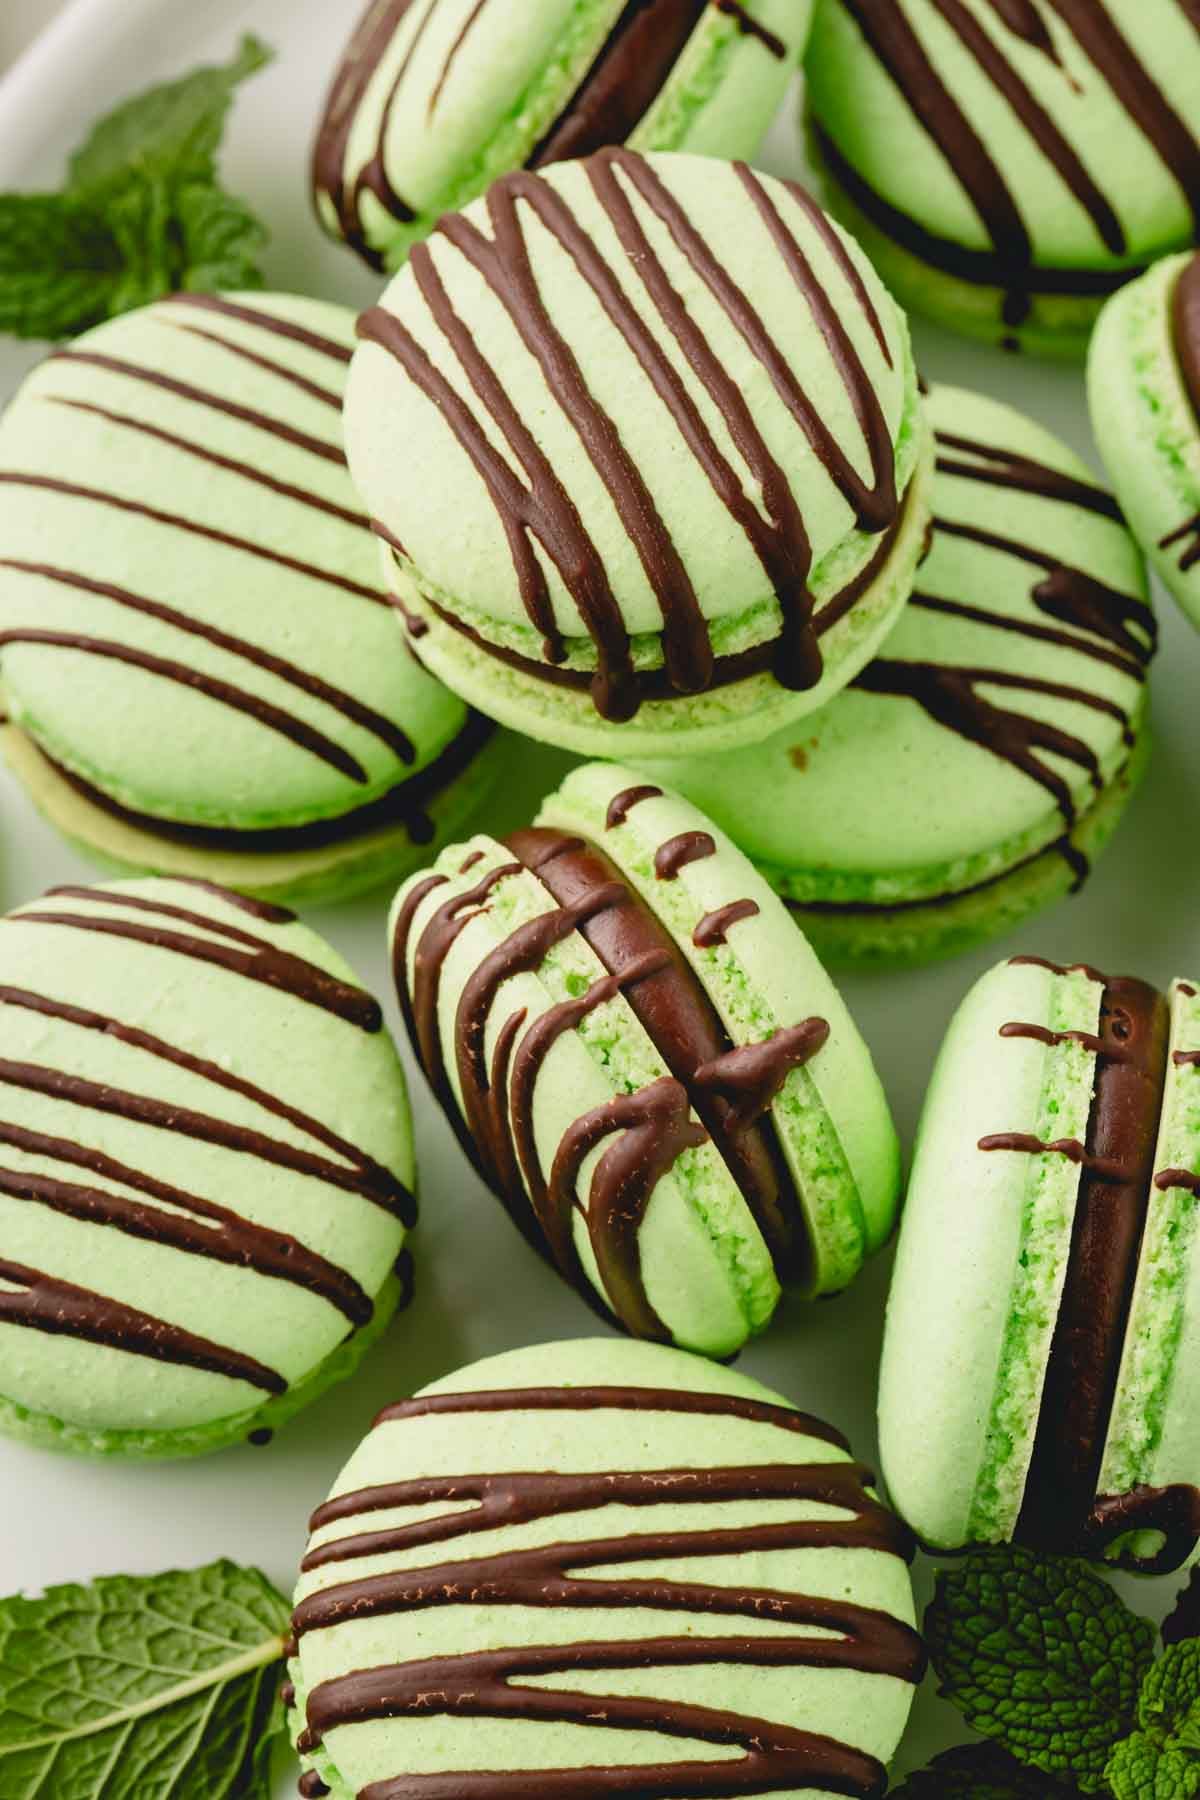
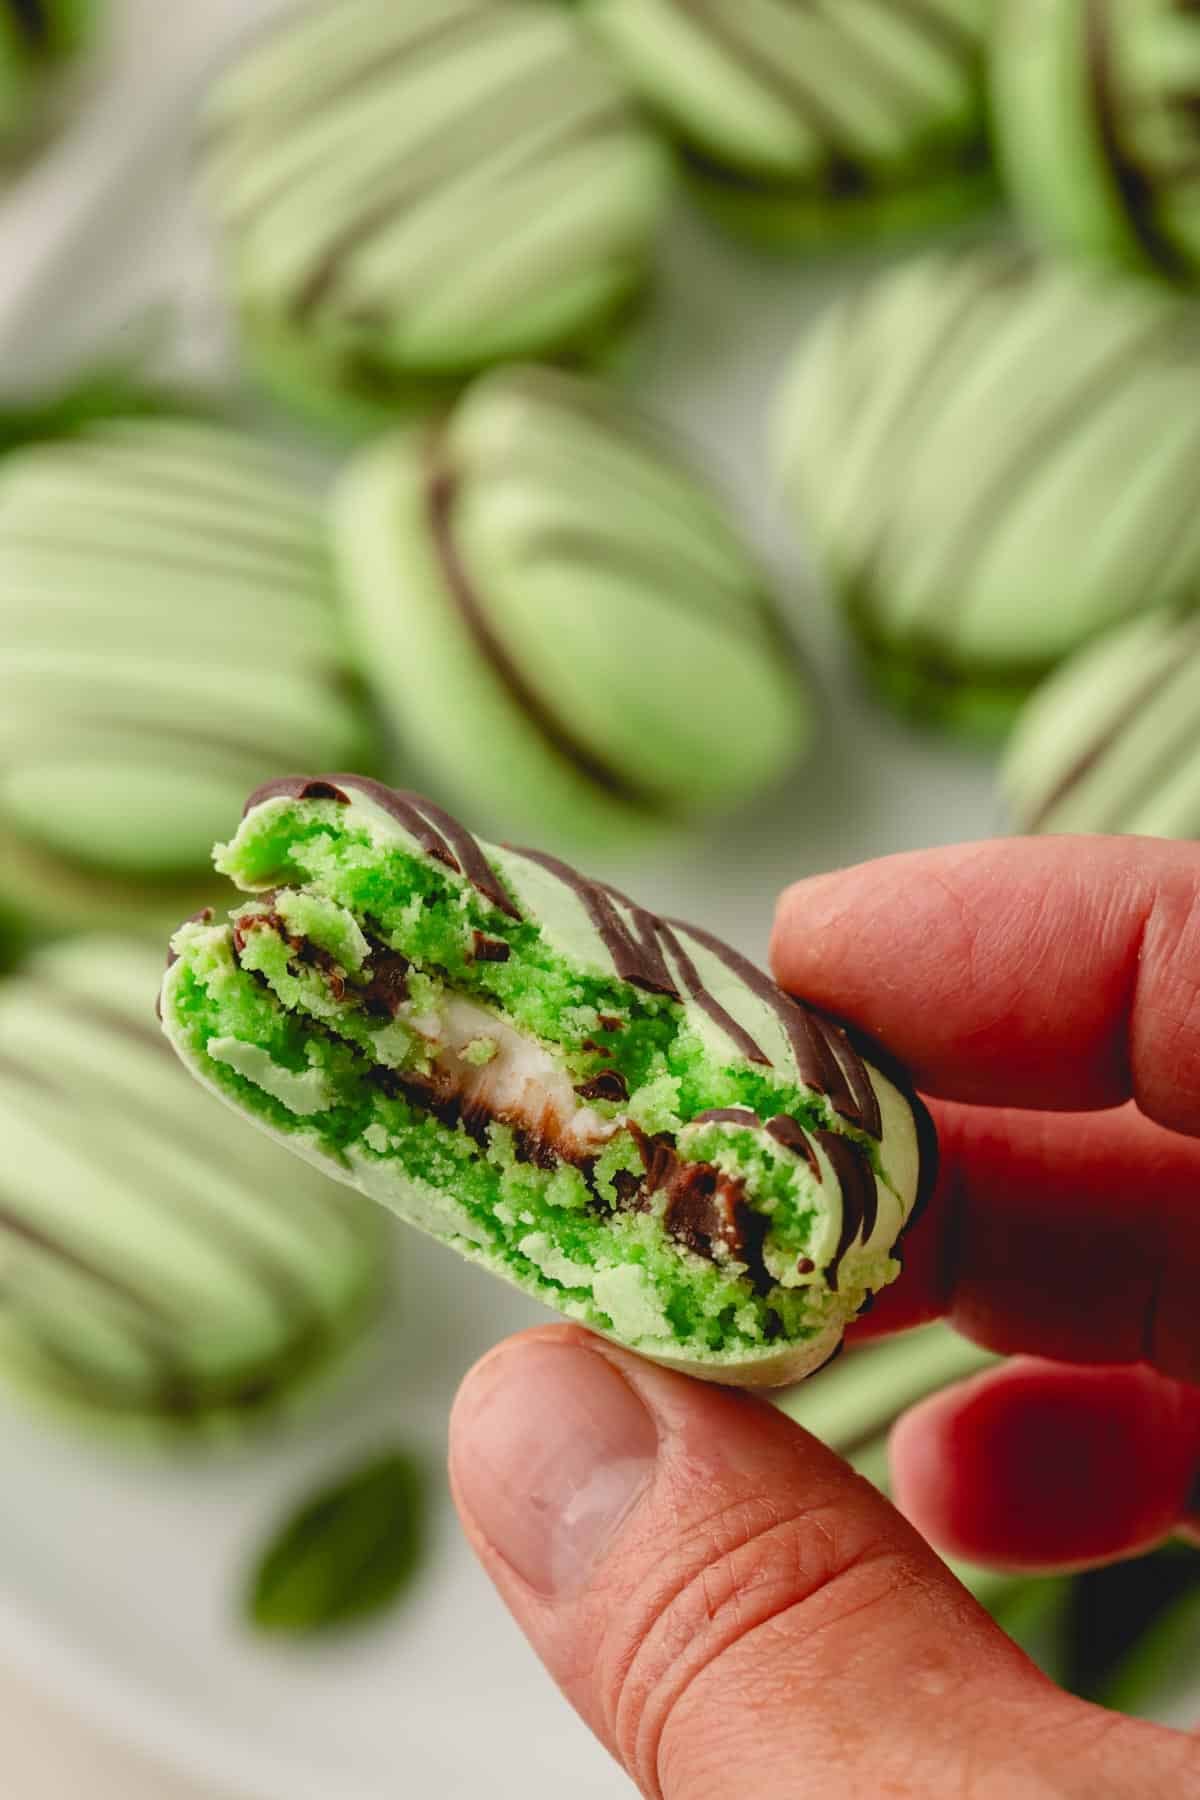
Table of Contents
How to make mint chocolate macarons
1. Make the meringue
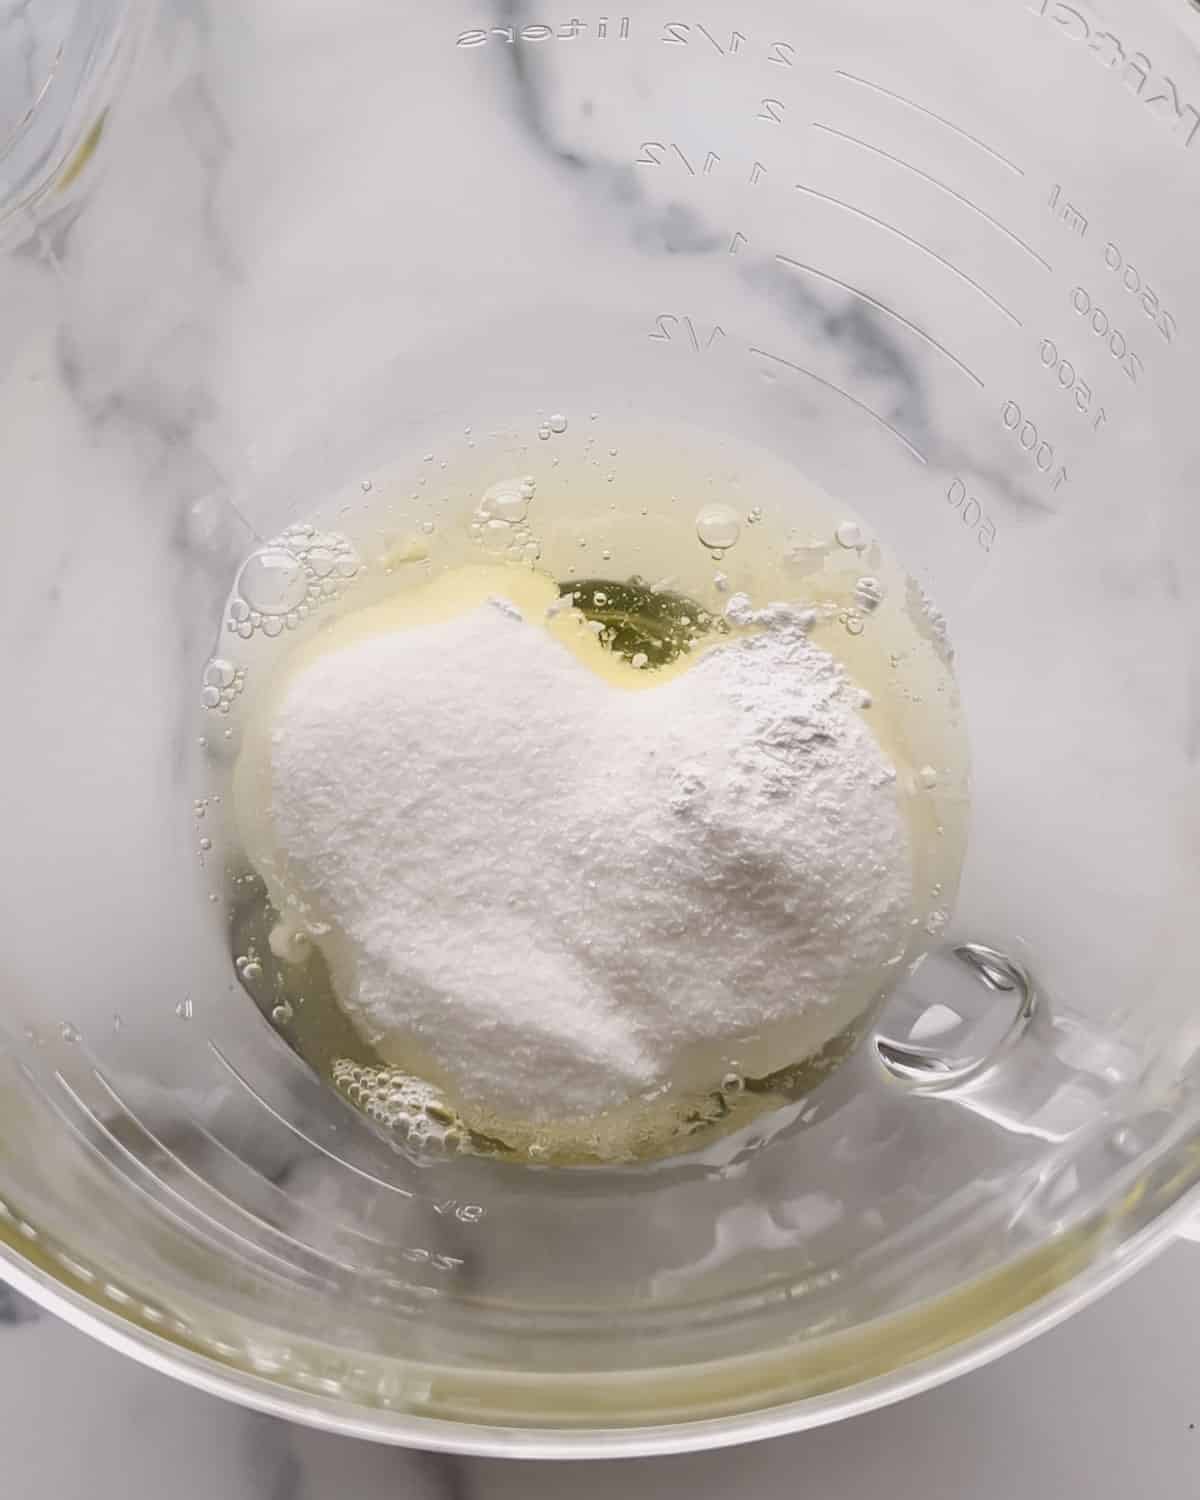
- Combine egg whites, granulated sugar, cream of tartar, and salt in a mixing bowl with a whisk attachment.
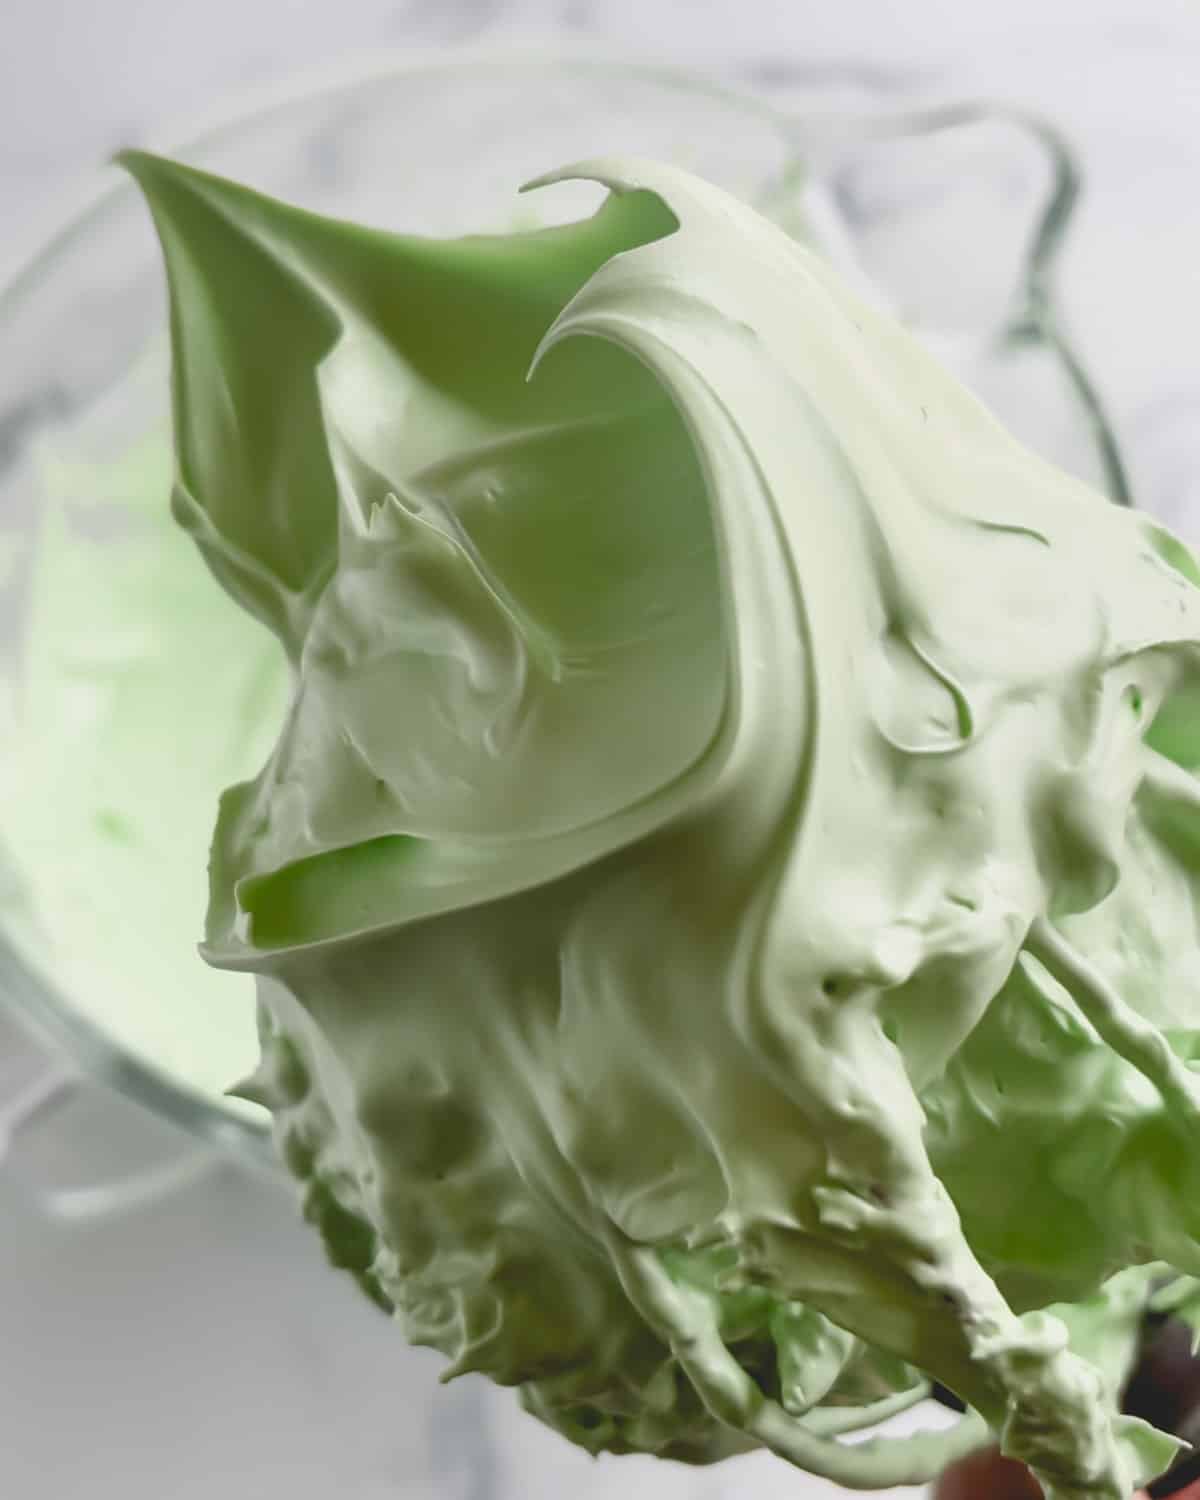
- Beat on a consistent medium speed until soft peaks form. (On KitchenAid stand mixer, I beat the meringue on speed 4.)
- Add green gel food coloring.
- Continue whipping the meringue on medium speed until stiff peaks form.
- Add peppermint extract once the meringue has reached stiff peaks.
Visual Cues: Your meringue should be super thick and ball up inside the whisk. When you lift the whisk, the meringue should hold a pointy end and have sharp ribs.
Why we add peppermint extract last?
Peppermint extract contains oil. And any fat or oil can prevent the egg whites from whipping into fluffy and stable meringue. That’s why adding it once the meringue has reached stiff peaks is essential!
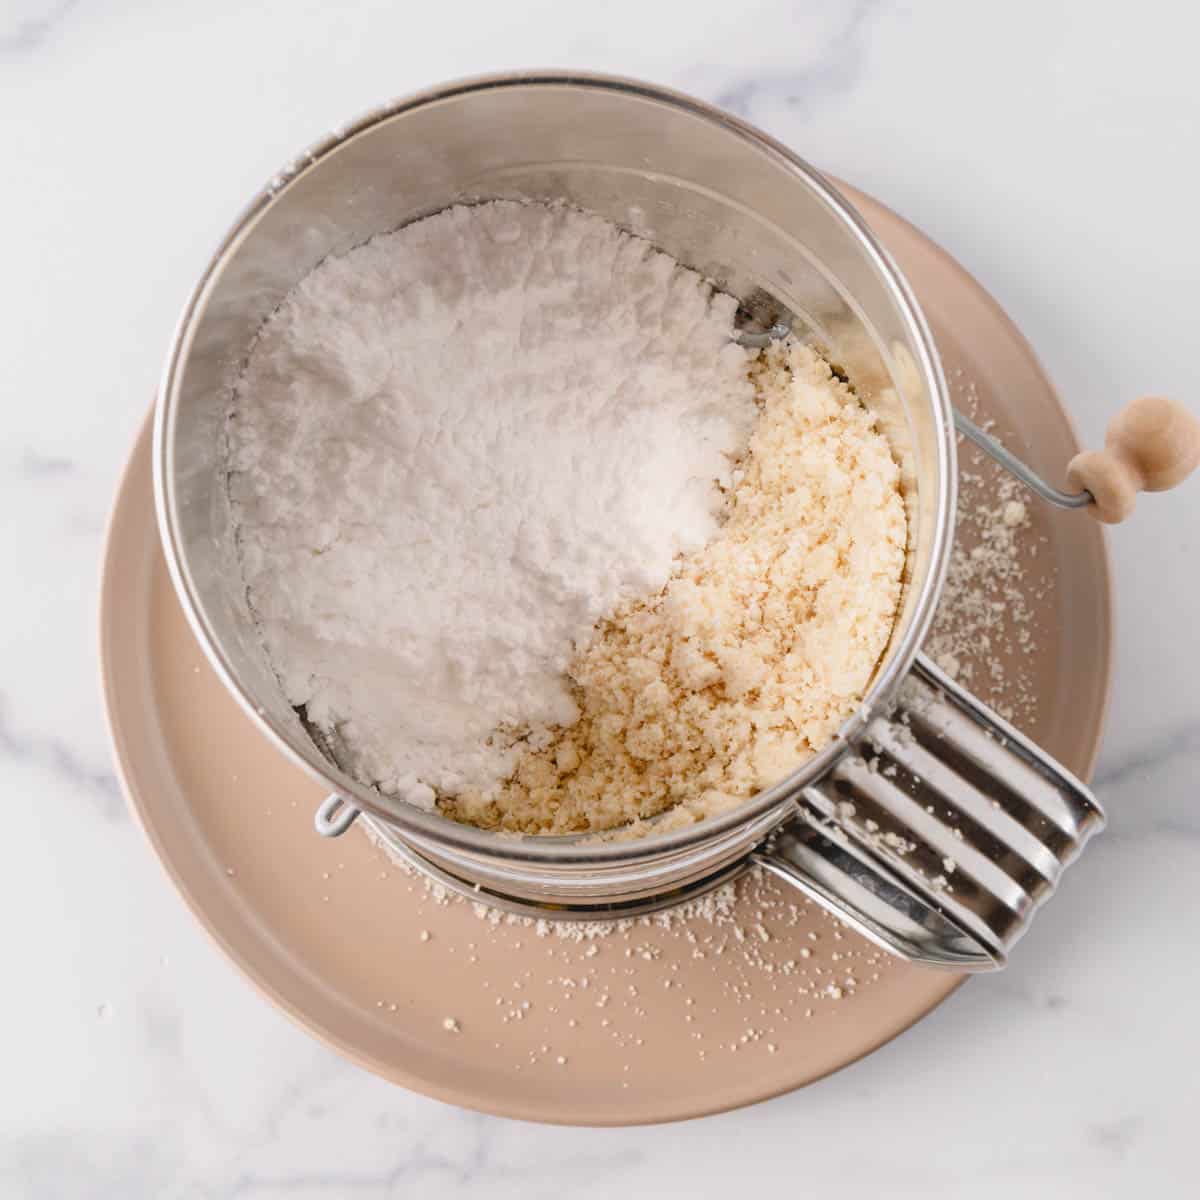
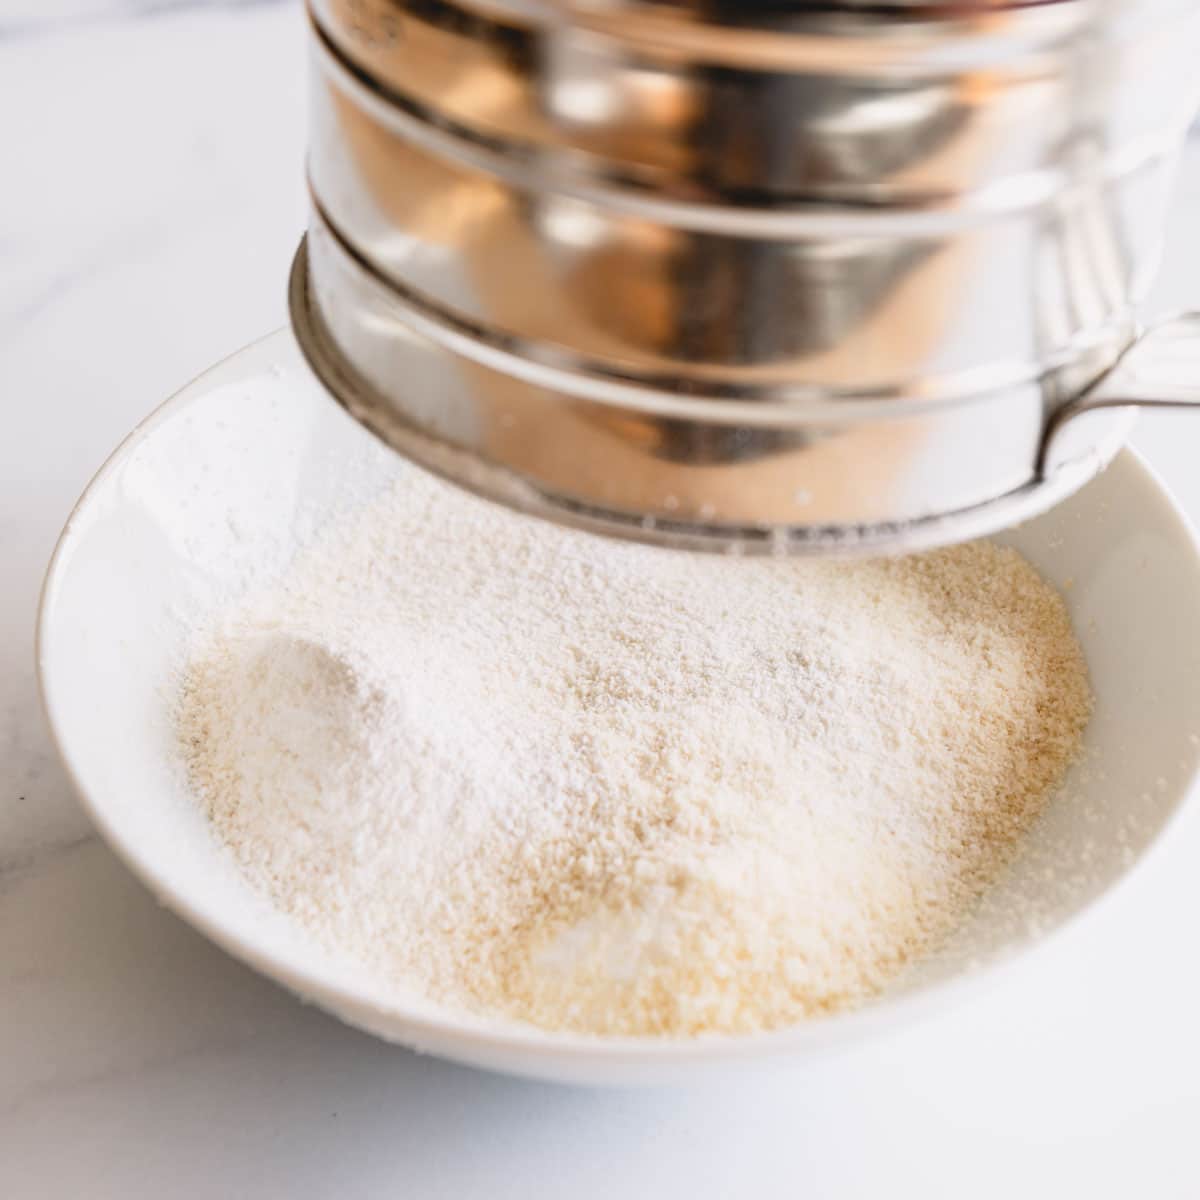
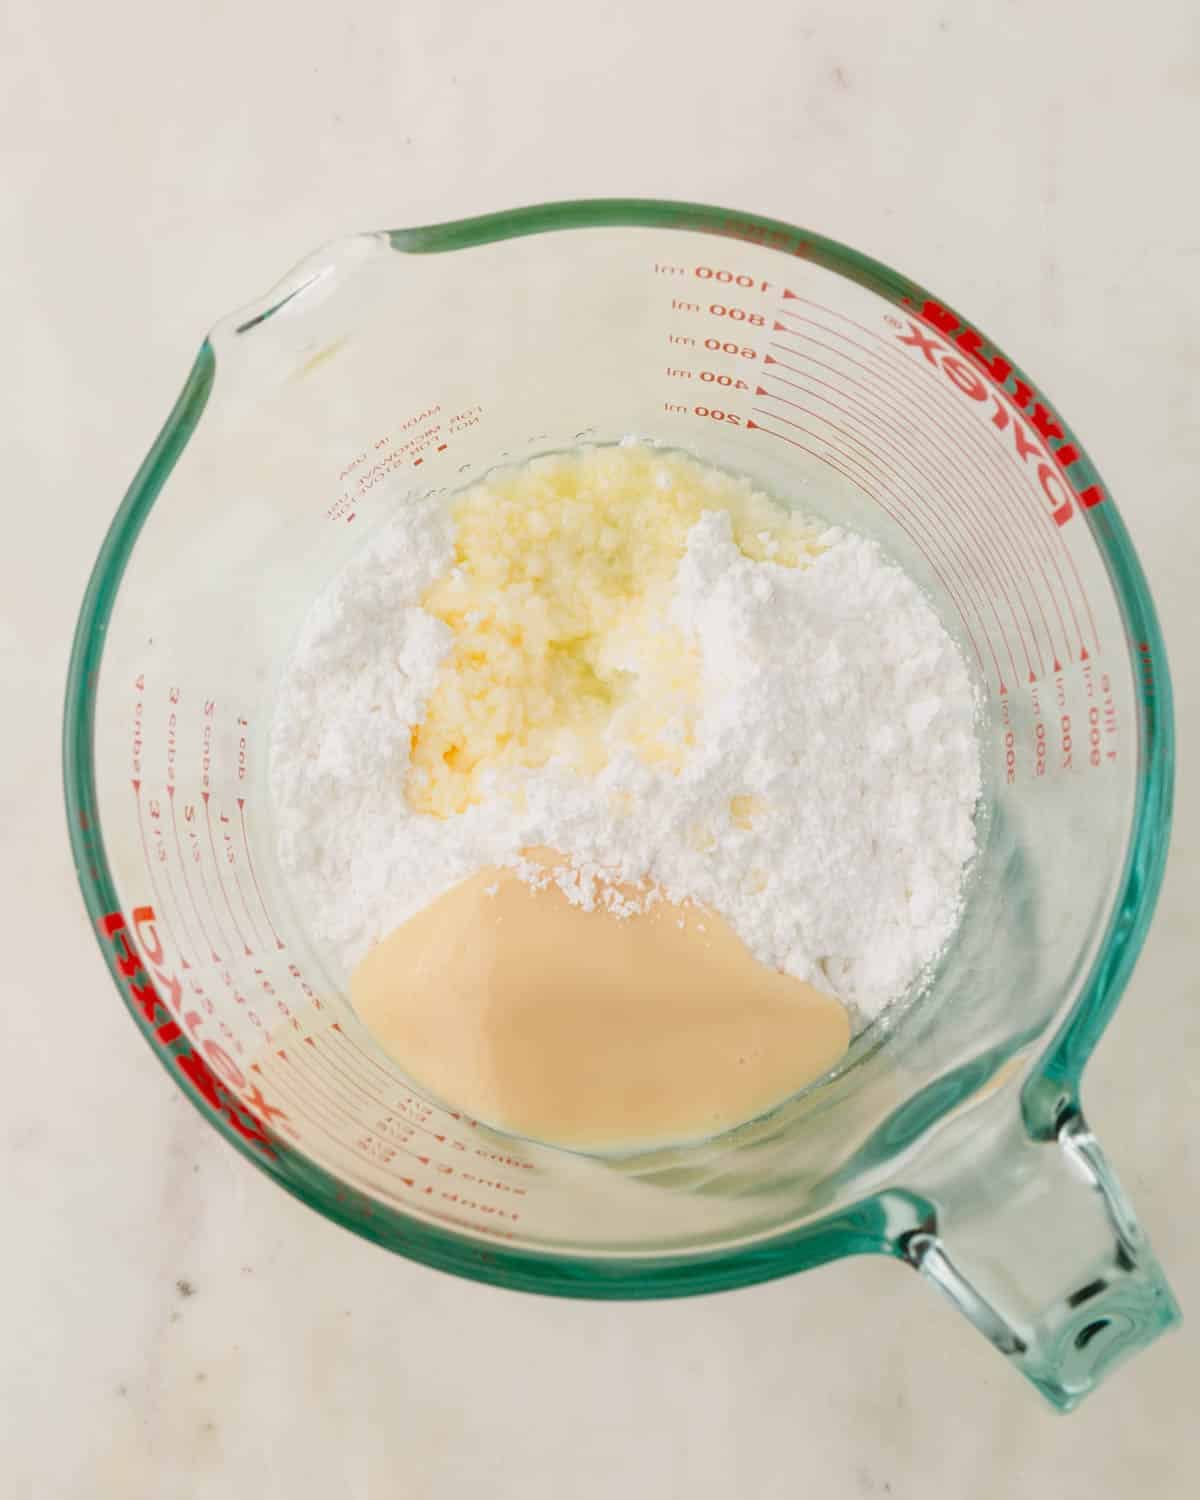
2. Sift dry ingredients
- Sift the almond flour and powdered sugar twice to aerate and remove large chunks.
- Discard the large chunks. (You don’t have to replace the discarded portion as long as they’re no more than 2 tablespoons.)
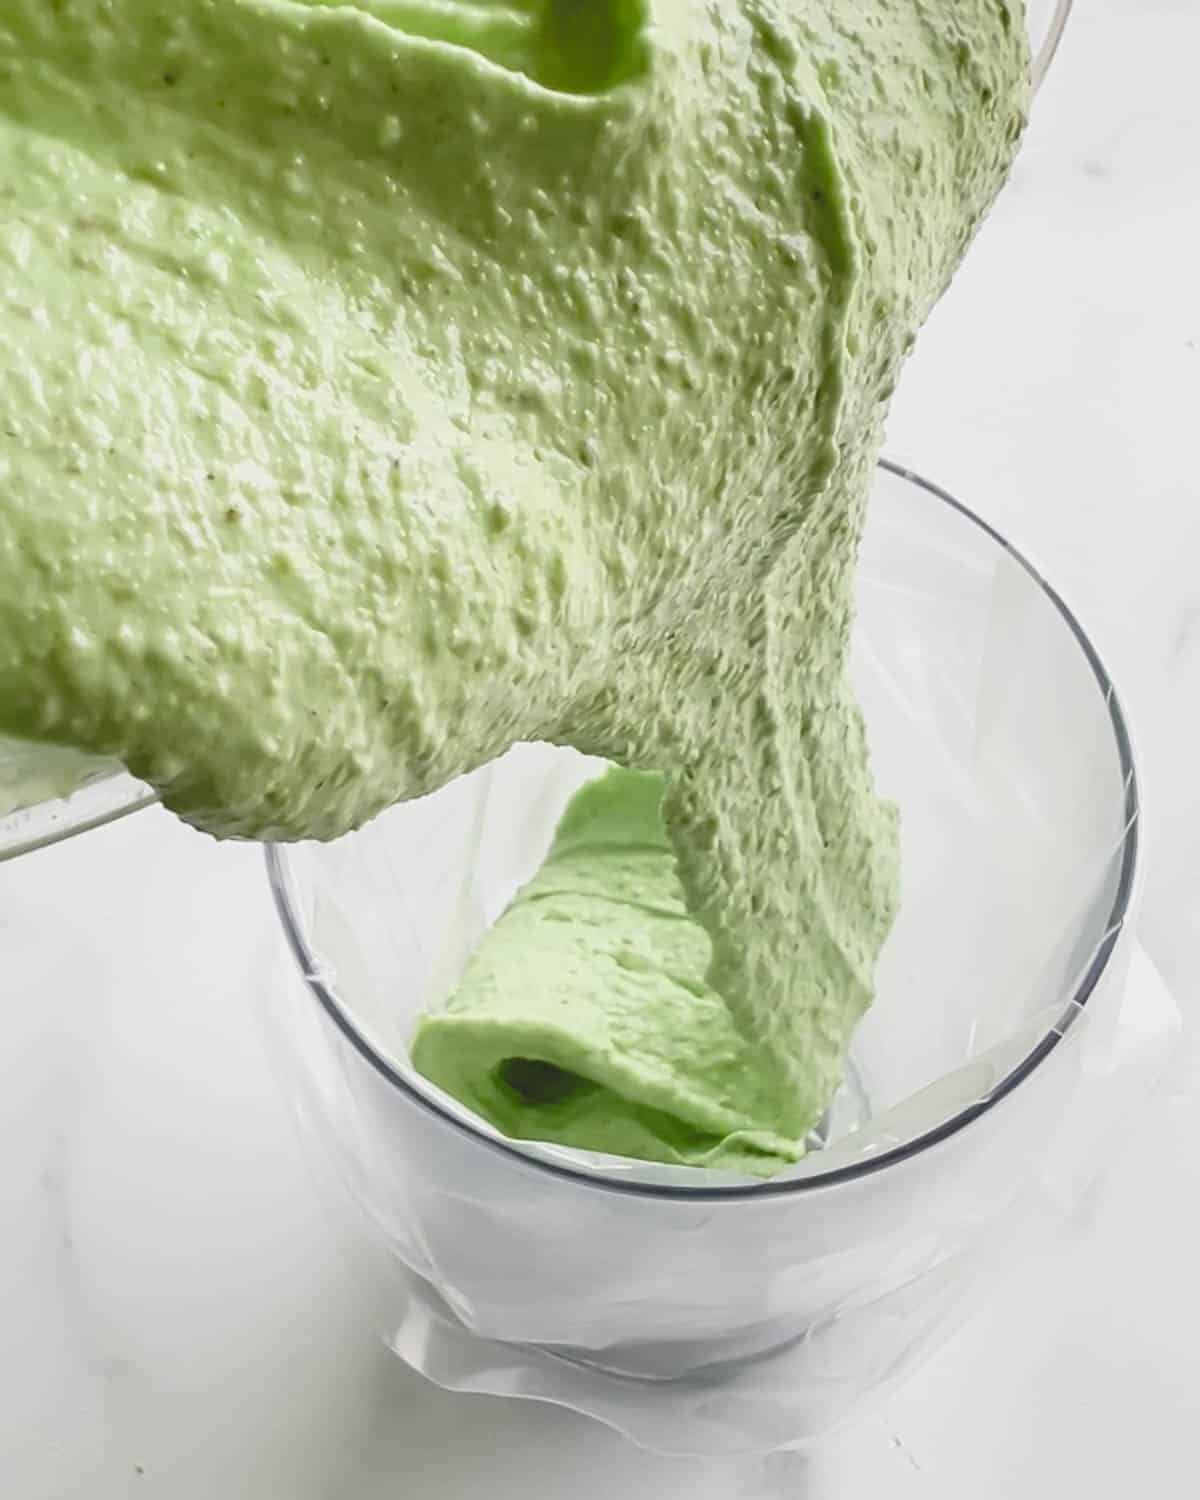
3. Mix the macaron batter
- Sift the dry ingredients into the meringue.
- Fold the batter with a large silicone spatula until a lava-like consistency. Watch my real-time Macaronage video for better visual cues.


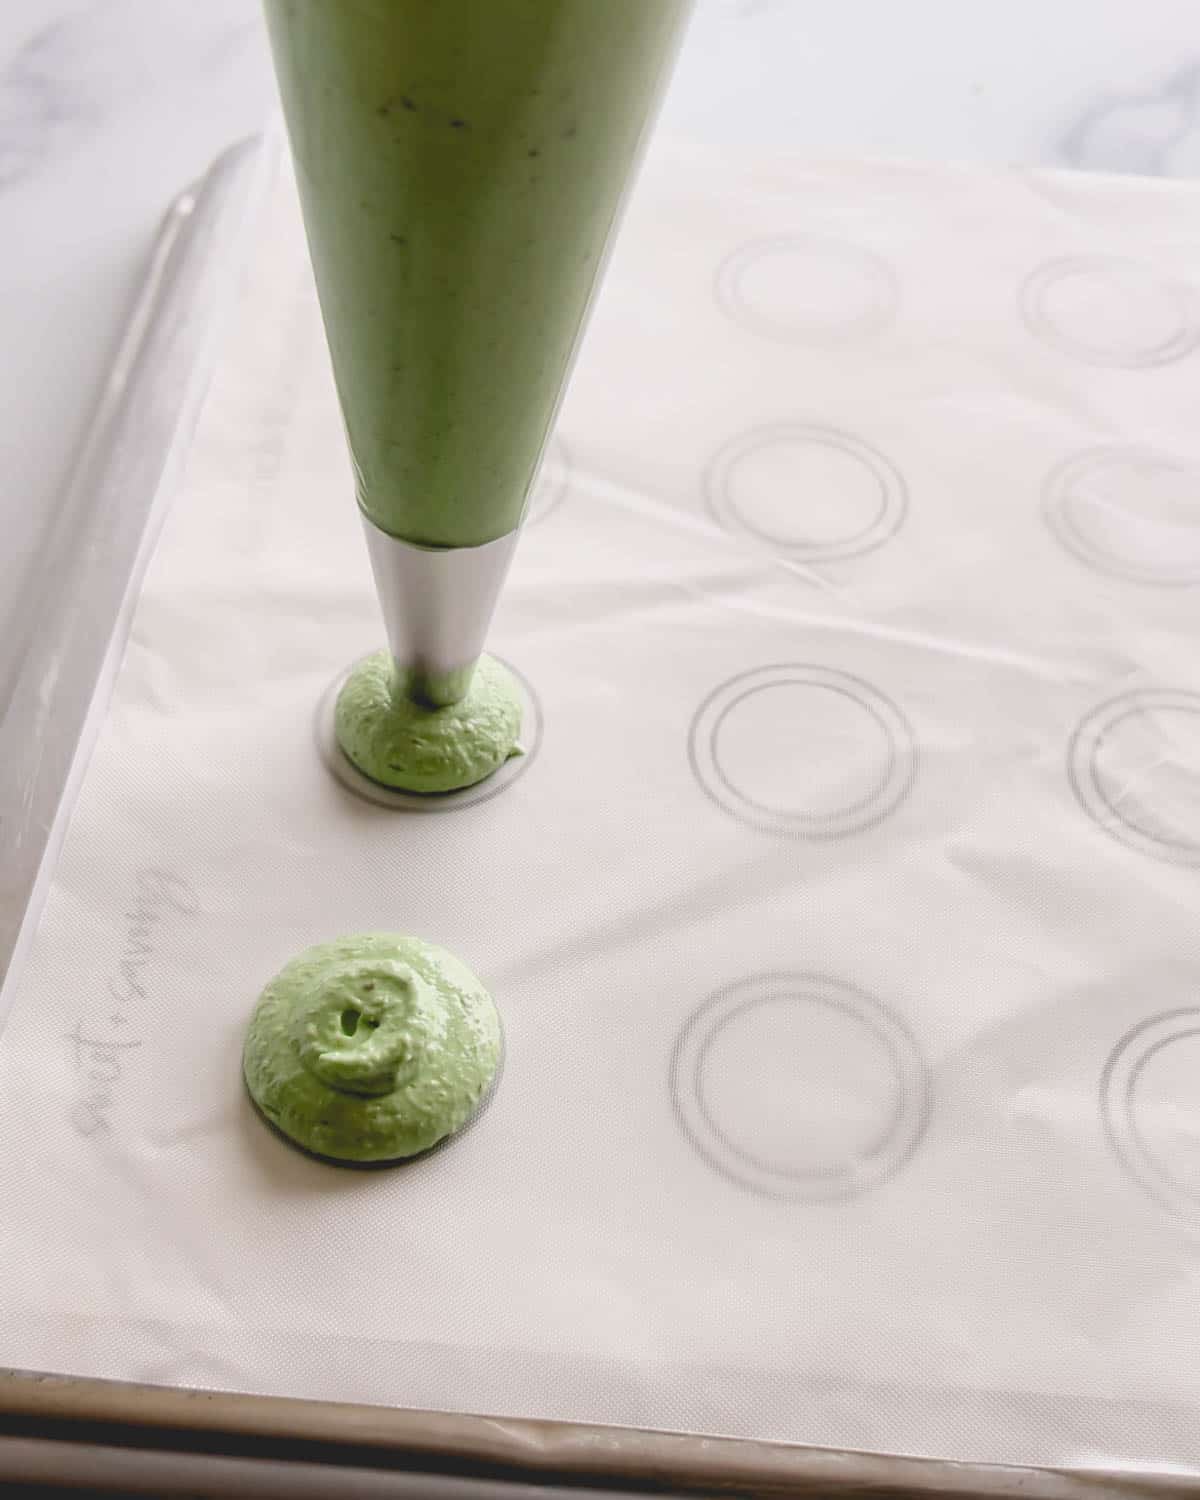
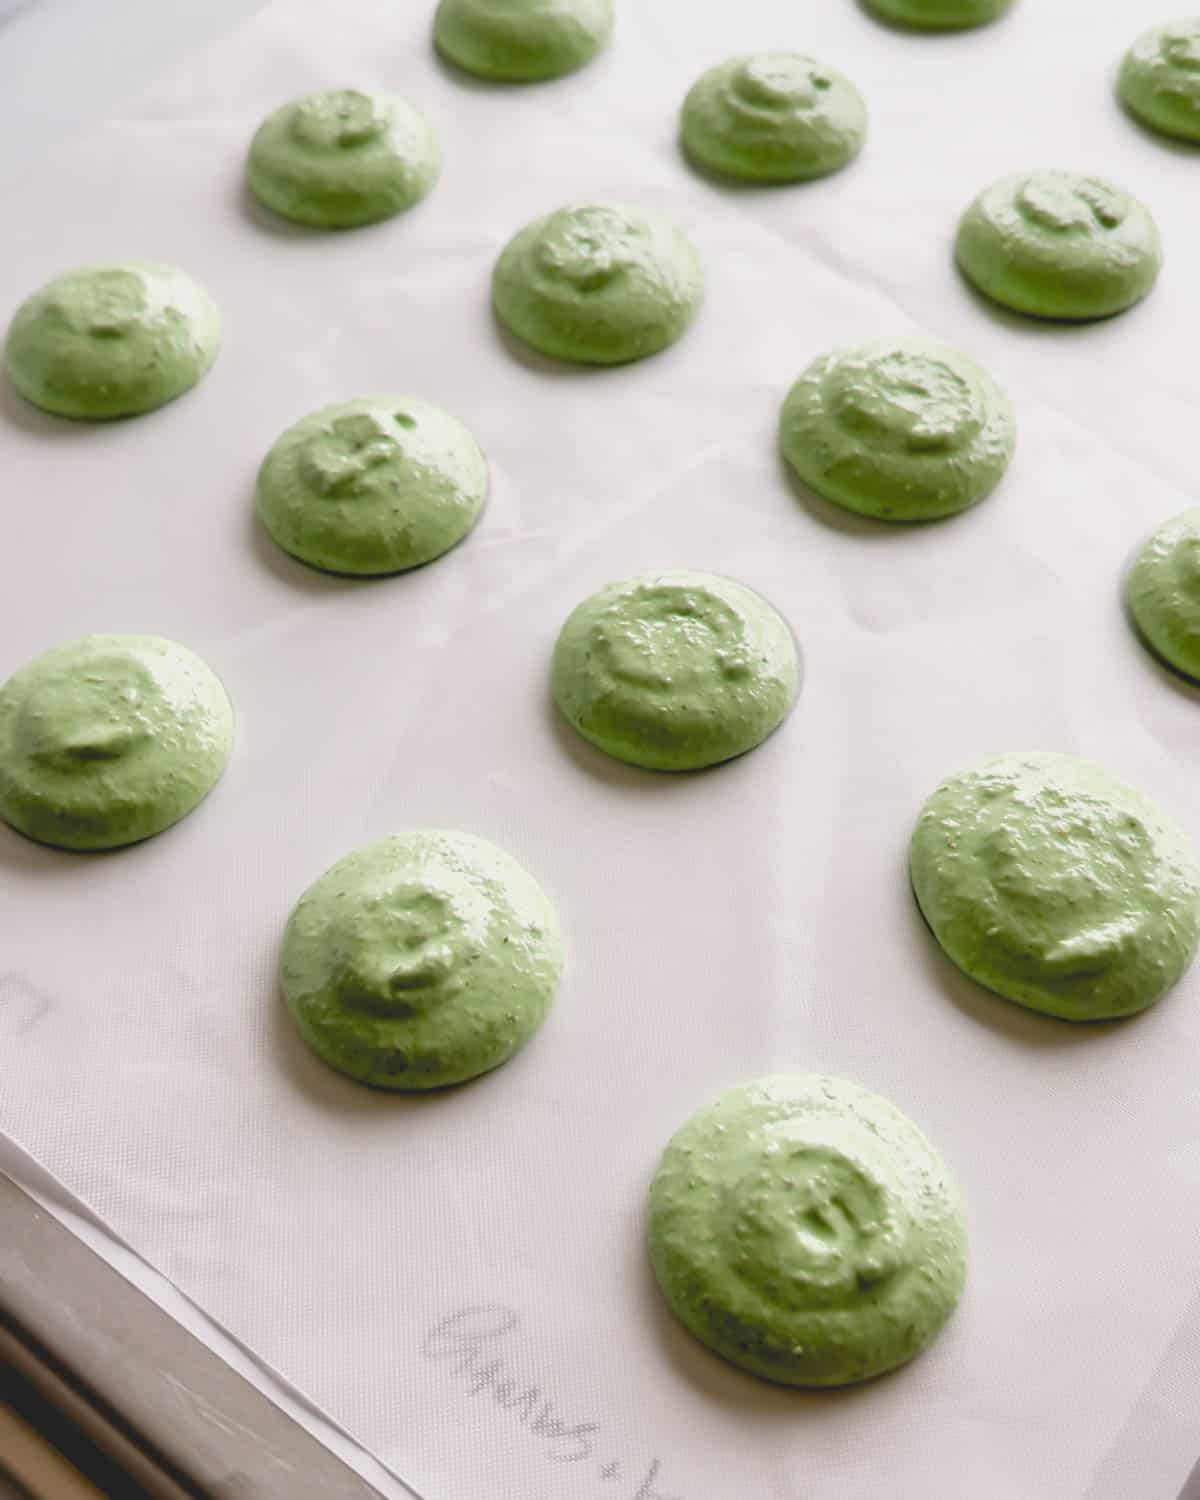
4. Pipe and bake macaron shells
- Transfer the macaron batter into a pastry bag with a round tip. And line 2 baking sheets with parchment paper, or teflon sheets.
- Pipe the batter into 1.5-inch rounds on the prepared baking sheets.
WATCH MY PIPING TECHNIQUE VIDEO
Get My Free Macaron Template
I made a perfect template for you. Subscribe to my e-mail list and download this custom macaron template for FREE. (This template is perfect for my recipe and super easy to use!)
5. Bake
Preheat the oven to 300°F for at least 30 minutes. Check the accuracy of oven temperature with an oven thermometer for the best result.
- Tap the baking sheet from the bottom a few times to smooth out the shells and pop any air bubbles trapped in the shells. If needed, use a toothpick to pop stubborn bubbles.
- Rest macaron shells for 15 minutes before baking. (TIP: Ideally, the surface of the macarons should be dry to the touch.)
- Bake, one baking sheet at a time, for 15-18 minutes. I don’t use convection settings for baking macarons. My oven is set to heat from top and bottom.
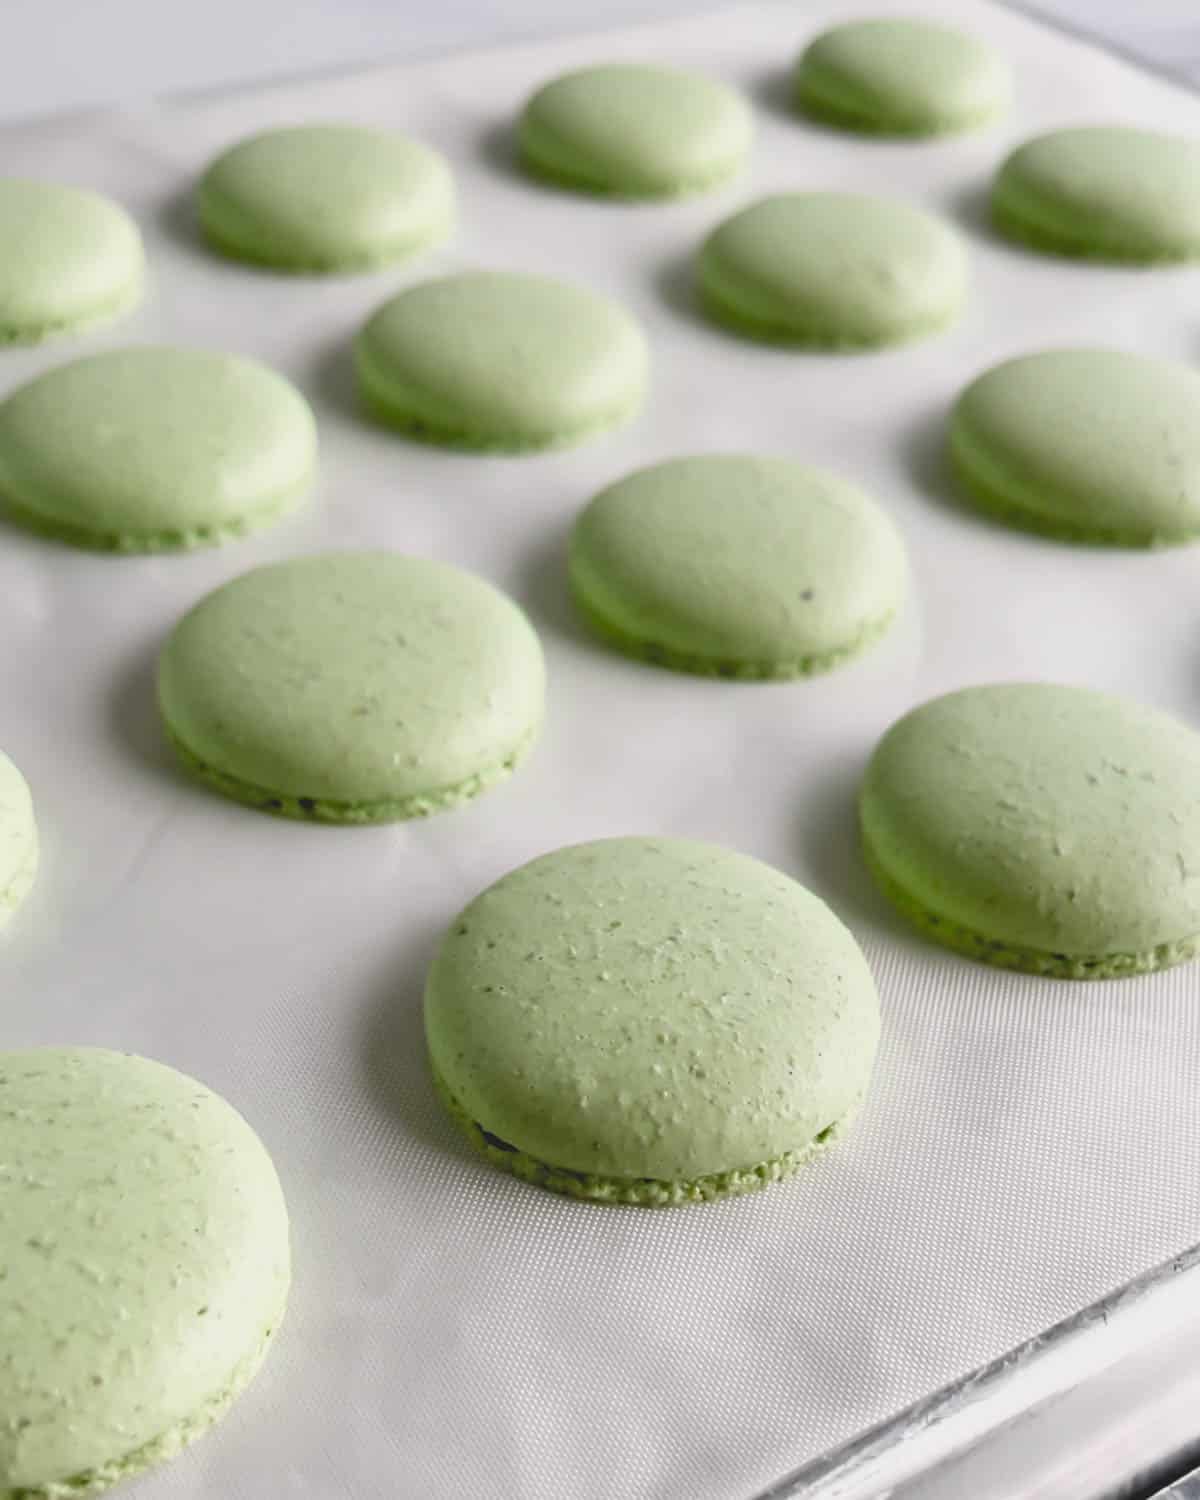
How to Check if Macarons are Done
Touch a macaron lightly and try to move it. If it slides and wobbles, bake a minute or so longer. The cooked macarons should be firm to the touch, and the base shouldn’t move. It’s always better to slightly over-bake macarons than under-bake them!
6. Make mint Dark chocolate ganache
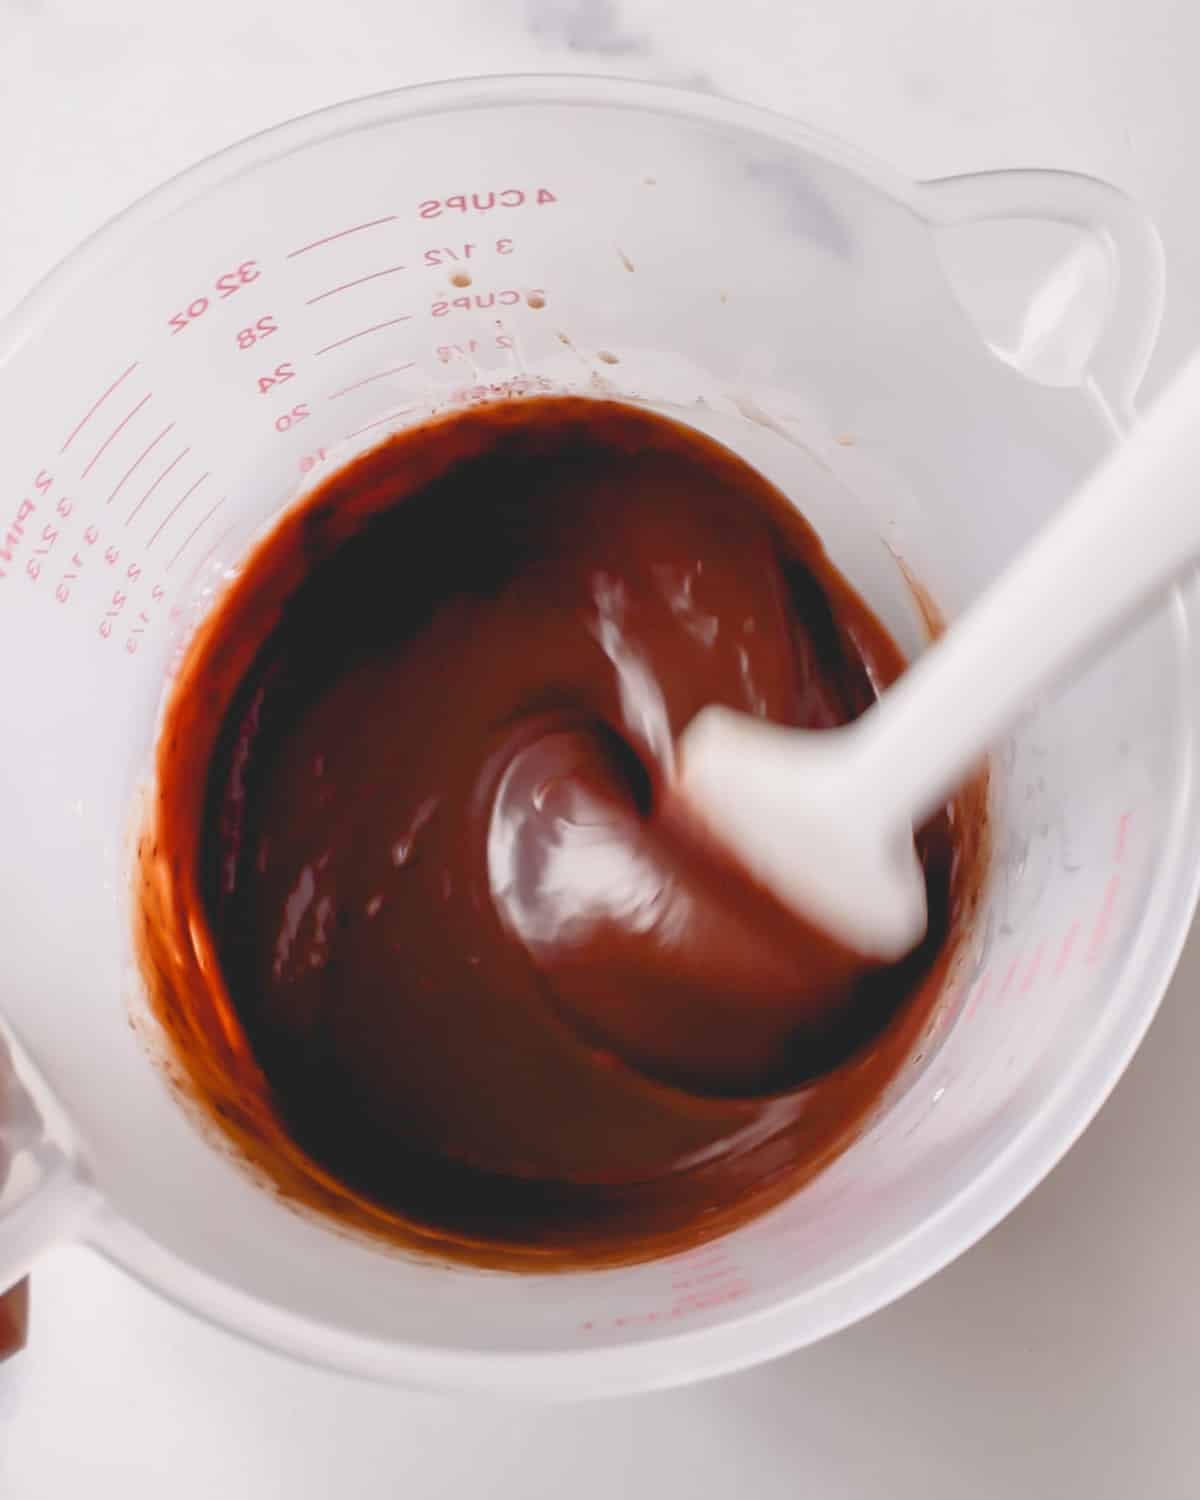
- Warm the heavy cream in a microwave for 30-60 seconds.
- Pour it over the chocolate and let it sit for 2 minutes undisturbed.
- Then mix until smooth with a small silicone spatula.
- Add butter and beat it with an immersion blender.
- Pour the ganache into a flat container, cover with plastic wrap, ensuring the entire surface is in contact.
- Stabilize the ganache at room temperature for about 1 hour, or until a scoopable consistency.
- Transfer into a piping bag.
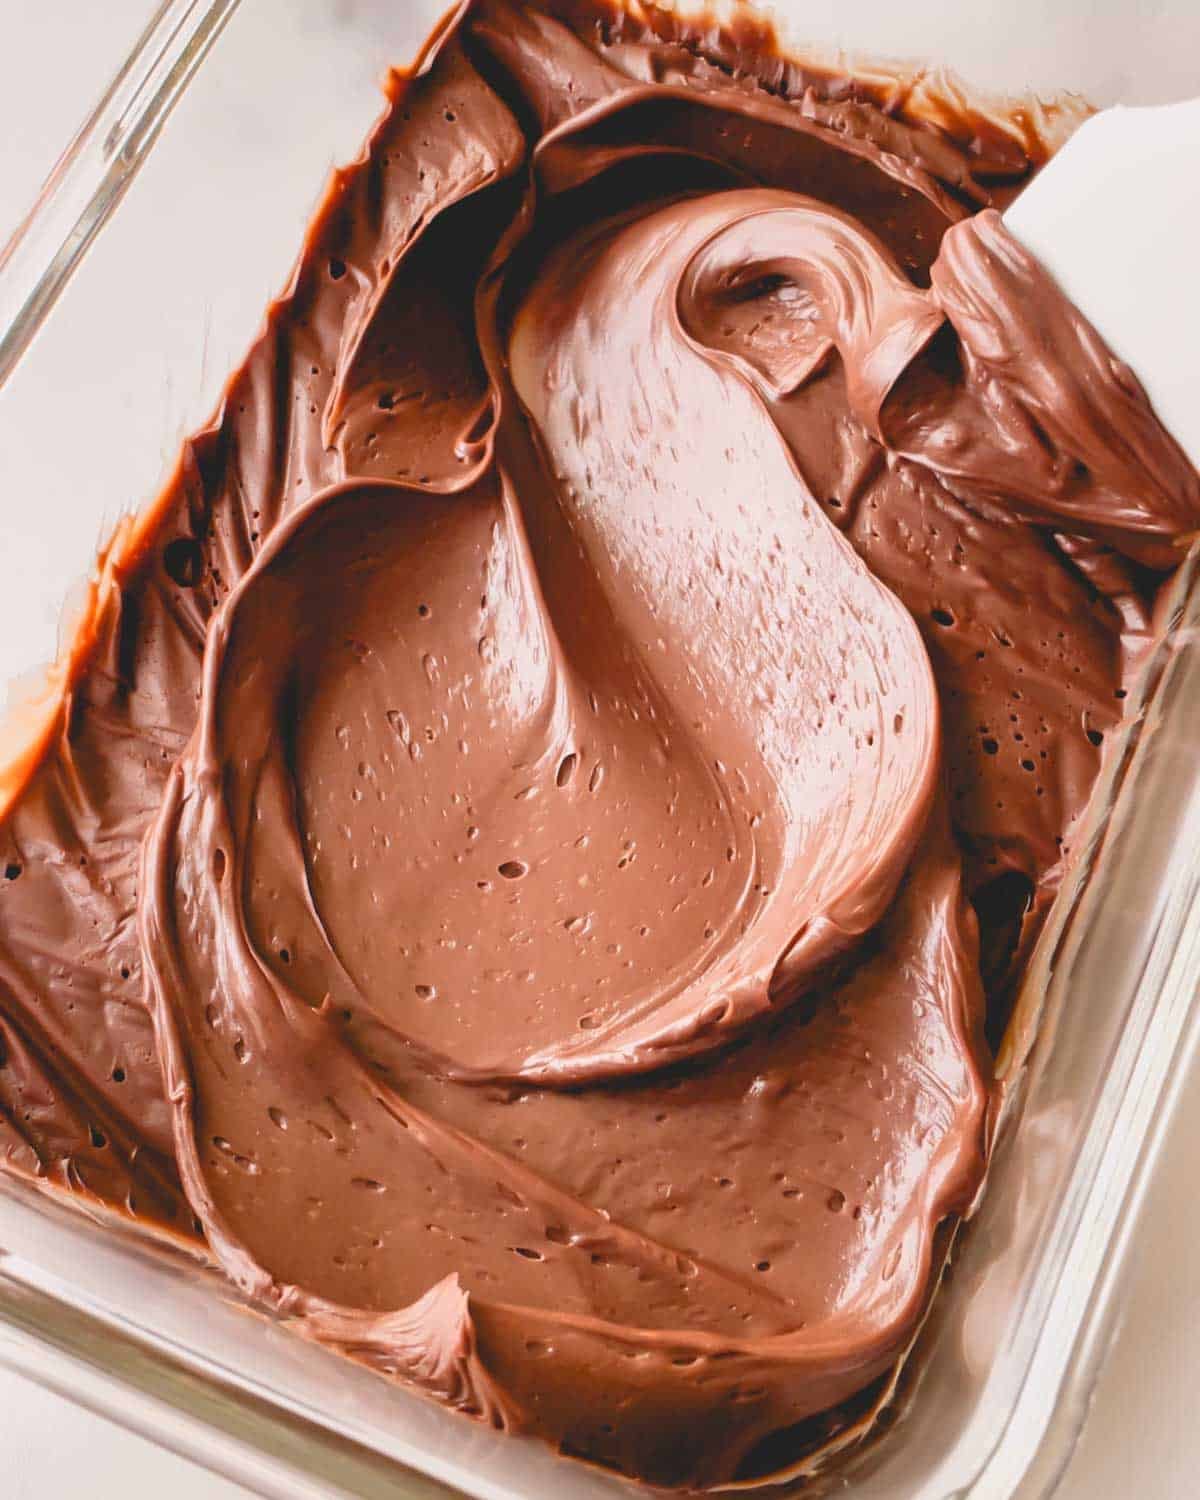
To prevent cracks in ganache
Aim for a silky, pipeable ganache! Letting it sit too long or refrigerating it too much can make it too firm, causing it to crack as you pipe.
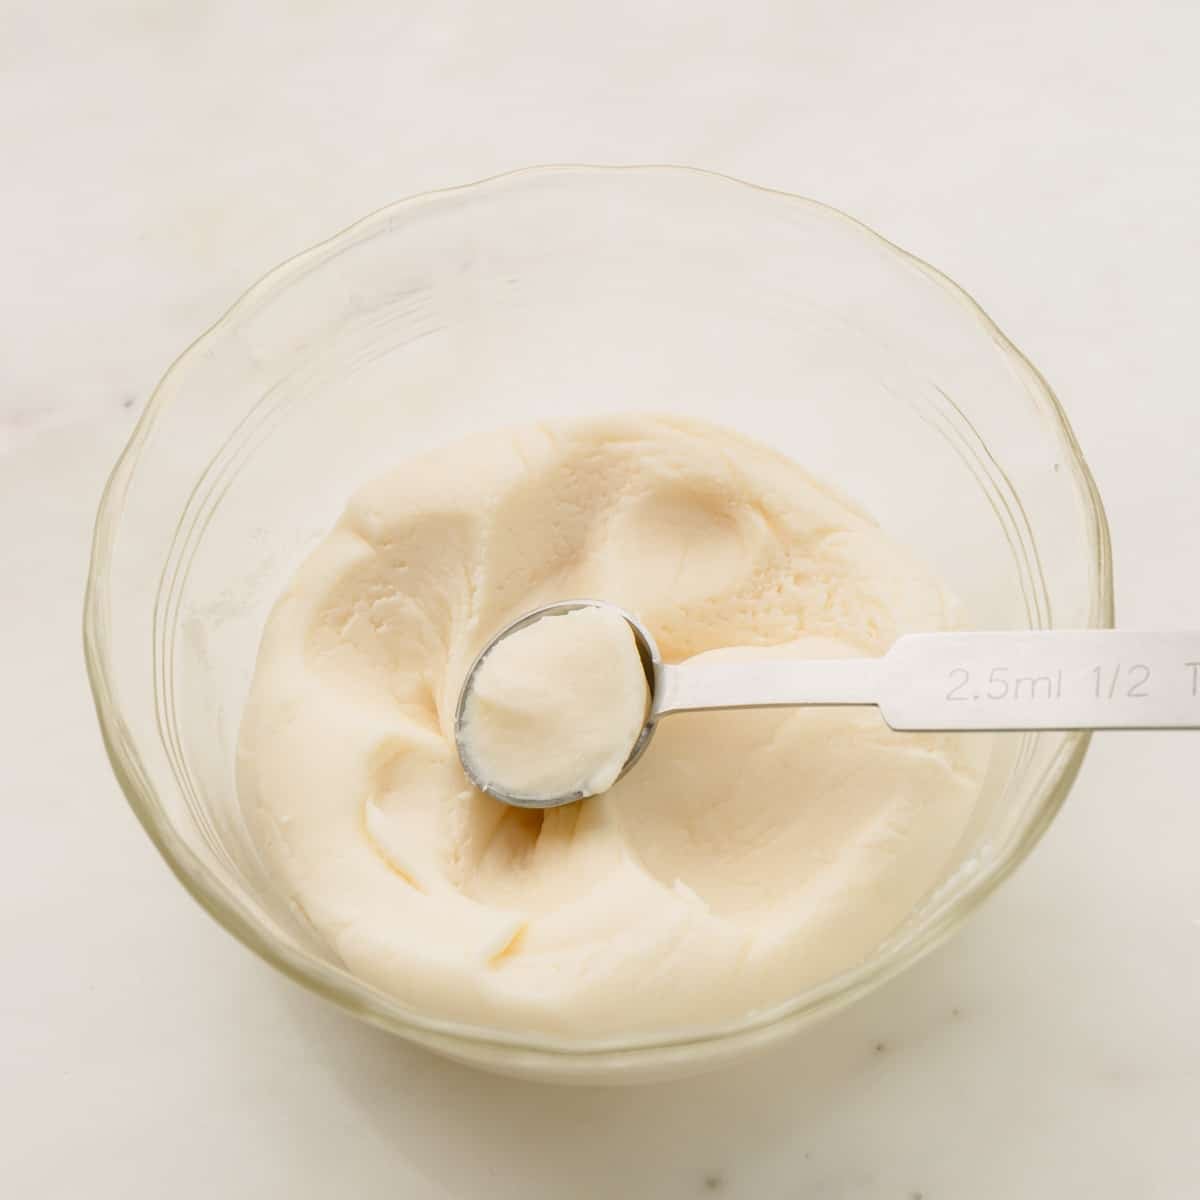
7. Make mint candy filling
- Beat the powdered sugar, sweetened condensed milk, melted butter, and peppermint extract with an electric hand mixer until smooth.

8. Assemble the macarons
- Remove the macaron shells from the baking surface once they are cooled completely. If the shells are stuck to the baking surface, the shells are either underbaked, or you need to let them cool completely.
- Pair the shells by size and arrange them on a baking sheet, or wire rack, placing one shell bottom side up.
- Pipe the chocolate ganache into a ring and drop ½ teaspoon of mint candy filling in the center.
- Place the top shell over the filling, and press lightly so the filling spreads to the edges.


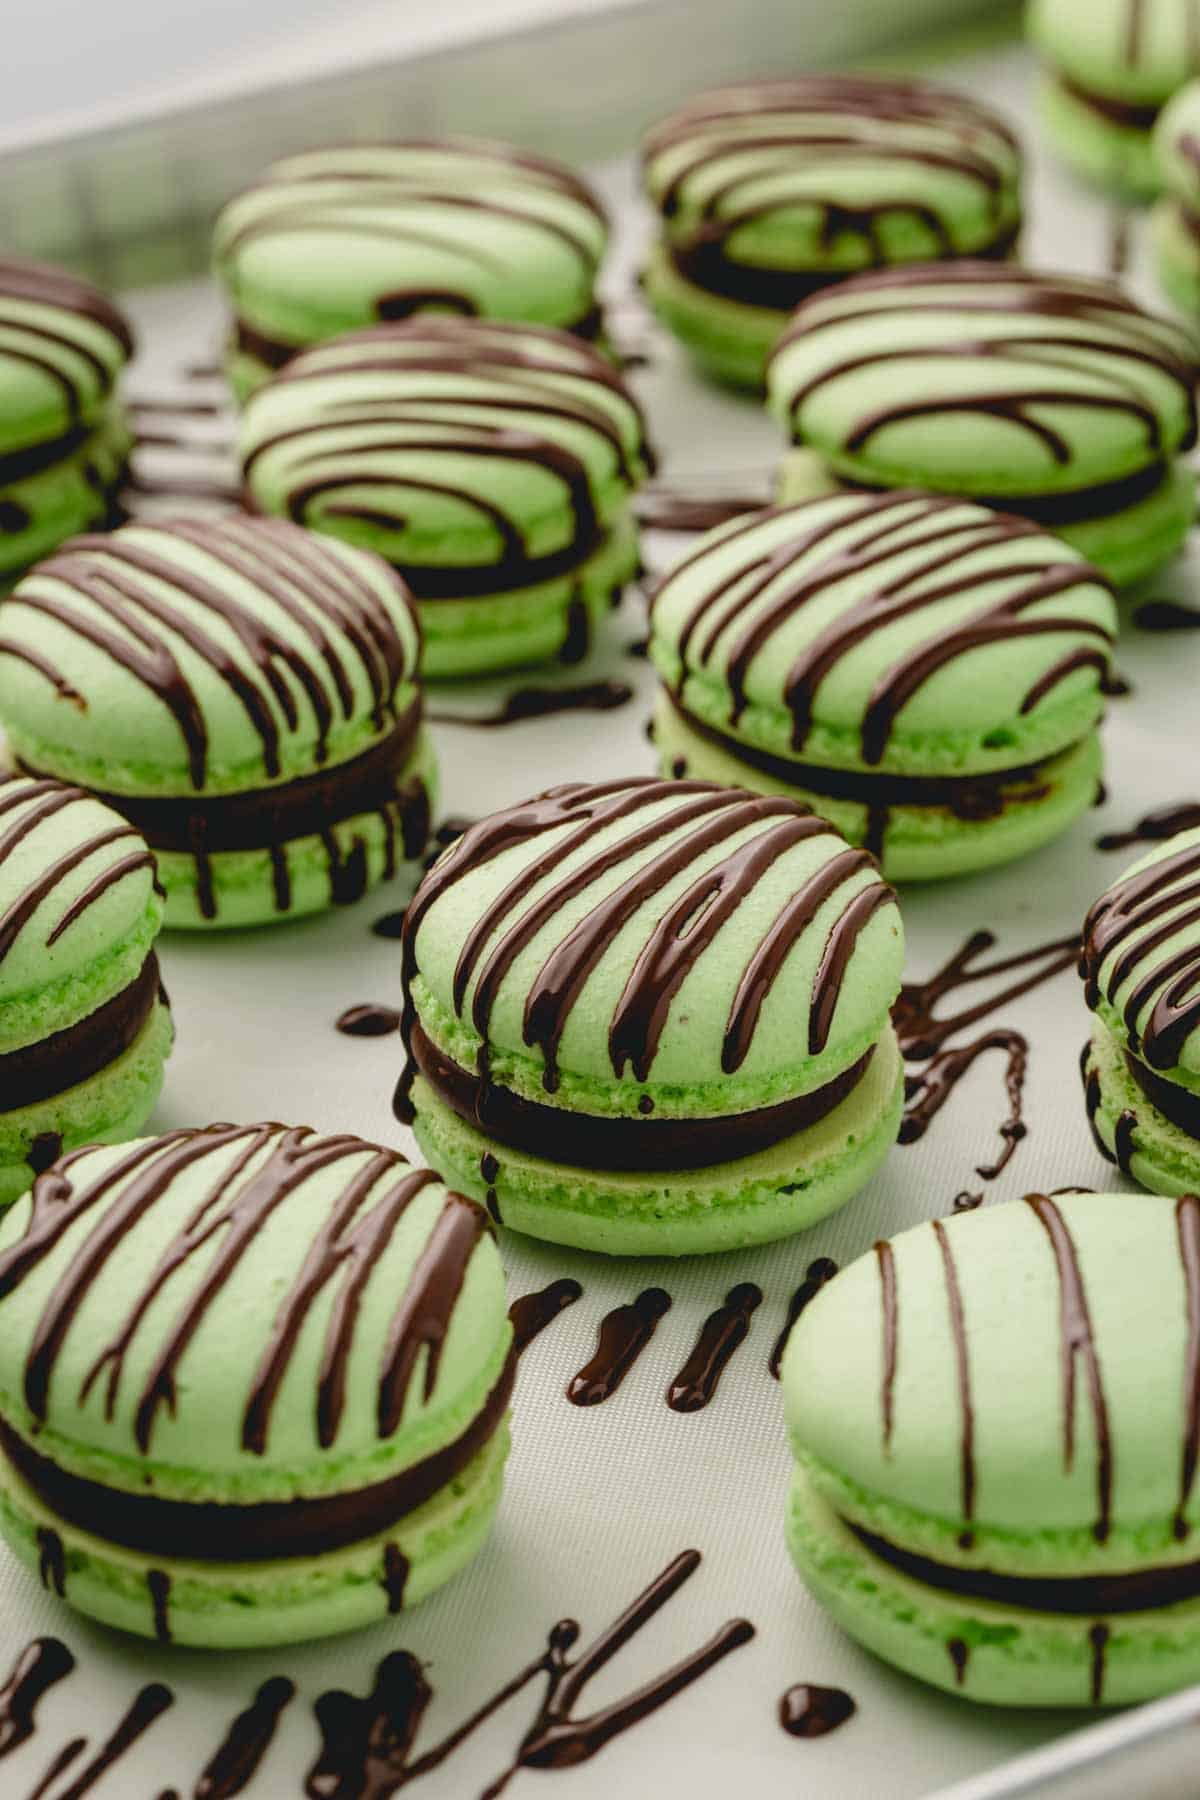
Optional decor
- Melt some chocolate until smooth and pour it into a piping bag. Cut a small hole.
- Drizzle over filled macaron shells to decorate.
9. Mature the macarons
- Place the filled macarons in an airtight container and refrigerate for at least 8 hours or preferably for 24 hours. This process is called maturing, which allows the filling to soften and flavor the shells.
- Bring the macarons to room temperature (about 30 minutes on the counter) before serving.
What does maturing macarons mean?
Many macaron recipes direct you to fill the macarons and store in the fridge for at least 24 hours to mature. But what does that mean?
Maturing macarons basically means letting the filled macarons rest in the fridge to allow the filling seep into the shells, softening and flavoring it. This’s especially important if the macaron shells have no flavoring.
That’s being said, I have no problem devouring a few macarons right away, with and without filling!!
To mature filled macarons, place them in an airtight container and place it in the fridge for up to 24 hours.
Bring the macarons to room temperature for 30 minutes before serving.
How to store macarons
Once the macarons mature in the fridge for 24 hours, you can either keep them in the fridge or freeze them!
- Refrigerate in an airtight container for 3-5 days, depending on the filling.
- Freeze in airtight container for up to 1 month.
You can also freeze unfilled macarons shells in airtight container for up to 3 months.

Mint Chocolate Macarons
Ingredients
For macaron shells:
- 100 g fine almond flour Note 1
- 65 g powdered sugar Note 2
- 70 g egg whites Note 3
- 75 g fine granulated sugar Note 4
- ¼ teaspoon cream of tartar Note 5
- ¼ teaspoon peppermint extract
- 1 drop green gel food coloring Note 6
Mint Chocolate Ganache
- 3 ½ oz (100 g) semi-sweet chocolate chips
- 3 ½ oz (100 ml) heavy whipping cream
- ¼ teaspoon peppermint extract
- 1 tablespoon (14 g) unsalted butter softened and cubed
Mint Candy Filling:
- ¾ cup (90 g) powdered sugar
- 2 tablespoons (40 g) sweetened condensed milk
- 1 tablespoon (14 g) unsalted butter melted
- 1/8 teaspoon peppermint extract
Instructions
To make macaron shells:
- Preheat the oven to 300°F (150°C). Line 2 baking sheets with parchment paper, a Teflon sheet, or a silicone mat.
- To prepare dry ingredients, sift together almond flour and powdered sugar twice. (Note: If you have up to 2 tablespoons of chunky dry ingredients left in the sifter, you don't have to replace it. Simply discard those chunky bits.)
- To make meringue, in a clean mixing bowl with a whisk attachment, combine egg whites, granulated sugar, cream of tartar and salt and beat the mixture on medium speed until soft peaks form. (I set it to speed 4 on my KitchenAid stand mixer. It takes 30-40 minutes to whip the meringue, but it's well worth it for nice and full shells.)
- When the meringue reaches soft peaks, add a few drops of green gel food coloring.
- Continue beating the meringue at the same medium speed until hard peaks form. Visual cues: Meringue should ball up inside the whisk, and when you lift the whisk, the meringue should hold a pointy end and have sharp ribs.
- Once the meringue has reached stiff peaks, add the peppermint extract and whisk for about 30 seconds or so.
- To make batter, sift the almond flour mixture into the meringue. Using a silicone spatula, fold the dry ingredients into the meringue until fully incorporated. Then continue to fold the batter until it’s runny enough to draw a figure eight. To test, take a small amount of batter and drop it into the bowl. If the small peaks dissolve into the batter on their own in about 10 seconds, the batter is ready. If not, fold a couple more times and test again. Be careful not to over-fold the batter. (TIP: Making French macarons is all about the technique. This is one of the most crucial steps. Let me try to describe the folding motion as best as I can: run the spatula clockwise from the bottom, up around the sides, and cut the batter in half. If you’re a beginner macaron-baker, I suggest counting every fold. It takes roughly about 50 folds to reach the proper consistency. After 50 folds, start testing the batter, and continue testing after every couple of folds.)
- To pipe macaron shells, transfer the batter into a pastry bag, fitted with a round tip. (I use a Wilton 2A tip.)
- Hold the pastry bag at a straight 90° angle and pipe about 1.5-inch rounds about an inch apart on prepared baking sheets. (TIP 2: Download my free macaron template. Simply pipe the batter to fill the inner circle.)
- Tap the baking sheets firmly on the counter (or slap the bottom of the baking sheet with one of your hands) a few times to get rid of any air bubbles. You can also use a toothpick to burst some large air bubbles. This step ensures smooth tops.
- Let the macarons rest on the counter for 15 minutes before baking.
- To bake, bake the macarons for 15-18 minutes, one baking sheet at a time, on the middle rack. It’ll take longer for larger macarons. To test for doneness, touch a macaron lightly and try to move it. If it slides and wobbles, bake a minute or so longer. The cooked macarons should be firm to touch and the base shouldn’t move.
- Cool the macarons complete and then remove the shells from the baking surface. (TIP: Don't remove the shells while warm, you may risk breaking the shells, or the bottom might get stuck to the baking surface.)
To make the mint chocolate ganache:
- Bring heavy cream to a simmer, not a boil. Alternatively, you can microwave it for 30-45 seconds.
- Pour the hot cream over the chocolate and let it stand for 2 minutes. Then mix with a silicone spatula until smooth.
- Add the peppermint extract and butter.
- Using an immersion blender, blend the mixture until silky smooth, which means the mixture is emulsified.
- Pour the ganache into a flat container and cover it with plastic wrap, making sure the wrap touches the entire surface of the ganache.
- Allow the ganache to stabilize at room temperature until a scoopable consistency, about 1 hour.
- Transfer the ganache into a pastry bag with a round tip. (I use a Wilton 2A tip.)
To make the mint candy filling:
- In a medium bowl, beat the powdered sugar, sweetened condensed milk, melted butter, and peppermint extract with an electric hand mixer until smooth.
- If not using immediately, transfer the mixture to a small bowl and cover it with plastic wrap.
To assemble macarons:
- Pair the macaron shells by size and arrange them on a wire rack. Line them up so that bottom shells are upside down.
- Pipe a ring of ganache filling on the bottom shells.
- Drop ½ teaspoon of mint candy filling in the center of each macaron.
- Place the top shell over the filling and press lightly so the filling spreads to the edges.
- Refrigerate the filled macarons in an airtight container for at least 24 hours to mature, allowing the filling to soften and infuse the shells with flavor.
- To serve, bring the macarons out about 30 minutes prior to serving.
⭐️ Did you make this recipe?
Please leave a review and let us know how you liked it!
Tips & Notes
Nutrition


Wondering what you would think about a dark chocolate ganache instead of a milk chocolate?
Hi, Anne. I think it’ll work great!
Hi! These worked much better than any recipe I have tried so far! If I would like to make them a darker green, can I add more food coloring or would that be too much liquid? Thank you!!
Hi, Annie. Yes, if you’ve got the technique down, you can absolutely use more food coloring. I use a lot of food coloring to get bright red for my red velvet macarons, and black macaron cake, with no issues.
They came out perfect, only thing, I was able to make 17 complete macaroons and they were on small size, I baked 1.5 sheets, I would love to make 2 complete sheets, so I will try to double this recipe and then I should get 3 sheets with macaroons