These outrageously adorable Halloween sugar cookies are made using my signature mixing method, resulting in perfectly flat sugar cookies that don’t spread or puff up. They’re perfect for decorating with cute designs and fun toppings!

Pin this now to find it later
Pin ItWhy you’ll love this recipe:
Grab your kiddos, and make these tender cut-out cookies with crisp, golden-brown edges. These festive Halloween sugar cookies are sweet, buttery, and seriously adorable!
Baking is the perfect activity for a crisp October day!
- Quick – As far as sugar cookie recipes go, this is a fast one! There’s no chilling time, and you can easily make the dough and royal icing in advance.
- Method – This Halloween sugar cookie recipe uses reverse-creaming method, which guarantees soft, thin cookies.
- Creative – Encourage your little ones to use their imagination when decorating, or let them follow my easy instructions for witch hats and black cats!
With a room-temperature storage time of one week, these sugar cookies are perfect for school Halloween parties, bake sales, and boo baskets, too.

Key Ingredient Notes:
For the cookies
- All-purpose flour – It’s crucial that the flour is properly measured, ideally using a kitchen scale. Use the spoon and level method if you don’t have a scale. Since I’ve only tested this recipe using all-purpose flour, I do not recommend any flour substitutions.
- Sugar – The combination of granulated and brown sugar adds the perfect sweetness and a luscious texture. I’ve tested this recipe with both light and dark brown sugar, and both taste great! However, I prefer light brown sugar, because it yields lighter colored cookies that are easier to decorate.
- Cornstarch contributes to the soft and tender texture.
- Baking powder – Unlike other dessert recipes, this doesn’t cause the cookies to puff up or spread. Instead, it helps make them light and airy while still keeping them thin and crisp! For the best results, make sure it’s fresh.
- Kosher salt – This is a type of coarse salt with large crystals and will enhance the overall flavor of the cookies. I use Diamond Crystal kosher salt.
- Unsalted butter is best, but salted will also work as long as you omit the added kosher salt. Keep the butter cold, only bringing it out 10-15 minutes prior to mixing your dough.
- Egg – You’ll need one large egg brought up to room temperature. It’s best to weigh your cracked egg to ensure you use the correct size.
- Vanilla extract – Always splurge on pure vanilla extract, or make your own DIY vanilla extract.
- Almond extract – My secret ingredient for rounding out the flavor perfectly! You won’t taste an almond flavor when you add it, but you will notice if it’s missing!
For decorating
- Royal icing – Make a half batch of my 4-ingredient royal icing recipe.
- Food coloring – You’ll need black, purple, and green food coloring to make ghosts, cats, and witch hats.
- Sanding sugar – An optional ingredient, but I recommend using it for the added sparkle.
Key Equipment Notes:
- Piping bag – Tipless piping bags are easier to work with, but plastic baggies will also work.
- Halloween cookie cutters – I recommend investing in a set. You’ll use them for years!
How to make Halloween sugar cookies:
Before you get started, preheat your oven to 350°F, and line 2-3 baking sheets with parchment paper or silicone mats.
1. Prepare the dough
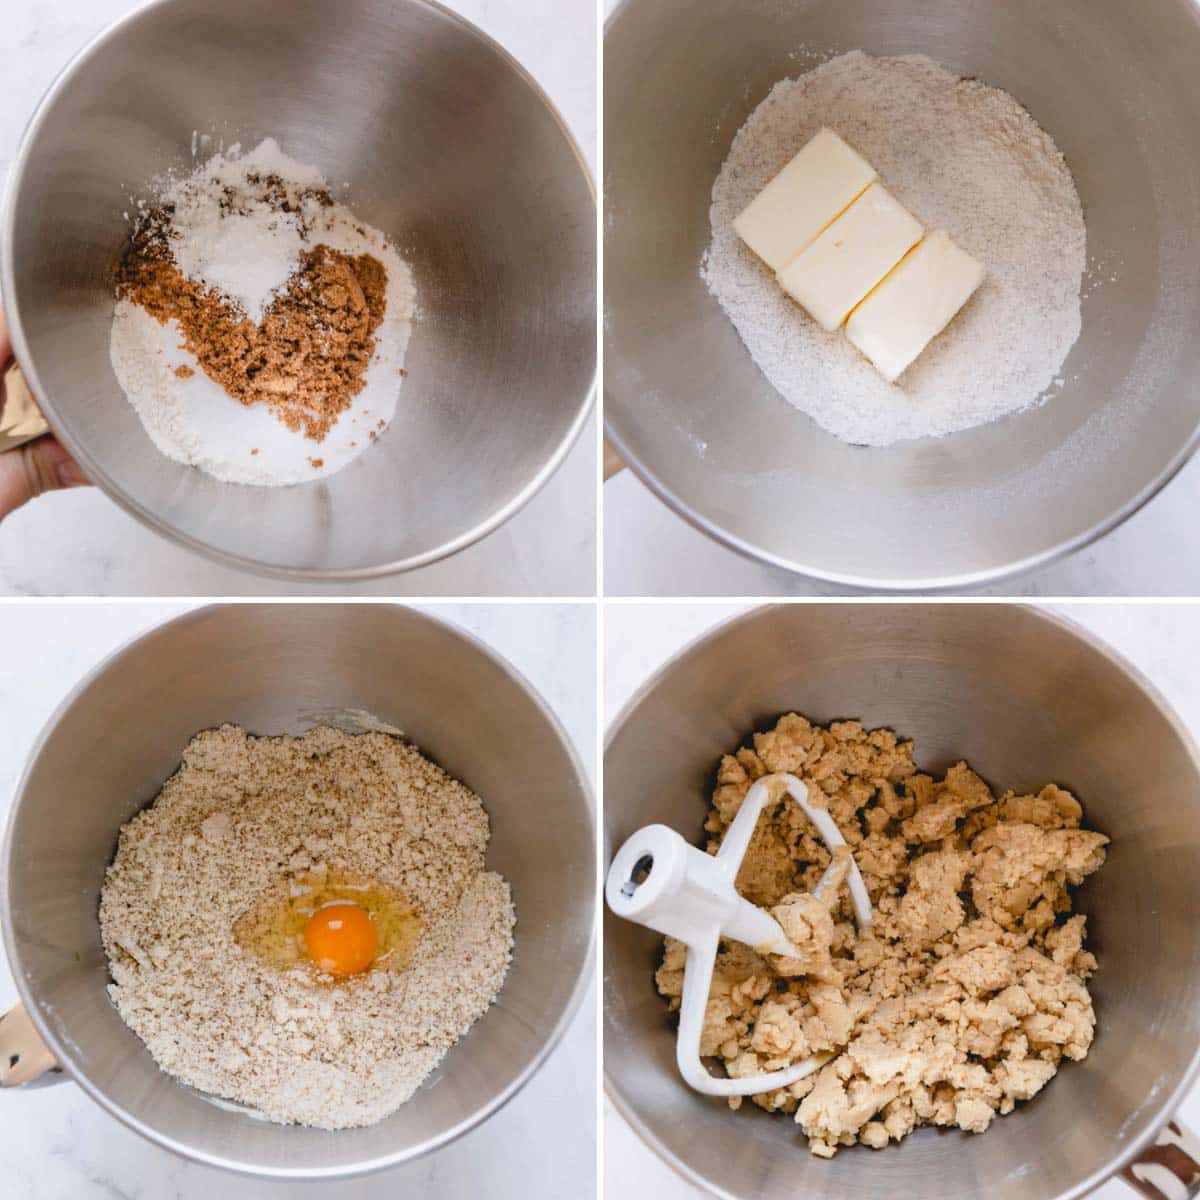
- Mix the flour, sugars, baking powder, cornstarch, and salt in a mixing bowl fitted with a paddle attachment.
- Add the butter, and mix on low speed for 1-2 minutes or until the mixture is evenly moistened. The mixture should resemble wet sand!
- Mix in the egg, vanilla, and almond extracts until just combined. This only takes about 30 seconds! The dough should be crumbly but also wet enough to stick together when squeezed in your hand.
- Divide the dough into two equal parts, and knead it into smooth balls.
- Place each dough ball between two parchment sheets, and roll the dough out into ¼-inch thick disks.
Roll the dough with ease
Use a silicone mat when rolling out the dough to keep it in place. This adjustable rolling pin will help you control the thickness of the dough, making it perfectly even!
2. Cut out and bake the cookies
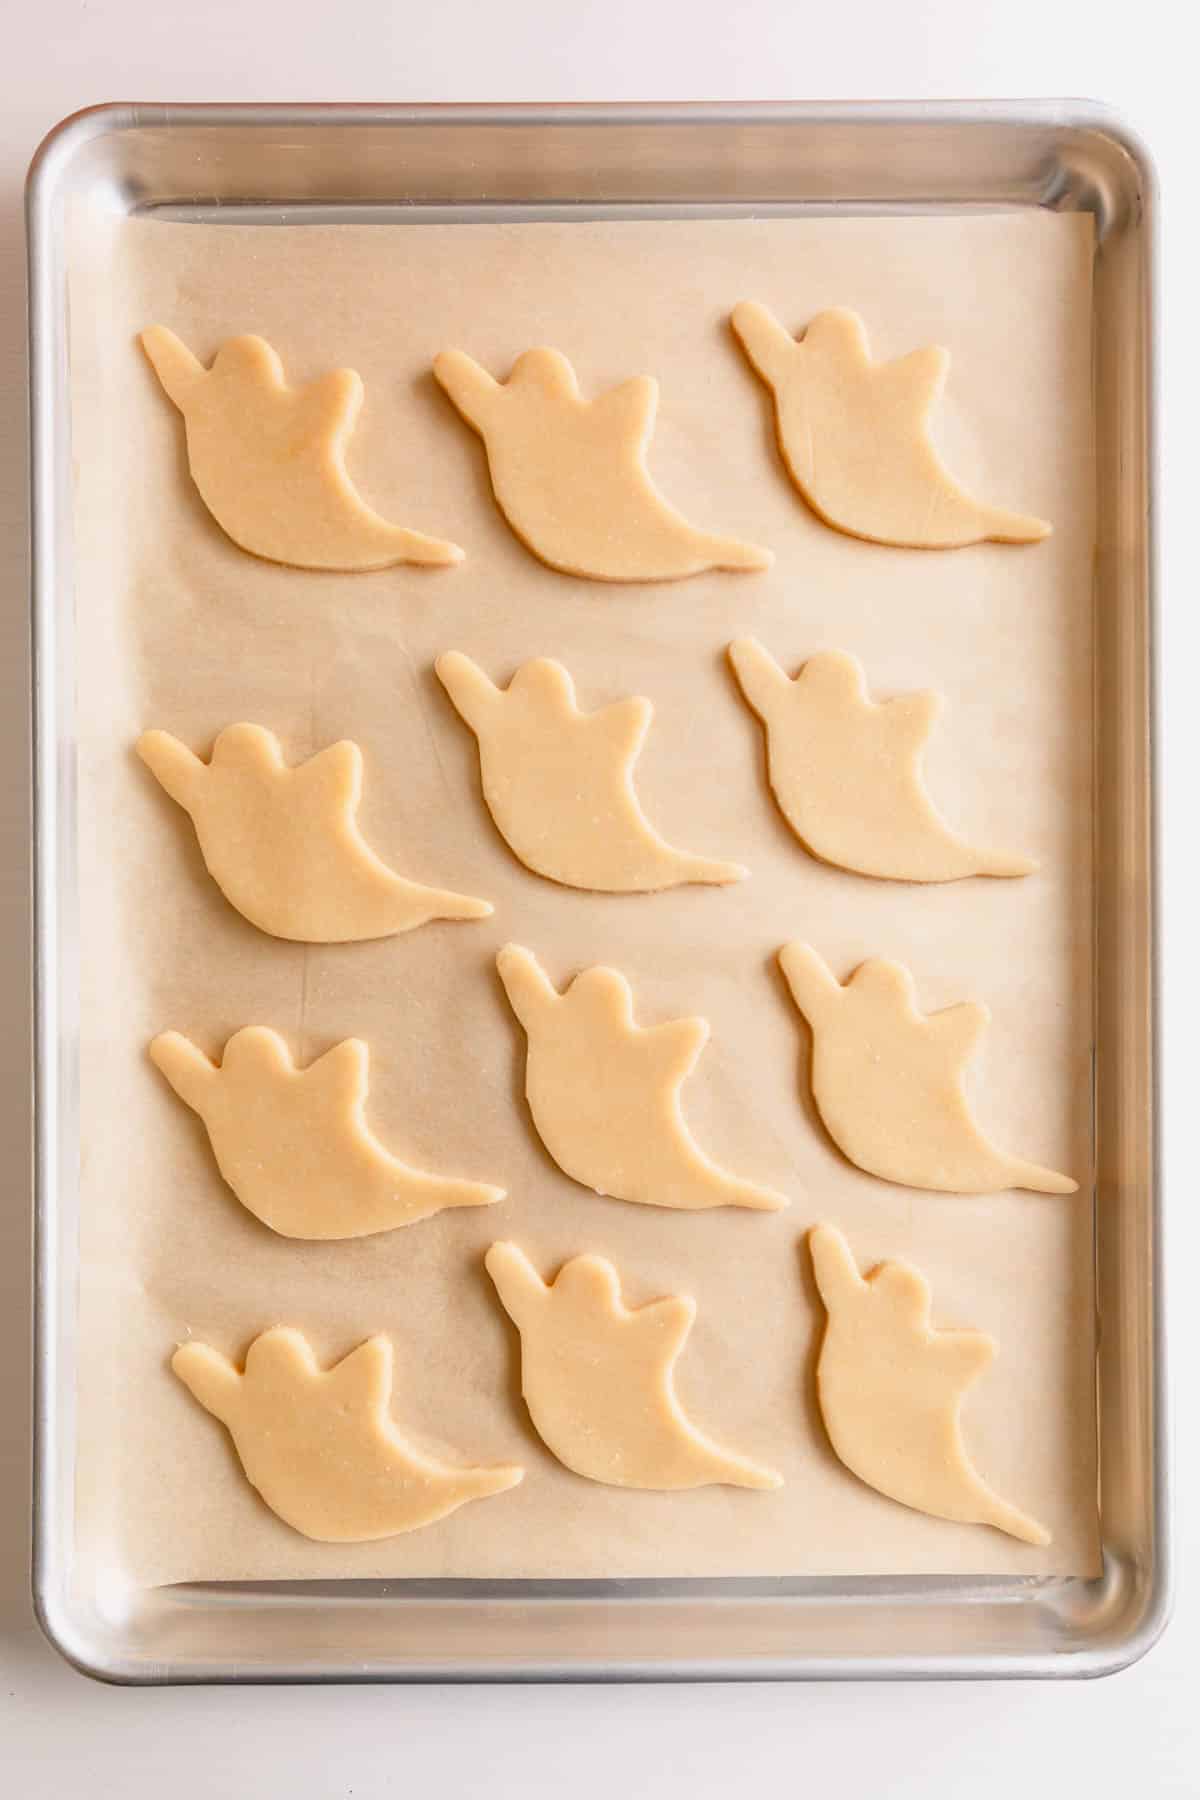
- Cut out the cookies using Halloween cookie cutters. Arrange the cut-outs on the prepared baking sheets
- Gather the scraps of dough, roll it out again, and let it chill before cutting more cookies. Repeat this process until all the dough is used.
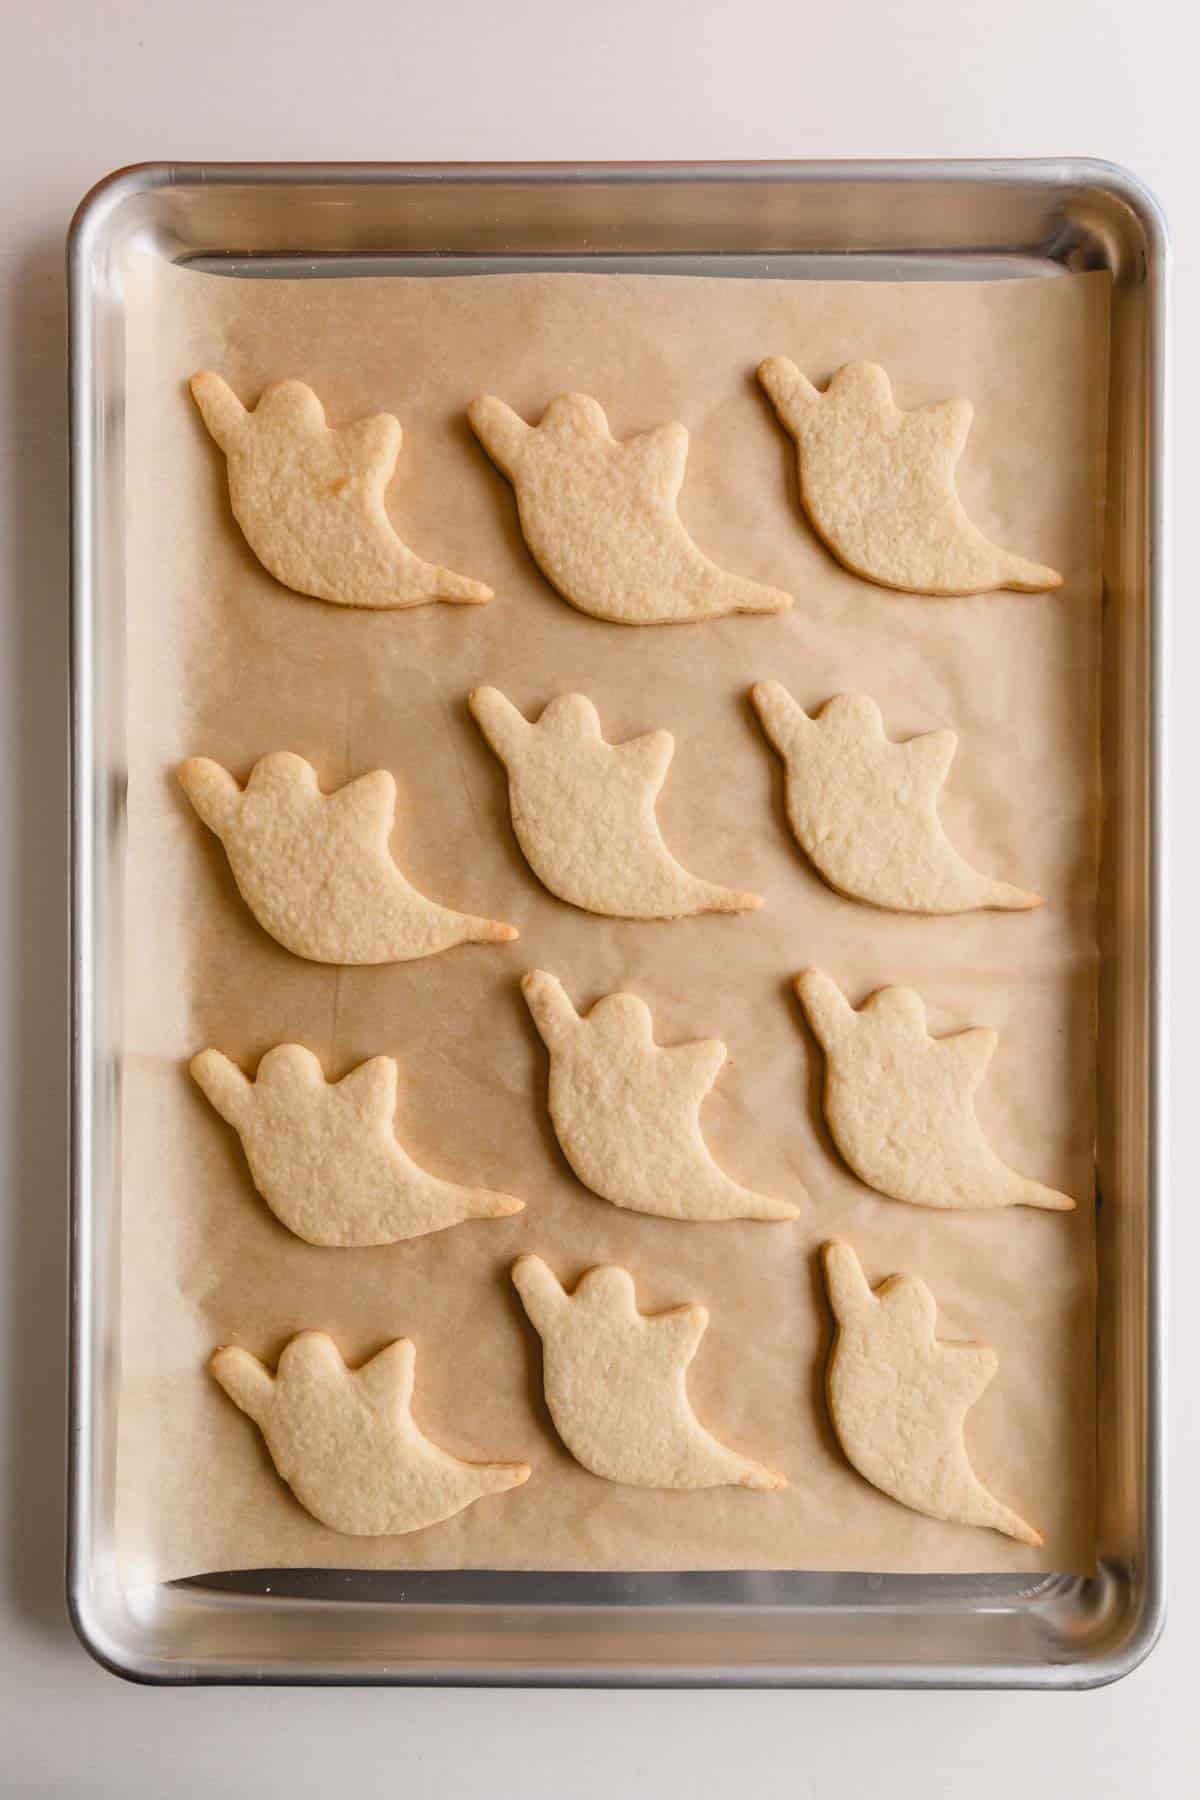
- Bake the cookies for 10-13 minutes, or until the edges start to turn light a light, golden color.
- Cool the cookies on the baking sheet for 5 minutes. Then, transfer them to a cooling rack to cool completely.
3. Prepare the icing
- Make a half batch of this royal icing recipe. You’ll be amazed by the flawless finish!
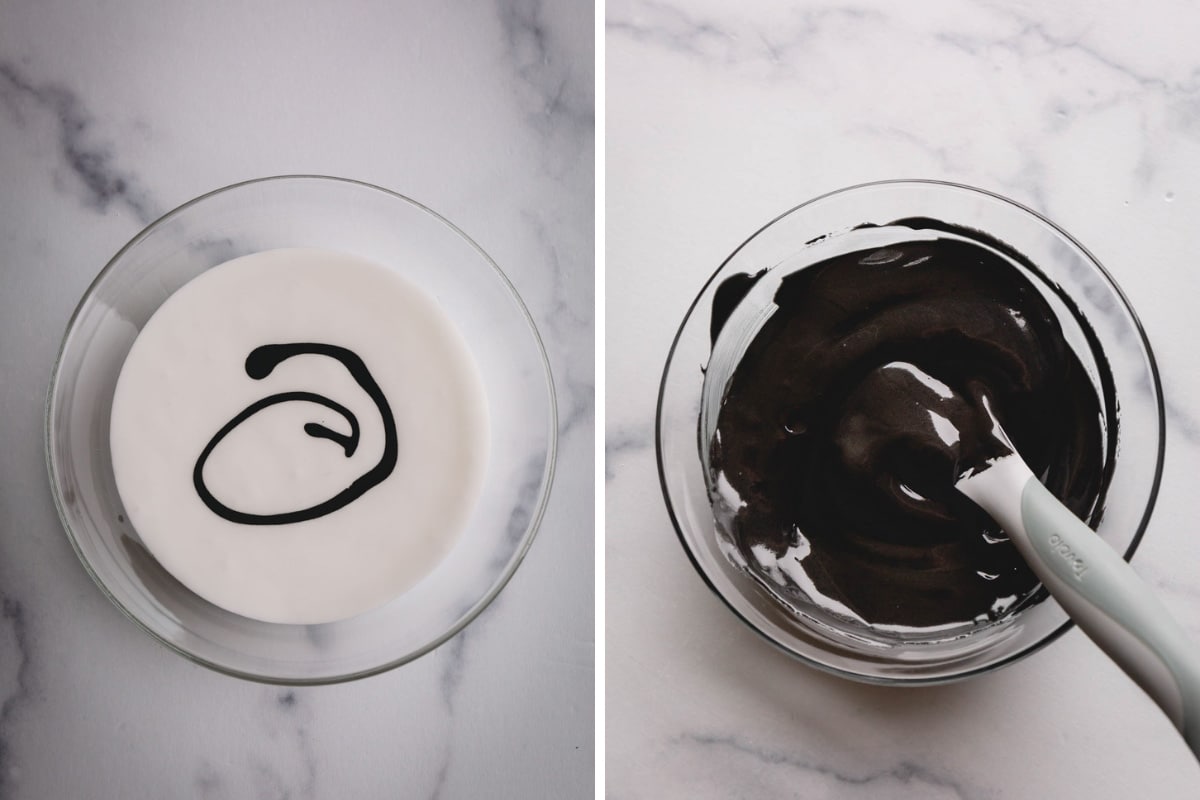
- Divide the icing into four sections.
- Color with gel food coloring. Use any color or a combination of colors you like best. I made 120 grams of black, 100 grams of white, 50 grams of purple, and 30 grams of green!
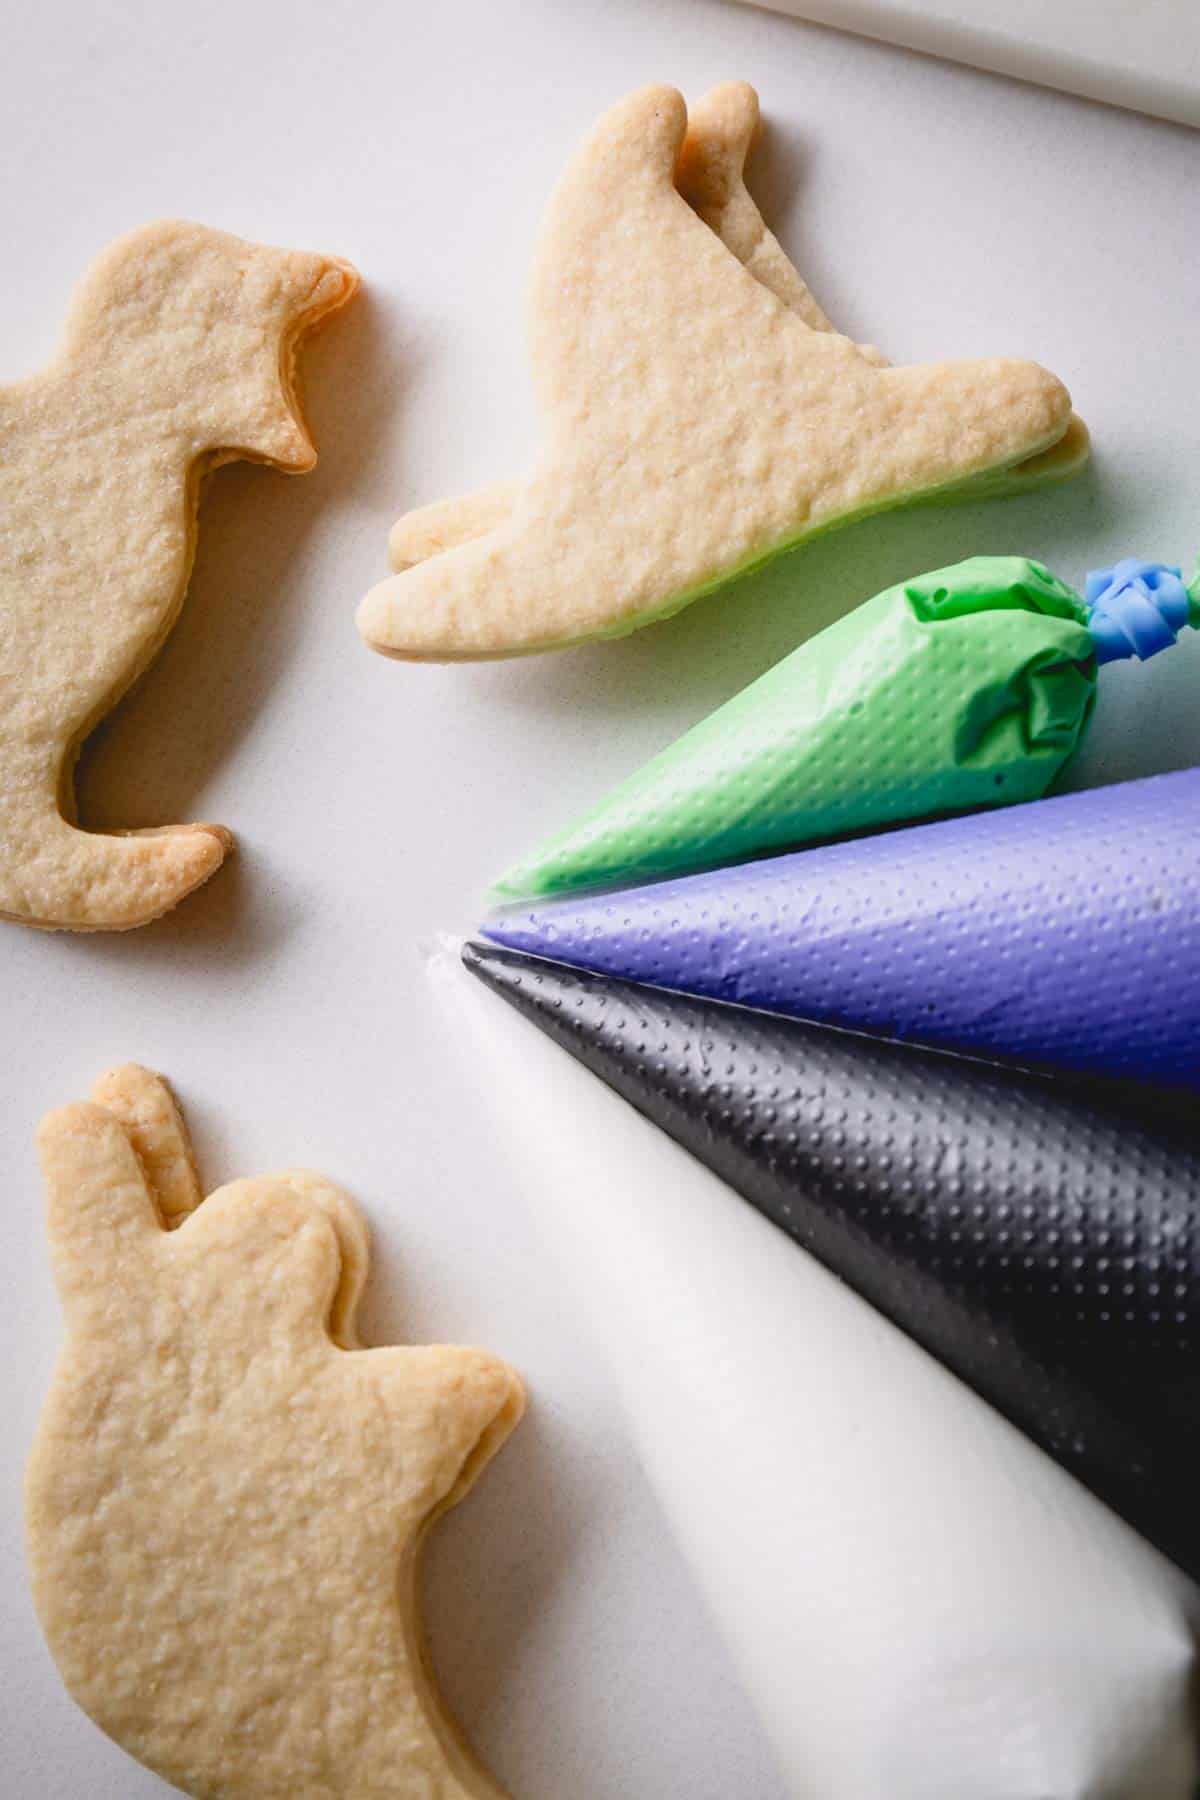
- Transfer the royal icing into tipless piping bags.
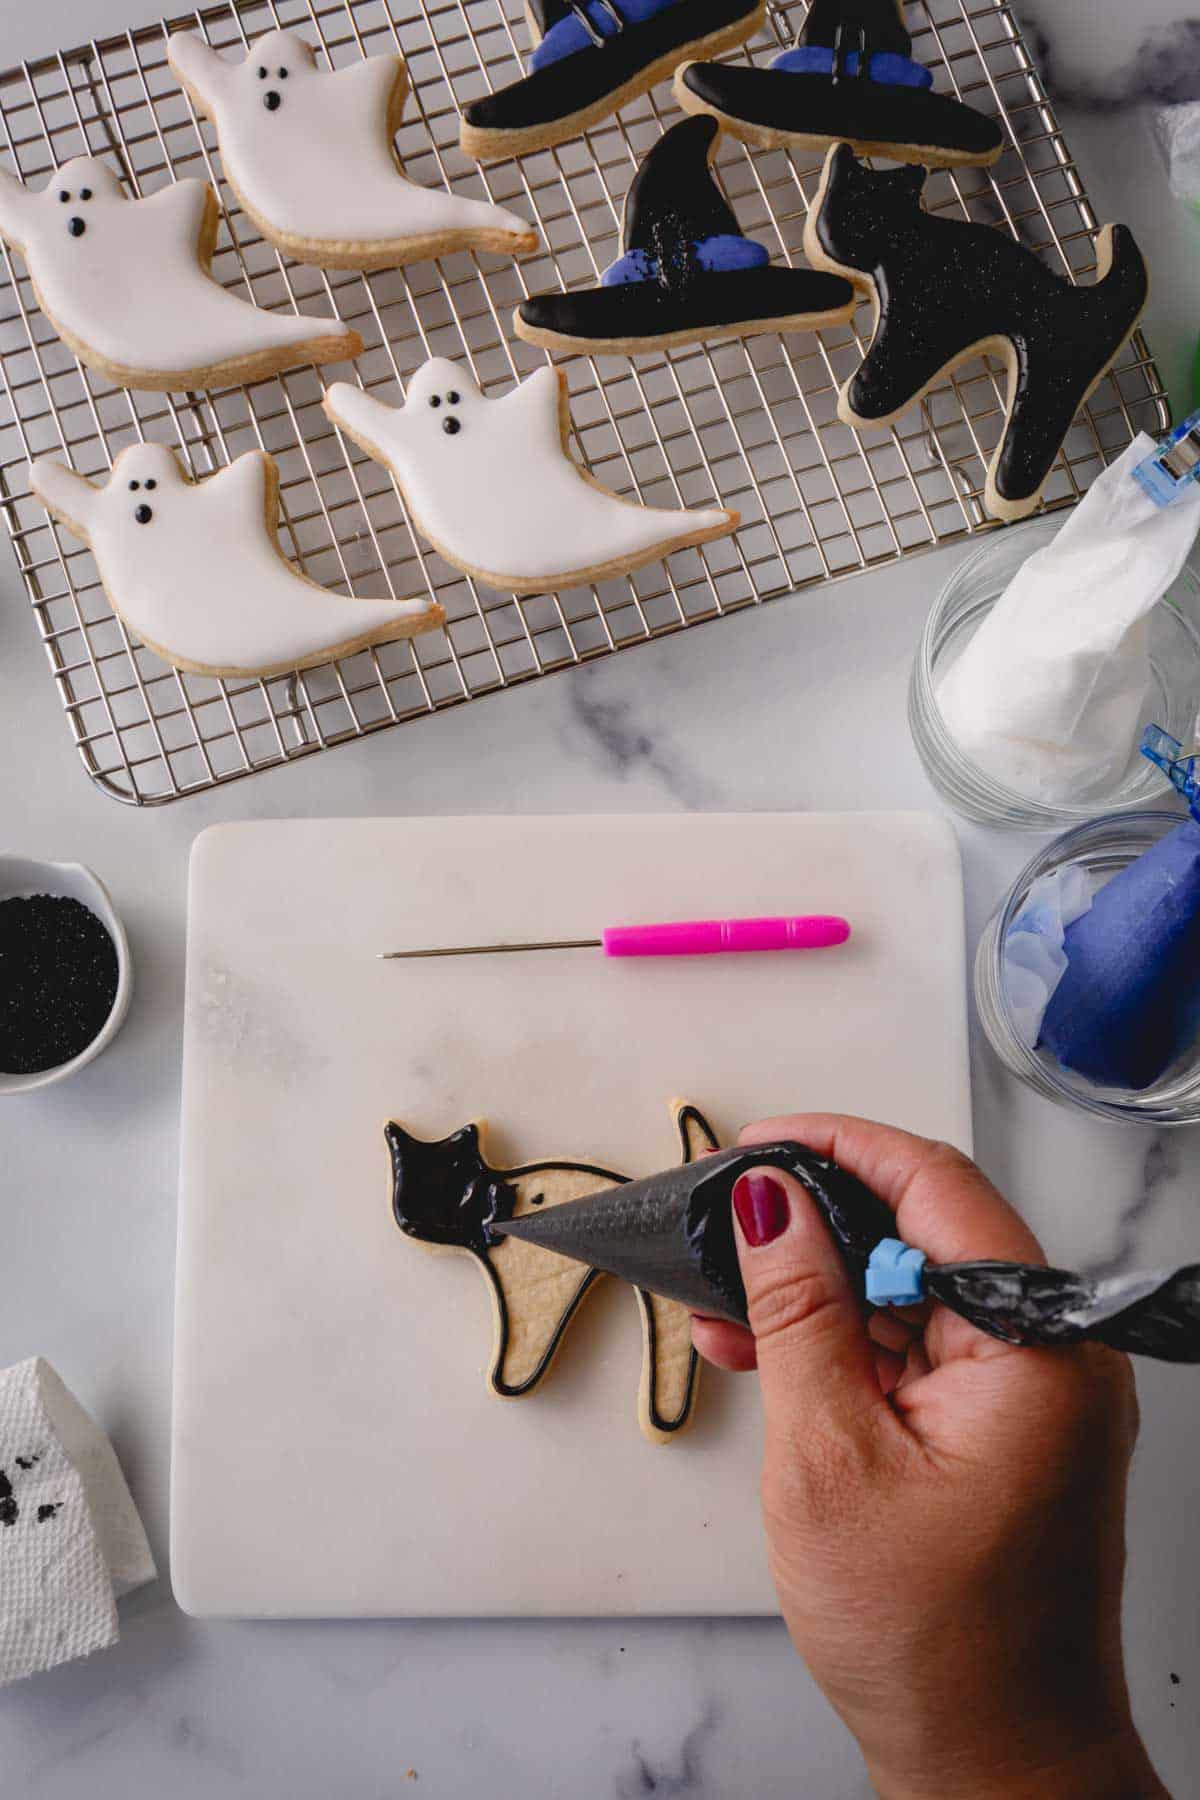
4. Decorate the cookies
This is the fun part! Get creative, or follow my decorating instructions for easy cats and witch hats.
- Outline the cookies with royal icing in a tipless piping bag with a small opening.
- Flood the cookies with more icing, keeping the same consistency as the outline.
- Decorate cat cookies. Add the eyes after the icing has set for about 30 minutes. If you’d like, you can add black sanding sugar before the icing sets!
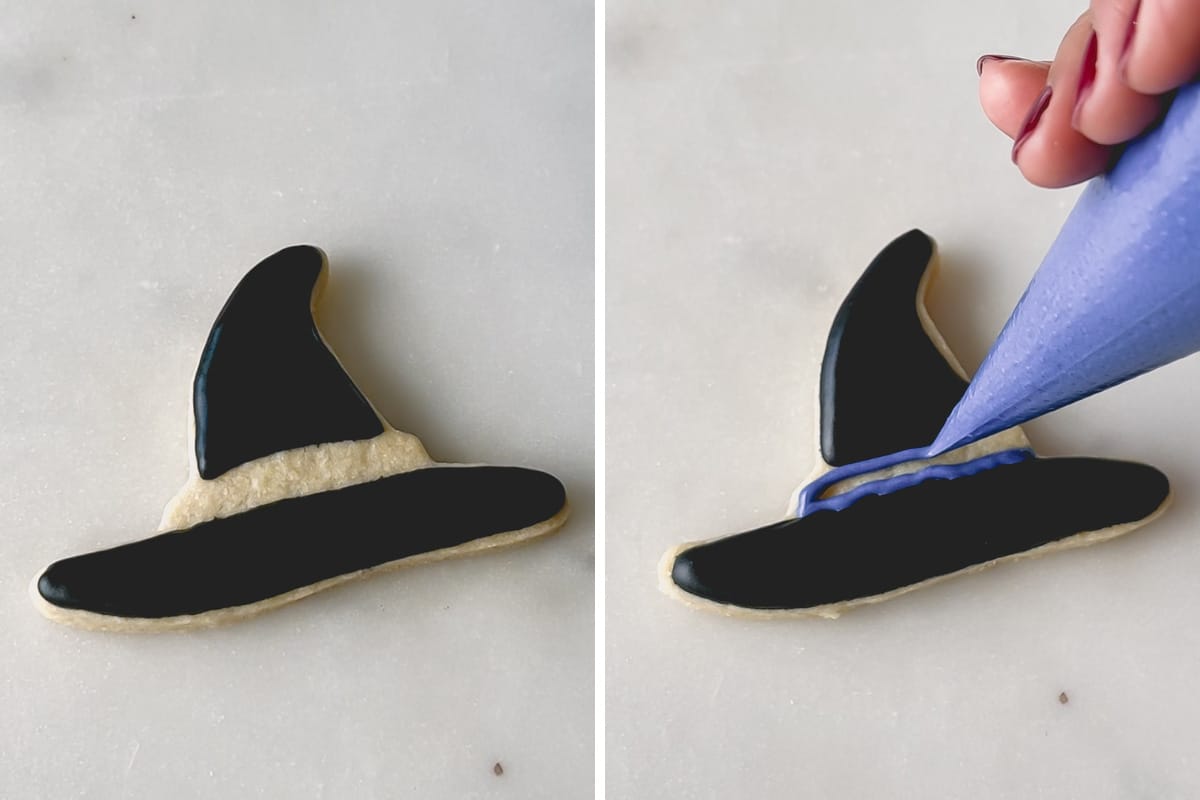
- Decorate witch hat cookies. Outline and flood the black portion of the hats. After the icing has set for 30 minutes, add the purple ribbon. Let the icing set again. Then, add the final detail on the top of the hat.
Tips for Success:
- Use cold butter. This is the key to success with no-chill dough.
- Weigh all of your ingredients. This is another crucial success tip! Skip the measuring cups, and break out the kitchen scale. If you want perfectly shaped Halloween cut-out cookies, you must accurately measure your ingredients.
- Don’t overmix the icing. This weakens the egg whites, making it so the icing doesn’t set properly.
- Let the icing cool completely before stacking the decorated Halloween sugar cookies in storage containers. Depending on humidity, this could take up to 48 hours.
- Don’t overfill your piping bags. Only fill the bag about ⅔ of the way up.


Make-Ahead Tips:
I highly recommend making the dough in advance so you don’t feel rushed and can have lots of fun decorating!
- Prepare the cookie dough. Instead of rolling it out flat, shape the dough into ½-inch thick disks, and wrap it tightly in plastic wrap. Or, place it in a ziplock plastic bag.
- Refrigerate raw cookie dough for up to 3 days.
- Freeze raw cookie dough for up to 3 months.
- Thaw frozen cookie dough in the refrigerator overnight. Let it warm up to room temperature for 15-30 minutes before shaping the cookies.
- Royal icing can be made up to two weeks in advance!

Sugar Cookie Storing Tips:
Decorated Halloween sugar cookies stay soft and fresh for days, thanks to the icing. Icing seals in the moisture, preventing the cookies from drying out.
- Room temperature – Keep the decorated cookies in a single layer on a baking sheet until the icing has fully hardened, up to 48 hours. Place the cookies in an airtight container with parchment paper in between the layers. Store at room temperature for up to one week.
- Freezer – Once the decorated cookies have fully set, they can be frozen for up to one month.
- To thaw – Remove the container from the freezer, and leave it on the counter for 8-12 hours WITHOUT opening it. Keeping it closed will prevent condensation from forming, which causes the colors to run.
Keep the cookies fresh
Don’t refrigerate decorated Halloween sugar cookies! Sugar cookies dry out in the refrigerator, and condensation can cause the icing colors to run.
Halloween Sugar Cookie FAQs:
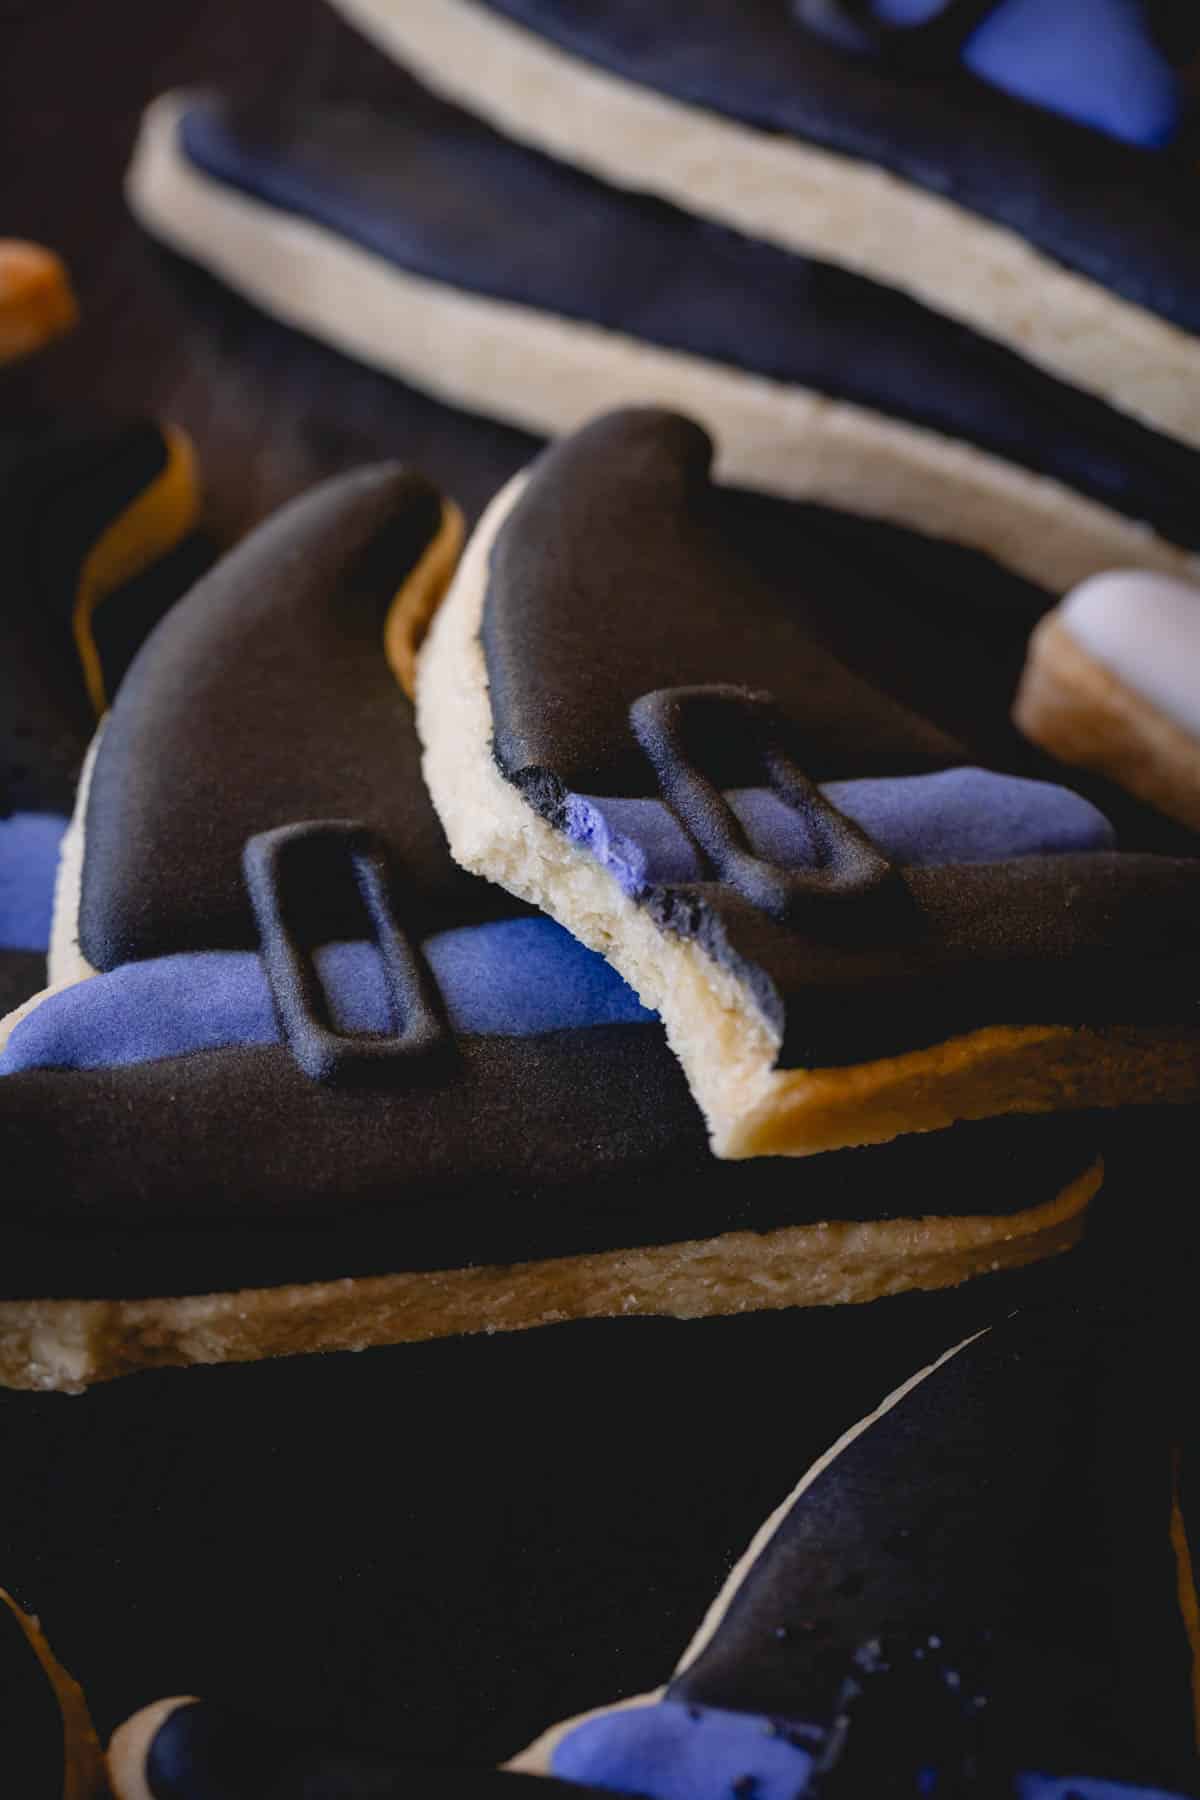
The cookies might be overbaked, or it could be due to the icing. Thin sugar cookies bake much faster than you’d think and continue to set as they cool. So, resist the urge to leave them in the oven longer than instructed! Once the edges turn golden, it’s time to pull them out. Also, fully set icing is supposed to be dry and hard. This will result in a crunchier cookie.
Royal icing is one of my favorite ways to decorate sugar cookies, but I also use powdered sugar icing and cream cheese frosting. Sprinkles, sanding sugar, and candy decorations are also fun to use!
Yes, this is a very beginner-friendly sugar cookie recipe! The dough comes together easily and doesn’t require any chilling time. Rolling out and shaping the cookies is the fun part!
More Halloween Recipes:

Halloween Sugar Cookies
Ingredients
- 3 cups (375 g) all-purpose flour properly measured
- ½ cup (100 g) granulated sugar
- ¼ cup (50 g) packed brown sugar Note 1
- 1 tablespoon (8 g) cornstarch
- ½ teaspoon baking powder
- ¼ teaspoon coarse kosher salt
- 1 ½ sticks (170 g) unsalted butter Note 2
- 1 (53 g) large egg at room temperature
- 2 teaspoons pure vanilla extract
- ¼ teaspoon almond extract optional Note 3
For decorating:
- ½ batch of royal icing
- Black food coloring
- Purple food coloring
- Green food coloring
- Black sanding sugar optional
Equipment
Instructions
TO PREPARE THE DOUGH:
- In a mixing bowl with a paddle attachment, mix flour, sugars, cornstarch, baking powder and salt.3 cups all-purpose flour, ½ cup granulated sugar, ¼ cup packed brown sugar , ½ teaspoon baking powder, ¼ teaspoon coarse kosher salt, 1 tablespoon cornstarch
- Add butter and mix on low speed until the mixture is evenly moistened, 1-2 minutes. The mixture should resemble wet sand.1 ½ sticks unsalted butter
- Add egg, vanilla, and almond extracts and mix until just combined, about 30 seconds. The dough will be crumbly, but it should stick together when you squeeze it in your hand.1 large egg, 2 teaspoons pure vanilla extract, ¼ teaspoon almond extract
- Divide the dough into 2 equal parts. Knead it into a smooth balls. Place each dough ball between 2 parchment sheets and roll it out into 1/4-inch thick disc. (TIP: Place the dough with parchment paper on a silicone mat to roll it out, so it stays in place. And this adjustable rolling pin is perfect for rolling out even dough.)
- At this point, you can move on to shaping and baking the cookies right away. Or you can put the dough into plastic bags and refrigerate for up to 3 days, or freeze for up to 3 months.
TO SHAPE AND BAKE COOKIES:
- Preheat the oven to 350°F (175°C). Line 2-3 baking sheets with parchment papers, or silicone mats.
- Using cookie cutters, cut out the cookies and arrange them on the prepared baking sheets.
- Gather the scraps of dough, roll and cut out more cookies. Repeat until all the dough is used. (TIP: If the dough is too soft, you may refrigerate the rolled out dough for 5 minutes to firm it up. This will ensure nice crisp edges on your cookies.)
- Bake the cookies for 10-13 minutes, or until the edges start to turn light golden color.
- Cool the cookies on the baking sheet for 5 minutes, then transfer them onto a cooling rack to cool completely.
TO DECORATE THE COOKIES:
- Make half batch of this royal icing recipe. Divide the icing into 4 sections and color with gel food coloring (I made 120g black, 100g white, 50g purple, and 30g of green royal icing.) Transfer the royal icing into tipless piping bags.½ batch of royal icing, Black food coloring, Purple food coloring, Green food coloring
- First, outline the cookies with royal icing in a tipless piping bag with a small opening.
- Then, flood the cookies with more icing. I use the same consistency of royal icing for outline and flooding.
- For cat cookies, let the icing set for about 30 minutes before adding details for eyes. If desired, you can also sprinkle black sanding sugar after flooding before the icing is set.Black sanding sugar
- For witch hat cookies, first outline and flood the black portion. Let it set for 30 minutes, then add the purple ribbon part to give that separate effect. Then let the icing set again and then add the final detail on top.
- Decorated cookies store well at room temperature. Keep the iced sugar cookies in a single layer on a baking sheet until the icing is fully hardened, for up to 48 hours. The icing seals the moisture and won’t dry out the cookies.
- Once the icing is fully set, place the cookies in an airtight container with parchment paper in between the layers. Store at room temperature for up to a week.
⭐️ Did you make this recipe?
Please leave a review and let us know how you liked it!
Tips & Notes
Note 4: Nutrition information does not include icing or decorations. Storing:
– Store cookies in an airtight container at room temperature for up to 1 week.
– Halloween sugar cookies can be frozen for up to 1 month!
– To thaw frozen cookies, remove the container from the freezer, and leave it on the counter for 8-12 hours WITHOUT opening it. Keeping it closed will prevent condensation from forming, which causes the colors to run.
Nutrition