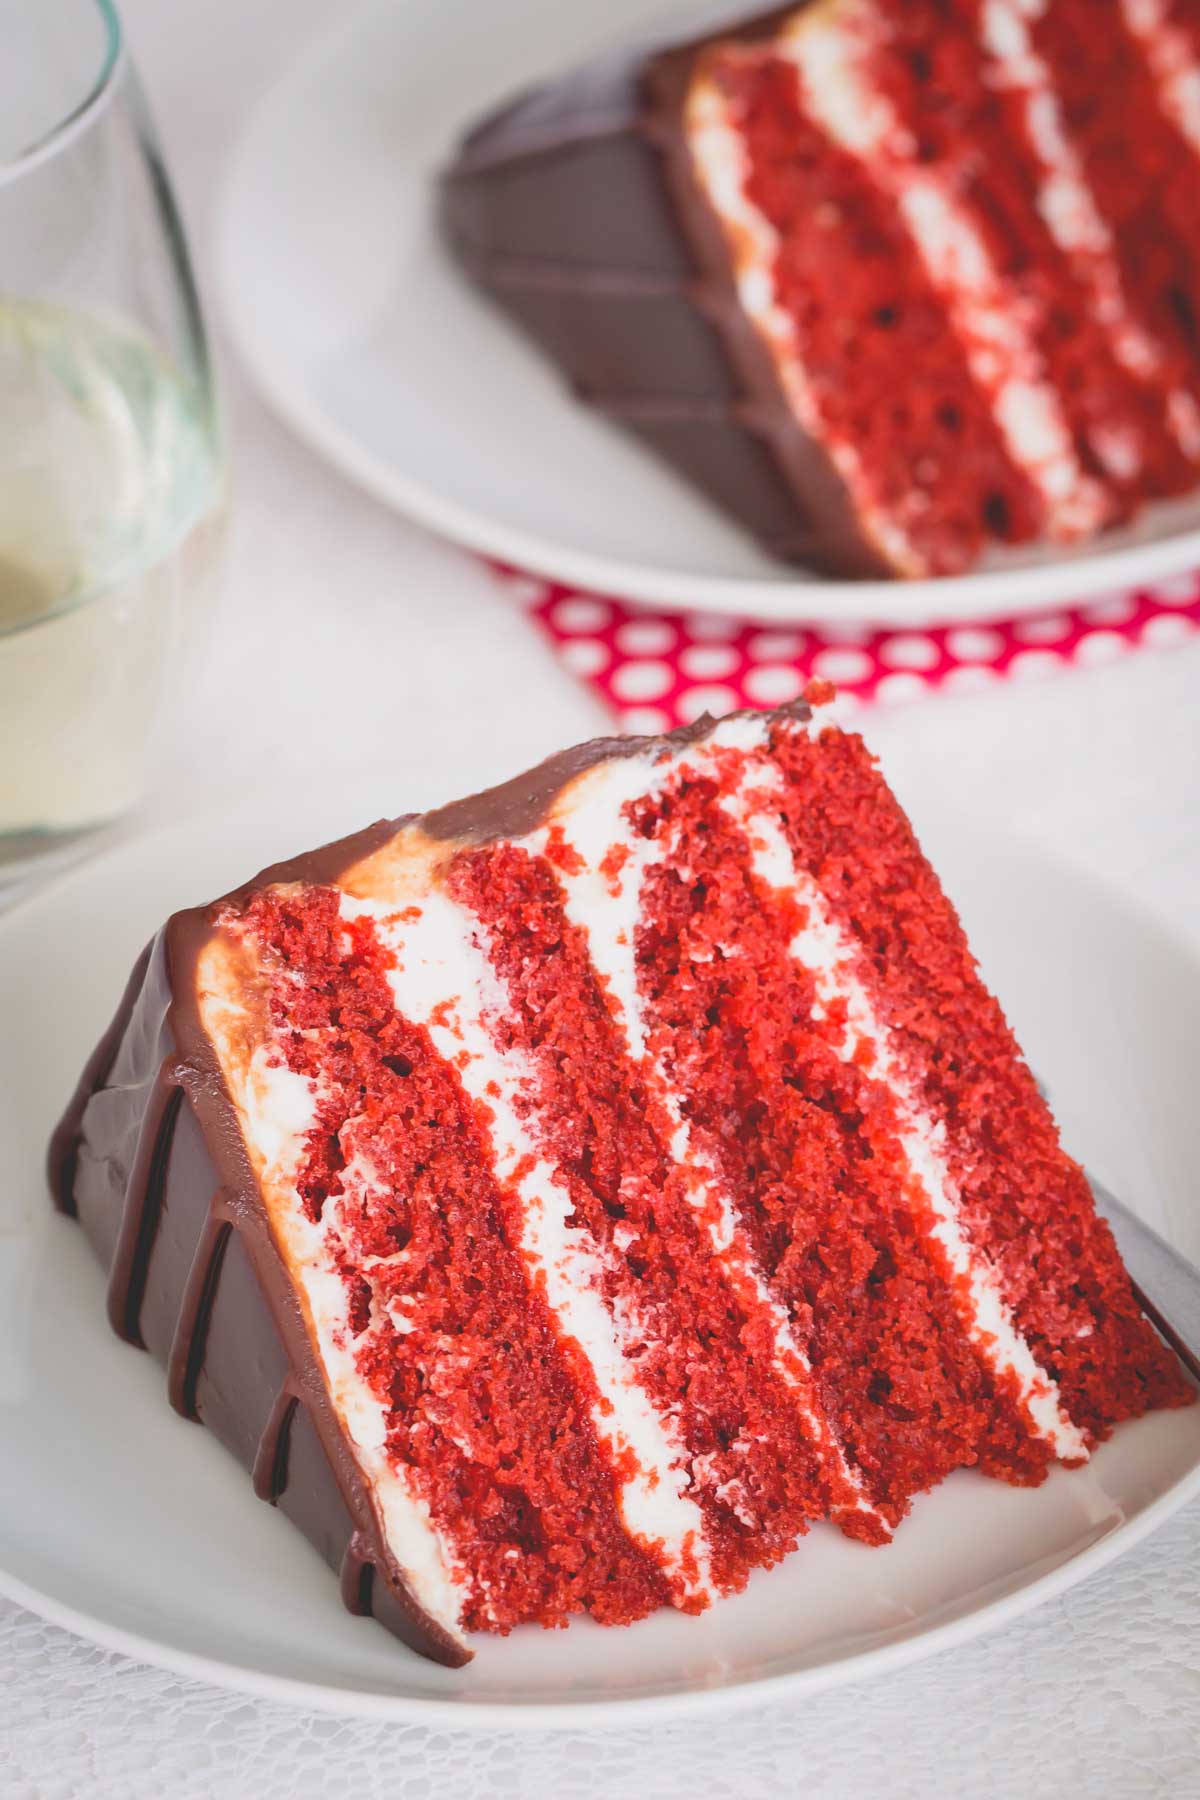
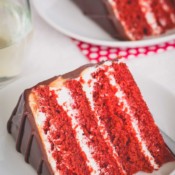
Buttery soft red velvet cake layers generously filled with classic cream cheese frosting and finished with luscious chocolate ganache. This is the cake you don’t wanna miss!
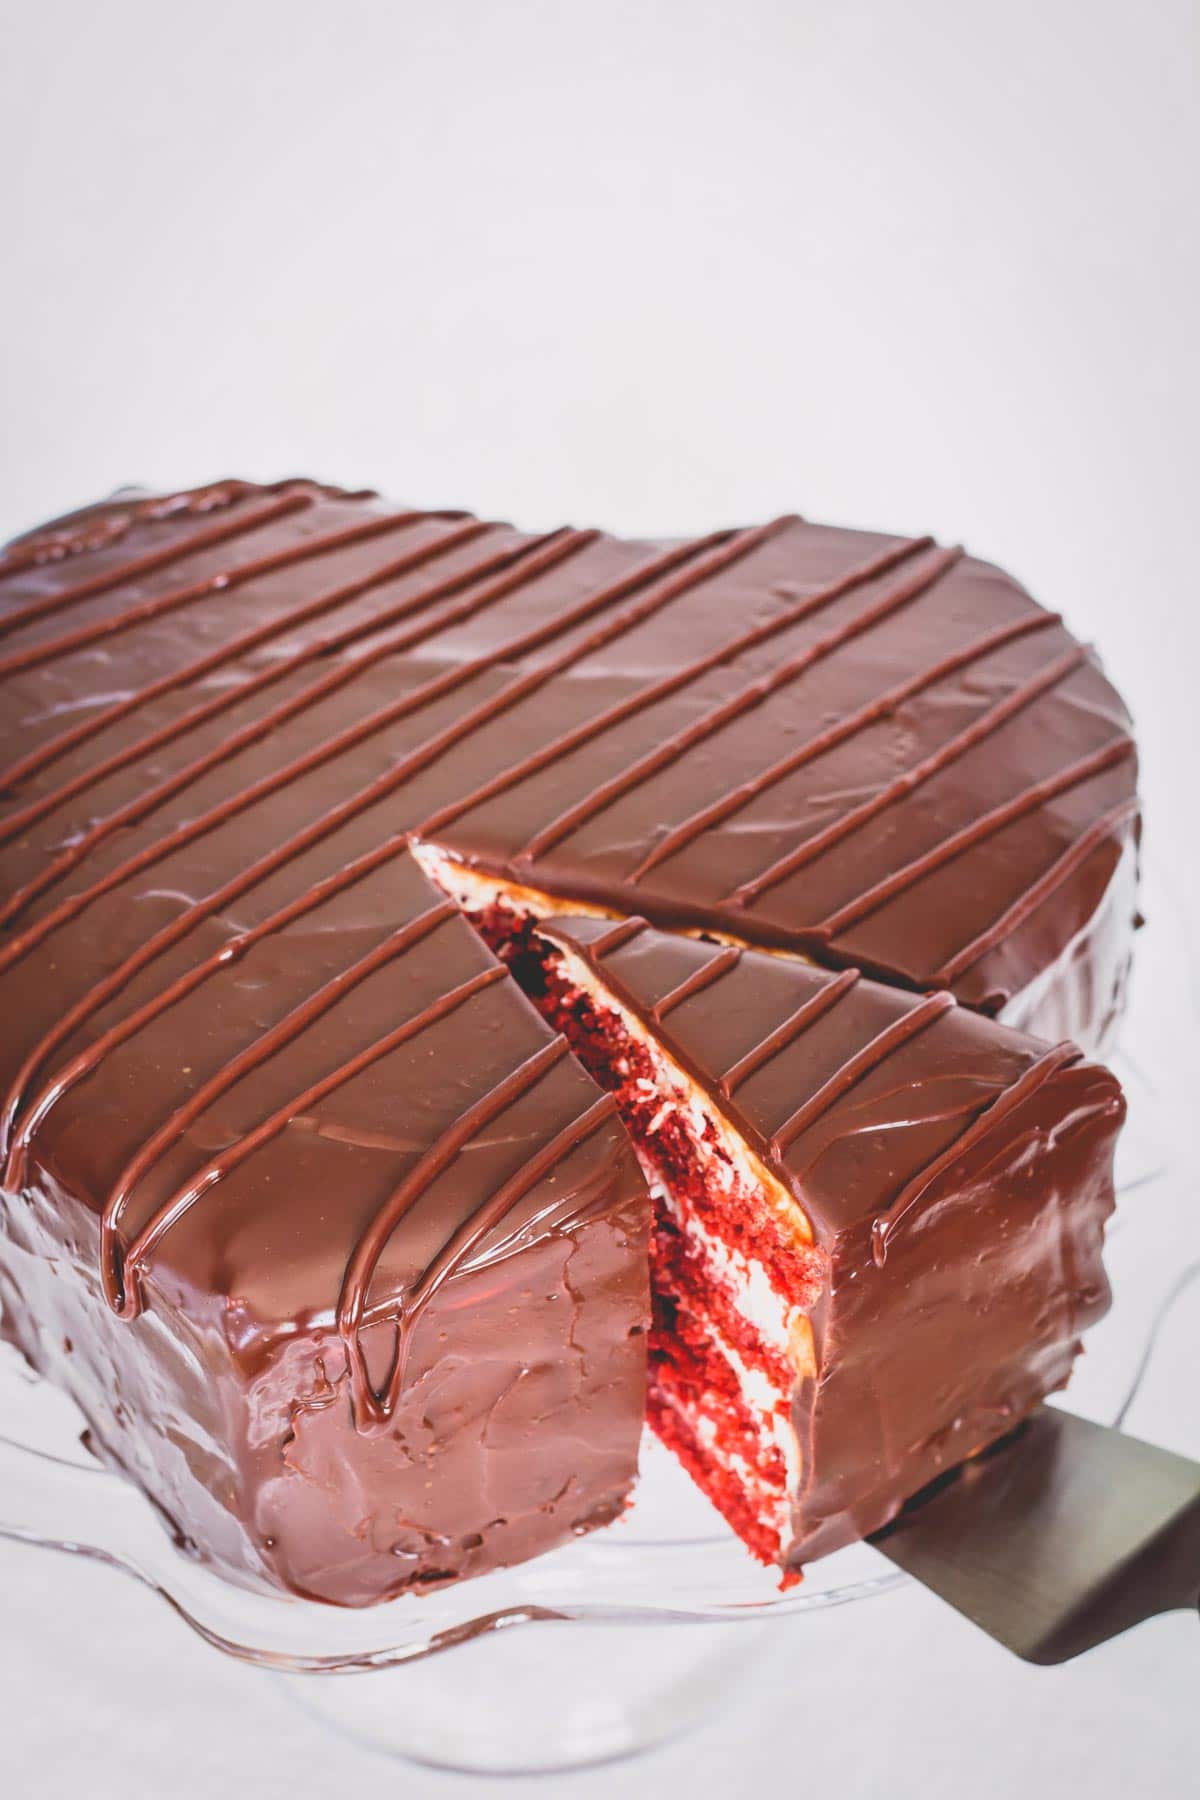
Table of Contents
Why you’ll love this recipe:
There’s absolutely nothing not to love about this red velvet layer cake:
- Buttery tender and soft cake layers
- Sweet & tangy cream cheese frosting
- Semi-sweet chocolate ganache
- Effortlessly impressive – no baking skills required!
This cake is huge, by the way!! And I promise, every bite is absolutely worth it!!!
Key Ingredients for Red Velvet Cake:
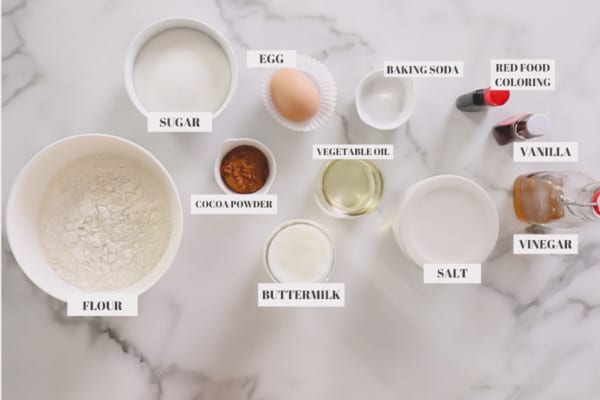
- Flour – This recipe has been tested with all-purpose flour.
- Cocoa powder – When it comes to cocoa powder, I recommend using unsweetened natural cocoa powder. Dutch-processed cocoa powder has a darker color, which may result darker cake layers. Here’s an excellent article on difference between natural and dutch processed cocoa powder.
- Buttermilk is a must for that beautiful velvet-y texture, moist and soft crumbs and a slight tang, the signature taste and texture of classic red velvet cake. If you don’t have buttermilk, here’s a homemade buttermilk substitute you can make in a pinch. (Method #2 is best for this cake!)
- Food coloring – Either liquid or gel food coloring will work for this recipe. To achieve the level of brightness you see in these photos, you’ll need: 1 tablespoon of liquid food coloring, or 1 teaspoon of gel food coloring.
How to make this cake:
This cake is not difficult to make! But it consists of 3 main components: cake layers, frosting and ganache. Both cake layers and frosting can be made in advance. More details on this later.
1. Bake the cake
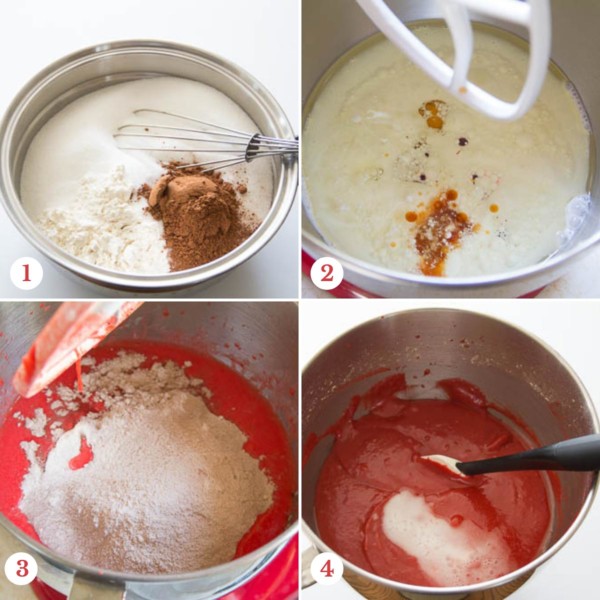
To make the batter, first we’ll mix together all the dry ingredients. And then mix the wet ingredients in another bowl.
Next, combine wet and dry ingredients and mix until mostly smooth.
Finally, combine baking soda and vinegar and add the bubbling mixture into the batter.
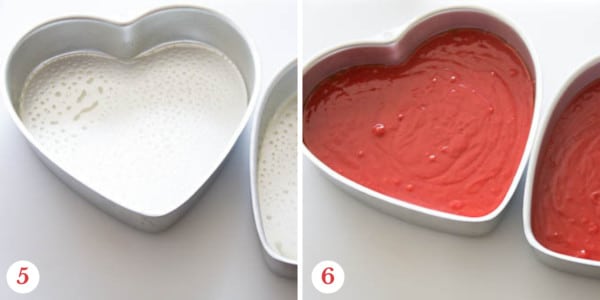
Divide the batter into 2 cake pans, lined with parchment paper and sprayed with non-stick cooking spray.
Bake for 30-35 minutes, or until inserted toothpick comes out clean.
Then cool the cakes in the pan for 5 minutes, and then invert them onto a wire rack to cool completely.
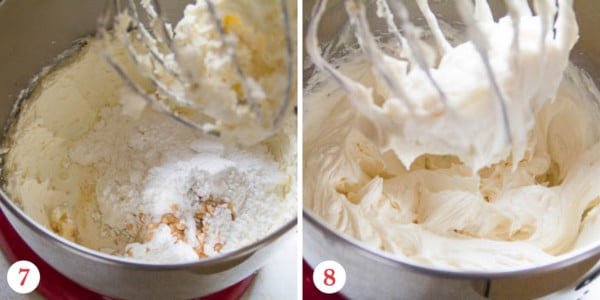
2. Make the frosting
I have comprehensive tutorial on how to make cream cheese frosting here. It has step by step photos and troubleshooting guide.
But in a gist, we’ll whip the cream cheese and butter until fluffy. And then stir in powdered sugar, followed by vanilla extract.
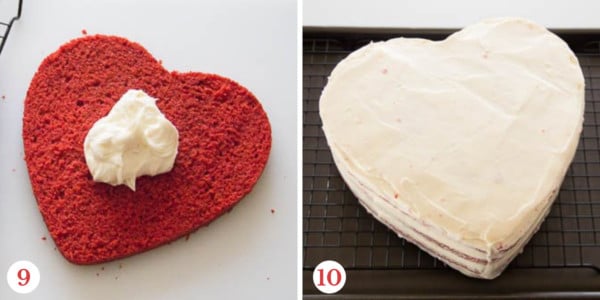
3. Assemble the cake
Once the red velvet cakes are cooled completely, slice each cake horizontally as evenly as possible.
Tip
This cake slicer helps you slice even layers with ease!
Now, the fun starts!! Smear a little bit of frosting on a cake board, and place the first layer of the cake. And spread a generous dollop of frosting all over the cake, followed by the next cake layer. Continue with the remaining cake layers.
Once all the layers are stacked, place it in the fridge for 30 minutes or so to firm up. Then crumb coat the entire cake with the remaining frosting. Chill in the fridge.
4. Make ganache topping
We’ll make 1:1 ganache with semi-sweet chocolate. This type of ganache is perfect for pouring over cakes. In my full ganache 101 post, I shared my go-to chocolate brands, different ratios and tips.
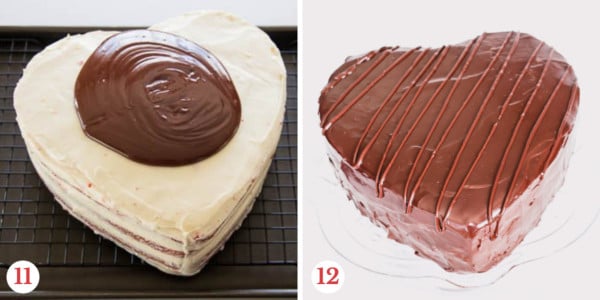
Tip
For smooth coverage, pour the ganache as soon as you make it and while it’s still nice and runny. As it cools, ganache gets thicker and harder to achieve that smooth and shiny coverage.
Red Velvet Layer Cake Tips:
- Be sure all of the ingredients are at room temperature, so that everything incorporates well without mixing the batter for too long.
- Don’t over-bake the cake, or they’ll dry out!
- Don’t slice warm cake layers, as they’re fragile when warm. It’s best to chill the cake layers well for at least couple of hours or preferably overnight.
- If you don’t want to slice the cake layers horizontally, you can bake the cake in three 9-inch pans and make 3 layer cake instead.
- Read my ultimate cream cheese frosting for tips and troubleshooting guides.
- You may skip chocolate ganache altogether and keep it simple with just cream cheese frosting.
Make-Ahead Tips:
You can make both cake layers and frosting in advance.
- Store the cooled cake layers, tightly wrapped with a plastic wrap, at room temperature overnight, or freeze for up to 3 months. Thaw the frozen cakes in the fridge overnight.
- Refrigerate the frosting, covered, until ready to assemble the cake.
Storing Tips:
Refrigerate the assemble cake, covered, until ready to serve. Leftovers can be refrigerated for up to 5 days.

Red Velvet Layer Cake
Ingredients
For cake:
- 3 cups (375g) all-purpose flour
- 2 cups (400g) granulated sugar
- 2 tablespoons natural unsweetened cocoa powder Note 1
- ½ teaspoon salt
- 2 large eggs at room temperature
- 1 ½ cup (360ml) buttermilk at room temperature Note 2
- 1 cup (240ml) vegetable oil
- 1 tablespoon pure vanilla extract
- 2 teaspoons gel red food coloring Note 3
- 1 teaspoon baking soda
- 1 teaspoon white distilled vinegar
For cream cheese filling:
- 16 oz (450g) cream cheese at room temperature Note 4
- 1 cup (230g) unsalted butter at room temperature
- 4 cups (460g) powdered sugar
- 2 teaspoons pure vanilla extract
For ganache:
- 1 cup (240ml) heavy whipping cream
- 8 oz (225g) semi-sweet chocolate Note 5
- 1/4 teaspoon coarse kosher salt
Instructions
To make the cake:
- Preheat the oven to 350°F (175°C). Line two 9-inch round cake pans* with parchment paper and spray with a cooking spray.
- In a medium bowl, whisk together flour, sugar, cocoa and salt. Set aside.
- In a large mixing bowl, beat the eggs, vegetable oil, buttermilk, red food coloring, and vanilla extract until well combined.
- Add the flour mixture and mix the batter until smooth, about a minute.
- In a small dish, mix together baking soda and vinegar. While the soda/vinegar mixture is bubbling, add it to the batter and mix well.
- Evenly divide the batter between the two cake pans. Bake the cakes for about 30 minutes, or until the inserted toothpick comes out clean. If the toothpick comes out with moist crumb, bake for a minute longer and test again. Be careful not to overbake the cakes, or they'll dry out.
- Cool the cakes in the pan for 5 minutes, then invert them onto a wire rack to cool completely, for couple of hours or overnight. (Wrap the cakes in a plastic wrap, if you're resting overnight.)
To make the filling:
- In a mixing bowl with paddle attachment, beat cream cheese and butter on medium high speed until fluffy, about 1 minute.
- Add powdered sugar and beat on low speed for a minute. Then increase the speed to medium high and continue to beat until smooth and fluffy, about 3 minutes.
- Stir in vanilla extract and salt. Whip again until incorporated, 30 seconds.
To assemble the cake:
- Once the cakes are completely cooled, slice each cake layer horizontally. (TIP: This cake slicer makes the job quick and easy!)
- Smear a small amount of frosting on a cake board, or serving platter. And place the first layer of cake.
- Evenly spread about 2/3 cup of filling all over the cake and place the next cake layer followed by another round of frosting. Continue until all the cake layers are stacked. If necessary, place the cake in the fridge to firm up for 30-60 minutes.
- Then cover the entire cake with remaining frosting and refrigerate it while you prepare the ganache.
To make the ganache:
- Roughly chop chocolate with a sharp knife and place in a arge bowl.
- Heat heavy whipping cream in a microwave for 1-2 minutes, or until hot. (Alternatively, you can heat the cream on stovetop until almost boiling, but not quite to a boil.)
- Pour hot cream over chopped chocolate and let it sit for good 2-3 minutes.
- Add salt and whisk the mixture gently from the center, stirring in one direction and slowly incorporating cream into the chocolate, until it's nice and smooth, about 2 minutes.
- Immediately pour the ganache over the cake and spread it evenly with an ofset spatula. (Note: Ganache thickens as it cools, therefore pour it over the cake while ganache is still warm and runny. TIP: If the ganache cooled and thickened, reheat it in a microwave in 15-second increments at 50% power to make it runny again.)
- The cake can be assembled 1 day in advance. Store the cake, covered, in the fridge. Refrigerate leftovers, covered, for up to 5 days.
Tips & Notes
You can make both cake layers and frosting in advance.
– Store the cooled cake layers, tightly wrapped with a plastic wrap, at room temperature overnight, or freeze for up to 3 months. Thaw the frozen cakes in the fridge overnight.
– Refrigerate the frosting, covered, until ready to assemble the cake. Read my ultimate cream cheese frosting post for more tips and troubleshooting guide. And here’s my full tutorial for ganache 101.
Nutrition


Is it fine if I cover the cake with fondant
& what is the size of the cake
Hi, Srin. Yes, this cake is strudy enough for fondant. This cake is for 9-inch cake pan.