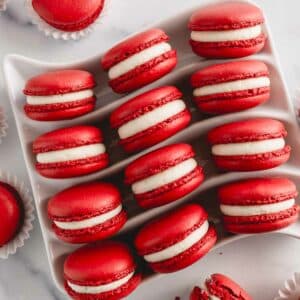
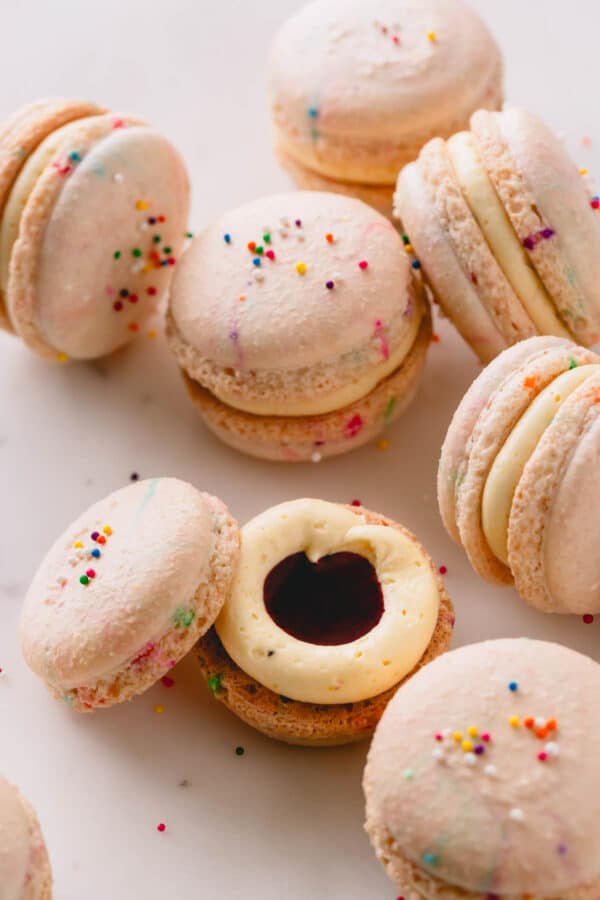
Filled with sweet and tangy cream cheese frosting, these stunning red velvet macarons are made to impress! Learn how to achieve that perfect deep red color and texture!
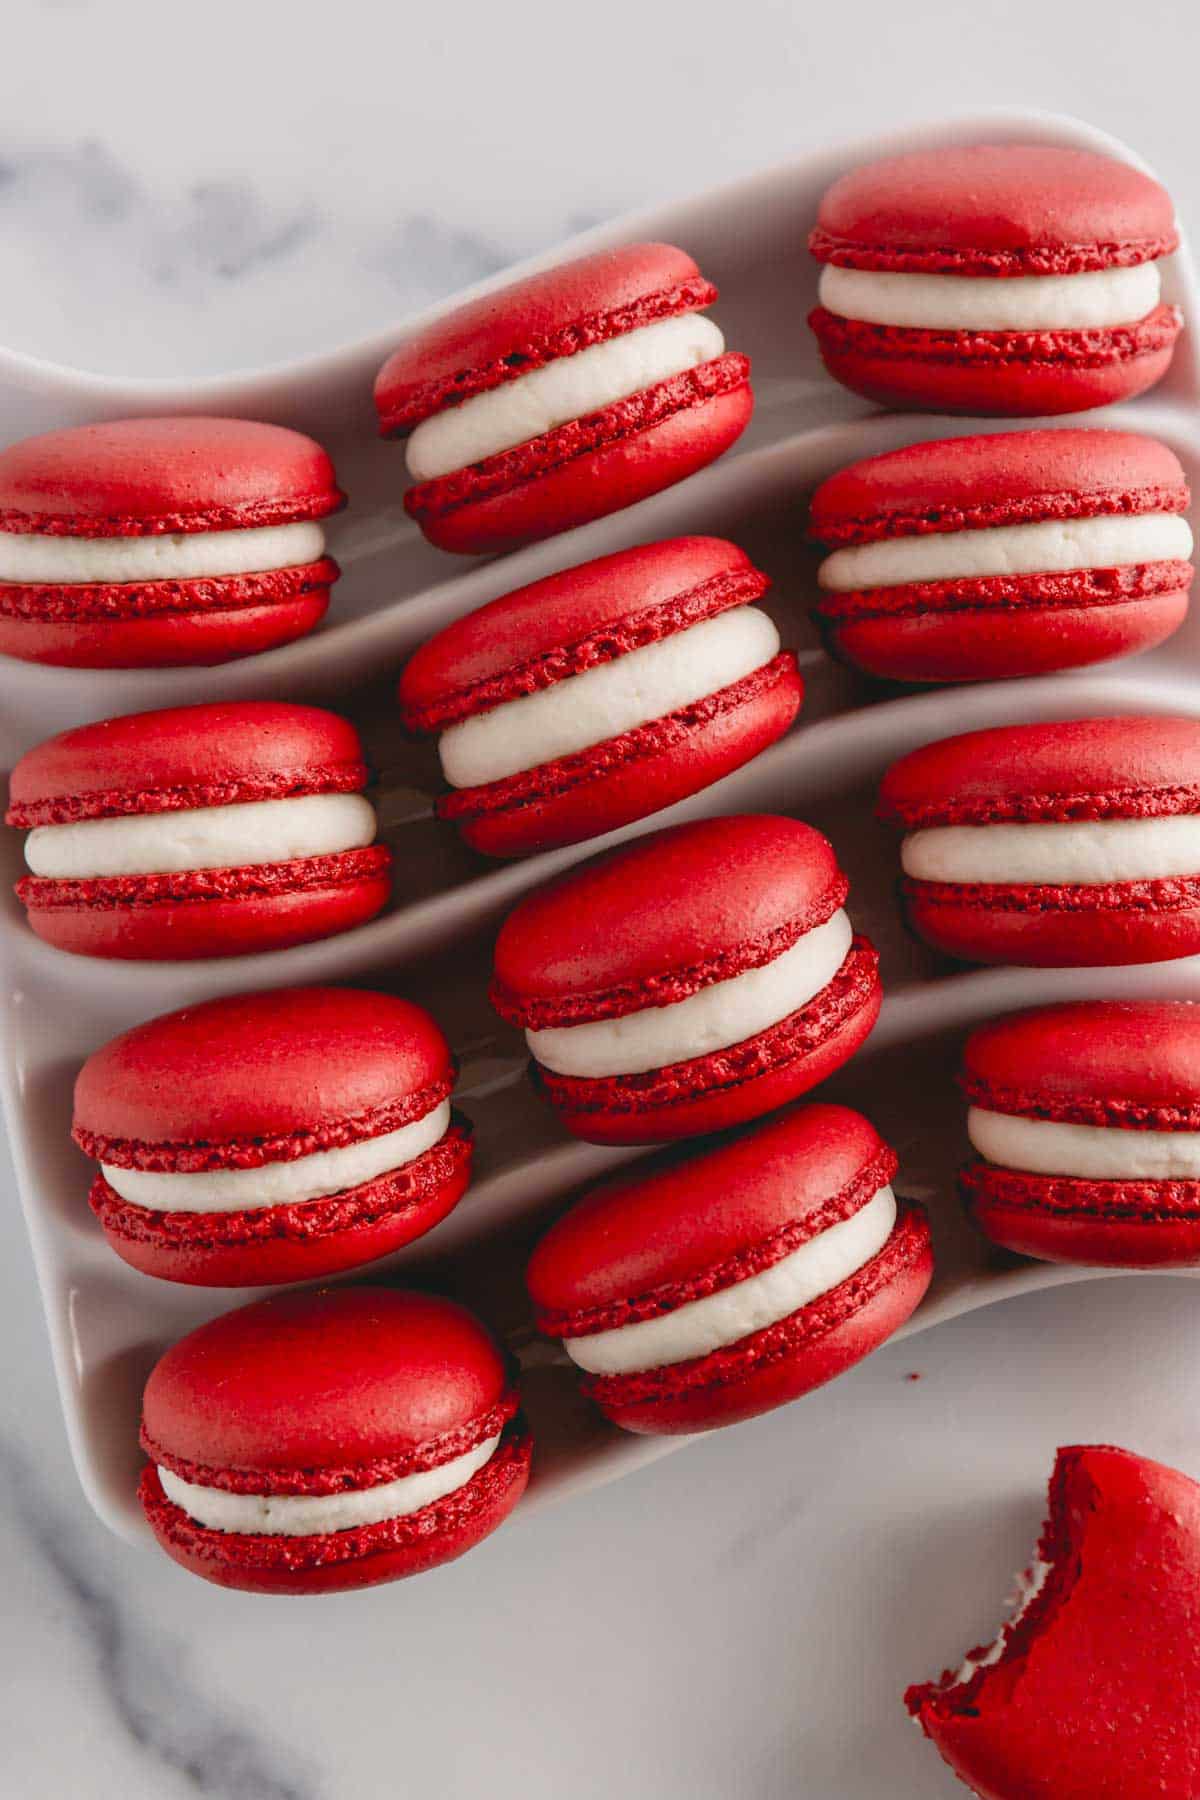
Table of Contents
- Why you’ll love red velvet macarons:
- Is this macaron recipe for you?
- Key Ingredients Note:
- How to make red velvet macarons:
- 1. Sift the dry ingredients
- 2. Make the meringue
- 3. Mix the macaron batter (aka Macaronage)
- 4. Pipe and bake the macaron shells
- 5. Make cream cheese filling
- 6. Fill the macaron shells
- 7. Mature the macarons
- The Secret to Vibrant Red Color:
- How to store macarons:
- Red Velvet Macarons Recipe
Why you’ll love red velvet macarons:
Red velvet macarons are, hands down, one of my absolute favorite macaron flavors, right after pistachio macarons and lemon macs.
Not only does it have the most gorgeous color, but the flavor is so, so good!
The sweet n’ tangy cream cheese filling, crisp and pleasantly chewy shells with slight hint of cocoa and vanilla. I couldn’t ask for anything better!
Is this macaron recipe for you?
Now, if you’re new to making macarons and you’re determined to get the “perfect” look, this may not be the best recipe to start your macaron journey.
I highly recommend starting with my plain macarons for beginners. It has all the nitty-gritty details, explanation of techniques for success and video tutorial.
This red velvet macaron recipe is slightly advanced because of added cocoa powder and significant amount of food coloring.
Check out my entire MACARON ARCHIVE full of helpful resources for beginner macaron bakers!
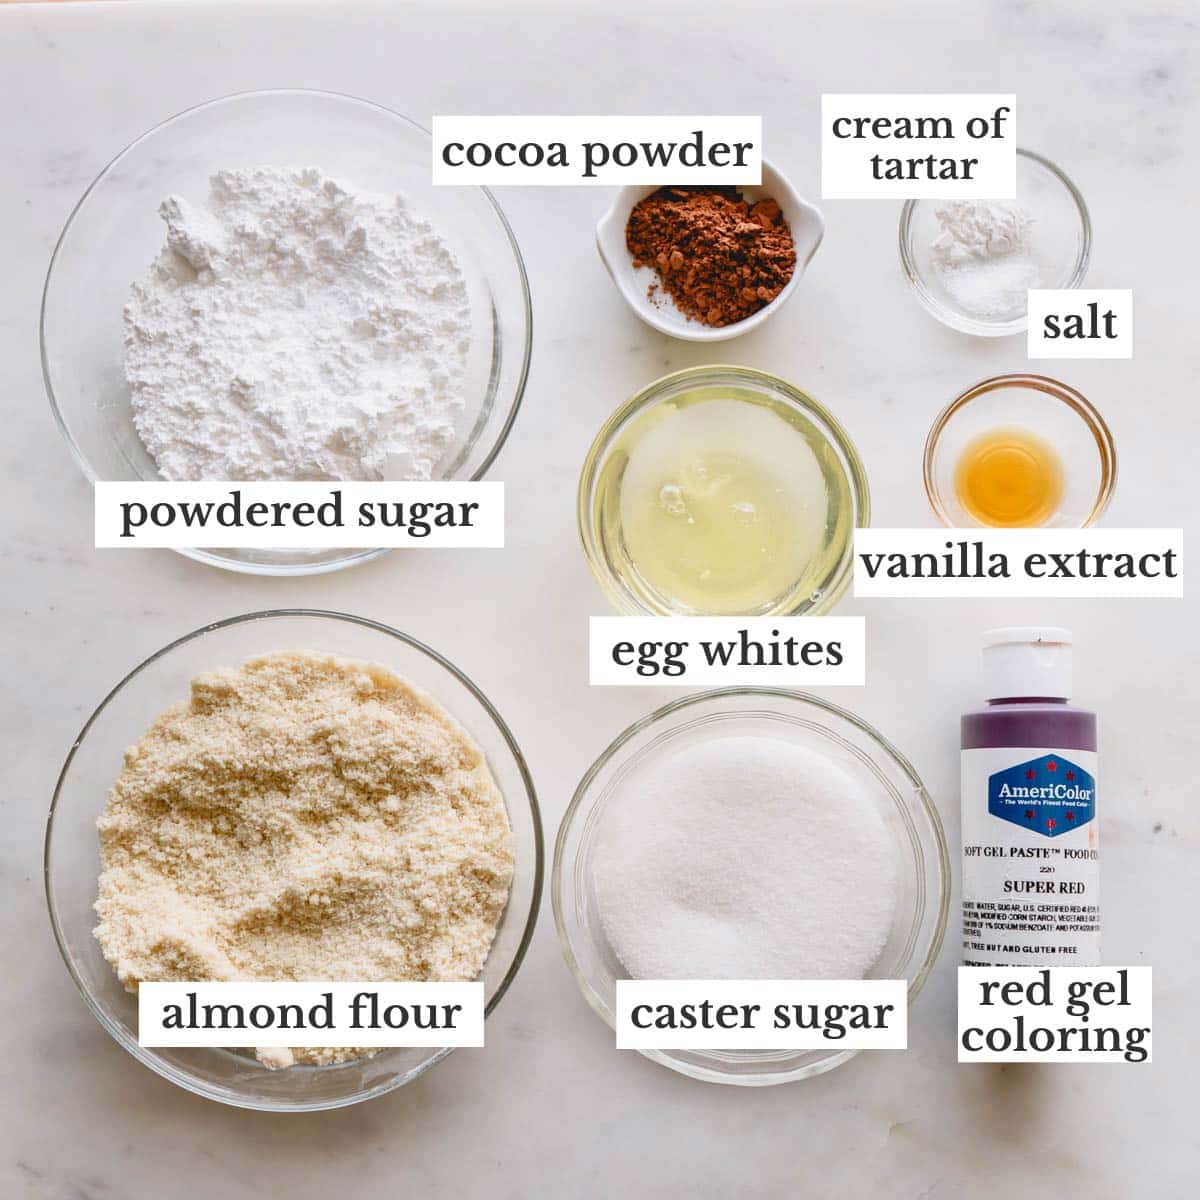
Key Ingredients Note:
Measure the macaron ingredients in grams with a kitchen scale. This intentional step leaves no wiggle room for error, maximizing your success!
- Egg whites – Quality egg whites lead to stable meringue, which is the foundation of perfect macarons. Choose fresh eggs, carefully separate the whites and yolk, and weigh the amount precisely. I’ve also had success with carton egg whites. Be sure to check the labels and avoid the ones that’s says “not for meringue”.
- Almond flour – Choose super-fine almond flour to with light beige color and fluffy texture. Avoid oily, yellow and/or coarse almond flour. This almond flour is my go-to.
- Powdered sugar – I don’t recommend making your own powder sugar, because commercial powdered sugar has cornstarch in it. And it helps with texture of the cookies.
- Granulated sugar – It’s important to use fine granulated sugar for meringue, as it dissolves quicker. You can also use caster sugar, aka baker’s sugar.
- Cocoa powder adds a hint of chocolate flavor and deepens the red color of the macarons. You can use either natural or Dutch-processed unsweetened cocoa powder.
- Cream of tartar is optional and can be omitted. However, it helps to stabilize egg whites and create sturdier meringue. It’s just an extra insurance!
- Red gel food coloring is absolutely necessary to achieve that vibrant red color.
How to make red velvet macarons:
We’re making French meringue macarons, which is my go-to method and it’s the easiest method of all.
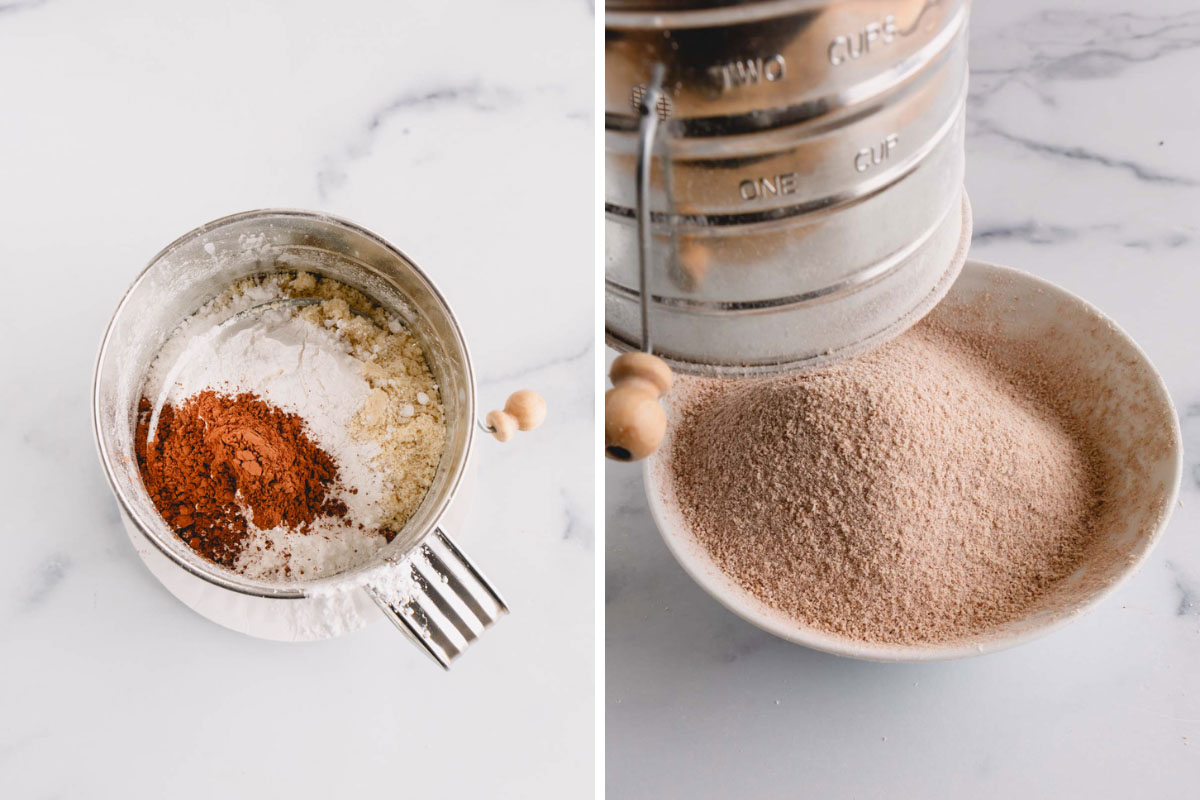
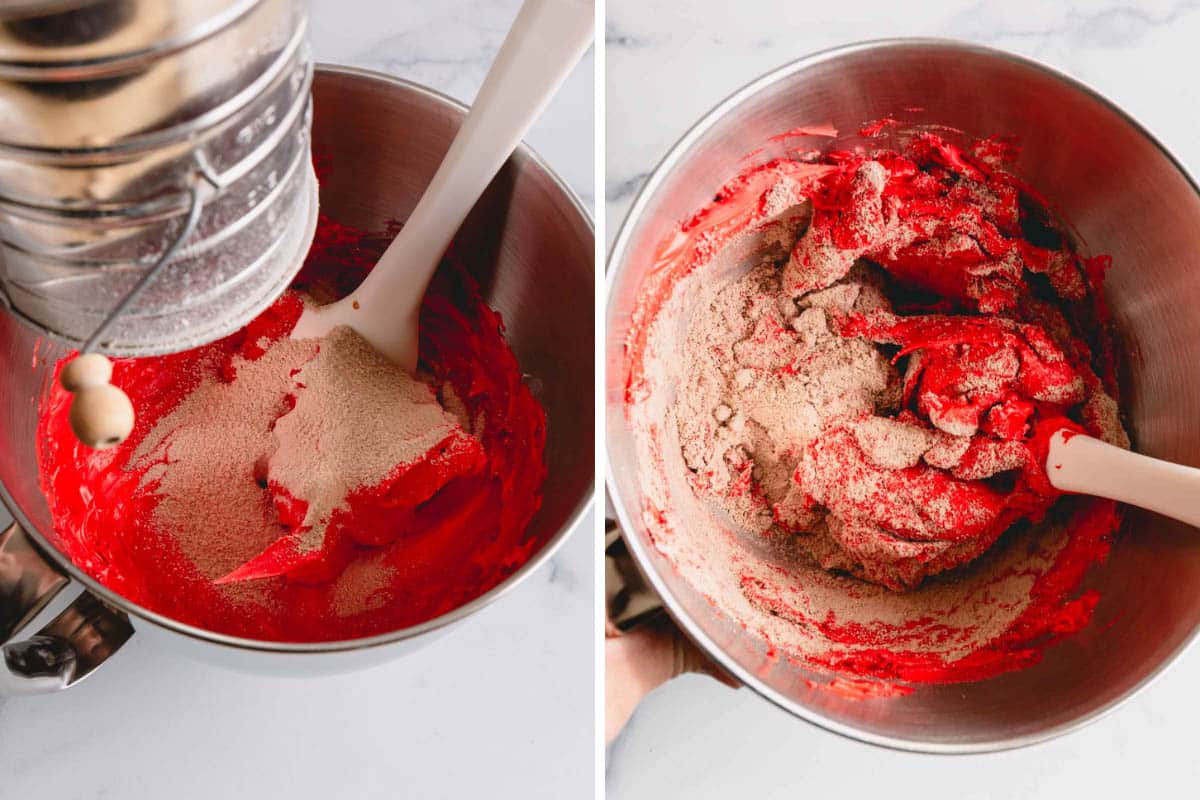
1. Sift the dry ingredients
Sift almond flour, powdered sugar and cocoa powder 3 times. This’s important, because not only are we mixing the ingredients, but we’re also aerating them for fluffier cookies.
TIME-SAVING TIP: If you have a stand mixer, sift the dry ingredients while the meringue is whipping.
2. Make the meringue
French meringue is the easiest, because we simply whisk egg whites with sugar until stiff peaks. Now, while it seems super easy, there’re a few things to keep in mind.
Combine egg whites, granulated sugar, salt and cream of tartar, if using, in a large bowl. And beat the mixture on medium speed until soft peaks form.
Add red food coloring and continue to beat until stiff peaks form. You want to see a nice defined ridges as pictured below.
meringue tip
Slow and consistent speed is key to achieving the sturdiest meringue when it comes to French method. The exact time depends on each mixer. Don’t rush this process. It can take up to 40 minutes to reach stiff peaks!
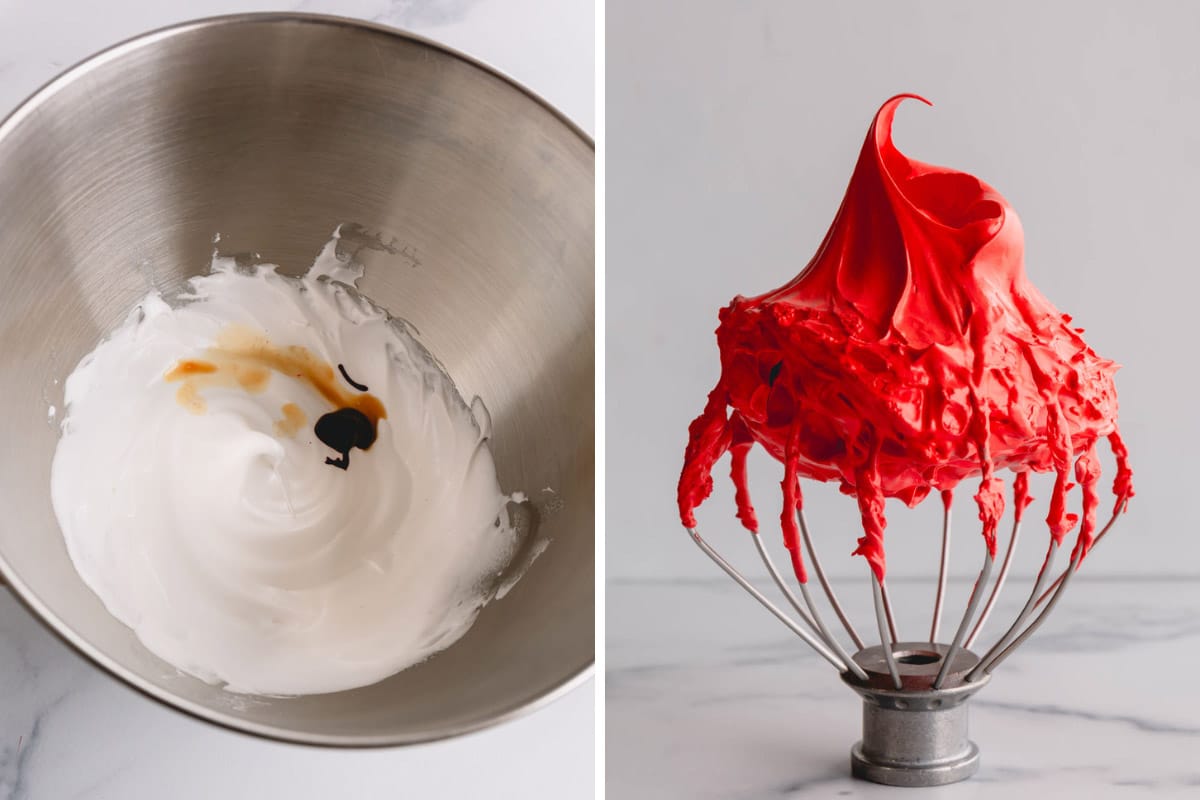
2023 UPDATE: In the last year, I’ve changed my French meringue technique to combining the egg whites, sugar, salt and cream of tartar from the start instead of adding sugar slowly into lightly whipped egg whites. I found this meringue method works better for macarons.
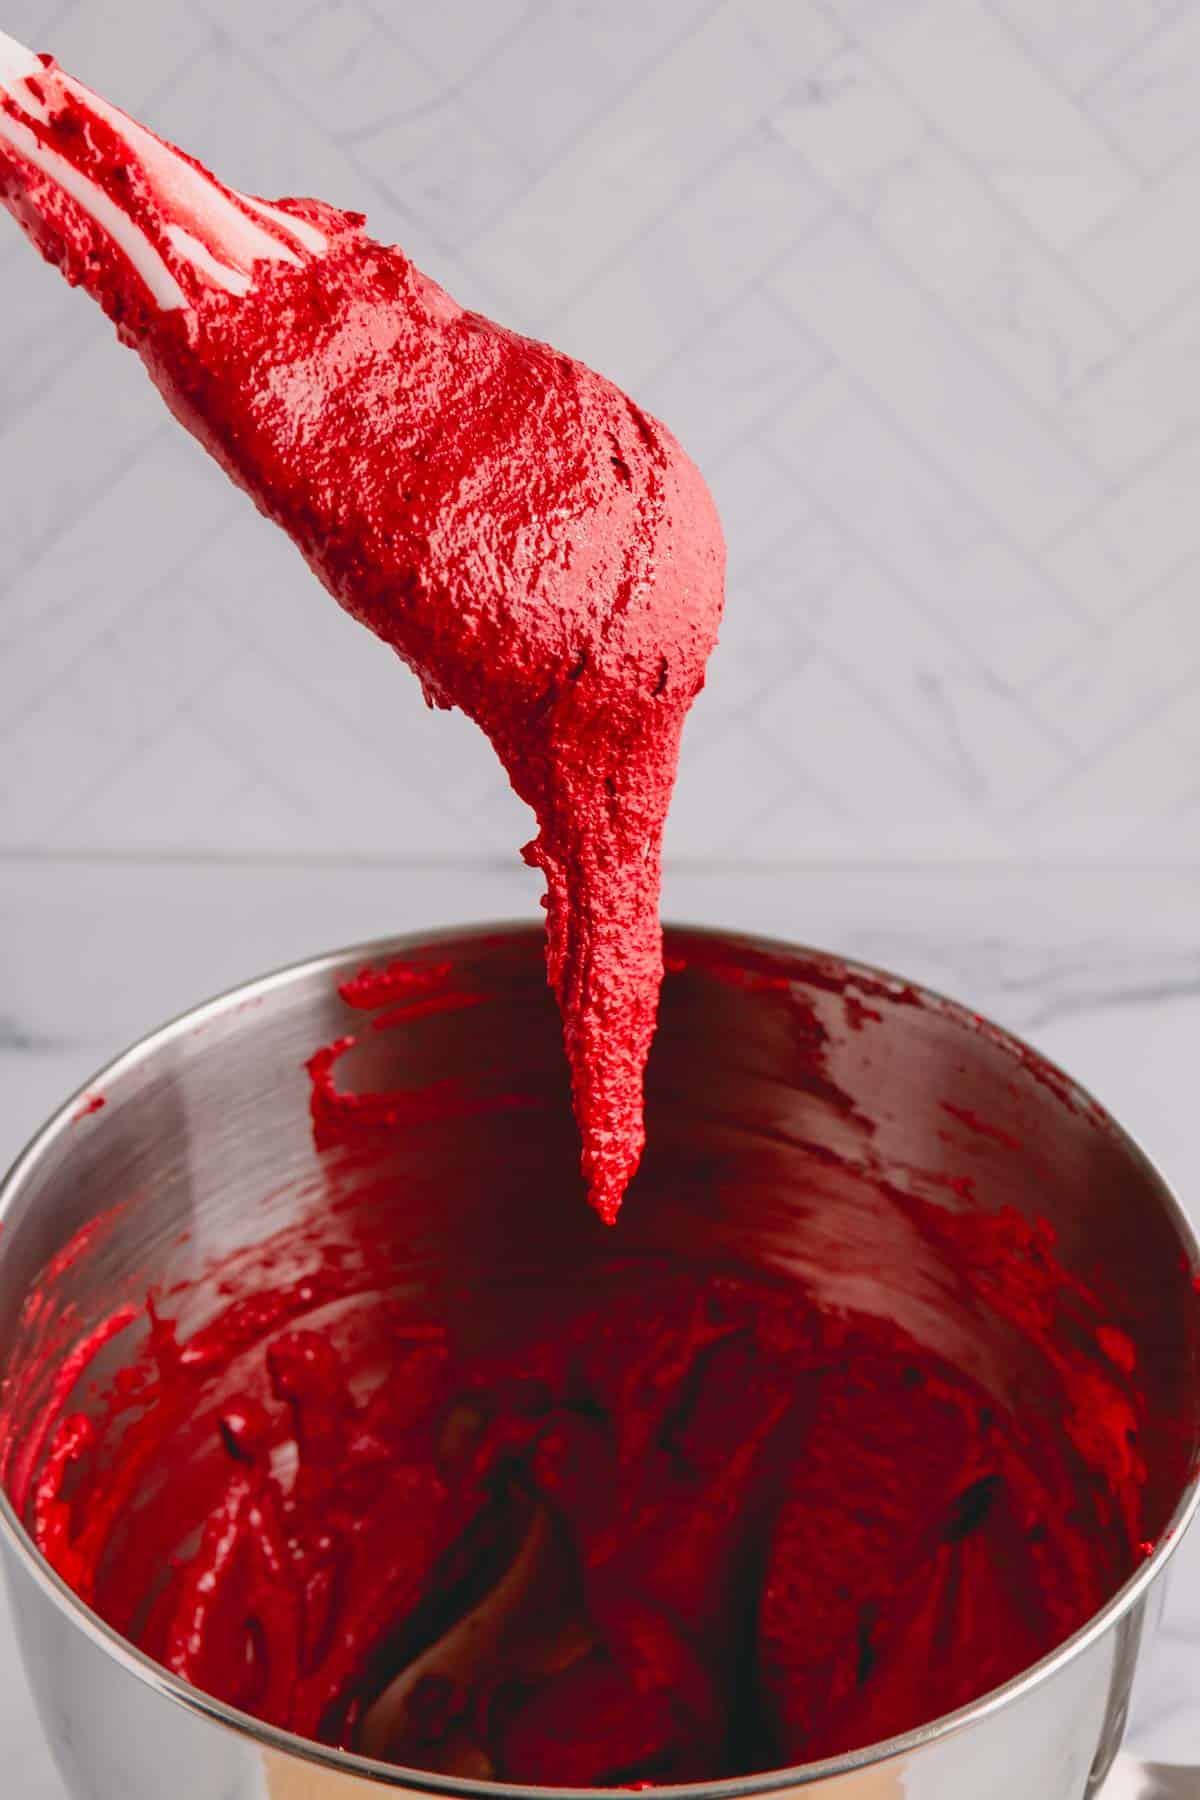
3. Mix the macaron batter (aka Macaronage)
Add dry ingredients into the meringue and fold the batter until it reaches the perfect consistency, which means the batter is thick, yet runny enough to slowly flow off the spatula into a ribbon.
how to check the batter consistency
1. Scoop some batter on your spatula and then drop the batter into a ribbon into the bowl.
2. Slightly tilt the bowl and count to 10.
3. If the edges of the ribbon melt back into the batter in 10 seconds, the batter is ready!
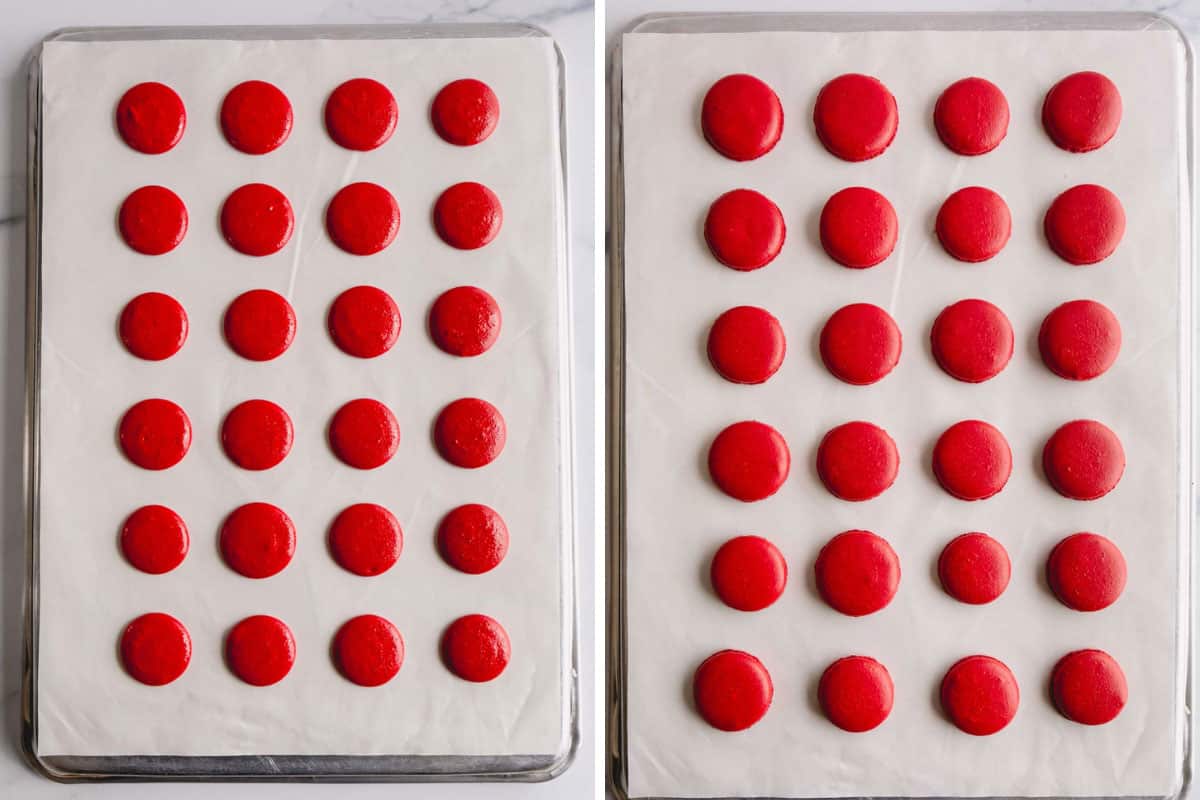
4. Pipe and bake the macaron shells
Transfer the batter into a piping bag, fitted with a round tip. (I use Wilton 12 tip.) Pipe the shells on 2 baking sheets lined with parchment paper.
Rest the macarons for 15 minutes. And bake one baking sheet at a time for about 18 minutes at 300°F.
FREE macaron template
I made a perfect template for you. Subscribe to my e-mail list and download this custom macaron template for FREE. (This template is perfect for my recipe and super easy to use!)
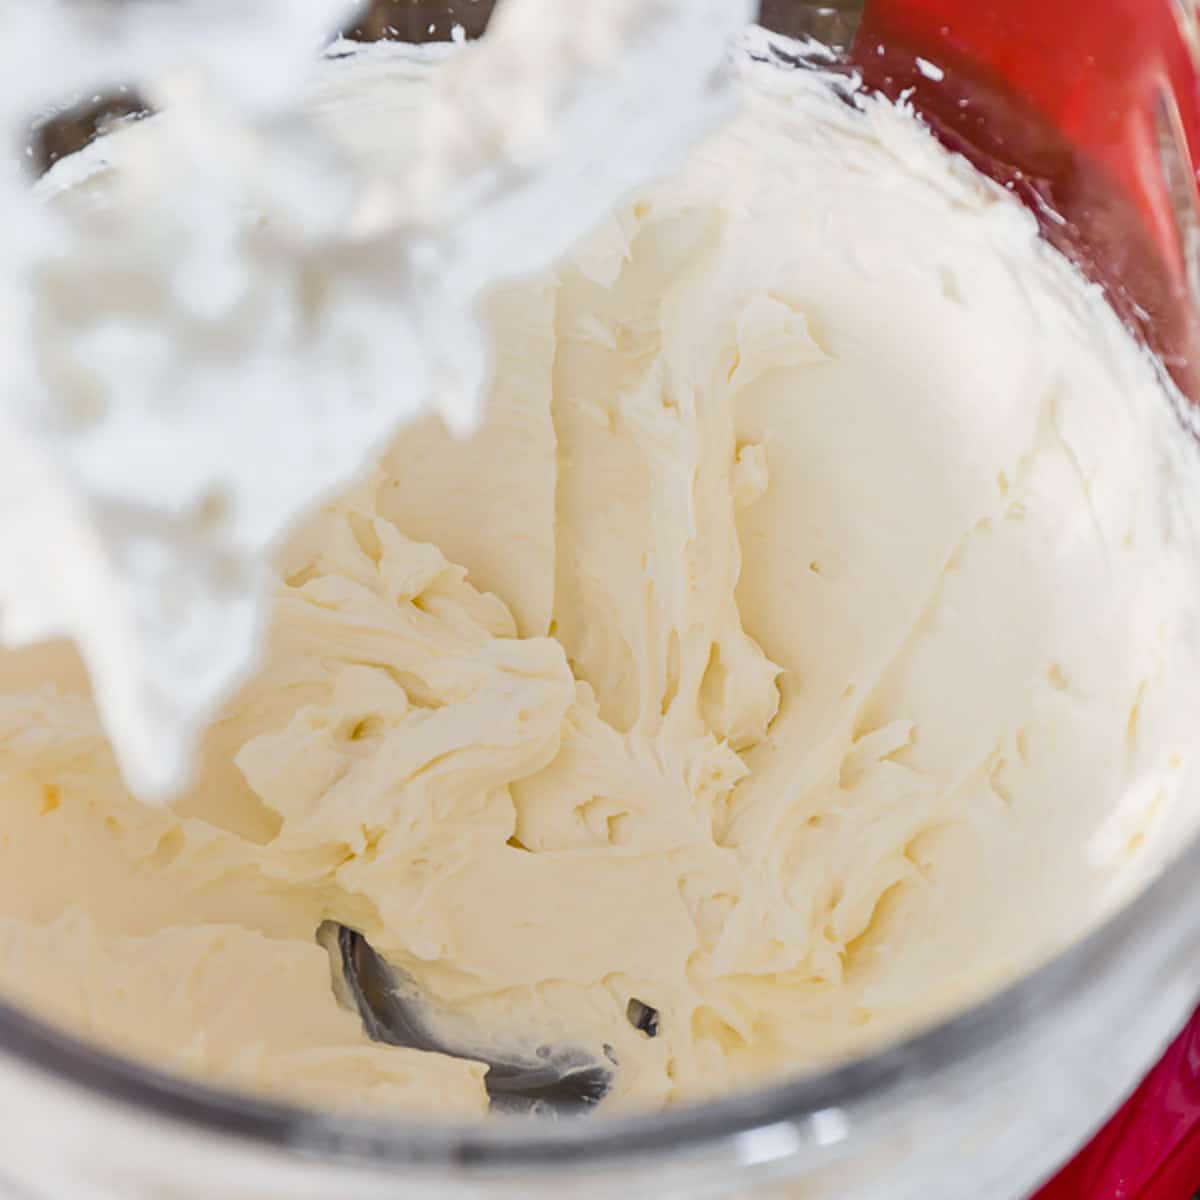
5. Make cream cheese filling
Make cream cheese filling while the macaron shells are cooling. I use my simple frosting recipe as it works perfectly for macarons as well.
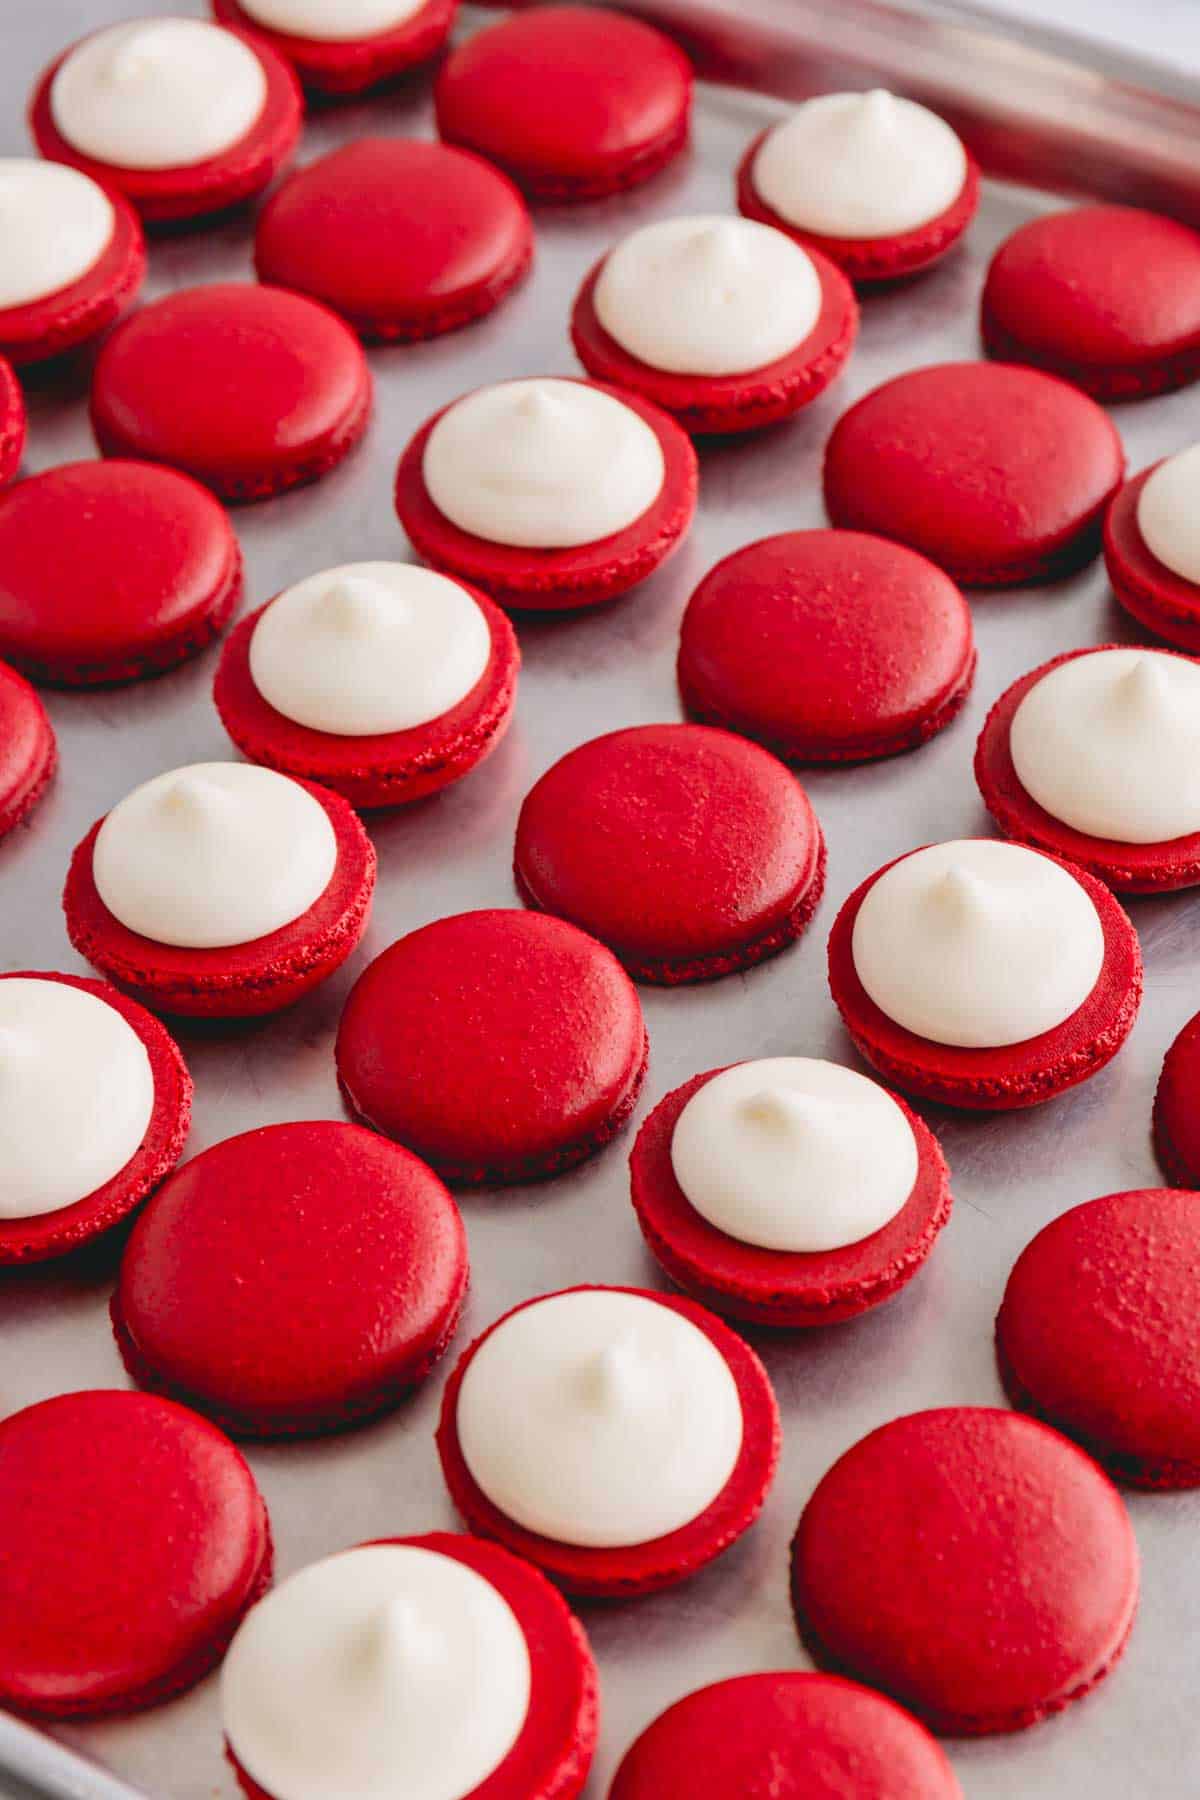
6. Fill the macaron shells
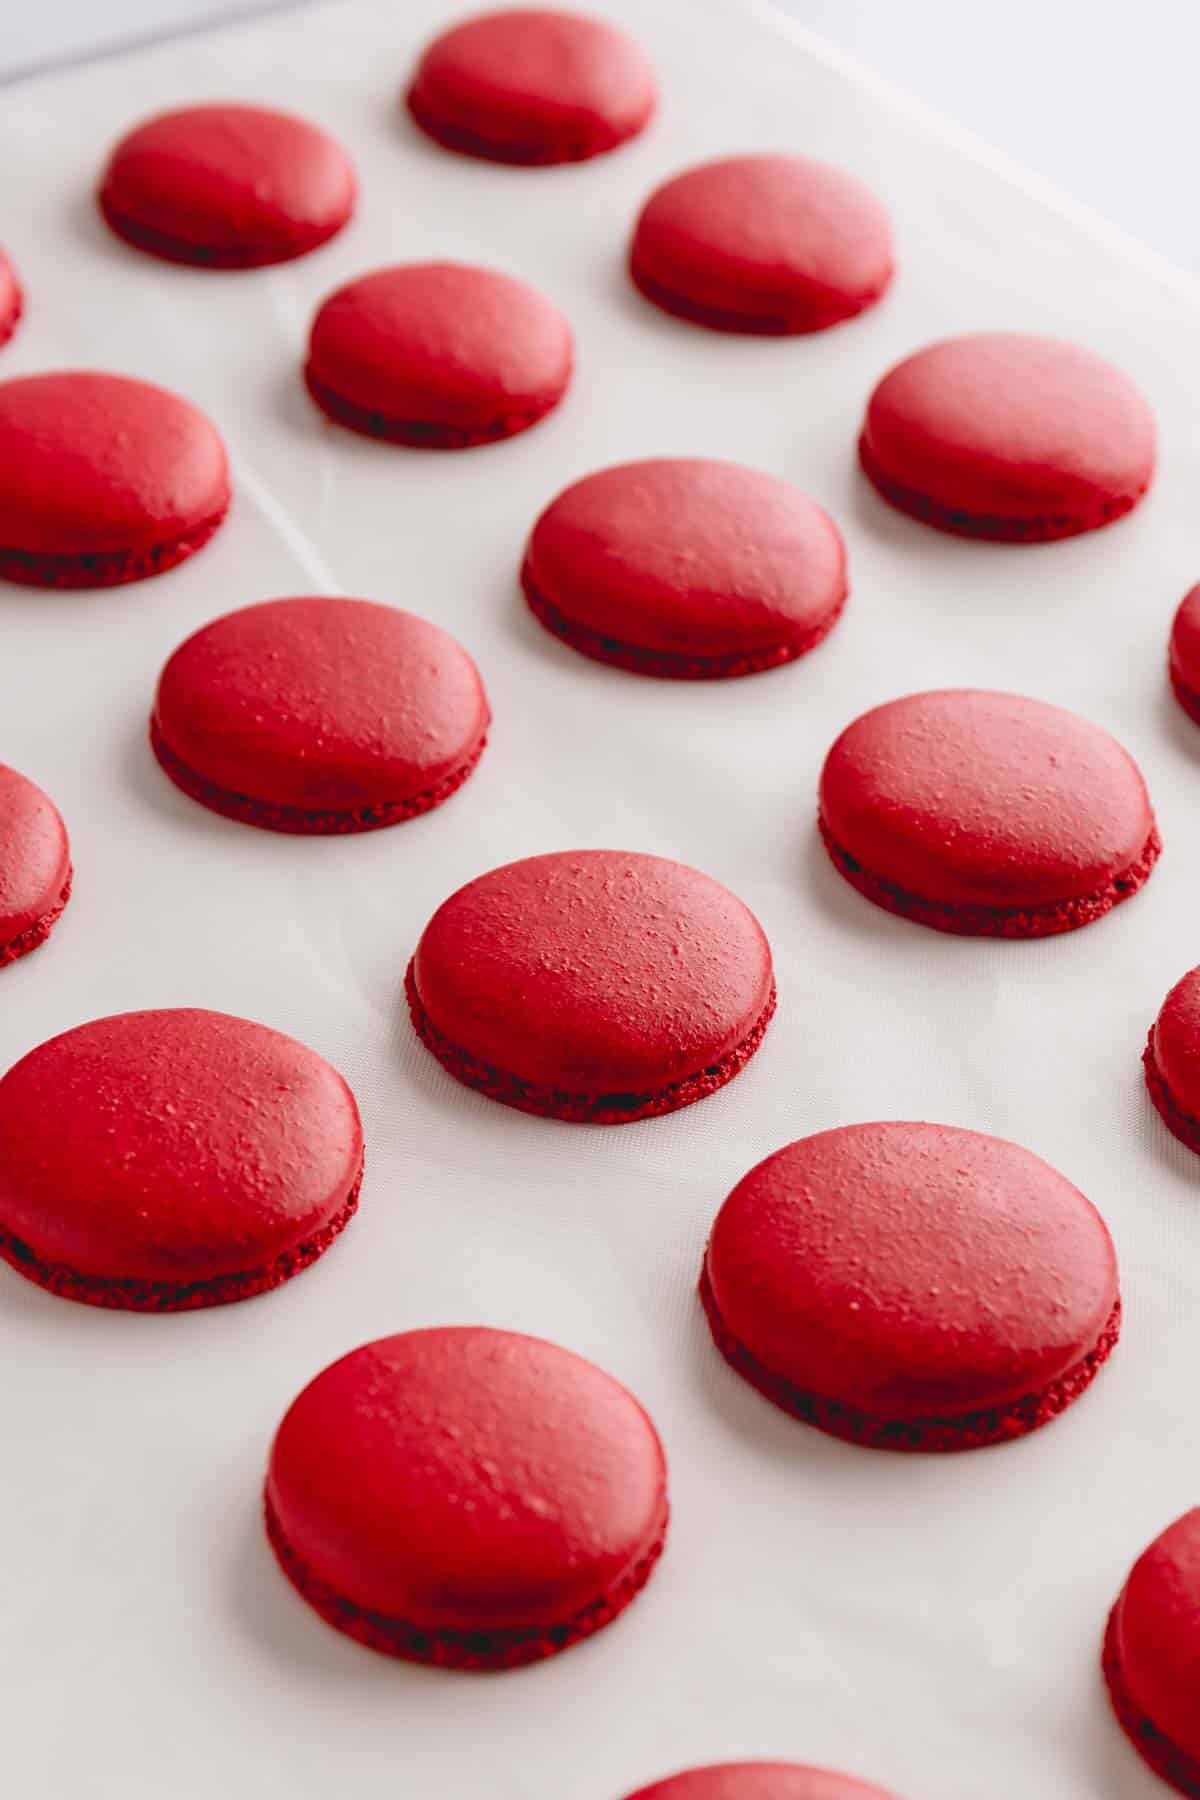
Remove the macaron shells from the baking surface once they are completely cooled. Then pair them by size and fill them with cream cheese frosting.
7. Mature the macarons
I know, you want to dive right in. But these macarons are best when served after maturing them for at least 8 hours in the fridge after filling.
During this process, filling seeps into the shells, softening and flavoring the macarons perfectly.
how long to mature the macarons
Typically, macarons are matured for at least 24 hours, but since cream cheese frosting is wetter filling, 8 hours is sufficient for maturing.
The Secret to Vibrant Red Color:
Red food coloring alone yields lighter, pinkish red macaron shells no matter how much coloring you add.
The secret to achieving intense red macarons is using the combination of cocoa powder and red food coloring.
choose the right food coloring
Only use gel food coloring for macarons, as liquid food coloring may throw the wet to dry ingredients ratio off.
How to store macarons:
- Plain macaron shells can be store in a dry, airtight container at room temperature for up to 7 days. Or frozen for up to 3 months.
- Assembled macarons should be refrigerated in a dry, airtight container for up to 3 days. Or freeze them for up to 1 month. If there’s any moisture in the container, it will transfer to the macarons and make them soggy.
- Remove the macarons from the refrigerator 30 minutes before serving. Macarons are best at room temperature!
- Don’t store these delicate cookies in bags. They are more likely to crack or break this way.
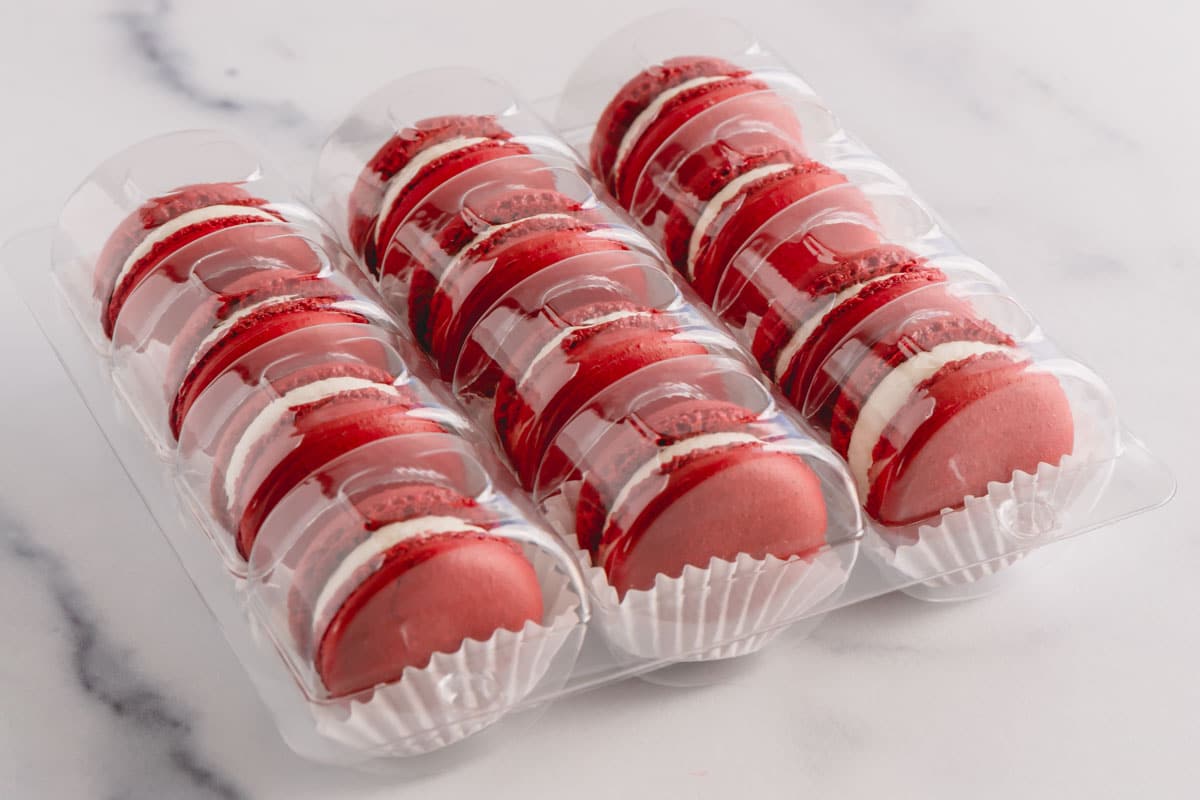
macaron storage container
These clamshell plastic container is not airtight. You can store macarons in this container, but place it in a freezer bag before refrigerating or freezing.
Red Velvet Macarons
Ingredients
For macaron shells:
- 100 g super fine almond flour Note 1
- 65 g powdered sugar Note 2
- 1 tablespoon unsweetened cocoa powder Note 3
- 70 g egg whites at room temperature Note 4
- ¼ teaspoon cream of tartar Note 5
- ¼ teaspoon salt
- 75 g fine granulated sugar Note 6
- 1 teaspoons red gel food coloring Note 7
- 1/2 teaspoon pure vanilla extract
For cream cheese filling:
- ¼ cup (55 g) cream cheese softened
- ¼ cup (56 g) unsalted butter softened
- 1 cup (120 g) powdered sugar
- ½ teaspoon pure vanilla extract
- 1/8 teaspoon coarse kosher salt
Instructions
To make macaron shells:
- Preheat the oven to 300°F (150°C). Line 2 baking sheets with parchment paper, or teflon sheet, or silicone mat.
- To prepare dry ingredients, sift together almond flour, powdered sugar and cocoa powder twice. Note: If you have up to 2 tablespoons of chunky dry ingredients left in the sifter, you don't have to replace it. Simply discard those chunky bits.
- To make meringue, in a clean mixing bowl with a whisk attachment, combine egg whites, granulated sugar, cream of tartar and salt and beat the mixture on medium speed until soft peaks form. (I set it to speed 4 on my KitchenAid stand mixer. It takes 30-40 minutes to whip the meringue, but it's well worth it for nice and full shells.)
- When the meringue reaches soft peaks stage, add red gel food coloring and vanilla extract.
- Continue beating the egg whites on the same medium low speed until hard peaks form. Visual cues: Meringue should ball up inside the whisk, and when you lift the whisk, the meringue should hold a pointy end and have sharp ribs.
- To make batter, sift almond flour mixture into the meringue. Using a silicone spatula, fold the dry ingredients into the meringue until fully incorporated. Then continue to fold the batter until it’s runny enough to draw a figure eight. To test, take a small amount of batter and drop it into the bowl. If the small peaks dissolve into the batter on its own in about 10 seconds, the batter is ready. If not, fold couple more times and test again. Be careful not to over-fold the batter. (TIP: Making french macarons is all about the technique. This is one of the most crucial step. Let me try to describe the folding motion as best as I can: run the spatula clockwise from the bottom, up around the sides and cut the batter in half. If you’re beginner macaron-baker, I suggest to count every fold. It takes roughly about 50 folds to reach the proper consistency. After 50 folds, start testing the batter, and continue testing after every couple folds.)
- To pipe macaron shells, transfer the batter into a pastry bag, fitted with a round tip. (I used this Wilton 12 tip.)
- Hold the pastry bag at straight 90° angle and pipe about 1.5-inch rounds about an inch apart on prepared baking sheets. (TIP 2: Download my free macaron template. Simply pipe the batter to fill inner circle.)
- Tap the baking sheets firmly on the counter (or using your hand) a few times to get rid of any air bubbles. You can also use a toothpick to burst some large air bubbles. This step ensures smooth tops.
- Let the macarons rest on the counter for 15 minutes before baking.
- To bake, working one baking sheet at a time, place one tray with macarons on the middle rack. (TIP: To prevent browning, place an empty baking sheet on top rack to shield the heat.) Bake for about 15-18 minutes. It’ll take longer for larger macarons. To test for doneness, touch a macaron lightly and try to move it. If it slides and wobbles, bake a minute or so longer. The cooked macarons should be firm to touch and the base shouldn’t move. (TIP: It’s always better to slightly over-bake macarons than under-bake them!)
- Cool macarons complete and then remove the shells from the parchment paper. (TIP: Don't remove the shells while warm, you may risk breaking the shells, or the bottom might get stuck to the baking surface.)
To make the filling:
- While macarons bake, prepare the cream cheese filling. In a mixing bowl with whisk attachment, beat the cream cheese and butter until fluffy. Add powdered sugar, vanilla extract and salt and beat until well combined.
- Transfer the filling into a pastry bag fitted with a round piping tip. (I used Wilton 10 piping tip.)
To assemble:
- Pair the macaron shells by size and arrange them on a wire rack. Line them up so that bottom shells are upside down.
- Pipe a dollop of filling on bottom shells. Place the top shell over the filling and press lightly so the filling spreads till the edges.
- Store the filled macarons in an airtight container in the fridge for at least 8 hours to mature, which allows the filling to soften and flavor the shells.
- To serve, bring the macarons out about 30 minutes prior to serving.
Tips & Notes
Nutrition
This recipe was originally published on June 27, 2016.


Hi! These look so perfect but I just made them and they came out with no feet and cracked all on the top!! I’m so bummed. Was going to bring them to a pampered chef party and now I feel embarrassed to bring them looking like they do! I’ve made French macaroons before and never had a problem!
Hi, Chanel! So sad to hear yours didn’t turn out well. A few things could have went wrong. Have you seen my Macaron Troubleshooting Guide? If not, take a look, it might help you to figure out the problem. But I think the batter might have been over-mixed, which causes no feet issue with cracked top.
Yes I use an oven thermometer all of the time since I bake cakes and cookies throughout the month. I am a cottage baker so I always go by the oven thermometer and have figured out the hot and cold spots in my oven. It could also just be that your recipe doesn’t work well in my environment. I live in Houston, TX so it’s humid every day of the year. But it’s just weird that I can successfully create other macaron recipes but no yours.
It could be very possible that my recipe is for dry climate. (I’m in ND.) Well, I decided to make these now and will see how it turns out. I’m going to document this on snapchat. If you happen to have snapchat, check it out. 🙂 (My snapchat username is shineshka.)
No Shinee I didn’t have a crisp shell. I had a soft shell instead. Like I said my other comment, they looked perfect so I expected them to have a crisp shell but they didn’t. And I’ll also add that they stuck to the parchment paper so I had a difficult time removing them. I baked them at 300F for 20 minutes and thoroughly let them cool.
I weighed the almond flour and powdered sugar and used cup measurements for everything else. What do you do? Would it really make that much of a difference?
I will try the recipe again in a few weeks because I admit that I did use my larger (6qt) stand mixer to make the batter. The whisk barely touched the eggs and I had to beat on high for a longer time to get the egg whites to the correct consistency. That may be the issue. I’ll use my 4 qt mixer next time.
Interesting! Thanks for more details. I asked if you weighed the dry ingredients to see if those were measured precisely. Measuring by cup doesn’t always turn out accurate, so I always weigh all of my ingredients. In my 4th image, you can see how my macarons had that signature crisp crust.
I’m so puzzled because you said that your macarons had feet and shiny top and everything, so it seems like the batter was right, but the only problem is the texture was off. Other potential culprits could be humidity and oven temperature. Let me know if you give this a try and how they turn out.
I tried the recipe again and did everything by weight this time just in case. I baked about 10-15 minutes longer until they had the crisp shell which I could clearly feel. They looked perfect and didn’t stick to the parchment paper but I was once again disappointed when I saw that they were rock hard on the bottom. I’m not sure what the problem is since I have tried a few other recipes and they work perfectly. Those recipes are also baked at 300F but their ingredient ratios are different. I’m stumped.
Hey, Amanda. Thanks for reporting back. So you baked the macarons 30-35 minutes total? That seems to be way too long. And this time they turned out too hard, not cake-like? Do you have an oven thermometer by chance? I’d recommend to make sure your oven tempt is accurate, most ovens vary up to 50° either way. I have some egg whites in the fridge, I now want to make these again and bake at low oven temp to see if I can recreate the issue. But it’s raining cats and dogs and humidity is too high, so it’s not a great day to test it.
Can the dry ingredients be sifted the day before? Trying to see if I can save some time.
Yes, you can the first 2 sifts the day before and then sift the last time right into the whipped egg whites. Have fun baking these, Amanda. I’d love to see how they turn out. 😉
I made them last night. They looked perfect. Smooth and somewhat shiny shell and good foot formation. But they were too chewy. I’ve made Macarons before and they have a crisp shell and somewhat chewy on the inside. They tasted good but these were almost cake-like and I felt like I was eating a mini red velvet whoopie pie, not a macaron. Not sure if they are supposed to be that chewy but I followed your recipe exactly. I did notice that your recipe only calls for 2 egg whites. That seemed a little low to me since every other recipe I made called for 3-4 egg whites.
Hmm, that’s interesting, Amanda. So yours didn’t have that crisp shell? I’ve never had that cake-like texture, so completely stumped. As for the amount of egg whites, it’s all depends on the ratio. If the recipe calls for 3-4 egg whites, my guess is it probably calls for more almond flour and sugar. Anyway, did you weight the dry ingredients, or did you use cups to measure?
Do you need blanched or unblanched almond flour for this recipe?? So excited to try but cannot find almond flour so I will have to make my own.
Hi, Isabel. I’d suggest blanching it for smoother texture. Let me know how they turn out. Have fun! 🙂
I have to make something around red velvet cake/cookies for a friend’s birthday in August. Saving it.
Awesome. Let me know how they turn out if you try this. Thanks, Aish!
your macarons look amazingly perfect. I bet they wont last long
Thanks, Dahn! They’re addicting for sure. 🙂
Macarons on are my bucket list of things I must bake – you make it look so easy, and they came out perfect for you!
Thanks so much, Kylee!
Wow these macaroons look so perfect! I’ve tried baking them once and failed, but might try again following your recipe to see how do they turn out!
Diana, practice makes these perfect. I have a detailed Macaron 101 post. Check it out before trying again.
You’ve taken two of the most popular desserts of the moment and combined them into one. Genius! I bet these are a hit wherever you bring them!
Sarah, they’re so good! I have some in the freezer and like to snack on daily!!