This post is sponsored by Red Star Yeast. All opinions are mine alone.
You can achieve bakery-style, authentic pain au chocolat (chocolate croissants) from scratch. I’m sharing my easy-to-follow directions and tips for success! You’ll get crisp flaky on the outside, soft and buttery on the inside croissants with perfect amount of intense chocolate in every bite!

Let’s get a little fancy today.
Pain au Chocolat, or chocolate croissants are on the menu!
If you love flaky, crispy on the outside, buttery and border-line custardy on the inside croissants, you’re in for real treat!
We’re going to make these beauties from scratch. Are you up for a challenge? I really hope so. Because while homemade croissants are labor intensive, they’re really not that hard.

I learned to make croissants about 4 years ago. Because really good croissants are hard to get when you live in the middle of nowhere. And it used to be my favorite special treat when I traveled. No more! I can now indulge in true bakery-style, quality croissants whenever I want to. I just need to put in a little bit of elbow grease.
And now you can too! Do you see those beautiful layers in the dough?
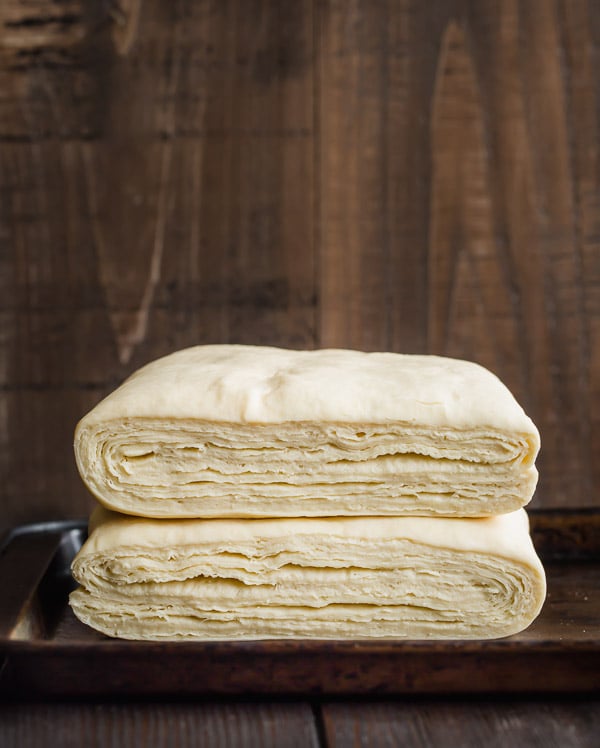
We’ll create those layers by rolling an yeast dough with a layer of butter. This process is called laminating. Though it may sound intimidating, if you properly chill the dough, it’s actually quite easy.
But first things first. Let me give you a quick run-down of the process. I like to break the entire process into 3 days.
- Day 1: Make the dough and shape the butter. Refrigerate for at least 6 hours, or overnight.
- Day 2: Roll the dough with a layer of butter 3 times with 30-minute rest in between the rolling sessions. Those breaks are for chilling the dough, so that it’s easier to roll it.
- Day 3: Roll the dough one more time, shape and bake!
Day 1 and 3 are the easiest. And you can actually make it in 2 days, if you want to. Just make the dough in the morning, then do the laminating process in the evening. And then shape and bake the next morning.
I’ve shared detailed step-by-step photos in my original croissant recipe here.
How do you roll the dough into a perfect rectangle?
I distinctly remember asking this very question before I embarked on this croissant-making journey 4 years ago. It just seemed impossible to roll it into perfect – looong – rectangle. But let me tell you, it’s easier than you may think. Just give it a try. Stretch the dough at the corners as you roll and it’ll work out.
What special tools do I need to make croissant?
Believe it or not, you don’t need any fancy tools to make homemade croissant. Here’s my list of tools I use:
- Stand mixer– not an essential equipment, but it sure makes it effortless to make the dough. But you can easily make the dough by hand.
- Rolling pin– the most important thing you’ll need!
- Tape measure– pretty unusual, I know. But you’ll need to measure your dough while rolling it, because it has to be precise.
- Plastic wrap– an important item to keep the dough from drying out during multiple resting in the fridge. Tea towel won’t work here, we need plastic wrap to keep the moisture in.
And since we’re making pain au chocolat, we’ll need a high quality chocolate for filling. I love dark chocolate. Not too sweet, intense chocolate flavor in the middle without overpowering the pastry. Exactly how it should be!
Tell me how gorgeous is that?? So puffy, so golden, with thousands of layers!!

And I can’t imagine these magnificent chocolate croissants without my trusted Red Star Platinum yeast. If you’ve been following S&S for any amount of time, you probably noticed it’s my go-to brand of yeast. And I couldn’t have been happier to partner with them to bring this recipe to you today.
If you’re intimidated baking with yeast, Red Star Platinum instant yeast makes it practically fail-proof!!

And there you have it. 5-star breakfast awaits you!
With your very first bite, you’ll realize all that hard work was absolutely worth it! And you’ll be ready to make your next batch.

Bon appetite!

Pain au Chocolat
Ingredients
For dough:
- 4 cups 500gr all-purpose flour
- 1 ¼ cup 300ml milk, at room temperature
- ¼ cup 50gr sugar
- 2 tablespoons unsalted butter softened
- 1 packet Red Star Platinum Superior Baking Yeast
- 1 ½ teaspoons salt
For laminating:
- 1 cup 225gr unsalted butter, semi-cold
For filling:
- 4 oz bittersweet or semisweet chocolate bar, cut into 16 rectangles
For egg wash:
- 1 egg yolk
Instructions
Day 1
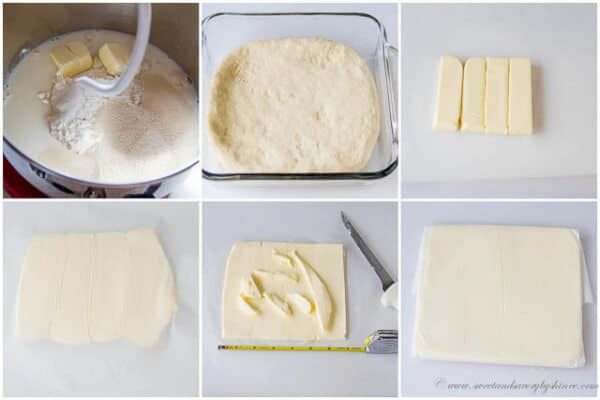
- 1. To make the dough, in a large mixing bowl with dough hook attachment, combine all the ingredients for the dough and mix until the dough comes together, about 5 minutes. Transfer the dough onto floured surface and knead for a minute. Flatten it into a disk and place it in the floured dish. (I use 8x8-inch baking pan.) Cover with plastic wrap and refrigerate for at least 6 hours, or overnight.
- 2. To prepare the butter, cut the butter sticks lengthwise and put them on a large parchment paper. Place another large parchment paper over the butter and roll it into 7x7-inch square. Trim the edges and place them over the butter and roll again until you get nice and even flat square of butter. Refrigerate for at least 30 minutes, or overnight. Do NOT freeze. (Frozen butter doesn’t soften easily during laminating process, and it’ll only lead to frustration. Refrigerating for at least 30 minutes will do the trick.)
- Day 2
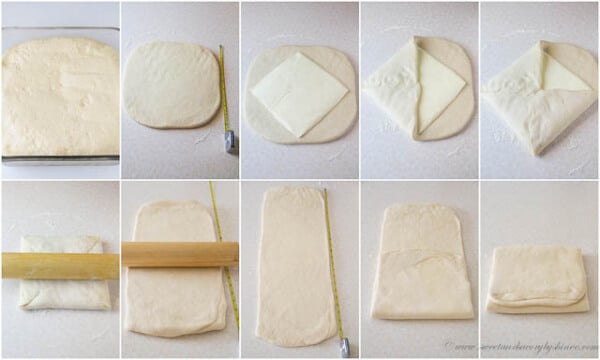
- 3. To make the layers (laminating process), roll the chilled dough on a floured surface into a 10x10-inch square. (It doesn’t have to be exact, but close enough.)
- 4. Place the prepared square butter in the middle of the dough so that corners of butter are pointing to the middle of sides of the dough. Fold the edges like an envelop and pinch the seams securely. (See picture in this post.)
- 5. Roll the dough into 8x24-inch rectangle. Again, it doesn’t have to be exact measurements, but do your best to be close to that. Fold into thirds and cover with plastic wrap. Refrigerate for 30 minutes.
- 6. Repeat step 5 two more times with 30-minute rest in the fridge in between. If the dough resist too much at any point, refrigerate for 10-15 minutes.
- 7. After 3rd rolling, fold the dough again into thirds, cover with plastic wrap and refrigerate overnight, or at least 8 hours.
- Day 3
- 8. Cut the dough into 2 equal parts and roll each one into 8x22-inch rectangle. Make sure to lift the dough before final measurement, because it shrinks back a little.
- 9. Using a sharp knife, cut each dough into 4 rectangles. You should get 8 rectangles total.
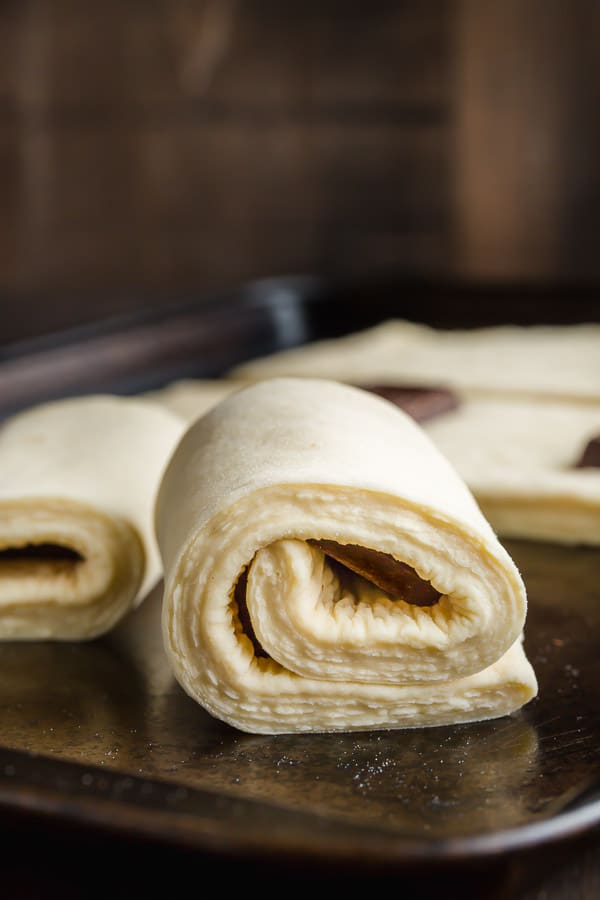
- 10. Place 1 piece of chocolate on one edge, and the 2nd piece in the middle of rectangle. Starting with chocolate edge, roll the dough tightly. Place it on a baking sheet, lined with parchment paper, or silicone mat. 4 pain au chocolat per baking sheet with ample space in between.
- 11. Cover with plastic wrap and rest for about an hour, or until doubled in size.
- 12. Preheat the oven to 425°F (220°C).
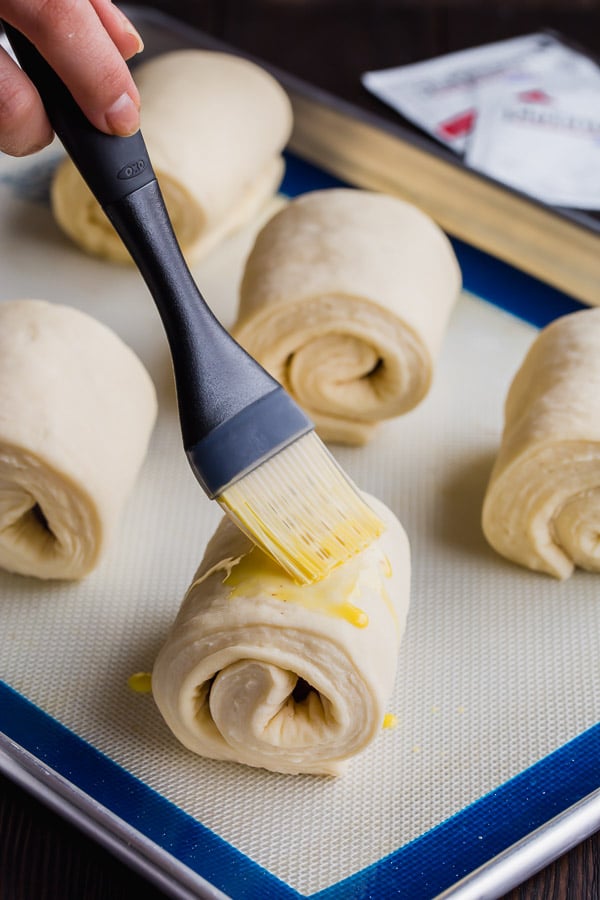
- 13. Right before baking, beat egg yolk with 1 tablespoon of water in a small bowl. Brush the egg wash over the croissants.
- 14. Bake for 20-25 minutes, until golden brown. Serve warm.
Tips & Notes
- Store the croissants in airtight container at room temperature for up to 2 days.
- Freezing instructions: Once you shape the croissants, instead of proofing, simply place the baking sheet into the freezer for at least 3 hours, or until completely frozen. Then transfer them into a ziplock bag. These can frozen for up to a month.
- To bake the frozen croissants, first thaw them on a baking sheet, lined with parchment paper, or silicone mat covered with kitchen towel on the counter overnight. In the morning, continue with step 11.
- You can also freeze baked croissants. Thaw on the counter for a couple of hours.
Nutrition

Special thanks to Red Star Yeast for sponsoring this post. Follow them on Instagram, Facebook, Pinterest, Twitter, Google Plus for more baking inspiration.


I’ve never had one of these before, but it looks amazing!! I need to try!
Megan, you’ll fall in love with chocolate croissants with your very first bite. 🙂
These are my absolute FAVORITE pastry. But I have never attempted them myself. Gorgeous!
Thank you so much, Megan! Hope you’ll give it a try! It’s so worth it.
You did a beautiful job with your pastry! Very impressive!!
Thank you so much, Renee!!!